WARNING: Avoid routing cable near fluorescent lights, air conditioning
compressors, or machines that may create electrical noise. For best quality
video, when exceeding 20 feet use coax cable.
Appendix A, B, and E
for fur-
ther cable information.
Step 3. Powering up the system
3.1
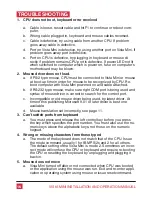
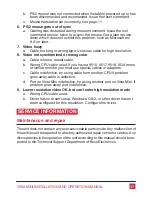
Boot up each of the connected CPUs. Vista Mini emulates all key-
board and mouse functions for automatic boot-up. You do not have
to re-boot the CPU, if it is inconvenient. In this case you may need to
issue the mode command, see page 9, to have proper keyboard
communication.
Step 4. Switching from the keyboard
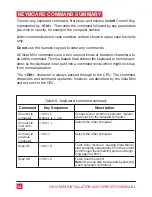
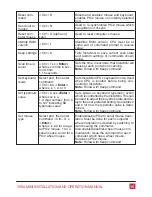
Your Vista Mini is now ready for operation using its default settings. Pressing the
numbered switch on the front panel will switch to that computer. To take full ad-
vantage of the Vista Mini features, refer to the
Operation
section beginning on
page 8 The
Operation
section gives detailed information about each of the Vista
Mini commands, describing its application and giving the keyboard command
sequence. For your convenience, this information is summarized in the
Key-
board command summary
on page 14. To begin switching immediately from
the keyboard follow the instructions below.
4.1
Press and release your keyboard’s left Control Key (<Ctrl>), then
type in the computer number 1-2.
NOTE: Before entering any Vista Mini keyboard command, you must press
and release the left Control Key. This activates Vista Mini to look for com-
mands from the keyboard. You then have two seconds in which to start en-
tering a valid command.
NOTE: When entering numeric commands, use only the numeral keys
located at the top of your alpha-numeric keyboard. Numbers entered from
the numeric keypad to the right will not be recognized as valid commands.
7
VIStA MINI INSTALLATION AND OPERATION MANUAL


