background image

2

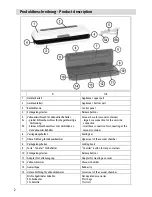
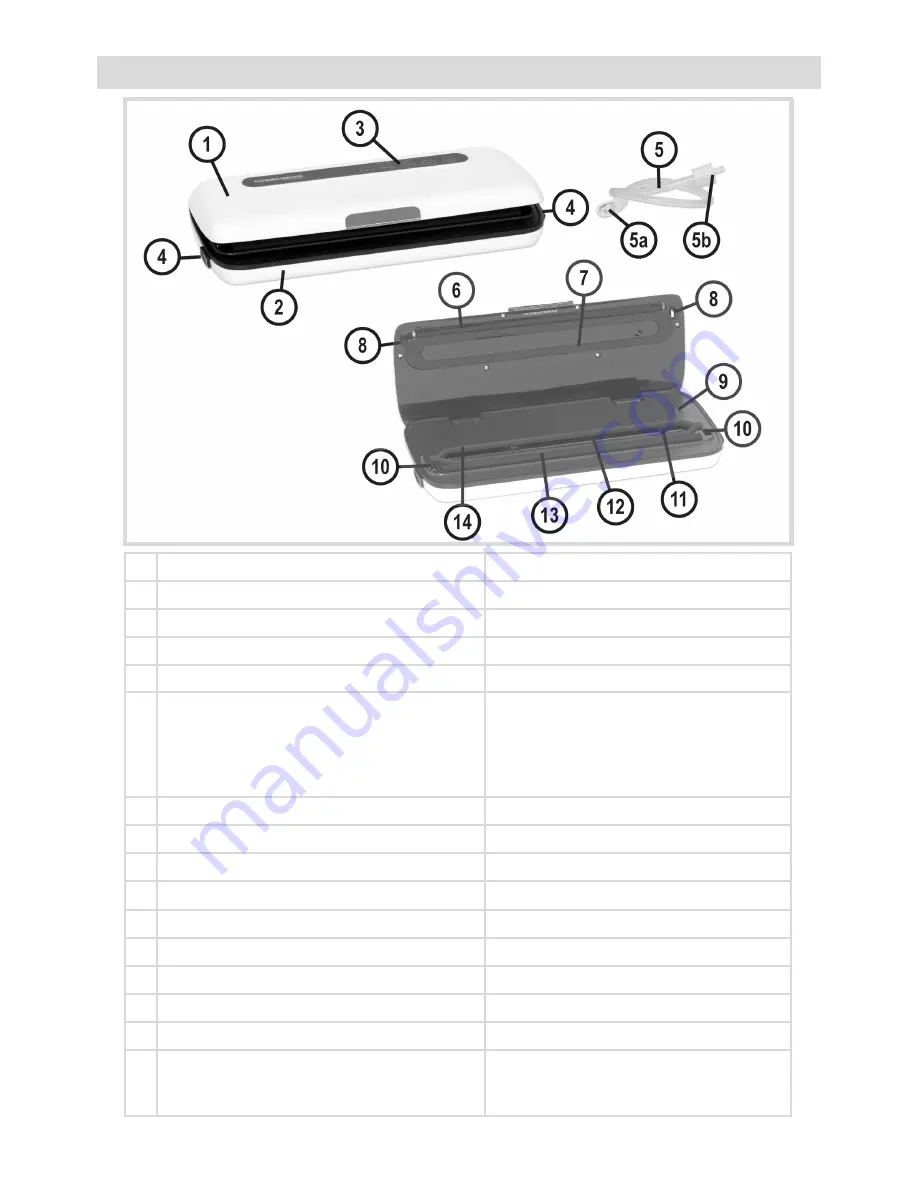
Produktbeschreibung - Product description

D

GB

1

Geräteoberteil

Appliance`s upper part

2

Geräteunterteil

Appliance`s bottom part

3

Bedienblende

Control panel

4

Entriegelungstasten

Release buttons

5
5a

5b

Vakuumierschlauch für Vakuumier-Behälter
 - großer Schlauchanschluss für die geräteseitige 
    Verbindung
 - kleiner Schlauchanschluss zum Verbinden an   
   den Vakuumier-Behälter

Vacuum hose for vacuum containers
 - large hose connection for the unit-side 
   connection
- small hose connection for connecting at the
  vacuum container

6

Versiegelungsbalken

Sealing bar

7

Obere Dichtung für Vakuumkammer

Upper seal of the vacuum chamber

8

Verriegelungshaken

Locking hook

9

Taste 

Canister“ für Behälter

Canister“-button for resp. containers

10 Entriegelungstasten

Release buttons

11 Adapter für Luftabsaugung

Adapter for creating a vacuum

12 Vakuumkammer

Vacuum chamber

13 Gummilippe

Rubber lip

14 Untere Dichtung für Vakuumkammer

Lower seal of the vacuum chamber

Nicht abgebildetes Zubehör:
5 Folienbeutel
1 Folienrolle

Not depicted accessories:
5 foil bags
1 foil roll

Содержание VAC 110

Страница 1: ...Bedienungsanleitung Instruction manual VAC 110 Vakuumierer Vacuum sealer GB D...

Страница 2: ...on for the unit side connection small hose connection for connecting at the vacuum container 6 Versiegelungsbalken Sealing bar 7 Obere Dichtung f r Vakuumkammer Upper seal of the vacuum chamber 8 Verr...

Страница 3: ...5 Bedienblende 8 5 Control panel 23 6 6 1 6 2 6 3 6 4 Bedienung Vakuumieren und Versiegeln Manuelles Vakuumieren Herstellen von Beuteln aus einer Folien rolle Vakuumieren mit Beh ltern f r Lebens mitt...

Страница 4: ...Nennspannung 220 240 V 50Hz Nennaufnahme 110 W Schutzklasse II Standby Verbrauch im Off Modus 0 5 Watt Ansaugleistung ca 9 l Min 1 3 Lieferumfang Kontrollieren Sie den Lieferumfang unmittelbar nach de...

Страница 5: ...Ger tes verursachen kann Sicherheitshinweis Verbrennungsgefahr Das Symbol weist auf Verbrennungsgefahr im Umgang mit dem Ger t hin Sicherheitshinweis Gefahr durch Stromschlag Das Symbol weist auf eine...

Страница 6: ...enutzen Lassen Sie das Ger t nicht ohne Aufsicht in Betrieb Kinder sollen beaufsichtigt werden um sicherzustellen dass sie nicht mit dem Ger t spielen Verpackungsmaterialien wie z B Folienbeutel geh r...

Страница 7: ...r Versiegelungsbalken wird w hrend der Benutzung hei Ber hren Sie diesen nicht Das Ger t ist nicht f r den Dauerbetrieb geeignet Lassen Sie das Ger t zwischen jedem Vakuumiervorgang f r 20 Sekunden ab...

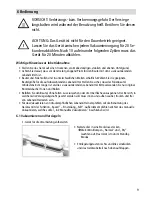
Страница 8: ...d die jeweilige Funktion aktiviert Die Bedienblende immer sauber und trocken halten nicht mit feuchten Fingern bet tigen und nicht als Ablagefl che benutzen da dies zu Fehlfunktionen f hren kann 5 Bed...

Страница 9: ...Sie sicher dass der Folienbeutel mindestens 8 cm l nger ist als die zu vakuumierenden Lebensmittel Bitte verwenden Sie nur original Rommelsbacher Folien und Rollen Bef llen Sie den Beutel ohne Falten...

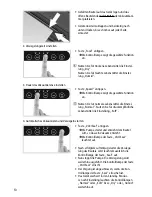
Страница 10: ...nsmittel die Einstel lung Normal Nutzen Sie f r druckempfindliche Lebensmittel die Einstellung Soft 4 Automatisches Vakuumieren und Versiegeln starten Taste VAC Seal antippen Die Pumpe startet und ent...

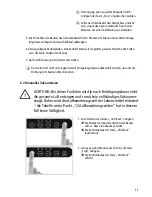
Страница 11: ...Netzstecker ziehen Das Ger t darf nicht mit eingerasteten Entriegelungstasten aufbewahrt werden da sonst die Dichtungen Schaden nehmen k nnen 6 2 Manuelles Vakuumieren ACHTUNG Bei dieser Funktion wird...

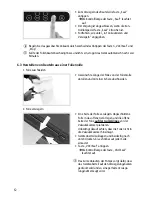
Страница 12: ...zuschneiden Gew nschte L nge der Folie von der Folienrolle abrollen und mit einer Schere abschneiden 2 Folie versiegeln Eine Seite der Folie versiegeln Abgeschnittene Folie in das offene Ger t legen u...

Страница 13: ...Die Kontrolllampen Normal und Dry leuchten auf Das Ger t ist nun im Standby Modus Entriegelungstasten rechts und links eindr cken und Ger teoberteil nach oben aufklappen Den gro en Anschluss des Vaku...

Страница 14: ...kann zu jedem Zeitpunkt durch erneutes Antippen der Taste Canister abgebrochen werden Sollte der Folienbeutel besch digt bzw undicht sein stoppt das Ger t automatisch nach zwei Minuten um eine berhitz...

Страница 15: ...nen lassen bevor diese wieder in das Ger t einbaut wer den Beim Zusammenbauen auf den korrekten Sitz der Dichtung sowie der Gummilippe achten ein nicht ordnungsgem er Einbau beeintr chtigt die Funktio...

Страница 16: ...ren Verwenden Sie leicht verderbliche lebensmittel nicht mehr wenn sie f r einige Zeit bei Raumtempera tur gelagert wurden Vakuumieren wird die Aufbewahrungszeit von trockenen Lebensmitteln verl ngern...

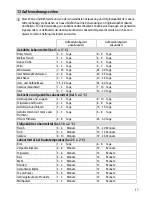
Страница 17: ...ge 20 25 Tage Weichk se 5 7 Tage 14 20 Tage Hart und Halbhartk se 15 20 Tage 25 60 Tage Gem se blanchiert 1 3 Tage 7 10 Tage Obst 5 7 Tage 14 20 Tage Gekochte und gek hlte Lebensmittel bei 5 2 C Gem s...

Страница 18: ...ichen Pr fen Sie den Versiegelungsbalken die Gummilippe und die Dichtungen auf Verunreinigungen Reinigen Sie diese und schieben Sie sie in die richtige Lage zur ck Pr fen Sie ob das Ger teoberteil auf...

Страница 19: ...nnect to alternating current Nominal voltage 220 240 V 50 Hz Nominal power 110 W Protection class II Standby consumption in off mode 0 5 W Suction power ca 9 l min 1 3 Scope of supply Check the scope...

Страница 20: ...ilure of the unit Safety instruction Danger of burning The symbol indicates a danger of burning while operating the appliance Safety instruction Danger of electrical shock The symbol indicates a dange...

Страница 21: ...re that they do not play with the appliance Packing material like e g foil bags should be kept away from children Do not operate this unit with an external timer or a separate telecontrol system Prior...

Страница 22: ...20 seconds after each vacuum sealing cycle After 20 cycles the appli ance has to cool down for 20 minutes If this is not observed the pump might get damaged Place the appliance beyond children s reach...

Страница 23: ...ctive function is activated Always keep the operating panel clean and dry and do not operate it with wet fingers or use it as storage place as this might lead to malfunctions 5 Control panel Button Fu...

Страница 24: ...ag size your food to be stored Make sure that the foil bag is at least 8 cm longer than the food to be vacuum sealed Please only use original Rommelsbacher foils and bags Fill the bag without making w...

Страница 25: ...od Use setting Soft for pressure sensitive food 4 Start automatic vacuuming and sealing Touch the button VAC Seal The pump starts and removes the air out of the bag for creating a vacuum The pilot lam...

Страница 26: ...the appliance with unlocked release buttons Otherwise the seals can be damaged 6 2 Manual vacuuming ATTENTION Depending on the duration of actuation this function doesn t evacuate the whole air Thus t...

Страница 27: ...l Unwind the desired length of the roll and cut it with a scissor 2 Seal the foil Seal one of the open ends of the opened foil For doing so place the foil with the open side on the rubber lip Make sur...

Страница 28: ...t the lid on the container Connect the appliance to the mains The pilot lamps Normal and Dry start to glow The appliance is in standby mode now Open the appliance s upper part by pressing the release...

Страница 29: ...ce s upper part it shall not latch You can stop the process at any time by pressing the button Canister again In order to avoid overheating the appliance stops automatically after two minutes if the c...

Страница 30: ...with a damp sponge and a mild dishwashing detergent Allow the seal and the rubber lip to dry completely before assembling them again When assembling make sure the seal and the rubber lip fit correctly...

Страница 31: ...ed up or defrosted perishable food it must be eatenconsumed or processed immediately Do not eat perishable food if it has been left at room temperature for many hours Vacuum sealing extends the storag...

Страница 32: ...ys soft cheese 5 7 days 14 20 days hard and semi hard cheese 15 20 days 25 60 days vegetables blanched 1 3 days 7 10 days fruit 5 7 days 14 20 days Cooked and cooled food at 5 2 C vegetable puree or s...

Страница 33: ...into the vacuum chamber Check the sealing bar the rubber lip and the seals for soilings Clean them and put them back into the correct position Check if the upper part of the appliance is correctly aud...

Страница 34: ...34 14 Notizen notes...

Страница 35: ...35...

Страница 36: ...Sie das Ger t bitte zusammen mit dem original Kaufbeleg keine Kopie und einer schriftlichen Fehlerbeschreibung an unsere nachstehende Adresse Ohne original Kaufbeleg wird die Reparatur ohne R ckfrage...

Отзывы: