


18
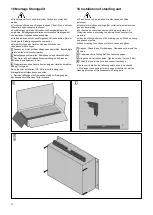
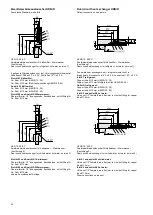
24 Umbau Stand- zu Deckengerät
(HKN 10- 50 EC)
Das HKN 10- 50 EC kann mit wenigen Handgriffen von der Stand auf
die Deckenversion umgebaut werden.
Die dafür notwendigen Komponenten sind separat erhältlich.
Beachten Sie bei der Verwendung von Kondensatpumpen Kapitel 28.
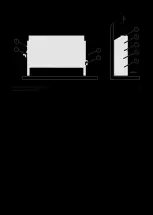
1.
Befestigungsschrauben der Tropfschale (Stand) lösen.
2.
Tropfschale (Stand) abnehmen, Kunstoffrohrbogen abnehmen.
3.
Tropfschale (Decke) auf Abfluss des Tropfbleches schieben,
Dichtung kontrollieren.
4.
Tropfschale (Decke) montieren, und weiterführende
Kondensatableitung sicherstellen.
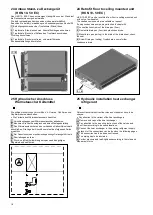
24 Retrofit floor to ceiling mounted unit
(HKN 10- 50 EC)
HKN 10- 50 EC can be retrofitted from floor to ceiling mounted unit
with only a few handles.
The needed components are available on request.
If using condensate pumps, pay attention to chapter 28.
1.
Loose fixation screws of the drain pan (floor).
2.
Dismantle drain pan (floor) and plastic bend tube.
3.
Mount drain pan (ceiling) to the drain of the drain sheet, check
the seal.
4.
Screw Drain pan (ceiling) Tropfschale, ensure further
condensate drain.
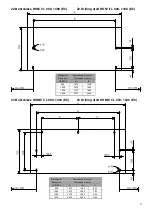
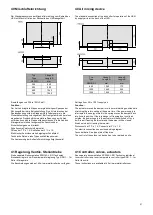
25 Hydraulischer Anschluss
Wärmetauscher Kältemittel
Die gültigen technischen Vorschriften d.h. Normen, Richtlinien und
Regelwerke sind einzuhalten.
•
Die Variante des Wärmeaustauschers beachten.
1.
Verschlusskappen vom Wärmeaustauscher abnehmen.
2.
Montieren Sie Ventile entsprechend deren Montageanleitung.
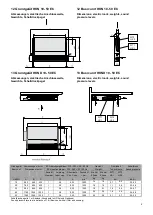
3.
Den Wärmeaustauscher an das vorhandene Kältemittelnetzwerk
anschließen. Die Lage der Anschlüsse ist auf den folgenden Seiten
ersichtlich.
4.
Der Anschluss muss mechanisch spannungsfrei ausgeführt sein.
5.
Rohrleitungen isolieren.
6.
Druck- und Dichtheitsprüfung entsprechend den gültigen
Regelwerken durchführen.
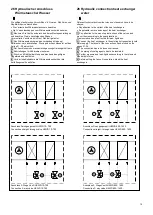
25 Hydraulic installation heat exchanger
refrigerant
Relevant technical advices like rules and standards have to be
obeyed.
•
Pay attention to the variant of the heat exchangers.
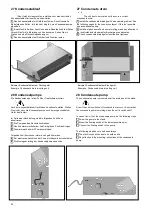
1.
Remove end caps of the heat exchanger.
2.
Pay attention to the mounting instructions of the valves and
mount them according to these explanations.
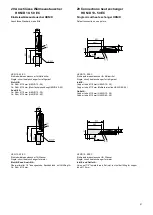
3.
Connect the heat exchanger to the existing refrigerant supply.
The layout of the connections can be found on the following pages.
4.
The connection has to be done unstressed,
5.
The piping has to be insulated.
6.
Perfom pressure and leak-tightness according to the rules and
standards in force.
3. / 4.
1./ 2.


