15
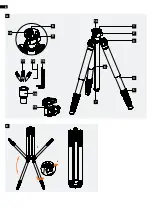
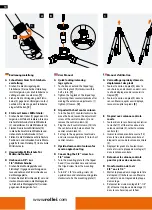
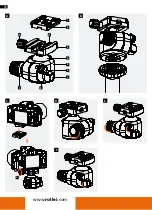
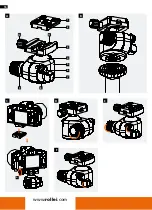
Bestandteile (A)
1. 1/4-Zoll-Schraube
2. Schnellwechselplatte
3. Basis der Schnellwechselplatte
4. Kugel
5. Gehäuse
6. Feineinstellung
7. Schwenkarretierung
8. Panorama-Achse
9. Hauptfixierung
10. Verriegelung der Schnellwechselplatte
11. Wasserwaage
Befestigung am Stativ (B)
1. Stellen Sie sicher, dass die Panorama-Achse über die
Schwenk arretierung festgestellt ist.
2. Schrauben Sie den Kugelkopf auf das Stativ und nutzen
Sie dafür das 3/8“-Gewinde an der Unterseite des Kopfes.
Sollte Ihr Stativ über eine 1/4“-Schraube verfügen, nutzen
Sie einen entsprechenden Adapter (nicht im Lieferumfang
enthalten).
3. Anschließend kontern Sie den Kopf über die kleine Schraube
an der Stativbasis platte, sodass er sich nicht mehr versehent-
lich lösen kann.
Anbringen der Kamera (C)
1. Bringen Sie die Schnellwechselplatte an der Unterseite Ihrer
Kamera an.
2. Öffnen Sie die Verriegelung der Schnellwechselplatte [a]
indem Sie sie gegen den Uhrzeigersinn drehen.
3. Setzen Sie die Schnellwechselplatte ein, indem Sie erst
die eine Seite in die Nut geben und dann die andere Seite
herunter drücken.
4. Wenn die Schnellwechselplatte korrekt eingesetzt ist, schie-
ßen Sie die Verriegelung wieder [b].
Hauptfixierung (D)
1. Drehen sie die Hauptfixierung, nach Einstellung des ge-
wünschten Winkels, im Uhrzeigersinn fest.
Feineinstellung (E)
1. Drehen Sie die Feineinstellung im Uhrzeigersinn fest. Der
Kugelkopf ist fest aber lässt sich noch feinjustieren.
2. Um den Kugelkopf komplett zu fixieren, drehen Sie beide
Schrauben fest.
Panorama-Achse (F)
1. Lösen Sie die Schwenkarretierung und drehen Sie den Kopf,
gegen oder mit dem Uhrzeigersinn, an die gewünschte
Position.
2. Fixieren Sie die Position, indem Sie die Schwenkarretierung
im Uhrzeigersinn fest drehen.
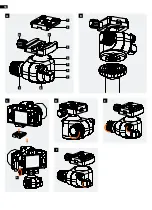
Ball Head Parts (A)
1. 1/4 inch screw
2. Quick Release Plate
3. Bubble Level
4. Ball
5. Body
6. Fine adjustment
7. Swivel lock
8. Panorama axis
9. Main fixation
10. Locking of the quick release plate
11. Spirit level
Mounting on a tripod (B)
1. Make sure that the panning base is locked by tightening the
panning knob.
2. Screw the ball head onto the tripod and use the 3/8“ screw
thread on the bottom of the head. Please note if the tripod
has a 1/4“ screw you need to use an adapter (not included).
3. Afterwards, please use the small screw on the tripod plate to
fix the ball head firmly so it cannot fall off accidently.
Camera attachment (C)
1. Attach the quick release plate under your camera.
2. Open the clamp lock by turning anticlockwise.
3. Insert the quick release plate [a] by first putting one side
into the groove and then press the other side down.
4. If the plate is correctly positioned then tighten the clamp
lock again.
Main fixation (D)
1. After setting the desired angle, tighten the main fixation
clockwise.
Fine adjustment (E)
1. Turn the fine adjustment clockwise. The ball head is fixed but
can still be fine-tuned.
2. To lock the ball head completely, tighten both screws.
Panorama axis (F)
1. Loosen the swivel lock and turn the head counterclockwise or
clockwise to the desired position.
2. Fix the position by turning the swivel lock clockwise.
Содержание Rock Solid Beta MK III
Страница 2: ...2 8 9 10 1 2 4 6 7 5 3 www rollei com 16 11 13 12 14 15 A B a b ...
Страница 6: ...6 8 9 10 1 2 4 6 7 5 3 16 11 13 12 14 15 A B a b ...
Страница 14: ...14 www rollei com B C D a b F E A 1 2 3 4 5 6 7 8 9 10 11 ...
Страница 16: ...16 www rollei com B C D a b F E A 1 2 3 4 5 6 7 8 9 10 11 ...
Страница 18: ...18 B C D a b F E A 1 2 3 4 5 6 7 8 9 10 11 ...


