background image

E N

Basic Operating Procedure


6

Auto-Focus Function                                                    

Under Auto-Focus, the camera lens focuses automatically when the shut-
ter release is pressed hal

f

way. To activate Auto-Focus, please follow these 

steps:

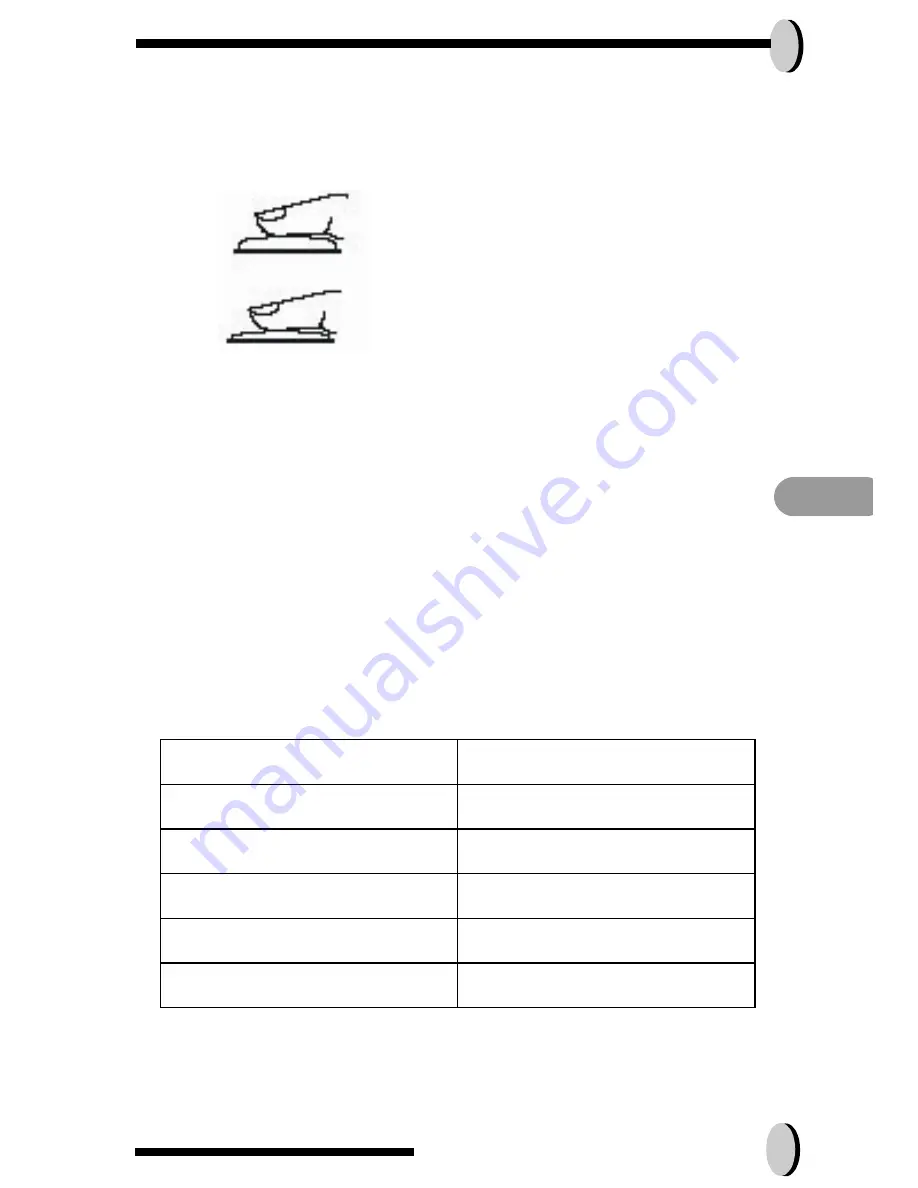
1.Crop mark is white in normal situation. Press 

the


shutter 

halfway 

to activate auto focus. Crop mark 

turns 

green when focused. If fail, crop mark is red.

2.Then, fully press the shutter button to take the 
picture.

Zooming In/Out                                                


This camera has 3 x optical zoom and 4 x digital zoom. The zoom bar 
located on the left side of the LCD display, informs users of the zoom sta-
tus while the zoom in or out button is pressed. While the zoom button is  
pressed, there would be 5 levels of optical zoom magnifications (f0~f6), 
from W(Wide) to T(Tele) of zoom bar; The zoom lens can automatically 
protrude and retract. Then, if you keep pressing the zoom button, there 

are

 additional 8 levels of optical zoom magnification (0.5x/each), 

from T(tele)to 4x (4x Digital Zoom) of zoom bar. Users can see the result 

on the

 LCD display.

1.

Once you have aligned your subject in the LCD display, press the zoom in or 
out button to select your preferred distance.

2.

The picture can be zoomed in up to four times the original size, 12 times from 
its original size.

Flash Setting                                                             


Please Refer to CAPTURE MODE, page 12.

Resolution

Digital Zoom

5.5M

x 1

4.0M

x 4

2.0M

x 4

1.3M

x 4

VGA

x 4

Playback                                                             


Please Refer back to PLAYBACK Mode, page 16

Содержание dt4200

Страница 1: ...optical plus 4 x digital The built in 16MB memory can store your images The stylish metallic case is crafted from aluminum alloy making this camera light and portable Through a USB cable connection p...

Страница 2: ...ure 5 Turning the Camera ON OFF 5 Basic Shooting 5 Auto Focus Function 6 Zooming In Out 6 Flash Setting 6 Playback 6 Five Main Camera Modes and Instructions 7 Video Mode 9 Capture Mode 10 Playback Mod...

Страница 3: ...d simple instructions Unpacking the camera 1 Clear all items from the box It is highly recommended that the box and wrap pings are kept for future usage 2 Double check for the following items Pouch Ca...

Страница 4: ...V 2A for use with this camera Other power sources may cause fire Power Flash LED Zoom Button TFT LCD DC in USB Connector Flash Viewfinder Self timer LED Auto Focus LED Zoom Lens Handstrap Hook Display...

Страница 5: ...lose the cover Battery Power Status Full Middle Low Empty CAUTION 1 Fully charge the battery before its first use 2 Use the rechargeable Li ion battery for docking 3 To improve battery performance rep...

Страница 6: ...ack menu setting to select Erase and then Format 3 You will then be asked Format SD card on the LCD Display 4 Press the OK button to confirm and proceed with formatting 5 Push the Menu button to exit...

Страница 7: ...playback your pictures Turning the Camera ON OFF 1 Locate the power button on top of the camera 2 Press the power button down to turn the camera ON or OFF The backside LED indicator will remain green...

Страница 8: ...button is pressed While the zoom button is pressed there would be 5 levels of optical zoom magnifications f0 f6 from W Wide to T Tele of zoom bar The zoom lens can automatically protrude and retract...

Страница 9: ...rther described Here are the five main functions of this camera Camera Mode Function Setting Page Video Mode 1 Record Movies Page 9 Capture Mode 1 Resolution 2 Image Quality 3 Color Effect 4 White Bal...

Страница 10: ...16 DSC Setup Mode 1 Date and Time 2 Auto Power Off 3 DPOF 4 Slide Show 5 Sound Effect 6 Languages 7 TV out 8 Restoring Page 17 NOTE 1 Press the display button once to delete the icons from the LCD di...

Страница 11: ...g whether the memory is sufficient to record a movie If the memory is full a warning sign will display on the LCD and will automatically exit the movie recording state 3 If there are no warning messag...

Страница 12: ...e If it is full a warning Mem ory Full icon will display on the LCD 2 Once the picture is taken you can erase the image under instant review by pressing ok and the user can protect image when in playb...

Страница 13: ...he LCD as well followed by a beep sound Shooting Continuously Setting Pictures can be shoot in successive orders 1 Keep pressing the right button twice until Shooting Continuously icon appears on the...

Страница 14: ...0M Default 5 5M The size of the pic ture The default size is 4 0 M but users will have the option of choosing VGA 1 3 M 2 0M 4 0M or 5 5 M Image Quality Users can select from the following quality Be...

Страница 15: ...ease This function allows users to control the exposure value to either lighten or darken images the camera is trying to focus The default is 0 Scene Users can select the fol lowing scene Night Portra...

Страница 16: ...emo Resolution with 16 MB SD Card Storage Mode 2720 x 2040 5 5M 8 pictures 2304 x 1728 4 0M 10 pictures 1600 x 1200 2 0M 20 pictures 1280 x 960 1 3M 35 pictures 640 x 480 VGA 140 pictures Date Battery...

Страница 17: ...press the Menu button 3 While you are in the Playback Mode menu setting use the Five Way Switch to select Function Setting Selection Definition Protect Picture Users can select the fol lowing Protect...

Страница 18: ...y from the SD card Pic tures can be printed on printers compatible with the DPOF standard frame set set for one image reset all set for all Voice Memo You are allowed 20 sec onds to record voice memo...

Страница 19: ...when change battery Auto Power Off Users can select the fol lowing minutes to Auto Power Off the camera This setting automatically turns off the camera Prior to shutting off the LCD will shut itself...

Страница 20: ...n select from the following languages Deutsch English French Italian Japanese Korean Spanish Simplified Chinese Traditional Chinese There are a total of nine languages you can choose to navigate this...

Страница 21: ...et back to default To revert the setting back to the default setting Press the OK if you want to if not press the right or left button to con tinue next setting When restoring is completed done will a...

Страница 22: ...ion system is Win 98 3 The installation wizard will guide you through the installation 4 You will be able to use the application once it s installed Connecting through the mini USB Both camera and doc...

Страница 23: ...loading images from camera to your PC please make sure the camera is in DSC mode Please refer back to DSC Setup Mode under page 17 1 This camera allows users to move the images or movies from camera...

Страница 24: ...amera with TV screen The LCD will turn off while connected to TV out Recharging through the docking station optional The optional docking station will serve as a battery charger Before you proceed in...

Страница 25: ...pictures Compression ratio 1 8 16MB SD card 5 5M 8 pictures 4 0M 10 pictures 2 0M 20 pictures 1 3M 35 pictures VGA 140 pictures Video mode display QVGA 15 20fps Lens 3X Optical Zoom Lens F2 8 4 8 Foc...

Страница 26: ...Traditional and Simplified Chi nese Korean Compatible Battery Li ion battery Battery Level High Middle Low Empty AC Adapter optional 5 V 2A Docking interface Optional Mini USB TV Out through docking D...

Страница 27: ...d Windows are either registered trademarks or trademarks of Microsoft Corporation in the United States and or other countries Mac and Macintosh are registered trademarks or trademarks of Apple Compute...

Отзывы: