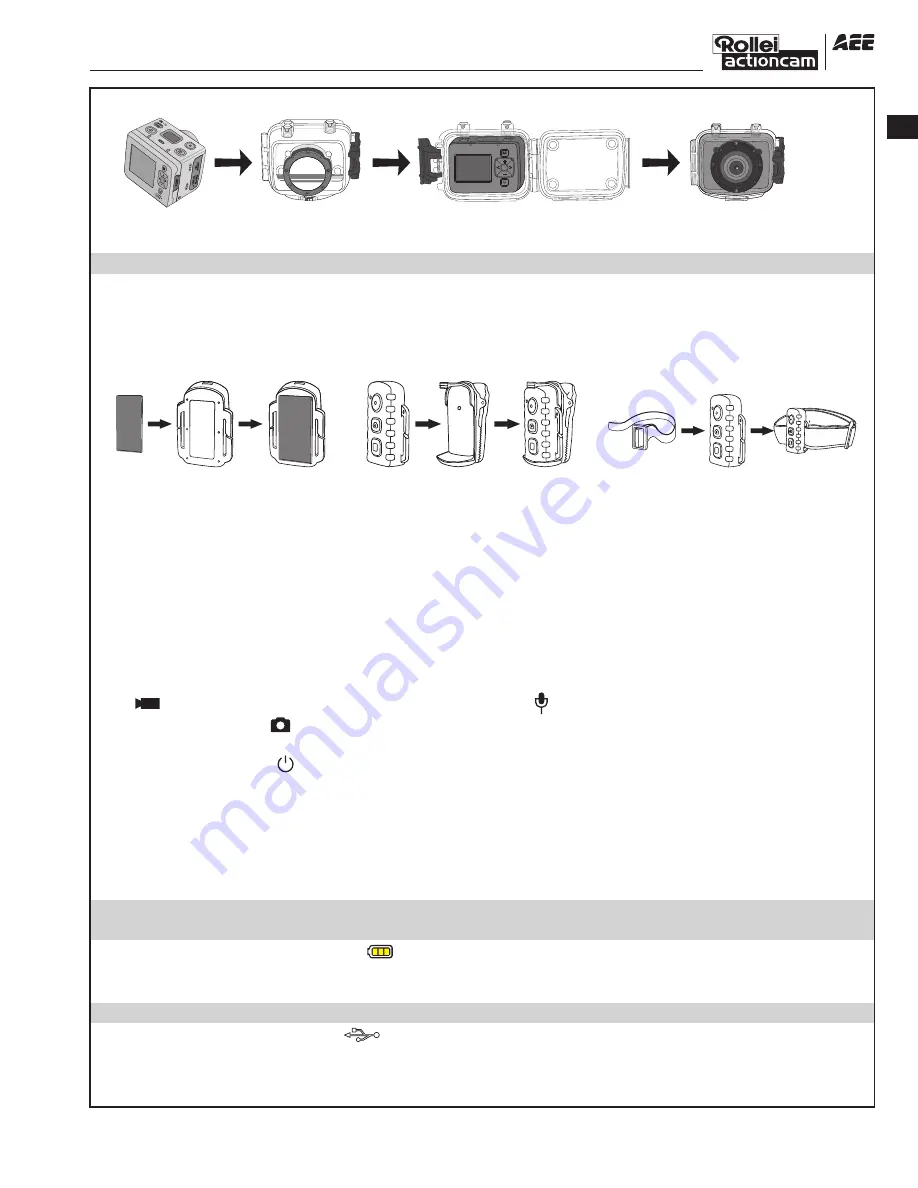
(2). Put the Rollei 5S video camera into the waterproof housing
video camera Waterproof Put the video camera into
housing the waterproof housing
** To remove the TFT screen, press the PUSH snap button and then remove it.**
2. Installing the Remote Controller
The Rollei 5S video camera is equipped with an independent remote controller, which can be
placed at different positions, depending on the accessories.
(1). Velcro
(2). Back clip (3). Binding strap
(provided by users)
Preparations
Before using the Rollei 5S video camera, complete the following preparations:
①
Power on the Rollei 5S video camera and check the power level.
Turn the power switch to the “
ON
” position to initiate the system. After the red indicator is on, the
corresponding symbols on the LCD screen turns on and then the system enters the preview state. On
the LCD segment screen, you can find the following information:
A Recording mode: The current recording mode is displayed on the LCD segmen screen. The icon
” “ indicates the video mode, whereas the icon ” “ indicates audio mode.
B Photo mode: The ” “ (shooting) icon is displayed on the screen. This icon blinks once for each
shooting.
C Power symbol: The ” “(power supply) icon is displayed in the upper-right corner. When the system
is working, this icon is constantly on. If this icon disappears, it indicates the Rollei 5S video camera
is in power-off or standby state.
D Video recording duration: In the medium row of the LCD segmen screen displays the duration of
the current recording video, for example,
005:20
. In the preview state, press the “
Video
“key
once to display the duration of the video recording, and press the “
Stop
“key once to hide the
duration.
Note:The duration for video recording on the LCD segment screen is synchronously displayed with that
on the TFT screen.
E Battery capacity indication: The” ”(battery capacity) icon is displayed in the bottom-left corner.
This icon indicates the battery level when the video camera is powered on. The more bars the
power indicator has, the more power the battery has.
Note: When the video camera is in the standby or power-off state, the power icon is not displayed.
F USB connection mode: The “ ”(USB mode) icon indicates whether the video camera has been
connected to a computer. When the video camera is powered on and connected to a computer,
this icon is lit with the green indicator on the left side blinking slowly. When the video camera is
not connected to a computer, this icon is not displayed.
G TF card capacity indication: The ” “ (TF card capacity) icon is displayed in the bottom-right
corner, indicating the available space of the TF card. The more bars the power indicator has, the
more free space you have. If the TF card is full, the green indicator on the left side is constantly on.
At this time, on the TFT screen, you can find the following information:
A Working mode: The ” “ (Video recording) symbol is displayed in the upper-left corner, indicating
that the video camera is ready for video recording.
B Battery capacity: The ” “(battery power) symbol is displayed in the upper-left corner, indicating
the battery level.
C Video resolution: The resolution icon in the bottom-left corner indicates the current video
recording resolution.
D Available storage capacity: If a memory card is available upon power-on of the video camera, the
” ” (free space of the memory card) icon is displayed in the bottom-right corner.
E There is no response for “
<
” and “
>
” keys in the preview state.
F When using the supplied USB cable to recharge the battery in power off , the “Working/recharging
red indicator” on the top of the video camera blinks slowly. The red indicator will be constantly on
upon full recharging. The recharging time lasts for about three hours.
Note:
a. Before using the video camera, check whether the battery has sufficient power. If the power level
is low, use the USB cable supplied with the video camera to recharge the battery. The " Working /
recharging red indicator " blinks slowly during the recharging. Upon full recharging, the red
indicator is constantly on, and the “ ” (battery power) symbol is displayed on the TFT screen.
b. Except USB cable, it is ok to recharge the battery with any 5V/2A power adapter.
②
Formatting the Micro SD card
The Micro SD card must be a high-speed card. Before video/audio recording and shooting pictures,
format the Micro SD card on the Rollei 5S video camera. If a Micro SD card has been used on other
devices, it should also be formatted on the Rollei 5S video camera for normal use.
Note:
Before formatting, make sure the files in the memory and Micro SD card are not needed. Even the
locked files on the video camera can be removed in formatting.
③
Setting the data and time
To set the date and time, perform the following operations:
− In the preview mode under power-on state, press the “
M
” key to display the menu interface.
− Press “
>
” to enter the “ ” system setup interface.
− Press “
+
”or ”
–
“ to display the “
01/01/2013 00:00
” menu.
− Press “
OK
” to display the “
Date / Time
” interface shown as follows.
The digits under the cursor will turn blue and adjustable:
− Press “
+
” or “
–
” to adjust the date or time.
− Press “
OK
” after adjusting the date or time.
− Press the “
M
” key to exit the interface.
Use and Installation
1. Installing the Rollei 5S Video camera
The Rollei 5S video camera can be hand-held or used with hand-free accessories. It can be
installed at your desired place or after being equipped with a waterproof housing, placed in
water for shooting underwater sceneries.
How to install the Rollei 5S video camera
(1). Assemble the TFT screen onto the video camera
TFT screen video camera Assemble the TFT screen onto the video camera
EN
-5-


