background image

Page. 5

Easy Spring Ultra Skyline


Installation


Manual | v2.0

2021 ©Copyright All Rights Reserved Rollease Acmeda

SECTION B | INSTALLATION

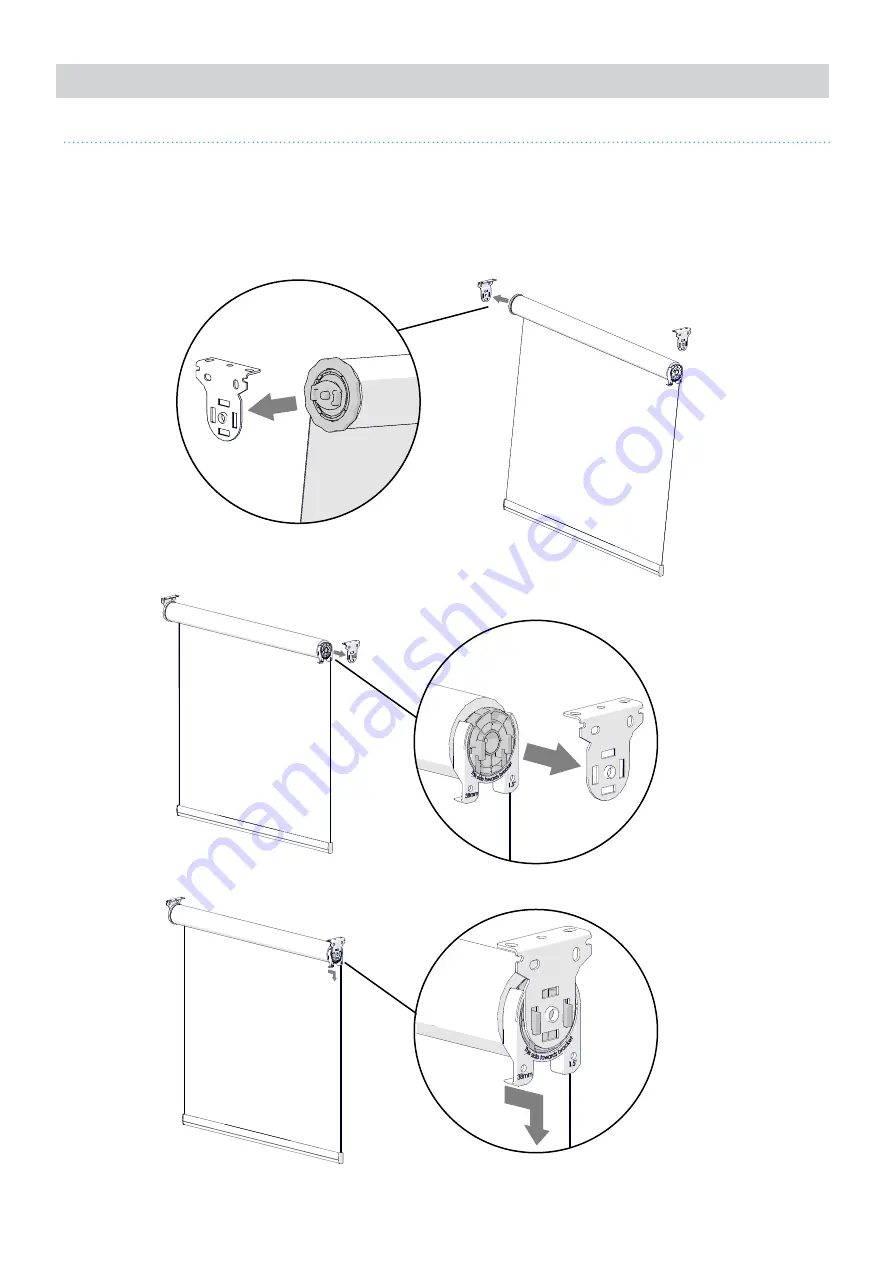
STEP 2 − INSTALL SHADE ONTO MOUNTING BRACKETS

Note: 

Insert limiter end into bracket first.

Shade shown with optional pre-tension retaining clip.

Содержание Easy Spring Ultra Skyline

Страница 1: ...Easy Spring Ultra Skyline INSTALLATION MANUAL ...

Страница 2: ...amages incurred by you resulting from errors in or omissions from the information included herein Rollease Acmeda reserves the right to make changes without further notice to any products to improve reliability function or design COPYRIGHT COPYRIGHT ROLLEASE ACMEDA All rights are reserved No part of this document may be reproduced or utilised in any means by any means electronic or mechanical incl...

Страница 3: ...ropriate Fasteners 5 ESU Pre Tension Retaining Clip 38mm 1 5 1 Shade Assembly 2 Mounting Bracket as required 3 Appropriate Fasteners as required 4 ESU Pre Tension Retaining Clip 38mm 1 5 5 8 x 3 4 Self Tapping Counter Sunk Screw Check you have all items required to complete installation OPEN SYSTEM CASSETTE SYSTEM The screw is used to secure the head to the bracket during transportation of Cassett...

Страница 4: ... TOP FIX TOP FIX SECTION B INSTALLATION PART A PREPARING INSTALLATION SPACE PART B MOUNTING BRACKET AND SHADE INSTALLATION STEP 1 ENSURE TOP OF INSTALLATION SPACE IS LEVEL STEP 1 INSTALL BRACKETS TO WALL CEILING USING APPROPRIATE FASTENERS TO SUIT APPLICATION SHADE INSTALLATION ORIENTATION NOTE Install additional Link bracket if required ...

Страница 5: ...stallation Manual v2 0 2021 Copyright All Rights Reserved Rollease Acmeda SECTION B INSTALLATION STEP 2 INSTALL SHADE ONTO MOUNTING BRACKETS Note Insert limiter end into bracket first Shade shown with optional pre tension retaining clip ...

Страница 6: ... Copyright All Rights Reserved Rollease Acmeda SECTION B INSTALLATION Before installation the clip and screw must be removed REMOVE SCREW REMOVE CLIP STEP 3 REMOVE PRE TENSION RETAINING CLIP NOTE FOR CASSETTE SYSTEM ONLY Note Pre tension retaining clip is optional ...

Страница 7: ...ted below to be locked and provide a Release Allowance for raising the shade iii TUG Bottom Rail Shade will automatically rise If Bottom Rail raises at the desired speed the correct number of pre turns have been assigned If Shade stops midway or slows significantly insufficient pre turns have been applied Pre turns to be added If Shade operates too fast too many pre turns have been applied NOTE As...

Страница 8: ...oving the shade from brackets Adding Pre Turns Use a Wrench for pre tensioning Removing Pre Turns To lock the pretension rotate in the pre tension direction slightly and then allow the head to un tension slightly and lock Limit Position Locked Position Right Hand back roll control shown as example Note Rotate 90 passed desired tension to lock the spring Note Rotate 45 passed desired tension to unl...

Страница 9: ...IT STEP 2 TEST LIMITS SHADE FUNCTIONALITY Ensure shade is fully raised Operate Shade up down To lower the top limit position rotate limiter head so that the shade moves down To raise the top limit position rotate limiter head so that the shade raises The shade must not be locked by the spring to allow hem bar to move up Standard back roll shown reverse for front roll ...

Страница 10: ...Page 10 Easy Spring Ultra Skyline Installation Manual v2 0 2021 Copyright All Rights Reserved Rollease Acmeda SECTION B INSTALLATION STEP 3 SLIDE END CAP COVERS OVER BRACKETS ...

Страница 11: ...the shade from mounting brackets remove the limiter from the tube rotate and move limit nut to appropriate stop position Reassemble and re install shade to adjust top limit 2 Erratic Behaviour Shade falls Connector on wrong end Remove and re install on other end See Assembly Manual Section E Part A No Pre Turns Add pretensions See Section B Part C 3 Shade will raise quickly Wrong Decelerator Remov...

Отзывы: