Roland VersaCAMM ECO-SOL MAX3 Скачать руководство пользователя страница 11

Switching the Ink

11

ECO-SOL MAX 3 Ink Switching Method

Open the right cover.

Preparations are complete when this screen appears.

Replace the second wiper.

The replacement procedure is the same as for the first wiper. See the illustration under step 

1.

-

.

Press 

.

Close the right cover.

2.

Replace the felt wipers.

Open the right cover.

Preparations are complete when this screen appears.

Open the front cover.

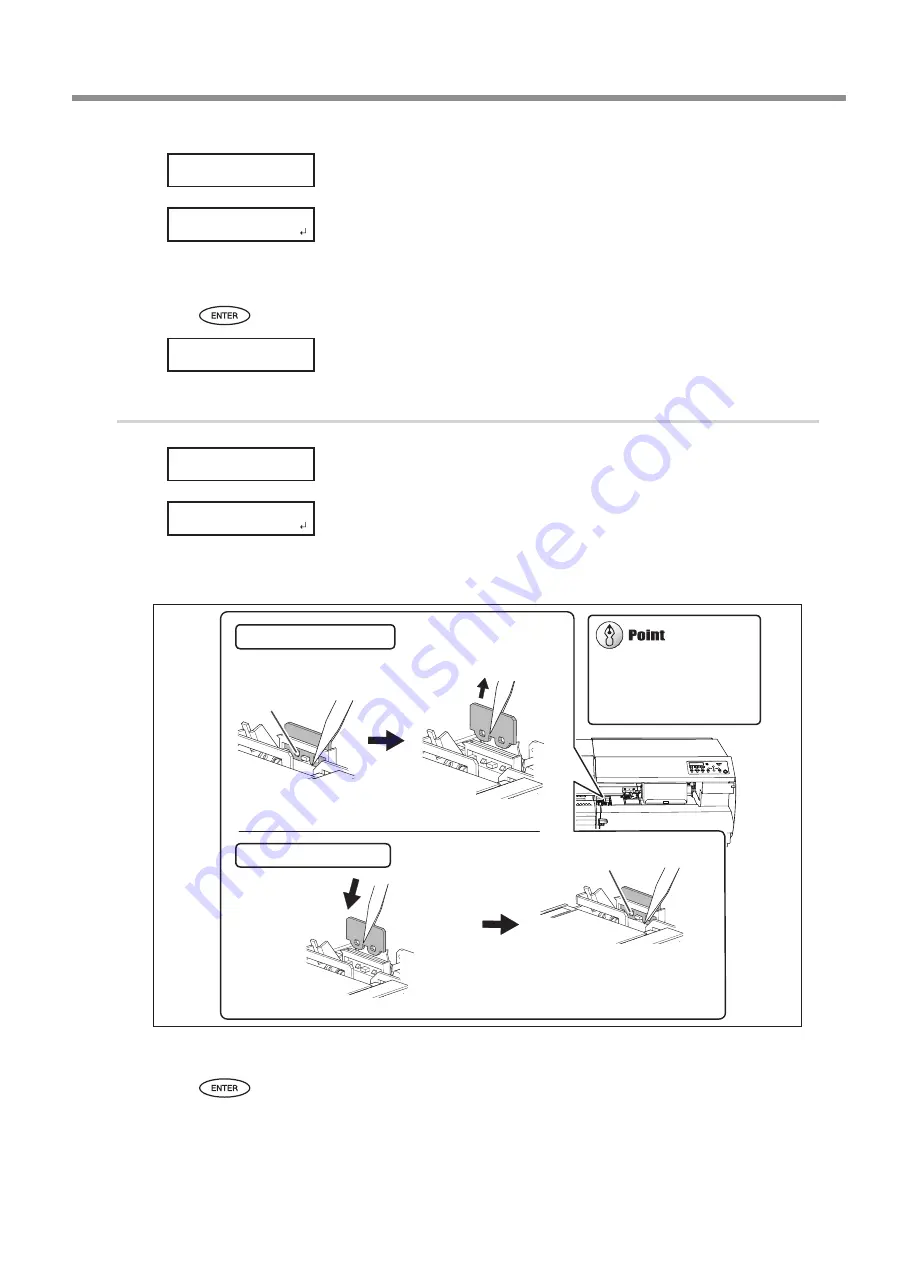
Replace the first felt wiper.

Close the front cover.

Press 

.

12'0%18'44

4'2.#%'9+2'4
(+0+5*'&!

%.15'%18'44

12'0%18'44

4'2.#%'('.6
(+0+5*'&!

Pull up and out.

Disconnect the hooks.

Using the tweezers to press on the hook in the hole on 
the felt wiper makes it easier to remove the felt wiper.

Tweezers (included)

Hook

Attaching a new felt wiper

Removing an old felt wiper

Hook

Attach the part to the hooks.

Be sure to attach the part to the 
hooks. Failure to do so may result 
in dot drop-out or other problems.

If the area is dark and difficult 

to see, use a flashlight or a 

similar device to illuminate 

the area.

Содержание VersaCAMM ECO-SOL MAX3

Страница 1: ...please inform us Roland DG Corp assumes no responsibility for any direct or indirect loss or damage that may occur through use of this product regardless of any failure to perform on the part of this...

Страница 2: ...Changes and Precautions after Switching the Ink 17 Change When to Perform Manual Cleaning 17 Change Cleaning Locations During Manual Cleaning 18 Daily Precautions 18 When Not in Use for a Prolonged Pe...

Страница 3: ...time Approx 5 minutes STEP 2 Switching the Ink P 5 Required time Approx 20 to 30 minutes STEP 3 Cleaning of the Periphery of the Print Heads Manual Cleaning P 6 Required time Approx 10 minutes STEP 4...

Страница 4: ...3 are necessary for the operations in this manual Check that the following files are present Firmware XF640Firm240 exe in the Firmware folder Updater LocalUpdater exe Ver 5 5 0 or later in the Roland...

Страница 5: ...drain bottle be sure to wait for the screen to display EMPTY DRAIN BOTTLE After discarding the discharged fluid promptly attach the drain bottle to the machine Failing to follow this procedure may ca...

Страница 6: ...the instructions and never touch any area not specified in the instructions Failure to observe these instructions may cause the machine to move suddenly resulting in injury 4 18 51 46 26 4 0 166 5 6 5...

Страница 7: ...from the message OPEN COVER L shown above is displayed a warning beep will sound to warn you of the print heads drying out When the warning beep sounds attach the left and right covers close the fron...

Страница 8: ...igure to discharge any static electricity Put on the pair of gloves included Moisten the cleaning stick with the cleaning liquid 12 0 18 4 4 Click 07 0 0 0 5 Usethecleaningliquidthatyouhavebeenusingsi...

Страница 9: ...Only moisten the part indicated with diagonal lines in location with cleaning liquid on the cleaning stick Press Close the left cover Close the right cover When the screen shown in the figure appears...

Страница 10: ...erations with the procedures in this manual Refer to the user s manual of the model that you are using and perform the operations according to the details listed under P 20 When Operations Are Interru...

Страница 11: ...he front cover Replace the first felt wiper Close the front cover Press 12 0 18 4 4 4 2 9 2 4 0 5 15 18 4 4 12 0 18 4 4 4 2 6 0 5 Pull up and out Disconnect the hooks Usingthetweezerstopressonthehooki...

Страница 12: ...on under step 2 3 Exit the CHANGE INK SET menu Close the front cover Press Close the right cover Open the left cover Attach the cut rail Press Close the left cover The screen shown in the figure appea...

Страница 13: ...rsaWorks Windows 8 1 Click on the Start screen Click Initialize Application for VersaWorks From this point the procedure differs depending on the type of printer that is connected to VersaWorks When o...

Страница 14: ...nter that has been switched to MAX 3 ink to VersaWorks Start VersaWorks The Printer Settings screen will appear Set IP Address to the IP address of the printer that has been switched to MAX 3 ink Clic...

Страница 15: ...switch to MAX 3 ink When a printer that does not use MAX 3 ink is connected to VersaWorks 2 Temporarily delete the printer that has been switched to MAX 3 ink from VersaWorks Start VersaWorks When th...

Страница 16: ...ink Click Verify Check that Ink Type is the MAX 3 ink Thisindicatesthatyouhavesuccessfullyreconnect edtoaprinterthathasbeenswitchedtoMAX3ink Click Apply The printer that has been switched to MAX 3 in...

Страница 17: ...also an effective means of improving the symptoms After switching to MAX 3 ink Cleaning timing Cleaning method Remarks Before the start of daily operations Normal cleaning Carry out a printing test If...

Страница 18: ...to close the left and right covers after performing maintenance This machine periodically performs automatic maintenance but this will not be performed if the front cover is open If the machine is le...

Страница 19: ...the discharged fluid CAUTION Before you detach the drain bottle be sure to wait for the screen to display EMPTY DRAIN BOTTLE Failing to do so may cause discharged fluid to flow out of the machine and...

Страница 20: ...The subsequent work to perform varies depending on the point when the operations were interrupted Refer to the follow ing sections and then perform operations according to the corresponding page of t...

Страница 21: ...R2 160408 FA01047...

Отзывы: