background image


176

Chapter 10 Various Other Settings


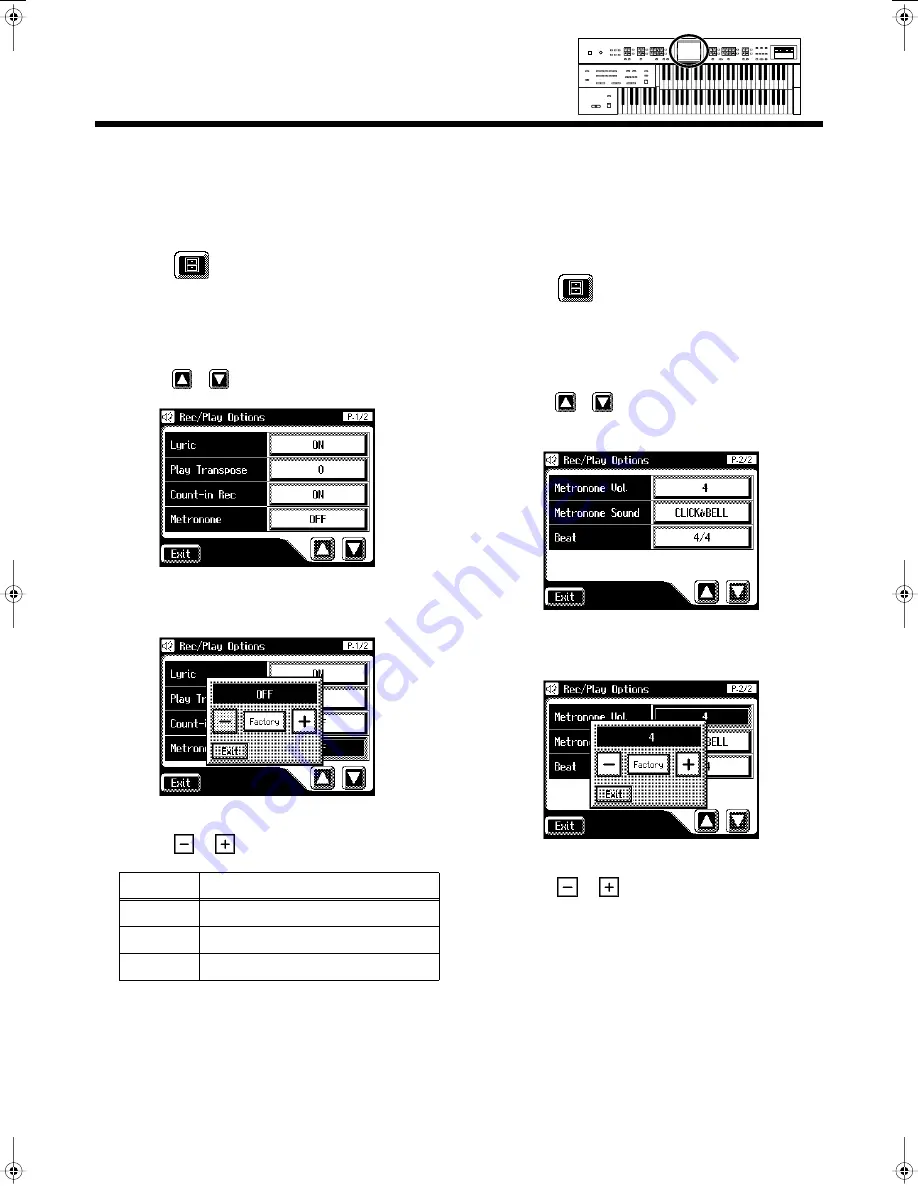
Changing the Metronome 
Setting


1.


Touch <Rec/Play> on the Main screen.


The Rec/Play screen appears.


2.


Touch <

> (Utility).


The Utility screen appears.


3.


Touch <Options>.


The Rec/Play Options screen appears.


4.


Touch <

><

> to display the Metronome.


5.


Touch the Metronome setting.


6.


Touch <

><

> to change the setting.


7.


Touch <Exit>.


Adjusting the Metronome 
Volume


You can adjust the volume of the metronome.


1.


Touch <Rec/Play> on the Main screen.


The Rec/Play screen appears.


2.


Touch <

> (Utility).


The Utility screen appears.


3.


Touch <Options>.


The Rec/Play Options screen appears.


4.


Touch <

><

> to display the Metronome Vol. 

(Metronome Volume).


5.


Touch Metronome Vol. setting.


6.


Touch <

><

> to change the setting.


Settings


1–10


Increasing the value will raise the volume of the 
metronome.


7.


Touch <Exit>.


Setting

Descriptions

OFF


Not heard at all


REC


Heard only while recording


ON


Heard constantly

AT-45_e.book 176 ページ 2005年2月21日 月曜日 午後5時43分

Содержание Music Atelier AT-45

Страница 1: ...ant information concerning the proper operation of the unit Additionally in order to feel assured that you have gained a good grasp of every feature provided by your new unit Owner s manual should be read in its entirety The manual should be saved and kept on hand as a convenient reference Copyright 2004 ROLAND CORPORATION All rights reserved No part of this publication may be reproduced in any fo...

Страница 2: ... has two blades and a third grounding prong The wide blade or the third prong are provided for your safety When the provided plug does not fit into your outlet consult an electrician for replacement of the obsolete outlet 10 Protect the power cord from being walked on or pinched particularly at plugs convenience receptacles and the point where they exit from the apparatus 11 Only use attachments a...

Страница 3: ...nging in the ears you should immediately stop using the unit and consult an audiologist 011 Do not allow any objects e g flammable material coins pins or liquids of any kind water soft drinks etc to penetrate the unit 012a Immediately turn the power off remove the power cord from the outlet and request servicing by your retailer the nearest Roland Service Center or an authorized Roland distributor...

Страница 4: ...it is to remain unused for an extended period of time Any accumulation of dust between the power plug and the power outlet can result in poor insulation and lead to fire 104 Try to prevent cords and cables from becoming entangled Also all cords and cables should be placed so they are out of the reach of children 106 Never climb on top of nor place heavy objects on the unit 107b Never handle the po...

Страница 5: ...sed while their light source is very close to the unit such as a piano light or powerful spotlights to shine upon the same area of the unit for extended periods of time Excessive heat can deform or discolor the unit 355b When moved from one location to another where the temperature and or humidity is very different water droplets condensation may form inside the unit Damage or malfunction may resu...

Страница 6: ...ering it unusable The disk drive s indicator will light up at full brightness when the drive is busy reading or writing data Ordinarily the indicator will be less brightly lit or be extinguished 606 Remove any disk from the drive before powering up or down 607 To prevent damage to the disk drive s heads always try to hold the floppy disk in a level position not tilted in any direction while insert...

Страница 7: ...ds Design utilizes your existing music data The ATELIER series is designed so that even on new models you will feel right at home and can begin playing immediately Data compatibility has also been carefully taken into account and song data or registration data from earlier models can be used without change Music styles from around the world Many of the best loved musical styles from around the wor...

Страница 8: ...rrange the Internal Rhythms You can use the Rhythm Customize function to edit the internal rhythms for example by adding a single cymbal at the end or changing the drum tone in a pattern 64 note lower keyboard for plenty of range Features a full 64 keys in the Lower keyboard starting from the A note just like a piano making it easier to perform corresponding piano pieces on this instrument You can...

Страница 9: ...Assistant Search 30 About the Quick Guide function 32 About the Index menu 32 Chapter 1 Selecting and Playing Sounds 34 Selecting Voices 34 About the Voices and Parts 34 Functions of the Upper Lower Pedal Bass Sound Select Buttons 35 Selecting the Upper and Lower Voices 36 Selecting Pedal Bass Voice 37 Selecting Solo Voice 38 Selecting a Voice Using the Others Button 39 Performing with a Human Voi...

Страница 10: ...Chapter 3 Using the Registration Buttons 79 Storing Registrations 80 Recalling a Registration 81 How to Recall a Registration DELAYED 81 How to Recall a Registration INSTANT 81 Changing the Timing of Recalling Registrations 82 Automatically Registering When You Switch Panel Settings 83 Assigning a Name to a Registration Set 84 Formatting Disks 86 Saving Registration Sets to a Floppy Disk 88 Loadin...

Страница 11: ...ute 132 Muting Individual Tracks of Performance Data 133 Viewing a Notation 134 Changing the Notation Settings 135 Recording a Performance 137 Playing Back a Performance Song 138 Add a Count Sound to Match the Timing Count In Play 138 Recording Each Part Separately 139 Re Recording 140 Erasing a Performance Song Song Clear 141 Changing the Name of a Performance Song Rename 141 Saving Performance S...

Страница 12: ...to Which the Pitch Bend Vibrato Lever will Apply 171 Changing the Pitch Bend Range 172 Rhythm Settings 172 Turning Chord Hold On Off 172 Count Down Sound 173 Preventing Rhythm Tempos from Switching Automatically 173 Registration Settings 174 Changing the Timing at Which Arranger Settings are Recalled 174 Changing the Timing at Which Transposition Settings are Recalled 174 Composer settings 175 Swi...

Страница 13: ...Rhythm Customize Function 201 Rhythm List 208 Music Style Disk List 209 Chord List 210 Glossary 212 About ATELIER Series Sound Generator 213 Settings That Are Stored After the Power Is Turned Off 214 Settings That Are Stored After the Power Is Turned Off 214 Settings That Are Stored In the Registration Buttons 214 Settings That Are Stored In the Individual Registration Buttons 214 MIDI Implementat...

Страница 14: ...vel buttons p 44 6 Transpose buttons p 102 7 Touch Screen p 22 8 Harmony Intelligence button p 109 9 Upper Voice select buttons p 36 Upper Organ Part Upper Orchestral Part Alternate button Level buttons p 44 10 Solo Voice select buttons p 38 Solo Part Alternate button To Lower button p 124 Level buttons p 44 11 Composer p 128 Reset button Play Stop button Rec buttons p 137 Track buttons p 128 Song...

Страница 15: ...9 Arranger On Off button p 58 Style Orchestrator buttons p 59 Intro Ending button p 55 p 56 p 57 Count Down button p 58 One Touch Program button p 64 Sync Start button p 56 Start Stop button p 55 p 57 16 Sustain Pedal button p 116 17 Bender Vibrato lever p 103 18 Rotary Sound p 111 On Off button Fast Slow button 19 Registration buttons Write button p 80 Manual button p 83 Registration 1 8 buttons ...

Страница 16: ...Setting Up the Music Rest 1 Insert the supplied screws for the music rest into the screw holes located on the top of the instrument and lightly tighten them 2 Put the music rest between the screws and the AT 45 s body 3 While supporting the music rest with one hand secure it in place by turning the screws When attaching the music rest support it firmly with one hand to make sure that you don t dro...

Страница 17: ...ower cord correctly connected to the AC inlet Is the power cord correctly connected to the AC outlet Is the Master Volume knob set to the Min minimum position fig 00 26 2 Press the Power On button to turn on the power fig 00 27 The Power indicator lights in red fig 00 28 NOTE This unit is equipped with a protection circuit A brief interval a few seconds after power up is required before the unit w...

Страница 18: ...e AT 45 is equipped with a Mic jack Since this instrument has a Mic In jack you can use a microphone to enjoy a variety of possibilities such as singing along with your performance or singing along with SMF music files sold separately fig 00 32 1 Connect your microphone to the Mic In jack underneath the left side of the keyboard 2 Use the Mic Volume knob to adjust the volume level for the micropho...

Страница 19: ...ttings other than the User memory p 52 to their original factory settings touch Panel Reset The confirmation message appears on screen fig 00 40 eps If you touch Cancel the Factory Reset will not be performed and you will return to the System screen 5 When you touch OK the Factory Reset operation will begin and the settings will return to the factory set condition NOTE Never switch off the power w...

Страница 20: ...8 eps You can also use the following method to return to the factory set condition 1 Make sure there is no floppy disk in the disk drive before carrying out the procedure 2 Turn down the volume to the minimum level then turn off the power 3 While holding down the One Touch Program button press the Power On switch to turn the power on fig 00 41 The following screen appears fig 00 40 eps NOTE Never ...

Страница 21: ...the Panel Reset will not be performed and you will return to the System screen 5 When you touch OK the Panel Reset operation will begin and the settings will return to the factory set condition NOTE Never switch off the power while this operation is in progress fig 00 40 eps NOTE To reset only the User memory p 52 to its original factory settings refer to p 68 ...

Страница 22: ...ffect depth keyboard etc NOTE The explanations in this manual include illustrations that depict what should typically be shown by the display Note however that your unit may incorporate a newer enhanced version of the system e g includes newer sounds so what you actually see in the display may not always match what appears in the manual NOTE The Touch Screen is operated by touching it lightly with...

Страница 23: ...ous settings 16 Quick Guide Displays the Quick Guide screen While the Quick Guide screen is displayed you can press the keyboard a button or a foot switch to jump to the related setting screen p 32 This icon is displayed when the V LINK function is on V LINK function p 182 This icon is displayed when the instrument contains SMF music files This icon is displayed when any portion of the recorded so...

Страница 24: ...tton Meaning Depending on the function some screens are spread over multiple pages You can touch to display the next or previous page of the screen Touch this when you want to exit close the currently displayed screen Normally touching several times takes you back to the Main screen When you touch a menu in the sub window the sub window will close and the selected menu screen will appear In a sub ...

Страница 25: ...25 About the Display Sub windows for setting values When you are making settings in the System screen the following type of screen appears Return to the factory settings Modify the value ...

Страница 26: ...niment that are available with the AT 45 fig 01 01 1 Make sure that a floppy disk is not inserted in the disk drive If a floppy disk is in the disk drive press the Eject button p 66 and remove the floppy disk 2 Press the Demo button to make the indicator light The Demo Screen appears For details on the composer of each demo song and their profiles refer to Demo Song List p 216 ...

Страница 27: ... possible to play the Demo songs fig E 62 1 If you want to delete the performance data touch OK If you do not want to delete the performance data touch Cancel You can start stop the demo songs by pressing the panel Play Stop button The performance data can be saved on a floppy disk If you wish to save the musical data to a floppy disk refer to Saving Performance Songs Onto Floppy Disk p 143 NOTE A...

Страница 28: ...ply select the keyword that most closely suggests the character of the song you have in mind and a rhythm performance a sound for the melody and other selections will be made for you Once you ve selected a keyword all you have to do is play the keyboard to start performing 1 Display the Main screen 2 Touch MUSIC ASSIST on the Main screen The Music Assistant screen appears If some other screen is d...

Страница 29: ...ill automatically be called up for the Registration 1 4 buttons 4 On the Lower keyboard play a chord At the moment you play the keyboard the Intro will begin and then the Rhythm and Automatic Accompaniment will play 5 Press a Registration button from 1 through 4 to switch the panel settings 6 To end the Music Assistant function press the One Touch Program button extinguishing its indicator ...

Страница 30: ... these for a Music Assistant search 1 Touch MUSIC ASSIST on the Main screen The Music Assistant screen appears 2 Touch Search on the Music Assistant screen A sub window appears Searching by Music Assistant name 3 Touch By Name If some other screen is displayed touch Exit to close the currently open screen ...

Страница 31: ...splay To cancel the search touch Exit in the Search Results screen 6 Touch a Music Assistant name to select a Music Assistant Touch Exit to return to the Music Assistant screen Searching by conditions 3 Touch By Conditions You can use four different criteria in searches Tempo Rhythm Genre and Scene 4 Touch the value for the search term 5 Touch to adjust the settings 6 After setting the search term...

Страница 32: ...ains settings related to the button keyboard pedal or foot switch that you pressed 3 Make settings in the screen to which you jumped 4 When you are finished making settings touch Exit to close the screen The Main screen appears About the Index menu In the Quick Guide screen you can touch index to access the Index Menu In the Index Menu screen you can touch a keyword to jump to the setting screen f...

Страница 33: ... letter of the alphabet A W to select the first letter of the desired keyword The Quick Guide Index screen appears and the keywords will be displayed 4 Touch the desired keyword The setting screen for the specified keyword appears 5 Make settings in the setting screen that appeared 6 Touch Exit The Main screen appears ...

Страница 34: ...ne voice from each part Plus with the addition of the Solo part voice you can have up to three voices playing simultaneously the Solo voice can be played in either the Upper or Lower keyboard The Pedalboard has Pedal part Keyboard Parts Upper Keyboard Upper Organ Upper Orchestral Solo This voice is sounded only when the Solo To Lower button be extinguished Lower Keyboard Lower Organ Lower Orchestr...

Страница 35: ... to each voice button Buttons with voices from two different families have the names of both voices printed on them The Alternate button switches between these two voices The Alternate button Voice that will be selected The Alternate button is not lit The voice indicated on the button is selected The Alternate button is lit Another voice of the same family or the voice indicated on the bottom half...

Страница 36: ...ator lights The name of the selected voice appears in the display for several seconds fig 01 08 Now when you play the Upper keyboard the Jazz Organ2 will sound 2 Press the Upper Organ Alternate button the indicator lights When you play the Upper keyboard the ComboJazzOrg will sound Each time you press the Alternate button you will switch between the two voices which are assigned the button 3 Press...

Страница 37: ... the Pedal Electric button indicator lights The name of the selected voice appears in the display for several seconds fig 01 10 Now when you play the Pedalboard E Bass 1 Electric Bass 1 will be heard 1 Normally playing the pedalboard will sound one note at a time Settings can be adjusted to allow multiple notes to be played on the Pedalboard p 169 If you press the Pedal To Lower button indicator l...

Страница 38: ...everal seconds fig 01 12 Play the Upper keyboard The selected voice will sound by the highest note played When you press the Alternate button the two voices assigned to the button will alternate 1 By pressing the Solo To Lower button you can play the Solo voice from the Lower keyboard For details refer to Playing the Solo Voice on the Lower Keyboard Solo To Lower Button p 124 It is possible to cha...

Страница 39: ...of the two available locations a newly selected voice will be assigned 2 Press the Others button for the Part for which you wish to specify a voice The Others Voice screen appears for several seconds fig 01 15 3 Touch a button that shows a sound group fig 01 15 A voice indicated by is called an EX voice These voices are especially recommended NOTE When you press the Others button the Others Voice ...

Страница 40: ...Others button will change from blinking to lit You can touch AEx Voice in the Voice Select screen to have only the Active Expression voices be displayed Active Expression voices can be assigned to the Others buttons of the Upper Orchestral part Lower Orchestral part Solo part and Pedal part For more on the active expression voices refer to Performing with an Active Expression Voice p 43 You can al...

Страница 41: ...he Others Voice screen appears for several seconds fig 01 15 3 Touch a button that shows a sound group fig 01 15 A sub window appears allowing you to select a sound group fig 01 16 For more information about the voices that can be assigned to an Others button please refer to Voice List p 196 NOTE When you press the Others button the Others Voice screen appears in the display screen but the Main sc...

Страница 42: ...again press the Others button for the part whose sound you wish to set to confirm the voice The indicator of the Others button will change from blinking to lit You can also confirm the voice by touching Exit in the Others Voice Other Voice select screen You can also press the key for the part containing a changed voice to confirm the voice setting For some human voices such as Jazz Scat the sound ...

Страница 43: ...Active Expression Voices from the entire collection are displayed fig 01 17 4 Touch a voice name 5 Once again press the Others button for the part whose sound you wish to set to confirm the voice The indicator of the Others button will change from blinking to lit An active expression voice will be selected NOTE Although you can select an Active Expression voice with the Others button for parts oth...

Страница 44: ...ollowing buttons are used to adjust the volume of a multiple number of Parts Button Part Accomp SMF button Automatic Accompaniment except Bass Playback of performance songs from something other than the Atelier performance songs for example SMF music files Rhythm button Rhythm performance Drums SFX Pedal button Pedal voice Bass note of automatic accompaniment ...

Страница 45: ...e from 0 to 12 When the volume value shown in the display is 0 that part will produce no sound You can also press the button and button of the part whose volume you wish to adjust so that the Part Balance Monitor screen is displayed for several seconds allowing you to check the volume balance fig 01 27 The Part Balance Monitor screen is displayed for several seconds and then closes automatically I...

Страница 46: ...ed Octave Shift You can apply an Octave shift to all Parts 1 Touch Sound Kbd on the Main screen fig 05 08 The Sound Keyboard screen appears fig 01 29 2 Touch either UPPER LOWER or PEDAL 3 Touch to display the Octave Shift Menu Part whose pitch will change UPPER To change the pitch of the Upper and Solo part LOWER To change the pitch of the Lower part PEDAL To change the pitch of the Pedal part ...

Страница 47: ... 6 Touch Exit You will return to the Upper Keyboard Lower Keyboard Pedalboard screen You can open the Pedalboard screen Lower Keyboard screen or Upper Keyboard screen with touching Pedal Lower and Upper NOTE Please note that when you apply the Octave Shift function to certain voices their pitch could be stretched beyond their recommended note ranges and they may not sound as expected Care should b...

Страница 48: ...X button getting its indicator to light up The Drums SFX button indicator will alternate between on lit and off dark each time it is pressed The Drums SFX drums sound effects screen will be displayed for several seconds fig 01 33 2 Play the Lower keyboard and listen to the various drum sounds on each key Refer to Drum Set List p 198 for details on which drum sound or Sound Effect will be played by...

Страница 49: ... as follows STANDARD STANDARD2 ROOM ROOM2 POWER ELECTRONIC TR 808 DANCE JAZZ BRUSH BRUSH2 ORCHESTRA SOUND EFFECTS 3 Press the Drums SFX button once again The Drums SFX button indicator will be lit constantly and the selected Drum Set Type will be applied For the types of Drums SFS set and the drum sounds played by each key refer to Drums SFX set list p 198 You can also confirm the Drums SFX set by...

Страница 50: ...und until you play the next note s even if you release the keys you have played fig 02 14 1 Press the Lower Voice Hold button confirm that the indicator is lit The notes played on the lower keyboard will continue sounding While the Lower Voice Hold button is lit pressing a key will cause the note to continue sounding 2 When you press the Lower Voice Hold button to make the indicator go dark the no...

Страница 51: ...appears fig 02 09_55 The rhythms in the selected rhythm group appears in the display 2 Touch to switch screens and touch a rhythm name to select the desired rhythm The indicator of Rhythm button will blink 3 Press the Rhythm button once again indicator lights constantly The Rhythm button s indicator will change from blinking to light The Rhythm has now been applied For more on the internal rhythms...

Страница 52: ...er button will blink 4 After selecting a rhythm press the flashing Disk User button once more The Disk User button stops flashing and remains lit indicating that the rhythm has been selected If you wish to store a disk Rhythm in the User memory refer to Copying Rhythms on Disks into User Memory p 68 What is the User Memory The User memory is the area within the instrument where User rhythms you cr...

Страница 53: ... the Main screen fig 05 08 The following Rhythm screen appears 2 Touch on the Main screen A sub window appears If some other screen is displayed touch Exit to close the currently open screen You can also open the Rhythm screen by pressing Rhythm buttons You can also search only for rhythms other than the internal rhythms accessed with the Disk User button The icon does not appear in the display wh...

Страница 54: ...rch The search results appear in the display To cancel the search touch Exit in the Search Results screen 6 Touch a Rhythm name to select a Rhythm Touch Exit to return to the Rhythm screen Searching by Conditions 3 Touch By Conditions You can use four different criteria in searches Tempo Beat Groove and Genre 4 Touch the value for the search term 5 Touch to adjust the settings 6 After setting the ...

Страница 55: ...on indicator will light until the Intro ends then the button indicator will go dark Making the Intro Short and Simple 1 Press the To Variation or To Original button Start Stop button indicator will blink The indicator for the To Variation or To Original button will blink 2 Press the Start Stop button A short Intro is played and the Rhythm starts Starting Without an Intro 1 Press the Start Stop but...

Страница 56: ...ss the Sync Start button to make the indicator light up 2 Press the To Variation or To Original button Start Stop button indicator will blink The indicator for the To Variation or To Original button will blink 3 Play either the Lower keyboard or the Pedalboard A short Intro is played and the Rhythm starts Starting Without an Intro 1 Press the Sync Start button to make the indicator light up 2 Play...

Страница 57: ...1 Press the Tempo and buttons to change the tempo speed of the Rhythm or Automatic Accompaniment By pressing the Tempo and buttons simultaneously the tempo is returned to the standard preset tempo for the selected Rhythm The value of the tempo currently set 20 500 beats per minute can be checked in the Main screen and Rhythm screen Tempo button The tempo becomes slower Tempo button The tempo becom...

Страница 58: ...animent The Arranger function of the AT 45 can add an Automatic Accompaniment to each Rhythm Based on the selected Rhythm the Arranger function automatically adds an accompaniment that is suitable for the chord being pressed on the Lower keyboard fig 02 06 1 Press the Arranger On Off button indicator lights 2 Start the rhythm p 55 The rhythm and the automatic accompaniment will play together If th...

Страница 59: ... buttons to change the arrangement of the accompaniment The indicator of the button you pressed will light The Basic button produces the simplest arrangement and the Full button produces the most florid Button name Function Fill In To Variation button After the Fill In has played play the Variation Rhythm pattern Fill In To Original button After the Fill In has played play the Original Rhythm patt...

Страница 60: ...d to sound a C Major chord with the voice selected for the Lower part 1 Touch Rhythm on the Main screen The Rhythm screen appears fig 02 09_55 2 Touch Utility on the Rhythm screen The Utility screen appears fig 02 10_55 For more information about chord fingering refer to the Chord List p 210 You can also open the rhythm screen by pressing a Rhythm button If you press the root note of the chord p 2...

Страница 61: ...e you touch the Chord Intelligence setting it will be switched ON OFF 5 If you wish to turn off the Chord Intelligence function switch it OFF When the Leading Bass function p 62 is on and the Chord Intelligence function is off you can specify chords with a combination of the lower keyboard and pedalboard When you touch the One Touch Program button the Chord Intelligence setting will automatically ...

Страница 62: ...bass note the bottom note of the chord This allows the bass to be a note other than the root of the chord you play and the bass note will change when inverted chords are played p 212 1 Touch Rhythm on the Main screen The Rhythm screen appears fig 02 09_55 2 Touch Utility on the Rhythm screen The Utility screen appears fig 02 10_55 When the Leading Bass function is on and the Chord Intelligence fun...

Страница 63: ...turn it ON Each time you touch the Leading Bass setting it will be switched ON OFF 5 To turn off the Leading Bass function set the Leading Bass setting to OFF You can assign the Leading Bass functions to either of the foot switches located on each side of the Expression Pedal Please refer to Changing the Function of the Foot Switch p 105 ...

Страница 64: ... and volume suitable for the rhythm Arranger On Off button lit Automatic Accompaniment playing Sync Start button lit Intro Ending button blinking Waiting for Sync Start Chord Intelligence function is ON p 60 The panel settings specified by the One Touch Program function are as follows 8 panel settings for each rhythm 4 panel settings x 2 groups What is Sync Start Sync Start is a function that star...

Страница 65: ...d up for Registration 1 4 buttons 4 Press the Registration 1 4 button to select panel settings 5 On the Lower keyboard play a chord At the moment you play the lower keyboard the Intro will begin and then the Rhythm and Automatic Accompaniment will play 6 Press the Intro Ending or Start Stop button to stop the Rhythm Rhythm and Automatic Accompaniment stops 7 Press the One Touch Program button exti...

Страница 66: ...the unit above the keyboard fig 02 18 2 Press the Eject button The end of the floppy disk comes out of the slot Gently grasp the end of the floppy disk and pull it out fig 02 19 NOTE If you re using the disk drive for the first time be sure to read the important notes on p 6 Eject button Indicator Floppy Disk NOTE Never eject a disk while reading or writing is in progress since that can damage the...

Страница 67: ...t to light up the rhythms on the music style disk are displayed 4 Touch the Rhythm screen to select a Rhythm on the Music Style disk The Start Stop button indicator will blink while the Rhythms are being loaded into internal memory When loading is finished you will be able to play the selected rhythm 5 Press the Start Stop button or the Intro Ending button The selected Rhythm is played When is lit...

Страница 68: ...tyle Disk rhythms Rhythms loaded from the floppy disk into User memory will not be lost even if the power is turned off It is convenient to load frequently used disk Rhythms into User memory 1 Insert the Music Style disk into the disk drive 2 Touch Rhythm on the Main screen The Rhythm screen appears fig 02 21_55 3 Touch Utility on the Rhythm screen The Utility screen appears fig 02 22_55 ...

Страница 69: ...m Disk User button indicator will blink 6 After selecting the Music Style Disk Rhythm touch Next The following screen appears fig 02 24_55 Touch Back to go back to the previous screen 7 Touch the save destination rhythm The following screen appears fig 02 25_55 To cancel operation touch Cancel At this time you can press or the Start Stop button to play the rhythm to make sure of your choice ...

Страница 70: ...y button will return to the factory settings NOTE Never remove the disk or turn off the power while the Rhythm data is being loaded from disk into the AT 45 If you do so the Rhythm data will not be loaded into the AT 45 and malfunctions could result After returning the Rhythm stored in the Disk User button to the factory settings see following section re load the Rhythm from disk To restore all of...

Страница 71: ...nd copy them to floppy disks 1 Make sure that the disk drive contains a disk that was formatted p 86 by the AT 45 2 Press the Rhythm Disk User button The Rhythm screen appears fig 02 09_55 3 Touch 4 Touch the Rhythm name to select the rhythm you want to copy to the floppy disk When is lit the rhythms stored on the floppy disk are displayed ...

Страница 72: ...ars 7 Touch to select the copy destination number Numbers which have not been used in the saving operation will be displayed as To cancel the copy touch the Exit button to close the Copy to Disk screen 8 Touch Copy to copy the rhythm to the floppy disk Copying of the rhythm to the floppy disk begins When the rhythm is saved the Rhythm screen returns to the display ...

Страница 73: ...in User Memory You can rearrange the order of the rhythms stored in User memory p 52 1 Touch Rhythm on the Main screen The Rhythm screen appears fig 02 09_55 2 Touch Utility on the Rhythm screen The Utility screen appears fig 02 22_55 3 Touch Edit User The Edit User screen appears ...

Страница 74: ...cription Rename Modify the name The Rename screen appears You can touch the screen and rename the selected rhythm p 75 Up Change the order upward The selected rhythm will be moved earlier in the order Down Change the order downward The selected rhythm will be moved later in the order Delete Delete the Rhythm The selected rhythm will be deleted p 77 ...

Страница 75: ...You can rename rhythms stored in User memory p 52 1 Touch Rhythm on the Main screen The Rhythm screen appears 2 Touch Utility on the Rhythm screen The Utility screen appears fig 02 22_55 3 Touch Edit User The Edit User screen appears 4 Touch to select the rhythm whose name you want to change ...

Страница 76: ...character The following characters can be selected To cancel the operation touch Cancel 8 When you re done making the settings touch OK The Rhythm has now been named The Edit User screen reappears 9 Touch Exit Uppercase A B C D E F G H I J K L M N O P Q R S T U V W X Y Z Lowercase a b c d e f g h i j k l m n o p q r s t u v w x y z Symbols _ 0 1 2 3 4 5 6 7 8 9 Delete a character Insert a space Mo...

Страница 77: ...ete rhythms stored in User memory p 52 1 Touch Rhythm on the Main screen The Rhythm screen appears 2 Touch Utility on the Rhythm screen The Utility screen appears fig 02 22_55 3 Touch Edit User The Edit User screen appears 4 In the screen touch to select the rhythm that you wish to delete ...

Страница 78: ...hythm Performance 5 Touch Delete The following display appears To cancel operation touch Cancel 6 If you are sure that you wish to delete the rhythm touch OK When a rhythm is deleted the deleted rhythm name will change to ...

Страница 79: ... etc If you would like to know all of the settings that can be recorded to the Registration buttons refer to Settings That Are Stored After the Power Is Turned Off p 214 Furthermore you can group the settings assigned to the Registration 1 8 buttons as a single set and then register and save up to a maximum of 99 sets onto a single floppy disk p 88 In addition to the settings recorded to the Regis...

Страница 80: ...in the song You can use the Disk Edit function to alter the sequence and names of rhythms contained on the floppy disk p 84 p 98 as well as delete such rhythms p 96 Using Registration Sets Call up the Registration sets saved on the floppy disk to the AT 45 Insert the floppy disk containing the saved Registration sets into the disk drive and load the Registration sets into the AT 45 p 91 Switch the...

Страница 81: ...ddition to the panel settings 1 Press and hold a Registration button 1 8 for several seconds The indicator of the rhythm select button will blink and the panel settings and settings related to rhythm performance and automatic accompaniment will be recalled How to Recall a Registration INSTANT Recalling panel settings of a voice or when recalling settings for rhythm performance and Automatic Accomp...

Страница 82: ...nge this so that the settings are recalled the instant you press the button 1 Touch Registration on the Main screen The sub window appears fig 03 04_55 2 Touch Load The Registration Load screen appears fig 03 05_55 3 Touch Utility The Utility screen appears fig 03 06_55 When you touch go to Save the instrument jumps to the Registration Save screen You can also open the Registration Load screen by ...

Страница 83: ...AYED When you press and hold a Registration button for several seconds the settings for Rhythm and Automatic Accompaniment will be recalled in addition to the panel settings If you press and immediately release a Registration button only the settings that are not related to Rhythm or Automatic Accompaniment will be recalled INSTANT Settings for Rhythm and Automatic Accompaniment will be recalled t...

Страница 84: ...n a name that will help you later to identify the contents of the Registration set 1 Touch Registration on the Main screen The sub window appears fig 03 04_55 2 Touch Save The Registration Save screen appears fig 03 09_55 3 Touch Utility to open the Utility screen The Utility screen appears fig 03 10_55 When you touch go to Load the instrument jumps to the Registration Load screen ...

Страница 85: ...eration touch Cancel 7 When you re done making the settings touch OK The Registration set in the AT 45 s internal memory has now been named fig 03 12_55 Uppercase A B C D E F G H I J K L M N O P Q R S T U V W X Y Z Lowercase a b c d e f g h i j k l m n o p q r s t u v w x y z Symbols _ 0 1 2 3 4 5 6 7 8 9 Delete a character Insert a space Move the cursor the symbol that indicates the location at w...

Страница 86: ...ppy disk is in the Write permit position fig 07 17 2 With the label of the floppy disk facing upward insert it into the disk drive until it clicks into position The disk drive is located to the upper right of the AT 45 s keyboard fig 07 17 3 Touch Registration on the Main screen The sub window appears fig 03 04_55 NOTE Formatting a floppy disk erases all data previously stored on the disk If you r...

Страница 87: ...ig If you touch Cancel you will return to the Registration Save screen without formatting 7 Touch OK to start formatting While formatting is in progress the following display appears fig When the format is finished the Registration Save screen returns When you touch go to Load the instrument jumps to the Registration Load screen NOTE Never attempt to remove the floppy disk until formatting is comp...

Страница 88: ...ns created on the AT 45 to floppy disks you can call up their settings on other Atelier Series instruments and use the registrations the same way 1 Make sure that the disk drive contains a disk that was formatted p 86 by the AT 45 2 Touch Registration on the Main screen The sub window appears fig 03 04_55 3 Touch Save The Registration Save screen appears fig 03 09_55 When you touch go to Load the ...

Страница 89: ...screen appears fig 03 14_55 6 Touch Original or R Series 7 Touch OK Saving of the registration data will begin When saving ends the in the screen will change to the registration name that you saved If you have assigned a name the Registration set will be saved to floppy disk with that name Settings Description Original Save formats that can be used with the AT 45 When saved in this format the data...

Страница 90: ... update the contents of the Registration data 1 Touch OK If you wish to save new data instead of updating the registration 1 Touch Cancel Rewriting of the Registration will be canceled 2 In the Registration Save screen select the number that is displayed as a number that currently does not contain registration data 3 Save the Registration p 88 When saving is complete the saved registration name wi...

Страница 91: ...he Order that the Registrations are Saved on the Floppy Disk Load Next p 106 When the Load Next function is assigned to the foot switch p 106 Registration sets are called up in the order they are saved on the floppy disk Loading a Set of Registrations 1 Insert the floppy disk containing the Registration into the disk drive 2 Touch Registration on the Main screen The sub window appears fig 03 04_55...

Страница 92: ...istration data will start being read When the Registration has been loaded the Registration Load screen will reappear While registrations saved on the AT 90 AT 80 AT 30 are being loaded into this instrument the following screen appears fig 03 18_55 When you use the Registrations saved on the AT 90 AT 80 AT 30 refer to Using Registrations Created on an Earlier Model p 99 When you touch go to Save t...

Страница 93: ...g 03 04_55 3 Touch Load The Registration Load screen appears fig 03 05_55 4 In the screen touch to select the registration that you wish to load into internal memory 5 Touch Utility to open the Utility screen fig 03 06_55 When you touch go to Save the instrument jumps to the Registration Save screen You can also open the Registration Load screen by pressing the Registration button instead of perfo...

Страница 94: ...rs fig 03 19_50 7 In the screen touch Disk 1 8 to select the number of the registration button that you wish to load from disk into internal memory fig 03 20_50 8 In the screen touch Internal 1 8 to select the number of the storage destination button fig 03 21_50 To cancel this operation touch Cancel ...

Страница 95: ...5 Chapter 3 Using the Registration Buttons 9 When you re done making the settings touch OK The following display appears fig 03 22_55 When the Registration has been loaded the basic screen will reappear ...

Страница 96: ... window appears fig 03 04_55 3 Touch Disk Edit The Disk Edit screen appears fig 03 25_55 Button Mean Description Rename Modify the name The Rename screen appears You can touch the screen and rename the selected registration p 84 Up Change the order upward The selected registration will be moved earlier in the order p 98 Down Change the order downward The selected registration will be moved later i...

Страница 97: ... Touch Delete The following display appears fig 03 16_55 To cancel operation touch Cancel 6 If you are sure that you wish to delete the registration touch OK When the Registration has been deleted the Disk Edit screen will reappear When a registration is deleted the deleted registration name will change to fig 03 28_55 ...

Страница 98: ...s 3 Touch Disk Edit The Disk Edit screen appears fig 03 25_55 4 Touch in the screen to select a registration 5 Touch Up or Down to move the registration 6 Touch Exit Button Mean Description Rename Modify the name The Rename screen appears You can touch the screen and rename the selected registration p 84 Up Change the order upward The selected registration will be moved earlier in the order Down C...

Страница 99: ...nally used can also be loaded into the Disk User button to complete the accurate reproduction of the original registration Recalling a registration that was created on the AT 90 80 30 1 Insert the floppy disk that contains Registrations created on an earlier model of the ATELIER series 2 Touch Registration on the Main screen The sub window appears fig 03 04_55 3 Touch Load The Registration Load sc...

Страница 100: ...reen to select the model on which the Registration was created 7 Touch OK to confirm the model on which the Registration was created If the Rhythm used by the Registration is found in the internal memory of the AT 45 the Registration will be loaded into internal memory When loading is complete the Registration Load screen will reappear NOTE If the Rhythm of the Disk User button has been rewritten ...

Страница 101: ...st in internal memory will be substituted for the rhythm that does not exist and the registration will be loaded Loading a AT 90 80 30 rhythm into the Disk User button If you wish to use a Rhythm used by an earlier model of the ATELIER series with a Registration that you loaded load the Rhythm from the Music Style disk into the Disk User button 9 Remove the Registrations floppy disk from the disk ...

Страница 102: ...A to G in semitone steps The specified value will be displayed in the Main screen fig 04 02 State of the Transpose buttons 2 By pressing the Transpose buttons simultaneously you can restore the default setting C If transposed non C One of the Transpose button indicators is lit If not transposed C The Transpose button indicators are extinguished Transpose The transposition setting is stored in the ...

Страница 103: ...ault immediately after the power is turned on the Pitch Bend effect is added to the voices of all the sections being played on the Upper keyboard You can modify the setting so that decay is applied to notes played on the Upper keyboard p 171 NOTE Decay cannot be added to the Solo voices You can play the Pedal Bass voice in the Lower keyboard the To Lower button is on In this case a decay will not ...

Страница 104: ...fect by which the pitch is lowered by a semitone while the foot switch is pressed and is returned to what is originally was when you release your foot While you are pressing the Foot Switch the pitch will be temporarily lowered When you release the Foot Switch the pitch will return to normal gradually You can also change the functions assigned to the left and right Foot Switches Please refer to Ch...

Страница 105: ...e power is turned on Glide effect is added to the voice of all the sections being played on Upper keyboard LEADING BASS The Leading Bass function p 62 will operate only while you continue pressing the Foot Switch RHYTHM START STP Start Stop the Rhythm COMP PLAY STOP The same function as the Composer Play Stop button Each time you press the Foot Switch the performance data will play back or stop IN...

Страница 106: ...ou perform you can recall the next registration set easily and smoothly Checking the next registration set 1 Display the Main screen p 22 2 Touch the icon several times to switch to The Main screen display will switch to the registration Next will indicate the name of the next registration set Setting Descriptions OFF You can use a function assigned to the foot switch RIGHT The right foot switch i...

Страница 107: ...cify whether the Expression Pedal will or will not control the volume during the playback of recorded performance p 171 Using the expression pedal enables you to give your performances even richer musical expressiveness The expression pedal features the following special characteristics Completely releasing the expression pedal does not lower the volume to zero If you do want to turn down the volu...

Страница 108: ...ume change much 2 The expression pedal is applied to the rhythms and Automatic Accompaniment just as it is to the keyboard performance The volume is easily adjusted according to the angle of the expression pedal making this setting perfect for use in songs with big changes in dynamics 3 The expression pedal is applied to the rhythms and Automatic Accompaniment just as it is to the keyboard perform...

Страница 109: ...1 Press the Harmony Intelligence button getting its indicator to light up Each time you press the button the indicator will alternate between ON lit and OFF The Harmony Intelligence screen appears for several seconds fig 05 04_70 Changing the Type of Harmony Intelligence There are 8 different Harmony types When you press the Harmony Intelligence button to turn it on lit a voice most suitable for t...

Страница 110: ...ugel Horn 4 STRINGS Strings 1 Strings 1 4 TRADITIONAL Currently Selected Tone 3 HARP Harp 2 COMBO Clarinet Trombone 2 JAZZ SCAT Jazz Scat Jazz Scat 3 BROADWAY Celesta Theater Or 1 3 OCTAVE 1 Currently Selected Tone 2 You can also confirm the Harmony Intelligence settings by touching Exit on the Harmony Intelligence screen You can also play the upper manual to confirm the type of the Harmony Intell...

Страница 111: ...between Rotary Fast LED lit and Rotary Slow LED turned off When you switch the rotary effect from Fast to Slow the modulation will slow down gradually and when you switch from Slow to Fast the modulation will speed up gradually Rotary Fast Slow button Effect LED lit Fast The effect obtained is equivalent to speakers being rapidly rotated LED turned off Slow Effect simulating the slow rotation of s...

Страница 112: ...n the Main screen fig 05 08_50 The Sound Keyboard screen appears 2 Touch Effect The Effect screen appears fig 05 17_50 3 Touch to display the Rotary Speed 4 Touch the value setting buttons for Rotary Speed to adjust the setting fig 05 12_50 5 Touch to edit the value Settings SLOW NORMAL FAST 6 Touch Exit These settings remain stored in memory even while the power is off ...

Страница 113: ...n screen fig 05 08_50 The Sound Keyboard screen appears 2 Touch Effect The Effect screen appears fig 05 17_50 3 Touch to display the Rotary Color 4 Touch the value setting buttons for Rotary Color to adjust the setting Each time you touch the Rotary Color setting it will switch between BRIGHT and MELLOW Settings BRIGHT MELLOW 5 Touch Exit These settings remain stored in memory even while the power...

Страница 114: ... apply a chorus effect for the Upper Orchestral and Lower Orchestral voices 1 Touch Sound Kbd on the Main screen fig 05 09_55 The Sound Keyboard screen appears fig 05 10_55 2 Touch either UPPER or LOWER Menu Part to apply Chorus effect UPPER To apply chorus to the Upper part LOWER To apply chorus to the Lower part For some of the voices Chorus may already be turned ON ...

Страница 115: ...ch time you touch the Chorus setting it will alternate ON OFF fig 05 22 4 Touch Exit Indication Description ON The Chorus effect will be applied to the voice OFF The Chorus effect will not be applied to the voice NOTE Some voices do not allow the Chorus effect to be applied For details refer to Voice List p 196 ...

Страница 116: ...Sustain to the Upper Part and Lower Part 1 Touch Sound Kbd on the Main screen The Sound Keyboard screen appears 2 Touch either UPPER or LOWER 3 Touch to display the Sustain 4 Touch the Sustain setting to switch between ON and OFF Each time you touch the Sustain setting it will alternate ON OFF 5 Touch Exit Menu Part to apply Chorus effect UPPER To apply sustain to the Upper part LOWER To apply sus...

Страница 117: ...the Main screen fig 05 08_50 The Sound Keyboard screen appears fig 05 10_50 2 Touch either UPPER LOWER or PEDAL 3 Touch to display the Sustain Length fig 05 14_50 4 Touch the Sustain SHORT MIDDLE LONG display fig 05 14_50 5 Touch to change the value Settings SHORT MIDDLE LONG 6 Touch Exit Menu Part whose sustain length you wish to change UPPER To change the length of the Upper part LOWER To change...

Страница 118: ...ing the down button decreases the Reverb level When you press the Reverb buttons the Part Balance Monitor screen appears In the Part Balance Monitor screen you can check the reverb depth fig 01 27_55 The Part Balance Monitor screen is displayed for several seconds and then closes automatically If you touch Hold the screen continues to be displayed until you touch Hold again You can change the type...

Страница 119: ...0 5 Touch to change the setting NOTE It is not possible to modify the delay time delay interval when DELAY or PAN DELAY is selected 6 Touch Exit Display Description ROOM 1 Simulates the reverb of a conference room ROOM 2 Simulates the reverb of a performance lounge ROOM 3 Simulates the reverb of a large open room HALL 1 Simulates the reverb of a large concert hall HALL 2 Simulates the reverb of a ...

Страница 120: ...ch Sound Kbd on the Main screen fig 05 08_50 The Sound Keyboard screen appears 2 Touch Effect The Effect screen appears fig 05 17_50 3 Touch to display the Wall Type 4 Touch the value setting buttons for Wall Type to adjust the setting The following screen appears fig 05 21_50 5 Touch to change the setting 6 Touch Exit Display Description DRAPERY Pleated curtain CARPET Carpet ACOUSTIC TILE Acousti...

Страница 121: ...een fig 05 08_50 The Sound Keyboard screen appears 2 Touch UPPER LOWER or PEDAL The Upper Keyboard screen Lower Keyboard screen or Pedalboard screen will be displayed Upper fig 05 17_50 Lower fig 05 17_50 Pedal fig 05 17_50 3 Touch to display the Reverb Depth 4 Touch the part whose reverb depth you wish to adjust The following screen appears fig 05 20_50 5 Touch to adjust the setting Settings 0 10...

Страница 122: ...ouch to display the Rev Depth Reverb Depth fig 05 17_50 4 Touch the part whose reverb depth you wish to adjust The following screen appears fig 05 20_50 5 Touch to adjust the setting Settings 0 10 AUTO Accomp Rhythm A Bass For the three Parts of the Accomp Rhythm and Accompaniment Bass you have the option of selecting the AUTO setting Parts for which AUTO is selected will be set to the Reverb Dept...

Страница 123: ...sible Using the Lower Keyboard to Play the Solo Voice Playing Drum Sounds from the Entire Lower Keyboard Using the Lower Keyboard to Play Drum Sounds and Solo Voice Press the Solo To Lower button in the Upper Solo section to Play the Solo voice to the Lower keyboard p 124 fig 06 01 Drum SFX Lower Solo Press the Drums SFX button p 48 fig 06 04 Drum SFX Lower Solo Press the Drums SFX button p 48 Pre...

Страница 124: ... p 38 2 Press the Solo To Lower button indicator lights When you play the Lower keyboard the Solo voice will sound in the range to the right of the Solo Split Point fig 06 09 3 To turn off the Solo split press the Solo To Lower button indicator turns off The Solo voice will no longer sound in the Lower keyboard the Solo voice will now be played in the Upper keyboard The solo split point is include...

Страница 125: ...ON you can specify whether the Lower voice and the Solo voice will sound together layered or will sound separately split 1 Touch Sound Kbd on the Main screen The Sound Keyboard screen appears 2 Touch UPPER The Upper Keyboard screen appears 3 Touch to display the Solo To Lower Mode 4 Touch the Solo To Lower Mode setting to switch between SPLIT and LAYER Each time you touch the Solo To Lower Mode se...

Страница 126: ... appears ffig 06 12_50 2 Touch Split Point The Split Point screen appears fig 06 13_50 3 Touch to change the Solo Split Point Settings A1 to C7 4 Touch Exit You can also set the split point by pressing the key of the lower keyboard that you want to be the Solo Split Point fig 06 1 While touching the Solo Split Point value A1 C7 indication in the Split Point screen press the key in the Lower keyboa...

Страница 127: ...ou play a chord in the area of the Lower keyboard that sounds the Lower voice the Pedal Bass voice will also be heard and will play the root note If the Leading Bass function is on p 62 the lowest note played in the lower keyboard will sound the pedal bass voice 3 Press the Pedal To Lower button indicator turns off The Pedal Bass voice will no longer sound in the Lower keyboard NOTE If no portion ...

Страница 128: ...the floppy disk are played back one after another When no floppy disk is in the disk drive The Demo screen opens Track The indicator alternately switches on and off each time the button is pressed You can mute the voices on a particular track by turning off the track button s light For more about the track buttons refer to p 129 Button Description Track Rhythm Accmp Bass Lower Upper Solo Control B...

Страница 129: ...Data Note Hold Bender Modulation Solo Solo Voice Performance Data Note Hold Bender Modulation Control Glide Expression Reverb Type Reverb Depth Solo To Lower button ON OFF Pedal To Lower button ON OFF Transpose button setting Harmony Intelligence button ON OFF Harmony Intelligence Type Rotary Fast Slow button ON OFF Rotary ON OFF button ON OFF Pedal Bass Mode Solo Mode Control Solo To Lower Mode S...

Страница 130: ... is grouped to Rhythm If you want to mute only a portion of the rhythms or accompaniment open up the Track Mute screen and switch off the Track Mute buttons there p 133 Playing Back SMF Music Files and Performance Data on Disks In addition to playing back the music you recorded on the instrument and saved to a floppy disk AT 45 also lets you enjoy a wide variety of commercially available song file...

Страница 131: ...in the Rec Play screen By touching Bwd or Fwd you can rewind or fast forward the performance 6 Press the Eject button to eject the floppy disk fig 02 19 The floppy disk is ejected a little out of the slot Gently grasp the end of the floppy disk and pull it out Playing back all performance data 1 Hold the floppy disk with the label facing upwards and push it into the disk drive until it clicks into...

Страница 132: ...te only a portion of the rhythms or accompaniment open up the Track Mute screen and switch off the Track Mute buttons there p 133 6 Press a track button that is lit extinguishing the button When you play back the performance track buttons that are not lighted will be muted silenced fig 07 14 7 Press the track button once again button lights The part that had been muted will return to normal and wi...

Страница 133: ...k that you wish to mute The button you ve touched goes out indicating the sound is muted 4 When you touch an unlit Track Mute button the Track Mute button light comes on and the track mute is cancelled 5 Touch Exit NOTE Track mute will be defeated when you perform the following operations Select different performance data The seven Track Mute buttons in the Rec Play screen p 130 correspond to the ...

Страница 134: ...ppears fig 07 31_50 3 Touch to select the song that you want to display the notation 4 Touch Load After the song is loaded the Rec Play screen opens Displaying Notations 5 Touch DigiScore on the Rec Play screen The Notation screen appears fig 07 Touching the illustration of speaker on screen you can mute the part This is convenient when you want to practice with a specific part muted Touch the spe...

Страница 135: ... do are displayed in the detailed notation Clef Upper AUTO Display is switched automatically G Clef Displayed the G clef staff of the upper part F Clef Displayed the F clef staff of the upper part Clef Lower AUTO Display is switched automatically G Clef Displayed the G clef staff of the lower part F Clef Displayed the F clef staff of the lower part Key AUTO Key is switched automatically Db Ab Eb B...

Страница 136: ...play are produced based on the music files Viewing ease is given priority over precise expression when dealing with complex high level music Because of this you may find that the notation shown in the display does not match what is provided on commercially available sheet music The notation display feature is particularly unsuitable for the display of difficult complex musical works that demand ac...

Страница 137: ...tton when you have completed your recording The Track buttons indicator where a performance song is recorded will change from a flashing to a constant light When you press the Intro Ending button or Start Stop button while recording a Rhythm performance or Automatic Accompaniment the Rhythm performance and Automatic Accompaniment will stop However the recording itself will continue Press the Play ...

Страница 138: ... of the Expression Pedal p 105 You can specify whether or not the Expression Pedal will affect the playback and what you play while Atelier music file is being played back p 170 NOTE If you load performance data such as SMF music files that was not designed for an ATELIER Series instrument and play it back you may find when playing rhythms and automatic accompaniment that the music doesn t sound q...

Страница 139: ...r recording standby mode Play and the unrecorded track buttons in the screen will blink The track buttons that are already recorded will light fig 07 15 Also the panel Composer Rec button indicator will light and Play Stop button will blink You can also enter recording standby mode by pressing the Composer Rec button 5 In the Rec Play screen touch Play to begin recording When you touch Play in the...

Страница 140: ...oser Rec button indicator will light and Play Stop button will blink You can also enter recording standby mode by pressing the Composer Rec button 4 Touch the Track button which you wish to re recording button flashes The song data of the specified Track with the exception of the Control Track will be erased as new song data is recorded When the Track button is lit constantly no song data has been...

Страница 141: ...asking you to confirm your choice will be displayed fig E 62 If you touch Cancel the performance data will not be erased and you will return to the Rec Play screen 4 If you touch OK the performance data will be erased Changing the Name of a Performance Song Rename A name is automatically assigned to a performance song that you record However at some point you may wish to change the name to somethi...

Страница 142: ...settings touch OK The new name is now inserted fig 07 26 NOTE You cannot directly change or edit the name of a performance song stored on a disk The song must first be loaded p 144 into the instrument edited and then saved to disk again You can also access the Rename screen as follows 1 Touch Utility on the Rec Play screen The Utility screen appears 2 In the Utility screen touch Edit The Edit Menu...

Страница 143: ...he Main screen The Rec Play screen appears fig 07 04_50 3 Touch Utility The Utility screen appears fig 07 22_50 4 Touch Save Delete The Song Save Song Delete screen appears fig 07 22_50 5 Touch to select the number of the save destination Numbers which have not been used in the saving operation will be displayed as fig 07 28_50 To cancel the Save operation touch the Exit to close the Song Save Son...

Страница 144: ...ready on disk you must rename the song 1 Touch Cancel to stop the Save operation 2 In the Song Save Song Delete screen select the number that is displayed as a number that currently does not contain performance data 3 Save the performance data When saving is complete the saved performance name will be displayed Loading Performance Songs Into the AT 45 To edit p 150 or re record a performance song ...

Страница 145: ...l be displayed fig E 30 Deleting Performance Songs Stored on Disk You can delete a performance song that was saved onto a floppy disk 1 Insert the floppy disk containing the performance data into the disk drive 2 Touch Rec Play on the Main screen The Rec Play screen appears 3 In the lower right of the screen touch Utility The Utility screen appears 4 Touch Save Delete The Song Save Song Delete scr...

Страница 146: ...ding the performance 8 Touch the Bwd button and Fwd button to move to the measure at which you wish to begin recording 9 In the Rec Play screen touch Rec to enter recording standby mode Play and unrecorded track buttons in the screen will blink The button indicators of tracks that are already recorded will light Also the panel Composer Rec button indicator will light and the Play Stop button will ...

Страница 147: ...recording will begin fig 07 5 Touch to specify From the measure at which recording will begin 6 Touch the For value the number of measures that will be re recorded 7 Touch to set For the number of measures that will be re recorded 8 Touch Rec The Rec Play screen appears and the unit is placed in recording standby To Record While Listening to the Song 9 Press the Track button which you wish to re r...

Страница 148: ...reen move to the measure where you wish to start Loop Recording 4 Touch Utility The Utility screen appears fig 07 5 Touch Loop Rec The Loop Rec screen appears fig 07 6 Touch the For value the number of measures that will be recorded repeatedly fig 07 To cancel operation touch Exit 7 Touch to specify the For value the number of measures that will be recorded repeatedly 8 Touch Rec The Rec Play scre...

Страница 149: ...ain screen The Rec Play screen appears fig 07 04_50 2 Touch Utility The Utility screen appears fig 07 3 Touch Options fig 03 37_50 4 Touch to display the Count In Rec 5 Touch the Count In Rec setting ON OFF to switch it between ON OFF Each time you touch the Count In Rec setting it will alternate between ON OFF 6 Touch Exit Setting Description ON A two measure count will sound before recording OFF...

Страница 150: ...ding will be moved forward to fill the gap Example To delete measures bars 5 8 fig 08 01 1 Touch Rec Play on the Main screen The Rec Play screen appears fig 08 02_50 2 In the Rec Play screen touch Utility to open the Utility screen fig 08 03_50 3 In the Utility screen touch Edit The Edit Menu screen appears fig 08 08_50 4 Touch Delete Measure fig 08 04 2_50 The Delete Measure screen appears fig 08...

Страница 151: ...he following display appears fig 08 To cancel operation touch Cancel 12 Touch OK to delete the measures When deletion has been completed you are returned to the Delete Measure screen Delete the Recording from a Track Delete Track The AT 45 has seven tracks This function lets you delete the recording from a track that you specify For more on the content stored on each track refer to p 129 1 Touch R...

Страница 152: ...data you wish to delete 6 Touch to select the Track the track whose performance data you wish to delete fig 08 09_50 Settings RHYTHM ACCOMP BASS LOWER UPPER SOLO CONTROL 7 When you re done making the settings touch Exit 8 Touch Execute The following display appears fig 08 06 2_50 To cancel operation touch Cancel 9 Touch OK to delete the performance data When the recording has been deleted the Dele...

Страница 153: ... Rec Play screen appears fig 08 02_50 2 In the Rec Play screen touch Utility to open the Utility screen fig 08 03_50 3 In the Utility screen touch Edit The Edit Menu screen appears fig 08 08_50 4 Touch Erase Event fig 08 11 2_50 The Erase Event screen appears fig 08 11_50 5 Touch the Event value the type of performance data that you wish to erase ALL All recording NOTE Notes played on the keyboard...

Страница 154: ...lect ALL the recording will be erased from all parts 10 When you re done making the settings touch Exit 11 Touch the From value the measure at which erasure will begin 12 Touch to set From the measure at which erasure will begin 13 When you re done making the settings touch Exit 14 Touch the For value the number of measures from which the data will be erased 15 Touch to set For the number of measu...

Страница 155: ... In the Rec Play screen touch Utility to open the Utility screen fig 08 03_50 3 In the Utility screen touch Edit The Edit Menu screen appears fig 08 08_50 4 Touch Copy fig 08 14 2_50 The Copy screen appears fig 08 14_50 5 Touch the Track value the track to be copied 6 Touch to set Track the track to be copied fig 08 15 2_50 Settings ALL RHYTHM ACCOMP BASS LOWER UPPER SOLO CONTROL If you select ALL...

Страница 156: ...e number of times that the data will be copied 19 When you re done making the settings touch Exit 20 Touch Execute The following display appears fig 08 06 To cancel operation touch Cancel 21 Touch OK to copy the measures Once the measures have been copied you are returned to the Copy screen Correct Timing Inaccuracies Quantize You can correct for timing discrepancies in a recorded performance by h...

Страница 157: ...asures that will be quantized 12 Touch to set For the number of measures that will be quantized To specify everything through to the last measure set for ALL 13 When you re done making the settings touch Exit 14 Touch the Resolution value the resolution at which notes will be aligned 15 Touch the settings to select Resolution the resolution at which notes will be aligned The Resolution the timing ...

Страница 158: ...g the User Rhythm Open the Rhythm Customize screen Select the division Load the source rhythm Make the division settings Edit the rhythm Change the percussion Save the User Rhythm to the User Memory or floppy disk Copy User Rhythm on Floppy Disks to the User Memory Copy User Rhythm on User Memory to the Floppy Disks Saving the User Rhythm Changing the name of a User Rhythm Copying the User Rhythm ...

Страница 159: ...nd reduces zooms out the rhythm pattern display 7 Current location Measure Beat Tick 8 Instrument Name Indicates the name of the instrument used in the rhythm 9 Rhythm Pattern Display Displays the notes in the selected rhythm pattern 10 Utility button Displays the menu with settings for the Rhythm Customize function 11 Preview button Allows you to listen to the created rhythm 12 Delete button Dele...

Страница 160: ...ation p 159 in the Rhythm Customize screen 4 Touch a Division name to select the Division This returns you to the Rhythm Customize screen The name of the selected division now appears in the Rhythm Customize screen You can touch to hear how the rhythm sounds Division Performance division Intro The intro is played at the start of a song Original This is a basic accompaniment pattern Fill In To Vari...

Страница 161: ...n appears 4 Touch a Rhythm group name The sub window for selecting the rhythm group appears 5 Touch a Rhythm group name on the sub window to select the Rhythm group The Rhythm Load screen reappears 6 Touch to switch the screen then touch a rhythm name to select the rhythm You can touch Preview to hear how the rhythm sounds 7 Touch to select the Division you want to call up Selecting ALL calls up a...

Страница 162: ...ty screen appears 3 Touch Div Options Division Options The Division Options screen appears Changing the Drum Set 4 Touch the value set for Drum Set 5 Touch to change the setting 6 Touch Exit The Division Options screen reappears Changing the Beat 7 Touch the Beat setting 8 Touch to change the setting 9 Touch Exit The Division Options screen reappears Changing the Volume 10 Touch the Volume setting...

Страница 163: ...ch OK Copies the rhythm in the displayed measure and adds it to the end of that measure Deleting the Rhythm in a Selected Measure 1 Bring up the Rhythm Customize screen p 159 2 Touch Del to copy the selected measure The following screen appears To cancel operation touch Cancel 3 Touch OK The selected measure is deleted What you can do Page Copying the Rhythm in a Selected Measure p 163 Deleting th...

Страница 164: ... finger The information on the location Measure Beat Tick of the line on the screen is displayed When you remove your finger from the screen the Note Edit screen opens and the note positioned at the line in the Rhythm Customize screen is displayed You can touch to open the Utility screen and then touch Note Edit in the Utility screen to open the Note Edit screen Erasing Sounds 3 Touch to select th...

Страница 165: ...tick is a unit of time that s shorter than a beat 15 Touch 10 1 1 10 to move the sound With the Rhythm Customize function note locations are expressed in terms of Measure Beat Tick One tick is the smallest unit used in indicating the location of the note and there are 120 ticks in a quarter note Typical notes might be indicated as shown below Quarter Note 8th Note 8th Note Triplet 16th Note The ti...

Страница 166: ...t screen appears Changing the Instrument Used 3 Touch in the screen to select the name of the instrument you want to change 4 Touch Change The following screen appears 5 Touch to switch the screen then touch the instrument name The following screen appears To cancel operation touch Cancel 6 If you want to change the instrument touch OK The instrument is changed Deleting an Instrument You can delet...

Страница 167: ...hythm Save screen appears 4 Touch Rename The Rename screen appears fig 07 25_50 5 Touch the character select button to switch among uppercase lowercase symbols Touch the character select button repeatedly to cycle through the available choices like this uppercase lowercase symbols uppercase 6 Touch the screen to specify the desired character The following characters can be selected To cancel opera...

Страница 168: ...n the saving operation will be displayed as To cancel the save touch the Exit to close the Rhythm Save screen You can change the name of a rhythm by touching Rename 6 Touch Save The User rhythms are saved to the User memory or to floppy disks You can save rhythms after changing the tempo by pressing the Tempo button If the following screen appears The following screen appears if you select a numbe...

Страница 169: ...le notes only 1 Touch Sound Kbd on the Main screen The Sound Keyboard screen appears 2 Touch PEDAL The Pedalboard screen appears 3 Touch to display the PedalBass Mode 4 Touch the PedalBass Mode setting to switch between MONOPHONIC and POLYPHONIC Each time you touch the PedalBass Mode setting it will alternate between MONOPHONIC and POLYPHONIC 5 Touch Exit UPPER To change the initial touch setting ...

Страница 170: ...on of the Expression Pedal Specify how the Expression Pedal will function when your performance is being recorded and when ATELIER song data are being played back Function During Recording Specify whether Expression Pedal operations will be recorded or not while your performance is being recorded 1 Touch Sound Kbd on the Main screen The Sound Keyboard screen appears 2 Touch Controller The Controll...

Страница 171: ... The Sound Keyboard screen appears 2 Touch Controller The Controller screen appears 3 Touch to display the Bender Vibrato 4 Touch the Bender Vibrato setting 5 Touch to change the setting 6 Touch Exit Setting Descriptions PEDAL COMPOSER The Expression Pedal will function Expression Pedal recording within the song data will also be effective COMPOSER The Expression Pedal will not function The Expres...

Страница 172: ... The Chord Hold function can be switched ON OFF When Chord Hold is ON the Automatic Accompaniment will continue playing even when you lift your hand from the keyboard to play a new chord 1 Touch Rhythm on the Main screen The Rhythm screen appears 2 In the Rhythm screen touch Utility The Utility screen appears 3 Touch Options The Rhythm Option screen appears 4 Touch to display the Chord Hold 5 Touc...

Страница 173: ...s from switching automatically when you switch rhythms 1 Touch Rhythm on the Main screen The Rhythm screen appears 2 In the Rhythm screen touch Utility The Utility screen appears 3 Touch Options The Rhythm Option screen appears 4 Touch to display the Auto Std Tempo Auto Standard Tempo 5 Touch the Auto Std Tempo setting to switch between ON and OFF Each time you touch the Auto Std Tempo setting it ...

Страница 174: ...window appears 2 Touch Load The Registration Load screen appears 3 Touch Utility The Utility screen appears 4 Touch Options The Registration Options screen appears 5 Touch the Trans Update Transpose Update setting to switch between DELAYED and INSTANT Each time you touch the Trans Update setting it will alternate between DELAYED and INSTANT 6 Touch Exit This setting remains stored in memory even w...

Страница 175: ...c files that contains lyrics the display screen will switch and the lyrics will no longer be displayed To re display the lyrics touch Play on Rec Play screen once again This setting remains stored in memory even while power is turned off Changing the Key When Playing Back Songs Play Transpose SMF music files or a performance that you yourself recorded can be transposed for playback 1 Touch Rec Pla...

Страница 176: ...Exit Adjusting the Metronome Volume You can adjust the volume of the metronome 1 Touch Rec Play on the Main screen The Rec Play screen appears 2 Touch Utility The Utility screen appears 3 Touch Options The Rec Play Options screen appears 4 Touch to display the Metronome Vol Metronome Volume 5 Touch Metronome Vol setting 6 Touch to change the setting Settings 1 10 Increasing the value will raise th...

Страница 177: ...s setting determines the beat to be used when recording performance songs 1 Touch Rec Play on the Main screen The Rec Play screen appears 2 Touch Utility The Utility screen appears 3 Touch Options The Rec Play Options screen appears 4 Touch to display the Beat 5 Touch the Beat setting The time signature setting screen appears 6 Touch the time signature that you wish to set 7 Touch Exit When record...

Страница 178: ...66 2Hz 0 1 Hz units 5 Touch Exit By touching you can restore the default setting 440 0 Hz This setting remains stored in memory even while power is turned off Enabling Transmission of PC Numbers Transmission of PC Program Change numbers can be switched ON OFF when a Registration is selected 1 Touch System on the Main screen The System screen appears 2 Touch to display the Send PC Switch 3 Touch th...

Страница 179: ...the sound generator for GM2 GS data playback However by changing the MIDI IN Mode setting you can also control the keyboard sound generator from MIDI In 1 Touch System on the Main screen The System screen appears 2 Touch to display the MIDI IN Mode 3 Touch the MIDI IN Mode setting to switch between MODE 1 and MODE 2 Each time you touch the MIDI IN Mode setting it will alternate between Mode 1 and ...

Страница 180: ...d off Selecting the MIDI Transmit Channel When you use the MIDI connectors of the AT 45 to transmit musical data to external devices for each keyboard Upper Lower and Pedal you can specify the channel on which your playing will be transmitted as MIDI messages For details refer to p 186 1 Touch System on the Main screen The System screen appears 2 Touch Tx MIDI Ch Upper Tx MIDI Ch Lower Tx MIDI Ch ...

Страница 181: ...ouch screen NOTE Do this carefully because touching a location that s different from the one indicated for the pointer may make the displacement even worse Be sure to touch the pointer accurately If the following display appears perform the touch panel position adjustment once again Switching the Background of the Main Screen You can change the color and pattern for the main screen s background 1 ...

Страница 182: ...nce of music and visual material By using V LINK compatible video equipment visual effects can be easily liked to and made part of the expressive elements of a performance How to Use the V LINK 1 Touch System on the Main screen The System screen appears 2 Touch to display the V LINK 3 Touch the V LINK setting 4 Touch to change the setting 5 Touch Exit Setting Descriptions ON The bouncing ball appe...

Страница 183: ... the main screen 2 To cancel the V LINK function once again hold down the Composer Reset button and press either the Upper Organ Full button or the Upper Organ Jazz button If set to MODE 1 p 182 holding down the Composer Reset button and pressing the Upper Organ Full button switches the V LINK function off If set to MODE 2 p 182 holding down the Composer Reset button and pressing the Upper Organ J...

Страница 184: ...peaker 2 Output L mono R Jacks You can some sounds if you connect speakers or other audio equipment to these jacks You can also hook up a cassette recorder to record your performances 3 AC Inlet Connect the included power cord to this inlet p 17 Bottom Panel 4 Phones Jacks p 18 5 MIDI In Out Connectors You can connect external MIDI devices to the AT 45 and exchange performance data between them 6 ...

Страница 185: ...the order specified Failure to follow these steps in the order given could cause a malfunction and or damage to speakers or other equipment Playing Sounds from the AT 45 Through the Speakers on Audio Equipment or Recording Your Performances on a Recording Device 1 Turn the volume all the way down on the AT 45 and on the device you re about to connect 2 Turn off the power to the AT 45 and other con...

Страница 186: ...IDI In Connector Performance messages from an external MIDI device are received here These incoming messages may instruct the receiving MIDI instrument to play sounds or switch tones The AT 45 contains two sound generators one sound generator for its own keyboards and one GS sound generator p 213 Normally musical data transmitted from an external device to the MIDI In connector is sent to the GS s...

Страница 187: ...ed on your computer Connection examples NOTE To prevent malfunction and or damage to speakers or other devices always turn down the volume and turn off the power on all devices before making any connections In order to make connections to your computer you must install MIDI driver software on your computer For details refer to the owner s manual for your MIDI interface Use a USB MIDI interface cab...

Страница 188: ...e selected for the Lower keyboard but you are playing a key to which no drum sound is assigned Turn the Drums SFX off or play keys to which drums sounds are assigned p 48 No sound is heard when a MIDI instrument is connected The power of the connected external devices is not turned on Use the correct procedure to turn on the power of the connected external devices p 185 p 187 Damper Pedal does not...

Страница 189: ... your finger off a key You have selected a Marimba Treml sound This is not a malfunction If you select a Marimba Treml sound a sound will also be produced when you take your finger off the key Automatic Accompaniment sounds odd The keys for a chord were not pressed simultaneously Either turn on the Chord Intelligence function or play the chord correctly p 60 When Chord Intelligence is OFF the chor...

Страница 190: ... volume has been raised when the volume of each Part Balance button is already raised Either lower the Reverb volume or adjust the Part Balance of each part p 44 p 118 The Master Volume knob has been used to raise the overall volume excessively Use the Master Volume knob to lower the overall volume p 17 Some keys of certain keyboard parts sound strange You are playing notes outside the recommended...

Страница 191: ...ion In the Notation screen some lyrics or notes could extend beyond the edges of the screen and not be displayed This is not a malfunction A button was pressed while the lyrics were being shown in the display During the display of lyrics you could be taken to a different screen if you press a button If you want to have the lyrics be displayed again touch Play on the Rec Play screen p 128 The Touch...

Страница 192: ...not contain a resistor p 185 Pressing the expression pedal while playing back Atelier performance data produces a crackling noise The expression pedal function is set to PEDAL COMPOSER during playback of Atelier performance data When this setting is used moving the expression pedal while playing back Atelier performance data may create a difference between the expression pedal information in the p...

Страница 193: ...set Mode 2 When V LINK setting is Mode 2 the group of twelve keys starting at the very right of the lower keyboard are used for controlling video images Therefore no sounds are played even when you press these keys Turn the V LINK function off or select Mode 1 for the V LINK function p 182 Problem Check Solution Page ...

Страница 194: ...The floppy disk inserted into the disk drive cannot be read Please format the floppy disk Disk Ejected The floppy disk was removed from the disk drive while loading or writing was in progress Insert the floppy disk and repeat the procedure Damaged Disk This floppy disk is damaged and cannot be used Insert a different disk and repeat the procedure Can t Read This song cannot be read Can t Play It c...

Страница 195: ...to keep the previous Registration data in this memory and save your settings in an unused memory select a number for which is displayed and then save the data Overwrite Song OK There already is performance data having the same name on the disk To replace the existing data with the new version touch OK To save it as a separate new file touch Cancel first Then after changing the name save it on disk...

Страница 196: ...ttack1 Org Attack3 Org Click Strings Orch Str Ens Strings1 Strings2 Strings5 Strings6 Pizzicato 2 AEx Strings Slow Str 1 Slow Str 2 Synth Str 1 Synth Str 2 Violin 2 AEx Violin 2 Viola 2 Cello 2 Human Voice Jazz Scat 2 Jazz Doo 2 Jazz Doot 2 Jazz Dat 2 Jazz Bap 2 Jazz DowFall 2 Pop Voice 2 Classical Gregorian Choir Synth Choir Piano Grand Piano Piano3 AEx PianoStr Honky tonk StageE Piano 2 E Piano1...

Страница 197: ...h Bass1 Voice Thum 2 Percussion Timpani Crash Cymbal 2 Ride Cymbal Snare Drum Bass Drum Triangle 2 Tambourine Perc Set1 Perc Set2 Vibraphone 2 Glockenspiel Celesta Organ Harp Tubular bell Marimba MarimbaTreml 3 Xylophone Steel Drums Santur 2 Music Box 2 Vibra Bells 2 AEx AEx PipeOrg AEx Strings AEx Violin 2 AEx PianoStr AEx EP Str AEx AltoSax 2 AEx Flute 2 AEx Bs Timp The AEx voice group consists ...

Страница 198: ...XC2 Long Whistle EXC2 Short Guiro EXC3 Long Guiro EXC3 Claves Hi WoodBlock Lw WoodBlock Mute Cuica EXC4 Open Cuica EXC4 MuteTriangle EXC5 OpenTriangle EXC5 Shaker 1 Jingle Bell Bell Tree Castanets A Mute Surdo EXC6 Open Surdo EXC6 Metro Click1 Metro Bell 1 Std2 BD 1 Rm BD Rim Shot Rm SD 1 Hand Clap 1 Std2 SD 1 Rm2 Lw Tom 2 Std2 CloseHH EXC1 Rm2 Lw Tom 1 Std2 PedalHH EXC1 Rm2 Md Tom 2 Std2 Open HH ...

Страница 199: ...stle EXC2 Long Whistle EXC2 Short Guiro EXC3 Long Guiro EXC3 Claves Hi WoodBlock Lw WoodBlock Mute Cuica EXC4 Open Cuica EXC4 MuteTriangle EXC5 OpenTriangle EXC5 Shaker 1 Jingle Bell Bell Tree Castanets A Mute Surdo EXC6 Open Surdo EXC6 Metro Click1 Metro Bell 1 Std2 BD 1 808 BD 2A 808 Rim Shot 909 SD Hand Clap 1 Dnc SD 2B 808 LwTom 2 808CloseHH A EXC1 808 LwTom 1 808CloseHH B EXC1 808 MdTom 2 808...

Страница 200: ...aMute Hi Conga 1 Lw Conga 2 Hi Timbale 1 Lw Timbale 1 Hi Agogo Lw Agogo Cabasa Maracas ShortWhistle EXC2 Long Whistle EXC2 Short Guiro EXC3 Long Guiro EXC3 Claves Hi WoodBlock Lw WoodBlock Mute Cuica EXC4 Open Cuica EXC4 MuteTriangle EXC5 OpenTriangle EXC5 Shaker 1 Jingle Bell Bell Tree Castanets A Mute Surdo EXC6 Open Surdo EXC6 High Q Slap Scratch Push EXC7 Scratch Pull EXC7 Sticks Square Click ...

Страница 201: ...iangle Jingle Bell Bell Tree Castanets A Mute Surdo Open Surdo Cana Shekere 1 Shekere 2 Vox Afahhh B Vox That B Vox Aahhh B R B PopCrashCym1 PopCrashCym2 Splash Cym Pop ChinaCym PopRideCym1A PopRideCym1B Pop RideBell Cymbal Roll Pop CloseHH1 Pop CloseHH2 Pop Pedal HH Pop Open HH R B SD A R B SD B Pop SD 3C Pop SD 3D Pop SD 3E Pop SD Flm A Pop SD Flm B Rk SD 2A Rk SD 2B Jz SD C Jz SD D Rm SD 1 Rm S...

Страница 202: ... Jingle Bell Bell Tree Castanets A Mute Surdo Open Surdo Cana Shekere 1 Shekere 2 Vox Afahhh B Vox That B Vox Aahhh B JAZZ BRUSH Jz CrashCym1 Jz CrashCym2 Splash Cym Jz China Cym Jz RideCym 1 Jz RideCym 2 Pop RideCym2 Cymbal Roll Pop CloseHH1 Pop CloseHH2 Pop Pedal HH Pop Open HH Jz SD A Jz SD B Jz SD C Jz SD D Jz SD Sweep1 Jz SD Sweep2 Pop SD 3A Pop SD 3B Pop SD 3C Pop SD 3D Pop SD Flm A R B SD B...

Страница 203: ...oodBlock Lw WoodBlock Mute Cuica Open Cuica MuteTriangle OpenTriangle Jingle Bell Bell Tree Castanets A Mute Surdo Open Surdo Applause High Q Slap Scratch Push Scratch Pull Square Click Metro Click1 Metro Click2 Metro Bell 1 Metro Bell 2 Voice One Voice Two Voice Three VOX DRUM Vox Dut Vox Dom Vox Trush Vox Hehho Vox Doyear Vox Thu Vox That A Vox That B Vox Aahhh A Vox Aahhh B Vox Tu Vox Dooh Vox ...

Страница 204: ... 1 Hi Tom 2 Md Tom 1 Md Tom 2 Lw Tom 1 Lw Tom 2 Std2 BD 1 Std2 BD 2 Tambourine 1 Cowbell Vibra Slap 1 Hand Clap 1 Finger SnapA Finger SnapB Hi Bongo 1 Lw Bongo 1 Hi CongaMute Hi Conga 1 Lw Conga 2 Hi Timbale 1 Lw Timbale 1 Hi Agogo Lw Agogo Shaker 1 Cabasa Maracas ShortWhistle Long Whistle Short Guiro Long Guiro Claves Hi WoodBlock Lw WoodBlock Mute Cuica Open Cuica MuteTriangle OpenTriangle Jingl...

Страница 205: ...ger SnapA Hi Bongo 1 Lw Bongo 1 Hi CongaMute Hi Conga 1 Lw Conga 2 Hi Timbale 1 Lw Timbale 1 Hi Agogo Lw Agogo Shaker 1 Cabasa Maracas ShortWhistle Long Whistle Short Guiro Long Guiro Claves Hi WoodBlock Lw WoodBlock Mute Cuica Open Cuica MuteTriangle OpenTriangle Jingle Bell Bell Tree Bar Chimes A Castanets A Mute Surdo Open Surdo High Q Slap Scratch Push Scratch Pull Square Click Metro Click1 Me...

Страница 206: ... Lw Agogo Shaker 1 Cabasa 808 Maracas ShortWhistle Long Whistle Short Guiro Long Guiro 808 Claves Hi WoodBlock Lw WoodBlock Mute Cuica Open Cuica MuteTriangle OpenTriangle Jingle Bell Bell Tree Bar Chimes A Castanets A Mute Surdo Open Surdo High Q Slap Scratch Push Scratch Pull Square Click Metro Click1 Metro Bell 1 JAZZ Crash Cym 1 Crash Cym 2 Splash Cym China Cym Ride Cym 1 Ride Cym 2 Ride Bell ...

Страница 207: ...oodBlock Lw WoodBlock Mute Cuica Open Cuica MuteTriangle OpenTriangle Jingle Bell Bell Tree Bar Chimes A Castanets A Mute Surdo Open Surdo High Q Slap Scratch Push Scratch Pull Square Click Metro Click1 Metro Bell 1 ORCHESTRA ConcertCym 1 ConcertCym 2 Splash Cym Ride Cym 1 Std Close HH Std Pedal HH Std Open HH Concert SD A Concert SD B SD Roll Rim Shot Sticks Timpani f Timpani e Timpani d Timpani ...

Страница 208: ...2 Love Romance Soft Ballad Love Songs 6 8 Ballad MediumBallad Scat Ballad Crystal SunnyFeelin Pop Ballad Torch Song World Paris French Waltz Irish Hawaiian Hula Latin Bossa Nova 1 Samba Rio Salsa Mambo 3 Slow Rhumba Beguine Trad Tango ChaCha 2 Bossa Nova 2 Slow Bossa Samba Slow Beguine Plena Latin Latin Fusion Waltz March StringsWaltz Waltz Quiet Waltz Slow Waltz March MarchingBand March 4 4 March...

Страница 209: ...ogie2 10 Reggae 2 11 Volk Musik 12 Bossa Nova 6 13 Rhumba 3 14 Dance Rhumba 15 Dance Mambo 16 Tango 3 17 Tango 5 18 Tango 6 19 Sevilla 20 Pop 1 21 Pop 2 22 Pop 3 23 Ballad 2 24 Ballad 3 25 Simple 8Beat 26 Gt Arpeggio1 27 Gt Arpeggio2 28 ThreeFinger1 29 ThreeFinger2 30 Gt Stroke 31 Gt Shuffle 32 16BeatShffl2 33 DeutchWalzer 34 Jazz Waltz 2 35 Swing Waltz2 36 SimpleMarch2 37 Folk Dance 38 8Beat Enka...

Страница 210: ...Cm7 5 C C D E E F Cmaj7 C maj7 Dmaj7 E maj7 Emaj7 Fmaj7 C7 C 7 D7 E 7 E7 F7 Cm C m Dm E m Em Fm Cm7 C m7 Dm7 E m7 Em7 Fm7 Cdim C dim Ddim E dim Edim Fdim Dm7 5 Em7 5 Caug C aug Daug E aug Eaug Faug Csus4 C sus4 Dsus4 E sus4 Esus4 Fsus4 C7sus4 C 7sus4 D7sus4 E 7sus4 E7sus4 F7sus4 Fm7 5 E m7 5 C m7 5 C6 C 6 D6 E 6 E6 Cm6 Dm6 Em6 F6 Fm6 C m6 E m6 ...

Страница 211: ...7 F m Gm A m Am B m Bm F m7 Gm7 A m7 Am7 B m7 Bm7 F dim Gdim A dim Adim B dim Bdim Gm7 5 Am7 5 Bm7 5 F aug Gaug A aug Aaug B aug Baug F sus4 Gsus4 A sus4 Asus4 B sus4 Bsus4 F 7sus4 G7sus4 A 7sus4 A7sus4 B 7sus4 B7sus4 B m7 5 A m7 5 F m7 5 G6 Gm6 A6 A 6 B6 Bm6 B 6 B m6 Am6 A m6 F 6 F m6 ...

Страница 212: ... root position In contrast forms of a chord in which other notes are the lowest pitch are called inversions Mute To silence a sound The AT 45 provides a Track Mute function that allows you to turn off the track button indicator of a track on which music data has been recorded so that the corresponding track will temporarily be silenced Panel Settings Settings such as sound selections tempo Rotary ...

Страница 213: ... does not include the new enhancements is referred to as General MIDI 1 as a way of distinguishing it from General MIDI 2 GS format The GS Format is Roland s set of specifications for standardizing the performance of sound generating devices In addition to including support for everything defined by the General MIDI the highly compatible GS Format additionally offers an expanded number of sounds p...

Страница 214: ...gence button ON OFF Harmony Intelligence Type Rotary Fast Slow button ON OFF Rotary ON OFF button ON OFF Bender Vibrato Assignment Pitch Bend Range Pedal Bass Mode Solo Mode Solo To Lower Mode Solo Split Point Sustain ON OFF Sustain Length Tx MIDI Channel Initial Touch setting PC Number Program Change Number Bank LSB Bank Select LSB Bank MSB Bank Select MSB Wall Type The Voices assigned for each p...

Страница 215: ... 0 127 0 127 O O O O 0 127 O x x x x x O 120 126 127 O x O 123 125 O x Bank select Modulation Portamento time Data entry Volume Panpot Expression General purpose controller Glide Hold 1 Portamento Sostenuto Soft Resonance Release Time Attack Time Cut off Decay Time Vibrato Time Vibrato Depth Portamento control Effect1 depth Effect3 depth NRPN LSB MSB RPN LSB MSB 1 O x is selectable 2 O x is select...

Страница 216: ...rnegie Hall in New York Hector Olivera s expertise involves both the traditional pipe organ and the electronic organ Presently Olivera tours internationally playing some of the world s most magnificent pipe organs as well as his preferred electronic organ the Roland Atelier for which he continues to collaborate with its development Song Title Composer Player Copyright Pop Organ Ralf Schink Ralf Sc...

Страница 217: ...annone Ric Iannone began playing the piano and accordion at the age of two and a half By the time he was seven he was performing public and private engagements with his musician father For more than 20 years Ric has performed and traveled extensively throughout the United States and Europe delighting audiences with his unique playing style and music arrangements He is equally comfortable playing t...

Страница 218: ...it Point screen Sustain Pedal button Pedalboard screen Sustain Length Rotary On Off button Effect screen Rotary Color Rotary Slow Fast button Effect screen Rotary Speed Count Down button Rhythm Options screen Count Down Sound Upper Voice select buttons Solo Voice select buttons Alternate button Upper Keyboard screen Lower Voice select buttons Alternate button Lower Keyboard screen Pedal Voice sele...

Страница 219: ...Original Style Orchestrator Basic Advanced 1 Advanced 2 Full One Touch Program Chord Intelligence Chord Hold Leading Bass Auto Standard Tempo Music Assistant 900 settings 4 variatoins for each 225 keywords One Touch Program 880 settings 8 settings for each rhythm Drum SFX Sets 12 Drum Sets 1 SFX Set Master Tuning 415 3 Hz 466 2 Hz 0 1 Hz Steps Key Transpose 4 7 in semitones Playback Transpose 24 2...

Страница 220: ...feature Damper Pedal Connectors Phones jack Stereo AC Inlet MIDI connectors In Out Audio output jacks L mono R Audio input jacks L mono R Mic jack Power Supply AC 117 V AC 230 V AC 240 V Power Consumption 120 W AC 117V 120 W AC 230V 120 W AC 240V Finish Satin Mahogany Dimensions Console 1242 W x 570 D x 480 H mm 48 15 16 W x 22 1 2 D x 18 15 16 H inches Stand 1235 W x 515 D x 755 H mm 48 5 8 W x 2...

Страница 221: ... Stored in User Memory 77 Demo Song 26 Demo Song List 216 Disk Edit 98 Disk Rhythm 66 Display 22 Drums SFX 48 Drums SFX Set List 198 Drums SFX Sets 49 E Editing 150 Effects 109 Eject button 66 Erase Event 153 Erasing Performance Song 141 Exp Curve 108 Exp Src Play 171 Exp Src Rec 170 Expression Pedal 107 F Factory Reset 19 Factory Setting Disk button 70 Fill In 59 105 Foot Switch 104 105 Formattin...

Страница 222: ... 80 Registrations Created on an Earlier Model 99 Rename Performance Song 141 Registration 84 Rhythms Stored in User Memory 75 Reverb Effect 118 Depth of the Reverb 121 122 Reverb Type 119 Wall Type 120 Rhythm 51 Rhythm List 208 Rhythm Search 53 Rotary Effect 105 111 Rotary Color 113 Rotary Speed 112 S Saving Performance Songs 143 Registration Sets 88 Send PC Switch 178 SMF Format 144 SMF Music Fil...

Страница 223: ...223 Index Volume Master Volume 17 Part Balance 44 ...

Страница 224: ...224 MEMO ...

Страница 225: ...225 MEMO ...

Страница 226: ...anagua Nicaragua TEL 505 277 2557 PANAMA SUPRO MUNDIAL S A Boulevard Andrews Albrook Panama City REP DE PANAMA TEL 315 0101 PARAGUAY Distribuidora De Instrumentos Musicales J E Olear y ESQ Manduvira Asuncion PARAGUAY TEL 595 21 492147 PERU Audionet Distribuciones Musicales SAC Juan Fanning 530 Miraflores Lima Peru TEL 511 4461388 NORWAY Roland Scandinavia Avd Kontor Norge Lilleakerveien 2 Postboks...

Страница 227: ...o communications However there is no guarantee that interference will not occur in a particular installation If this equipment does cause harmful interference to radio or television reception which can be determined by turning the equipment off and on the user is encouraged to try to correct the interference by one or more of the following measures Reorient or relocate the receiving antenna Increa...

Страница 228: ...AT 45 Owner s Manual 03568345 05 2 3N ...

Отзывы: