Roland Metaza MPX-90M Скачать руководство пользователя страница 30

28

2-1 Preparing for Printing

Chapter 2 Printing

STEP 2: Specifying Output Destination for METAZAStudio

Procedure

Start METAZAStudio.

 P. 22, "How to Start The Software"

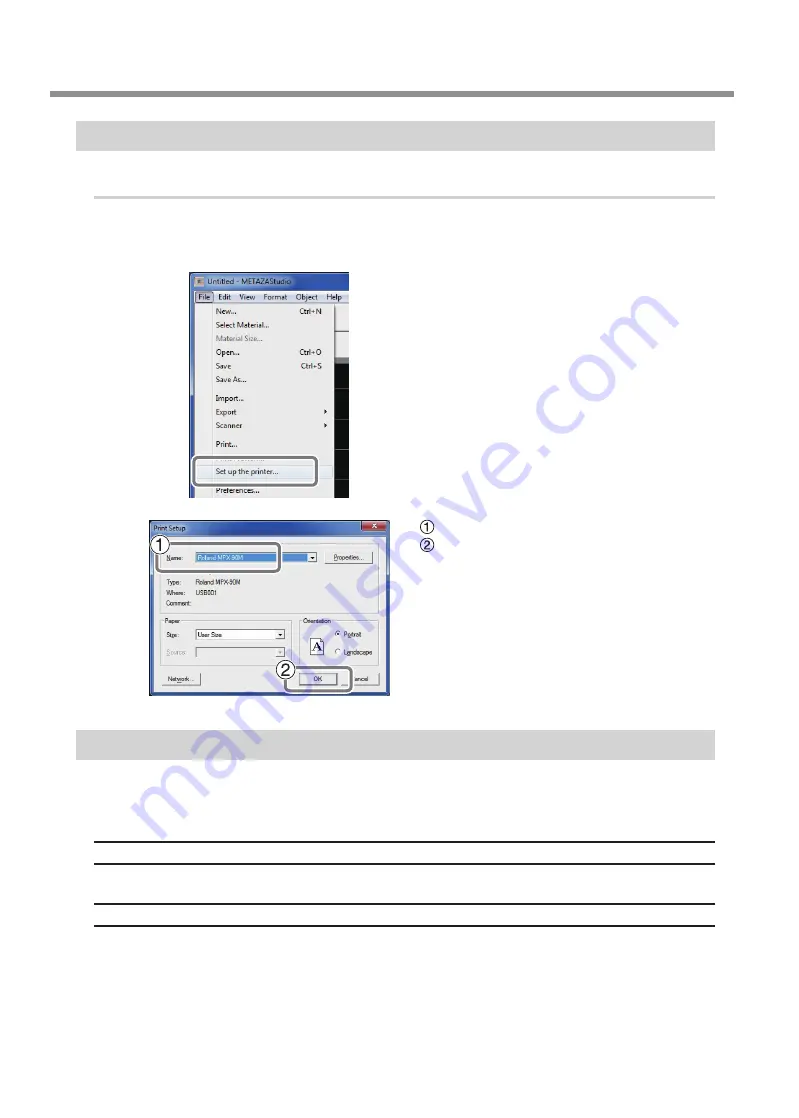
Click [File] → [Set up the printer].

The [Print Setup] dialog box appears.

 Select [MPX-90M].

 Click [OK].

STEP 3: Preparing Instrument to be Imprinted

The requirements for the instrument to be imprinted by the machine are described below. The instrument 
needs to meet all these requirements. 

Thickness

0.3 to 40 mm (0.012 to 1.5 in.)

Size

The instrument is large enough to be firmly secured.

The machine uses the vise or adhesive sheet to secure the instrument to be imprinted. Though it is accepted 
even if the size of the instrument is the one to protrude from the vise or adhesive sheet, the essential require-
ment is that the instrument can be firmly secured. 

Содержание Metaza MPX-90M

Страница 1: ...d DG Corp is prohibited The contents of this document and the specifications of this product are subject to change without notice Roland DG Corp assumes no responsibility for any loss or damage relati...

Страница 2: ...red to correct the interference at his own expense Unauthorized changes or modification to this system can void the users authority to operate this equipment Use only I O cables that have been designe...

Страница 3: ...26 Getting Started Checking Print Workflow 26 STEP 1 Switching On the Power 27 STEP 2 Specifying Output Destination for METAZAStudio 28 STEP 3 Preparing Instrument to be Imprinted 28 STEP 4 Preparing...

Страница 4: ...and Editing Line Text 61 Other operations available with METAZAStuido 65 4 2 What to Do If 66 The Power Movement button is blinking 66 The machine doesn t run even when printing data is sent 67 The pr...

Страница 5: ...ect to the home and all its furnishings as well to domestic animals or pets About the Symbols The symbol alerts the user to important instructions or warnings The specific meaning of the symbol is det...

Страница 6: ...e articles compatible with this machine Incompatible items may lead to an ac cident Never use the machine for any purpose for which it is not intended or use the machine in an undue manner that ex cee...

Страница 7: ...ocation where gases can accumulate Combustion or explosion may be a dan ger Handle the power cord plug and electri cal outlet correctly and with care Never use any article that is damaged Using a dama...

Страница 8: ...he power cord plug and electrical outlet Never place any object on top or subject to damage Never bend or twist with undue force Never pull with undue force Never bundle bind or roll up Never allow to...

Страница 9: ...se burns Warning label is affixed to make areas of danger immediately clear The meaning of the label is as follows Be sure to heed its warnings Also never remove the label or allow it to become obscur...

Страница 10: ...ions Never use the machine in an environment where silicone substances oil grease spray etc are present Doing so may cause poor switch contact When Moving the Machine When moving the machine be sure t...

Страница 11: ...ate the machine It also explains how to install and operate included software Be sure to read it first METAZA Driver Online Help Roland METAZAStudio Online Help Roland SFEdit2 Online Help You view thi...

Страница 12: ...10...

Страница 13: ...12 Checking the Included Items 14 1 2 Installation 15 Installation Environment 15 Removing and storing the retainers 15 Power Cord Connection 16 1 3 Installing the Software 17 System Requirements 17...

Страница 14: ...nd QR codes on small steel objects used for medical purposes Even when printing different multiple codes in a row you can continue printing without stopping to enter data for each instrument to be imp...

Страница 15: ...Retainers Vise This is used to fix an instrument to be imprinted P 35 STEP 1 Loading the Instrument to be Im printed Table Adhesive sheet This is used to fix an instrument to be imprinted that cannot...

Страница 16: ...1 Power cord 1 USB cable 1 Vise 1 Table 1 Adhesive sheet for vise 1 Installed on the vice by default Adhesive sheet for table 1 Head caps round bottom 10 One installed on the unit by default Head caps...

Страница 17: ...ocation exposed to considerable electrical or magnetic noise or other forms of electro magnetic energy Never install in an environment where silicone substances oil grease spray etc are present Removi...

Страница 18: ...care Never use any article that is damaged Using a damaged article may result in fire or electrical shock WARNING When using an extension cord or power strip use one that adequately satisfies the mach...

Страница 19: ...AZAStudio This is a program for creating printing data It enables you to import and print 2D symbol QR code and the like data It also enables you to edit and create 2D symbol directly enter text and p...

Страница 20: ...ll and Set Up You can install the driver and each software sepa rately P 72 To install METAZA driver separately P 76 To Install Software Separately When usingWindowsVista orWindows 7 If the User Accou...

Страница 21: ...ion for each software item will be displayed automatically as needed When installation is complete click in the installation menu Remove the Roland Software Package CD ROM from the computer Switch on...

Страница 22: ...t Select Install the software automati cally and then click Next Click Finish If this screen appears during installation Click Continue Anyway Remove the Roland Software Pack age CD ROM from the compu...

Страница 23: ...start menu click Devices and Printers or Printers and Faxes Right click the Roland MPX 90M icon and then click Printing Preferences The METAZA driver s Printing Preferences screen opens Printing Prefe...

Страница 24: ...references screen and then click Help P 21 How to Open the METAZA Driver s Printing Preferences Screen How to Start The Software From start menu click All Programs software you want to use software yo...

Страница 25: ...How to display help for software Start the software and then click Help Table of Contents from the menu P 22 How to Start The Software 23 Chapter 1 Getting Started 1 3 Installing the Software...

Страница 26: ...24...

Страница 27: ...for METAZAStudio 28 STEP 3 Preparing Instrument to be Imprinted 28 STEP 4 Preparing Print Data 30 2 2 Starting Printing 35 STEP 1 Loading the Instrument to be Imprinted 35 STEP 2 Making Prints 43 STEP...

Страница 28: ...TAZAStudio Preparing an instrument to be imprinted Check the several conditions for thickness hardness and the like that an instrument to be imprinted needs to meet P 28 STEP 3 Preparing Instrument to...

Страница 29: ...nt button The Head moves to the left rear and the lamp of the Power Movement button is turned ON This opera tion is called initialization When the power lamp remains blinking An initialization error L...

Страница 30: ...requirements for the instrument to be imprinted by the machine are described below The instrument needs to meet all these requirements Thickness 0 3 to 40 mm 0 012 to 1 5 in Size The instrument is lar...

Страница 31: ...surface comes into contact with the moving part of the machine when material is set or when printing is made Conditions for Material When Printing Curved Surfaces The table and figure below show the...

Страница 32: ...Material dialog box select the material of the instrument to be imprinted Uncheck the Use printer driver settings checkbox to select a type of material To use material that is not included in the lis...

Страница 33: ...mbol Click and then In the case of Text Click and then Drag the mouse move while holding down the left button of the mouse diagonally downward on the work area in METAZAStudio Variable Field in which...

Страница 34: ...operation is defined as the reference point in printing opera tion The center of the work area in METAZAStudio coincides with the reference point in printing operation Consequently making the center o...

Страница 35: ...g refer to the help for METAZAStudio Commands Object menu Properties Properties dialog P 23 How to Display Help for Software Properties dialog box for 2D symbol Properties dialog box for text After ma...

Страница 36: ...f the imported CSV file into the Variable Field 2D Symbol or Text is displayed in the Variable Field You can display each symbol in turn by clicking If you want to change the size or location of the V...

Страница 37: ...ument that can not be fixed by vise 1 Attach the head cap Make sure that preparations for printing are completed P 26 2 1 Preparing for Printing If the head unit is lowered press the Power Movement bu...

Страница 38: ...it is suitable for print ing on these surfaces This head cap however tends to be worn out compared to the flat bottom type Precautions for use of head cap Remove dirt and dust from the printing surfac...

Страница 39: ...he handle is placed against the main unit Align the sides of the vise with the alignment marks and lower the front side of the vise When the tabs on the bottom of the vise fit into the holes on the un...

Страница 40: ...n the table of the vise and lower the binder Follow the instructions below and determine the position of the instrument The area to be imprinted must be within the resin sheet on the table The area to...

Страница 41: ...ithin the range of 2 mm 0 08 in Lower the lock lever If you print using the head cap this completes loading of the instrument to be imprinted Go to STEP 2 Making Prints If you use no head cap go to St...

Страница 42: ...esive sheet straight inside the table frame by aligning it with the scale marks Be careful not to allow any air bubbles to form between the table and adhesive sheet Press the laser pointer button The...

Страница 43: ...g Prints If you use no head cap go to the following step 3 ThepositiontowhichthelaserpointerpointscoincideswiththecenteroftheworkareainMETAZAStu dio By making the position to which the laser pointer p...

Страница 44: ...at the position where the tip of the head cap rides on the surface of the instrument to be imprinted Loosen the head s stopper Lower the stopper to the bottom Fix the stopper Align the center of the...

Страница 45: ...nts After you complete Preparing for Printing and Loading Instrument to be Imprinted printing starts P 26 2 1 Preparing for Printing p 35 STEP 1 Loading the Instrument to be Imprinted Procedure Click...

Страница 46: ...he number of copies Material Select the material of the instrument to be imprinted and specify your priority on printing quality priority of quality or speed The selection you make when you cre ate ne...

Страница 47: ...r authorized Roland DG Corp dealer or us When you wish to print only the record being displayed Click The Print dialog box appears The number page number of the record being displayed in METAZAStudio...

Страница 48: ...Deleting Data from Print Queue Procedure Windows 7 From start menu click Control Panel Hardware and Sound Devices and Printers Windows Vista From start menu click Control Panel Hardware and Sound Prin...

Страница 49: ...e 48 Cleaning the Body Vise Table 48 Cleaning the Adhesive Sheet 48 Cleaning of the Head Cap 48 3 2 Adjustment 49 Adjusting the Striking Force of the Pin 49 Adjustment of Origin Point 50 3 3 The Repla...

Страница 50: ...the like on the adhesive sheet can reduce the sheet s adhesive force making it difficult to secure an instrument to be imprinted in place If the adhesive force has been reduced then wash the adhesive...

Страница 51: ...re Start MPX 90M Head Manager P 22 How to Start The Software Switch on the power to the machine P 27 STEP1 Switching On the Power Click Readjust Pin Follow the on screen instructions to perform adjust...

Страница 52: ...de with the desired position the origin point of the machine is displaced Adjust the origin point using the method described below Procedure Start MPX 90M Head Manager P 22 How to Start The Software C...

Страница 53: ...ations on materials such as aluminum results in especially rapid wear because of the extensive unevenness on the surface of the instrument to be imprinted Periodically check the state of the head cap...

Страница 54: ...23 mm 0 9 in Print Mode Photo Printing rate 35 25 000 dots per plate In the case of 2D symbol About 60 000 to 100 000 symbols of 3 mm x 3 mm H x W size can be printed It depends on the setting of META...

Страница 55: ...even How to Replace the Head MPX 90M Head Manager is used for the head replacement operation The pattern shown in the figure is struck during the head replacement operation You need to prepare a test...

Страница 56: ...e on screen instructions to perform adjust ment for the pin Set a material to be imprinted with a test pattern using the adhesive sheet and table Use a head cap P 35 STEP 1 Loading the Instrument to b...

Страница 57: ...printed location isn t where desired 67 You cannot select the material of the object to be imprinted using METAZAStudio 68 The printed image is unattractive 69 The image is uneven 69 The image is alw...

Страница 58: ...ZAStudio P 22 How to Start The Software If METAZAStudio is running click In the Select Material dialog box select the material of the instrument to be imprinted Uncheck the Use printer driver settings...

Страница 59: ...ed to the actual printing position In the machine the center in printing operation is defined as the reference point in printing opera tion The center of the work area in METAZAStu dio coincides with...

Страница 60: ...uding Size of the 2D symbol For details on each setting refer to the help for METAZAStudio Commands Object menu Proper ties Properties dialog box P 23 How to display help for software After making the...

Страница 61: ...f the striking force of materials you ve registered yourself in order to obtain better printing results Procedure Display the METAZA driver s Printing Preferences screen P 21 How to Open the METAZA Dr...

Страница 62: ...king is too weak Lower the value when bright areas of the image are struck with too much force Vector Impact You can set the maximum value of print impact for a line Select Advance Advance is availabl...

Страница 63: ...scribed above Though you can change these settings from METAZAStudio From File menu click Print Setup Proper ties to display Printing Preferences shown in step any changes you make disappear when you...

Страница 64: ...Select a font which is used as a base of a stroke character font to be created Click OK A stroke character font is automatically created Click Save dialog box appears Enter the name of the created st...

Страница 65: ...ll SFEdit2 and create a stroke character font P 18 Installing the Driver and the Software p 76 To Install Software Separately Create a new stroke character font P 62 Creating and saving a stroke chara...

Страница 66: ...ect Stroke character Click OK Entered characters are changed into stroke characters The stroke character font selected in is used for the stroke characters 2 Editing Stroke character Click Click the s...

Страница 67: ...itten to the selected stroke char acter font Click SFEdit2 is finished The edit is reflected to the stroke character Other operations available with METAZAStuido What METAZAStudio offers is not just c...

Страница 68: ...an appropriate position based on the surface height of the material instrument to be imprinted and secure the head firmly with the knob If the head is fixed at the position that is lower than the sur...

Страница 69: ...make sure to tighten the knob firmly P 35 STEP 1 Loading the Instrument to be Imprinted The machine doesn t run even when printing data is sent Is the power switched on Make sure the Power Movement bu...

Страница 70: ...ate rial or the height of the head unit does not correct the problem then the marking pin may be bent or broken Try changing to an unused marking pin and carry out test printing If you can print with...

Страница 71: ...ing Perform printing while leaving the value for Impact MAX unchanged and increasing the value for Impact MIN a little at a time At this time leave the instrument to be imprinted loaded and perform ov...

Страница 72: ...sive Recheck the requirements for the instruments that can be imprinted by the machine and select the instrument that meets the requirements Also image quality is not assured when printing photographi...

Страница 73: ...AZA driver s Printing Preferences screen opens Click Test Print in the Option tab The test pattern is printed on the material Use the scale to read and note down locations where the test pattern is no...

Страница 74: ...age CD ROM into the computer Windows Vista 7 only When the automatic playback window appears click Run menu exe The setup menu appears automatically Uninstall the METAZA driver if it has been already...

Страница 75: ...el name select USB as the port and then click Start Driver installation starts Follow the on screen in structions and continue with the installation Windows Vista or 7 If the screen shown here is disp...

Страница 76: ...Remove the CD ROM from the CD ROM drive Connect the machine and the computer with a USB cable Please use the included USB cable Do not use a USB hub Windows Vista or 7 The driver will be installed aut...

Страница 77: ...pter 4 Appendix 4 2 What to Do If Click Finish If the following screen is displayed during installation Click Continue Anyway Eject and remove the CD ROM and then click Back and repeat from the last s...

Страница 78: ...Install of the program you want to install P 17 The Software You Can Install and Set Up For detailed information about installing METAZA driver refer to page 72 To install METAZA driver separately Fo...

Страница 79: ...he METAZA driver 11 Follow the procedure on page 72 To install METAZA driver separately to install the driver again Windows Vista 1 Use a USB cable to connect the machine and the PC and then turn the...

Страница 80: ...ou want to uninstall and then click Uninstall 5 When a message prompting you to confirm that you want to uninstall the driver appears click Yes 6 On the task bar click Start All Programs Accessories R...

Страница 81: ...at is connecting the PC and the machine 2 Log on to Windows as an administrator or as a member of the Administrators group 3 On the task bar click Start Control Panel and then Uninstall a program 4 Se...

Страница 82: ...terials may result in damage to the machine Procedure Switching on the power P 27 STEP 1 Switching On the Power Remove the vise or the table Attach the head cap Switching off the power P 45 STEP3 Fini...

Страница 83: ...e retainers and wind up the screws with the provided hexagonal wrench Close the cover and repack the machine in the original package When moving the machine be sure to support it at the bottom using t...

Страница 84: ...e binder Table Maximum Printable Area 80 mm 80 mm 3 1 in 3 1 in The setting by METAZA Driver is required If an image exceeds the printable area the print result might become uneven in the outside of t...

Страница 85: ...ort Never remove the label Power rating Use an electrical outlet that meets the requirements for voltage frequency and amperage given here Power rating Use an electrical outlet that meets the requirem...

Страница 86: ...High resolution Text 24 mm sec 0 94 in sec Vector Interface USB interface compliant with Universal Serial Bus Specification Revision 1 1 Power requirements Dedicated AC adapter AC 100 V to 240V 10 50...

Страница 87: ...85...

Страница 88: ...86...

Страница 89: ...87...

Страница 90: ...88...

Страница 91: ......

Страница 92: ...R1 111229...

Отзывы: