background image

20

Functionality added in version 

1.11

Engineer’s Monitor function has been added to the M-48 Manager (p. 20).

M-48 mix option has been added (p. 21).

Number of V-LINK remote sources has been increased to 16.

The “Mute” and “To MAIN” selection have been added to the Scene Global Scope function.

Input/output patchbay operation via the RS-232C has been added.

For more information, refer to “V-Mixer RS-232C Reference.”

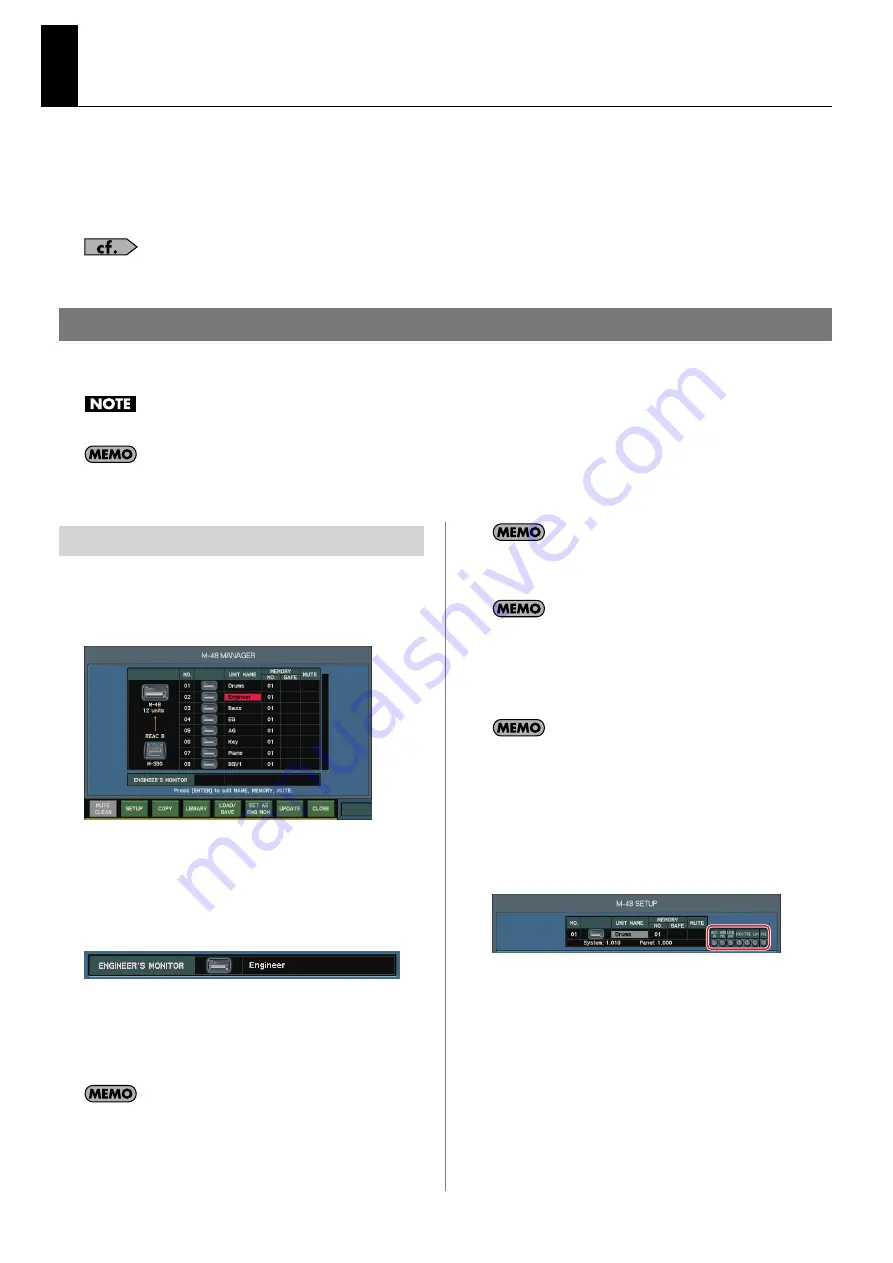
By designating an M-48 located beside the engineer as the Engineer’s Monitor, he/she can monitor and control the mix of any musician’s M-48 unit from the 

Engineer’s Monitor.

You cannot use the Engineer’s Monitor function if the system program version of the M-48 is prior to 1.01.

On the Engineer’s Monitor, you cannot monitor the AUX IN or the AMBIENT MIC on the musician’s side.

Using the Engineer’s Monitor function with the M-48 Personal Mixing System

1.

Press [MONITOR] to access the MONITOR screen.

2.

Press [F8 (M-48 MANAGER)] to access the M-48 
MANAGER popup.

fig.M48_Manager.eps

3.

In the M-48 list, move the cursor to the desired M-48 unit 
and press [F8 (SET AS ENG MON)].

A message will ask you to confirm the operation.

4.

Press [F8 (SET)] to specify the selected M-48 unit as the 
Engineer’s Monitor.

fig.M48_EngMon.eps

5.

To monitor a musician’s mix, select the corresponding M-
48 unit in the M-380’s screen.

6.

You can also control the musician’s group mix from the 
Engineer’s Monitor.

To control the musician’s mix from the Engineer’s Monitor, the 
MONITOR-ONLY select button on the M-48 ENGINEER’S MONITOR SETUP 
popup must be cleared.

The solo function on the M-48 works independently on the musician’s 
side and engineer’s side. Therefore, solo operation on engineer’s side 
does not affect the musician’s side.

The M-48 unit specified as the Engineer’s Monitor will be registered to 
the M-380’s system settings, and it can be saved to the M-380’s project 
file. When you initialize the M-380’s system settings, the Engineer’s 
Monitor setting will be cleared. You can load the Engineer’s Monitor 
settings by loading the system settings from the M-380’s project file you 
saved.

The following knobs work independently on the engineer’s side and 
musician’s side. The position of each knob on the musician’s side are 
displayed on the M-48 SETUP popup:

[AUX IN] knob

[AMBIENT MIC] knob

LINE OUT [VOLUME] knob

[BASS] knob, [TREBLE] knob

[LIMITER] knob

PHONES [VOLUME] knob

fig.M48_Setup02_Guide.eps

Specifying an Engineer’s Monitor unit

Содержание M-380

Страница 1: ...f this publication may be reproduced in any form without the written permission of ROLAND CORPORATION This document describes the features that have been added in this update In order to fully understand the M 380 s new features please read this document together with the Owner s Manual for the M 380 ...

Страница 2: ...ons New functionality has been added to the user buttons p 14 MONITOR DIMMER The following RS 232C commands have been added For more information refer to V Mixer RS 232C Reference Control commands Monitor dimmer on off USB memory recorder transport USB memory recorder locate Song select Request command Monitor dimmer request USB memory recorder status request USB memory recorder current position r...

Страница 3: ...7 The following RS 232C commands have been added For more information refer to V Mixer RS 232C Reference Control commands Display blackout cancel blackout Display brightness setting Panel brightness setting Lamp brightness setting Request command REAC connection status request Display blackout status request Display brightness request Panel brightness request Lamp brightness request Reply use comm...

Страница 4: ...e user buttons p 18 TALKBACK DESTINATION SELECT MUTE Other Improvements p 18 Now the GEQ ON FADER function does not cancel the SENDS ON FADER A 0 5dB STEP option has been added to the GEQ EDIT popup MAIN C and MATRIX operation via MIDI control change message has been added For more information refer to M 400 M 380 MIDI Implementation The Auto MDI MDI X function has been added Engineer s Monitor fu...

Страница 5: ...ition of specified operations New functionality has been added to the user buttons p 14 MONITOR DIMMER The following RS 232C commands have been added For more information refer to V Mixer RS 232C Reference Control commands Monitor dimmer on off USB memory recorder transport USB memory recorder locate Song select Request command Monitor dimmer request USB memory recorder status request USB memory r...

Страница 6: ...tton This switches MUTE for a DCA group on or off Fader This adjusts the level of a DCA group within a range of Inf dB to 10 dB Functioning of function buttons Accessing the CHANNEL DISPLAY screen for DCA groups 1 At the GROUP section press DCA The DCA GROUP screen appears New functionality for DCA Groups CHANNEL DISPLAY screen Button Function F2 NAME EDIT Displays the NAME EDIT popup F7 CLEAR ALL...

Страница 7: ...PLAY screen When DCA groups have been assigned to user fader layers the DCA group assignments can be checked at the METER screen LAYER VIEW tab DCA group assign This displays a view of all DCA group assignments Pressing ENTER displays the DCA GROUP ASSIGN popup S button This switches SOLO for a DCA group on or off M button This switches MUTE for a DCA group on or off Fader This adjusts the level o...

Страница 8: ...N has been selected using the MONITOR LEVEL CONTROL selection button DIMMER LEVEL This adjusts the dimmer level within a range of Inf to 0 0 dB TALKBACK DIMMER button Selecting this check box interlinks on off switching of the dimmer function with on off switching of talkback When SCREEN has been selected using the MONITOR LEVEL CONTROL selection button the fader for the MONITOR meter on the METER...

Страница 9: ...k on off switching of the dimmer function with on off switching of talkback The dimmer function has no effect on PHONES OUT headphones output Using the dimmer function 1 At the top panel s MONITOR section press DISP The MONITOR screen appears 2 Press F4 DIMMER to switch on the dimmer function The functioning of the DIMMER button can be assigned to a user button Dimmer function ...

Страница 10: ...MP EDIT popup will appear Device indication This indicates the input output unit or the M 480 itself that is the target of the PREAMP EDIT popup Preamp Here you can setup the preamps fig ScrPreEditGuide2 eps Input number This indicates the input jack number Channel name If the input jack is patched to the M 480 s input channel this indicates the name of the input channel to which the input jack is...

Страница 11: ...on off Turning this on will lower the input sensitivity of the preamp by 20 dB Since noise will be produced when you switch the pad setting the output of the channel whose setting you change will be briefly muted GAIN knob This adjusts the preamp gain in a range of 65 dBu 10 dBu if PAD is on a range of 45 dBu 10 dBu The preamp gain is not a continuous control it is digital with stepped control In ...

Страница 12: ...erations If you are operating the unit with ADMIN and desire to set user level with current user preference create a new user setting according to the steps below It is not possible to prohibit any operations for the ADMIN user Creating a New User Setting that Takes Over the Current User Setting 1 Connect a USB memory Connect a USB memory device to the USB MEMORY port of the M 380 2 Call up the US...

Страница 13: ...ed up 3 Display the PANEL tab Press F5 PANEL to display the PANEL tab Specify the operation to prohibit on this panel tab 4 Close the popup Press F8 OK to finalize the settings of USER LEVEL and close the popup AUX13 16 MTX LAYER This prohibits switching to AUX13 16 MTX LAYER AUX1 12 LAYER This prohibits switching to AUX1 12 LAYER CH37 48 LAYER This prohibits switching to CH37 48 LAYER CH25 36 LAY...

Страница 14: ... version 1 32 The following functions can be assigned to user buttons Addition of functions assignable to user buttons FUNCTION PARAM1 BUTTON Description MONITOR TALKBACK DIMMER ON lit OFF unlit Turns the monitor dimmer ON OFF ...

Страница 15: ...an R 1000 48 track recorder player is connected and the M 380 is used as a recording source p 17 The following RS 232C commands have been added For more information refer to V Mixer RS 232C Reference Control commands Display blackout cancel blackout Display brightness setting Panel brightness setting Lamp brightness setting Request command REAC connection status request Display blackout status req...

Страница 16: ... MAIN L R 1 At the SETUP section press SYSTEM The SYSTEM screen appears 2 At the MAIN OPTION selection buttons select the check box for Mutually Exclusive LR C Assign Exclusion control is performed for sends to MAIN L R and MAIN C The following functions can be assigned to user buttons Exclusion control of sends to MAIN L R and MAIN C Addition of functions assignable to user buttons FUNCTION PARAM...

Страница 17: ... 1000 The following rules are used to assign the track names according to the settings for the recording use INPUT patchbay on the R 1000 the input connector assigned to the recording track and the M 380 s patchbay settings Automatic application of M 380 channel names to R 1000 track names Assignment to R 1000 recording track Applied track name MAIN L R C Channel name MAIN MONO MAIN M AUX 1 16 Cha...

Страница 18: ... and F7 NEXT FADER have been added to the USER FADER ASSIGN popup F6 PREV BUTTON and F7 NEXT BUTTON have been added to the USER BUTTON EDIT popup New functionality has been added to the user buttons Other Improvements Now the GEQ ON FADER function does not cancel the SENDS ON FADER A 0 5dB STEP option has been added to the GEQ EDIT popup If this is checked the GEQ fader operation will step by 0 5 ...

Страница 19: ... or Straight and configures the connection appropriately By enabling this both Crossover and Straight Ethernet cable can be supported for REAC connection 1 In the SETUP section hold down SYSTEM and turn the power on The SYSTEM CONFIG screen will appear 2 Press F4 REAC The REAC popup will appear 3 Press ENTER to check Auto MDI MDI X 4 Press F8 OK 5 Turn off the power ...

Страница 20: ...firm the operation 4 Press F8 SET to specify the selected M 48 unit as the Engineer s Monitor fig M48_EngMon eps 5 To monitor a musician s mix select the corresponding M 48 unit in the M 380 s screen 6 You can also control the musician s group mix from the Engineer s Monitor To control the musician s mix from the Engineer s Monitor the MONITOR ONLY select button on the M 48 ENGINEER S MONITOR SETU...

Страница 21: ...ASE ENG MON A message will ask you to confirm the operation 4 Press F8 RELEASE to release the ENGINEER S MONITOR Editing the Engineer s Monitor preference settings Releasing the Engineer s Monitor The MIX OPTION has been added to the M 48 Source Assign popup By checking the MIX only Assigned Sources select button only sources assigned to a group will be mixed to the M 48 s MAIN buses You cannot ch...

Отзывы: