background image

Recording your music

32

r

KR111

 Digital Intelligent Piano

Other recording functions

The KR111’s 16-track Recorder can be used in several 
ways. Let us therefore have a look at the other 
recording modes.

About the recording modes

Modes

The KR111 provides one mode for recording new 
music, and two for adding parts or correcting pas-
sages of existing music:

Note: 

Each time you select “New Song” mode, the data in 

the 

USR

 memory are erased. Also note that “New Song” 

mode is selected whenever you press the 

[REC¥∏]

 button. 

Don’t forget to select another mode before you start 
recording if the previously recorded parts must not be 
erased.

Recorder memory

The KR111 provides one “live” song memory, which 
can contain one song at a time. After completing a 
song, you should save it (see p. 54).

Playing back a Standard MIDI File erases the song in 
the KR111’s 

USR

 memory. You could take advantage 

of this system to “load” a previously recorded song 
and to replace one of its parts with your own rendi-
tion, or to add new parts.

More about ‘New Song’ mode

In addition to what you learned on p. 30, here are a few 
considerations:

After pressing the 

[REC¥∏]

 button, the 16 track and 

[RECORD∏]

 icons start flashing to signal that all 16 

tracks are available for recording.

Here is what the tracks correspond to (after recording 
a song with Arranger backing):

For your convenience, the Keyboard parts are flagged 
with a “

k

” symbol in the above graphic.

Parts you do not hear during recording are not 
recorded. The track icons 

[1]

~

[16]

 thus do not show 

you what 

will

 be recorded, but rather what 

can

 be 

recorded. 

Note: 

If you assign a Drum Set to the Upper part, your drum 

performance is recorded onto track 16.

Solo recording mode

This mode can be used to add new parts to an already 
existing song (which you need to play back at least 
once in order to load its data into the 

USR

 memory). 

This approach furthermore allows you to replace an 
existing part (the bass line, for example) with your own 
version.

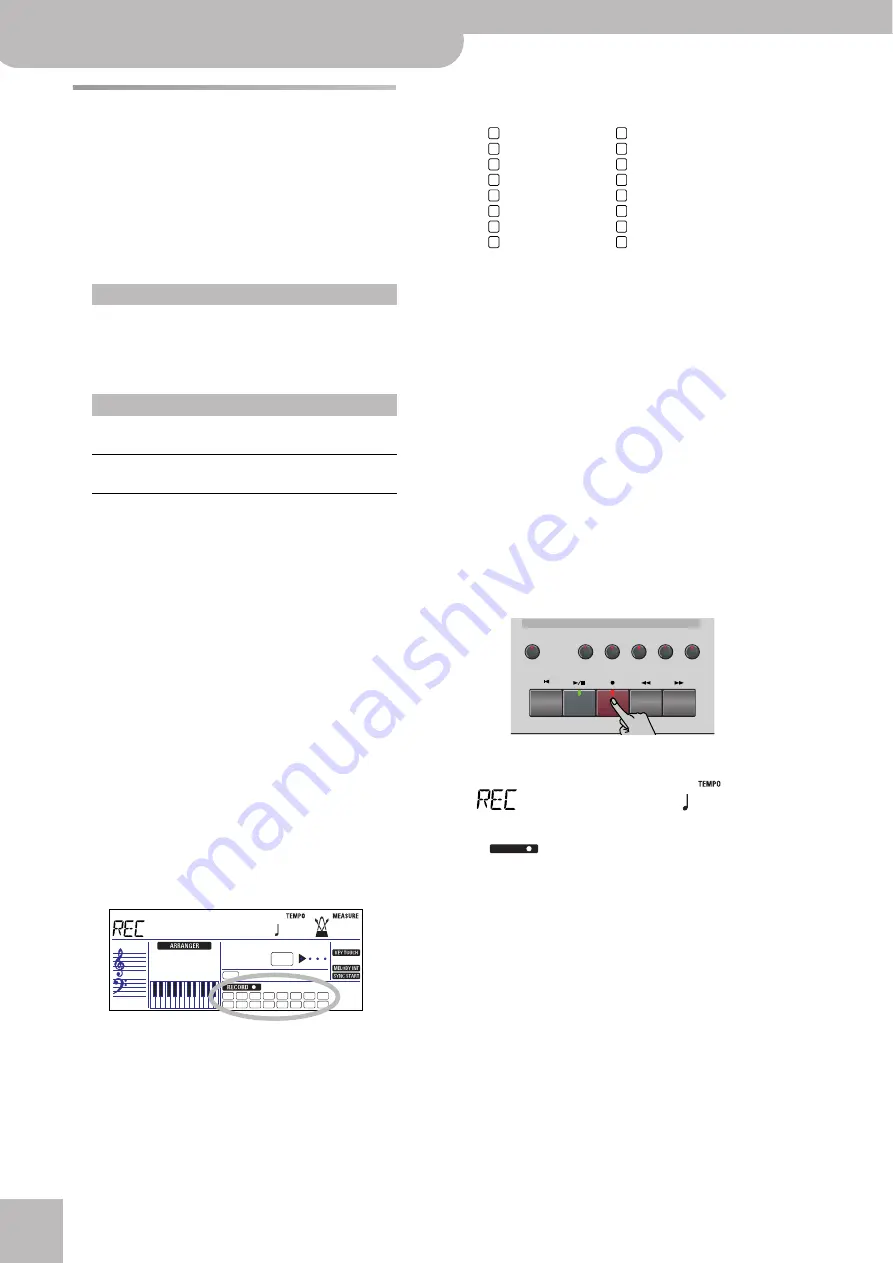
(1) Press the 

[REC¥∏]

 button (its indicator flashes).

The display now looks as follows:

The 

 icon and the icon of the first empty 

track flash. The indicator of the Recording/Playback 
button that corresponds to the first empty track also 
flashes. You could therefore record a new part 
straight away. (If all tracks already contain data, track 
1 is selected.)

(2) Use the 

[+][–]

 buttons to select the track you wish 

to record to.

You can only select one track at a time (hence the 
name “Solo”). If you select a track that already con-
tains data, your new version will overwrite the exist-
ing one.

(3) If necessary, assign the desired Tone to the part 

you are about to record (see p. 37).

If you select track 

[10]

, you can select Drum Sets 

rather than Tones. Track 10 is reserved for drum 
parts.

Recording a new song:

New Song

In this mode, you can record everything you and 
the KR111 can play simultaneously:
• Arranger (accompaniment).
• Keyboard parts (Upper and Layer or Lower).
• Your performance in Piano mode.

Adding parts to an existing song

Solo

In this mode, you can record onto one track at a 
time. The track can be freely selected. 

Punch I/O

This mode allows you to re-record a short section 
of an otherwise perfect part.

INTRO

FULL

BAND

=

1
9

2

10

3

11

4

12

5

13

6

14

7

15

8

16

ORCHESTRATOR

BEAT

NewSong

120

001

1

9

2

10

3

11

4

12

5

13

6

14

7

15

8

16

Whole
Arranger bass

Accomp 2

k

Upper

Accomp 3

k

Layer

Accomp 4

Accomp 5

Accomp 6
Arranger drums

k

Lower

Accomp 1

Melody Intell. (see p. 36)

(

k

Upper*)

(*)

If you assign a Drum Set to the Upper part. In that case, track 4 
is not used.

Record/Playback

Reset

Fwd

Bwd

Rec

Play/Stop

Upper

Lower

Whole

Rhythm

Bass

Accomp

Menu

R

4

3

2

1

=

Solo

120

RECORD

Содержание KR111

Страница 1: ...p 1 Manual del Usuario p 59 Mode d emploi p 117 Copyright 2005 ROLAND CORPORATION All rights reserved No part of this publication may be reproduced in any form without the written permission of ROLAN...

Страница 2: ...been exposed to rain or moisture does not operate normally or has been dropped IMPORTANT THE WIRES IN THIS MAINS LEAD ARE COLOURED IN ACCORDANCE WITH THE FOLLOWING CODE BLUE BROWN As the colours of th...

Страница 3: ...can save your own registrations a USB port for MIDI communication with your computer and a host of other great functions To get the most out of the KR111 and to ensure many years of trouble free servi...

Страница 4: ...orts a Piano Arranger function that allows you to play chords anywhere on the keyboard Excellent Arranger The KR111 comes loaded with more than 160 Music Styles prepared by Roland s legendary Style fo...

Страница 5: ...nd consult an audiologist Do not allow any objects e g flammable material coins pins or liquids of any kind water soft drinks etc to penetrate the unit In households with small children an adult shoul...

Страница 6: ...main unused for an extended period of time Any accumulation of dust between the power plug and the power outlet can result in poor insulation and lead to fire Never climb on top of nor place heavy obj...

Страница 7: ...certain tracks 28 8 Recording your music 30 Recording with Arranger backing 30 Recording without accompaniment 31 Other recording functions 32 About the recording modes 32 More about New Song mode 32...

Страница 8: ...htly dampened Try to wipe the entire surface using an equal amount of strength moving the cloth along with the grain of the wood Rubbing too hard in the same area can damage the finish Never use benzi...

Страница 9: ...ect position before you insert them into the drive of another instru ment except the PR 300 or a product of the HP G MT KR or Atelier families or into a computer s drive Otherwise when per forming any...

Страница 10: ...er settings to a User Program There are 34 User Program memories See page 48 J Style Orchestrator buttons Press one of these buttons to choose the desired orchestration for the selected Music Style Se...

Страница 11: ...Standard MIDI Files and start control playback of the selected song using the buttons in the Record Playback section The KR111 is supplied with several internal songs T Music Assistant button This but...

Страница 12: ...h the Melody Intelli gence function on off Melody Intelligence is a func tion that adds a harmony part to your melody play ing See p 36 Bottom panels A A MIDI sockets Out In Use these connectors to ex...

Страница 13: ...Expression socket This is where you can connect an optional EV 5 or EV 7 expression pedal that can be used as a volume pedal F Pedal socket This is where you can connect the pedal cable The KR111 com...

Страница 14: ...back of the stand and check whether the stand is held in place Before moving the KR111 be sure to lower the music stand as a safety precaution Opening closing the keyboard lid 1 When opening the KR111...

Страница 15: ...when performing piano pieces for four hands Addi tionally this allows you to play without having to worry about bothering others around you even at night Plug the headphones into the phones jack locat...

Страница 16: ...yboard adding a rich resonance The KR111 simulates this damper resonance Sostenuto pedal central pedal This pedal sustains only the sounds of the keys that were already played when you pressed the ped...

Страница 17: ...after the other 2 If necessary press the Start Stop button to stop playback 3 Press the Transpose and Reverb buttons again simultaneously to leave demo mode You can also listen to specific sound Tone...

Страница 18: ...vice turn off the power to both devices If you wish to amplify the KR111 through an external system or record your music using a tape recorder connect the KR111 s Output jacks to the AUX IN LINE IN or...

Страница 19: ...steps of one unit 5 Use your right hand to play a melody to the accompaniment See page 18 for details about the various Arranger functions 6 Press Start Stop again to stop Music Style play back Playi...

Страница 20: ...will do For seventh chords playing the root and the second key to its left is enough 4 Play another chord or note to change the Arranger s key Using the count in function The KR111 provides a count i...

Страница 21: ...r of the button you press lights Furthermore the chord field in the dis play indicates the name of the chord you played last This chord is used by the accompaniment While the VARIATION and ORIGINAL pa...

Страница 22: ...11 s internal ROM memory These Styles cannot be erased but you can modify them in realtime using the Style Orchestrator func tions see 21 USR This is where a Music Style loaded from a floppy disk MSA...

Страница 23: ...atterns played by the Arranger You can leave out parts thin out the drum part etc in real time i e while you are playing 1 Press the Arranger button to select the Arranger mode 2 Select the Music Styl...

Страница 24: ...Keyboard parts the parts you can play yourself 1 Turn the Balance knob towards Accomp if the Arranger or song parts are too soft 2 Turn the Balance knob towards Keyboard if you think your solo playin...

Страница 25: ...for how to set the volume of the Upper and Lower sounds 3 To assign another sound to the Lower part press the Split and Layer buttons to switch on the Lower part and proceed in the same way as for the...

Страница 26: ...t value is therefore not a good choice 5 Press the Exit button to leave this function 6 If necessary use the Tempo buttons to change the tempo 7 Press the Metronome button twice to switch the metronom...

Страница 27: ...rive The number of available songs depends on the floppy disk of course Note The KR111 can also read Roland i format files 3 Use to select a desired song within the selected group This is only necessa...

Страница 28: ...wing message appears in the display 2 Press to select the following parameter 3 Do one of the following Start song playback by pressing the Play Stop button or Stop song playback and use Bwd or Fwd to...

Страница 29: ...ot automatically adopt the Tone and related settings of the melody part Songs you record with the KR111 and the Standard MIDI Files you play back can consist of up to 16 tracks i e MIDI channels The t...

Страница 30: ...of song tracks if you they are too loud or too soft The setting range is 64 63 These volume parameters apply to the respective tracks of the song you are currently playing back In most cases you may w...

Страница 31: ...hold down or to quickly select a significantly higher or lower value The fastest way to scroll through the available settings is by holding down while pressing lower the volume or by holding down whi...

Страница 32: ...ee also page 37 6 Press the REC button its indicator flashes The display should look as follows The RECORD and 1 16 icons flash The indica tor of the REC button also flashes You are now in New Song mo...

Страница 33: ...4 6 Press Play Stop to start recording the REC button lights steadily Your solo playing is recorded to track 1 which is assigned to the Whole button This is also the case if you record with Arranger b...

Страница 34: ...e used to add new parts to an already existing song which you need to play back at least once in order to load its data into the USR memory This approach furthermore allows you to replace an existing...

Страница 35: ...ress to make the display look as follows The flashing track icon only one depends on the first track that already contains data In the above example track 1 contains data which is why its icon flashes...

Страница 36: ...al Your choice should be based on which pedal you want to use for activating and switching off record ing Only one of them needs to be assigned Use the buttons to select PunchI O Press Exit to leave t...

Страница 37: ...ognition remains active for the entire keyboard 6 Press the Start Stop button to start Arranger play back You can also press one or several keys because the Sync Start function is on If you prefer not...

Страница 38: ...ppears in the upper left corner of the display 5 Use the buttons to select the desired voicing Note The Melody Intelligence setting can be saved to a User Program memory 6 Press the Exit button to lea...

Страница 39: ...er Tone within the same group Note This setting can be saved to a User Program see p 48 Drum sounds and sound effects SFX Drum Sets The last sounds are so called Drum Sets When you select such a set e...

Страница 40: ...the display You can also specify which section s the Transpose function should apply to 3 Press to select one of the following options 4 To switch the Transpose function back off repeat steps 1 and 2...

Страница 41: ...the left and central pedals temporarily return to their official piano func tions 1 Press the Function button its indicator must light 2 Use the buttons to select one of the following parameters depe...

Страница 42: ...f Advanced is currently selected After selecting Basic how ever you will not return to Full when you press the pedal again MelInt On Off The pedal has the same function as the Melody Intelligence butt...

Страница 43: ...verb level while 0 means that you won t hear the effect 5 Press the Exit button to leave this function Note This setting can be saved to a User Program see p 48 Using the multi effects processor MFX T...

Страница 44: ...of the volume StChorus This is a stereo chorus Space D A multiple chorus that gives no impression of modulation but produces a transparent chorus effect the perfect stereo maker StDelay Delay is an ef...

Страница 45: ...ng the chorus effect on off Use the following procedure if you want no chorus at all for none of the KR111 s parts or to select another chorus type 1 Press the Function button its indicator must light...

Страница 46: ...ve elements of a perfor mance By using the KR111 with an Edirol DV 7PR you can use the KR111 s keyboard highest octave to switch images clips Press and hold a key for longer transition fade Briefly pr...

Страница 47: ...he keys in the highest octave to switch clips Keyboard velocity Dissolve Time CC23 The velocity of the keys in the highest octave controls the speed of transition between images Note All V LINK messag...

Страница 48: ...he left or central pedal only uses the assigned func tion if you do not press the Piano button afterwards and if the PDLSHIFT parameter see p 49 is set to Off UpperOct LayerOct LowerOct octave transpo...

Страница 49: ...ote of one octave C C D Eb E The settings you make here apply to all notes of the same name i e to every C every C etc Most of the time you will probably select the value 50 or 50 as they corre spond...

Страница 50: ...now responds with the Complete message Note that User Programs you write can also refer to a Music Style on floppy disk If you choose to work with a Style on floppy disk you need to insert the floppy...

Страница 51: ...activate the KR111 s Twin Piano mode The left pedal then acts as damper for the left half while the right pedal functions as damper pedal for the right half Note As soon as you modify any setting on t...

Страница 52: ...on to save your User Program set Press Exit if you don t want to save it after all Possible error messages Load Set This function allows you to transfer a set of 34 User Programs i e for all memories...

Страница 53: ...isk if available 5 Use to select the User Program set you wish to load The Ent message next to it starts flashing 6 Press the Enter button to load the selected file Note Press Exit if you do not want...

Страница 54: ...o the MIDI IN socket of another instrument that instrument may play the same notes as one of the KR111 s parts select sounds etc Note The KR111 receives on all MIDI channels assigned to the various pa...

Страница 55: ...the KR111 use several banks Send LSB 0 127 Default setting 0 Use this parame ter to specify the group that contains the sound you want to select Instruments of other manufacturers may also use this m...

Страница 56: ...l name if you do not want to overwrite an existing SMF allow you to move the cursor to the character position you want to change allow you to select a character for the position indicated by the curso...

Страница 57: ...se is IBM PC formatted there is no need to format it though disk access is faster with disks for matted on the KR111 Otherwise proceed as follows 1 Insert a disk into the drive Every floppy contains a...

Страница 58: ...ke you can also pur chase two Roland PJ 1M cables Note By connecting the Output jacks you do not switch off the KR111 s amplification system You can connect an optional EV 5 EV 7 expression pedal to t...

Страница 59: ...KR111 2 Hold down the Intro Ending and Start Stop but tons while you switch the KR111 back on again The display briefly shows DISABLED It is now impossible to start stop the Arranger or demo song play...

Страница 60: ...k Recorder 3 easy modes ALL SOLO PUNCH IN OUT Internal songs more than 50 User Programs 34 Effects Reverb 8 types Chorus 8 types Multi FX 47 types Data Storage Floppy disk drive 3 5 2HD 2DD Type of fi...

Страница 61: ...os registros un puerto USB para comunicaci n MIDI con el ordenador y muchas otras funcio nes de gran utilidad Para obtener el m ximo rendimiento del KR111 y para garantizar una utilizaci n sin problem...

Страница 62: ...Programas de Usuario El KR111 tambi n soporta la funci n Piano Arranger que le permite tocar acordes en cualquier punto del teclado Un Arranger impresionante El KR111 se entrega con m s de 160 Estilos...

Страница 63: ...el cable de alimentaci n ni deposite objetos pesados encima del mismo Podr a da ar el cable y causar desperfectos y corto circuitos Un cable da ado puede provocar incendios y descargas el ctricas Este...

Страница 64: ...la toma de corriente Si se acumula suciedad entre el conector y la toma de corriente se puede debilitar el ais lamiento y provocar un incendio No se encarame nunca sobre el equipo ni deposite obje to...

Страница 65: ...e algunas pistas 86 8 Grabar la m sica 88 Grabar con acompa amiento de estilo 88 Grabar sin acompa amiento 89 Otras funciones de grabaci n 90 Acerca de los modos de grabaci n 90 M s acerca del modo Ne...

Страница 66: ...mpieza del equipo utilice un pa o suave y seco o ligera mente humedecido con agua Pruebe de frotar toda la superficie utilizando una fuerza homog nea y mueva el pa o siguiendo las aguas de la madera S...

Страница 67: ...funcio namiento de este equipo deber n bloquearse siempre deslizar la leng eta de protecci n contra escritura a la posici n Protegido antes de introducirlos en las disqueteras de otros equipos except...

Страница 68: ...m El equipo dis pone de memorias 34 para User Program Consulte la p gina 106 J Botones Style Orchestrator Pulse uno de estos botones para seleccionar la orquestaci n deseada para el Estilo Musical Mus...

Страница 69: ...d MIDI Files e iniciar control de la reproducci n de la canci n seleccionada con los botones de la secci n Record Playback El KR111 se entrega con varias canciones internas T Bot n Music Assistant Est...

Страница 70: ...desactivar la funci n Melody Intelligence Melody Intelligence es una fun ci n que a ade una parte de armon a a la interpreta ci n de la melod a Consulte la p 94 Paneles inferiores A A Conectores MIDI...

Страница 71: ...Z calo Expression Puede conectar en este z calo un pedal de expresi n opcional EV 5 o EV 7 que puede utilizar como pedal de volumen F Z calo Pedal Aqu es donde puede conectar el cable del pedal El KR1...

Страница 72: ...ci n de la parte posterior del soporte y compruebe si el soporte se encuentra fijo en su posici n Antes de mover el KR111 baje siempre el atril como medida de precauci n Abrir Cerrar la tapa del tecla...

Страница 73: ...ara lecciones y al interpretar piezas de piano a cuatro manos Adem s esto permite tocar sin tener que preocuparse por si molesta a los que le rodean incluso por la noche Conecte los auriculares al jac...

Страница 74: ...nidos tocados en el teclado con lo cual se a ade una resonancia rica El KR111 simula esta resonancia Damper Pedal Sostenuto pedal central Este pedal sostiene s lo los sonidos de las teclas que ya se t...

Страница 75: ...la muestra lo siguiente El KR111 empieza la reproducci n de todas las demostraciones una tras otra 2 SI lo desea puede pulsar el bot n Start Stop para detener la reproducci n 3 Pulse de nuevo los boto...

Страница 76: ...xternos y otros dispositivos Si el sistema de amplificaci n del KR111 no propor ciona suficiente potencia para su aplicaci n puede utilizar los jacks Output Enviar audio a un equipo externo Antes de c...

Страница 77: ...para aumentar el tempo en pasos de una unidad 5 Use la mano derecha para tocar una melod a para el acompa amiento Consulte la p gina 76 para m s detalles acerca de las diversas funciones del Arranger...

Страница 78: ...para A mayor etc Para los acordes menores son suficientes la nota fundamental y la tercera tecla de su derecha Para los acordes de s ptima es suficiente reproducir la nota fundamental y la segunda te...

Страница 79: ...usando Estos botones seleccionan patrones del estilo musical Aparecer en la pantalla el icono correspondiente al bot n que ha pulsado y se iluminar el indicador del bot n que ha pulsado Adem s el cam...

Страница 80: ...lias de estilos de la memoria ROM interna del KR111 Estos estilos no se pueden borrar pero puede modificarlos a tiempo real utilizando las funciones de Style Orchestrator consulte 79 USR Aqu es donde...

Страница 81: ...oducidos por el Arranger Es posible omitir partes afinar la parte de percusi n etc a tiempo real por ejemplo al tocar 1 Pulse el bot n Arranger para seleccionar el modo del Arranger 2 Seleccione el Es...

Страница 82: ...e puede tocar usted mismo 1 Gire el mando Balance hacia Accomp si el Arran ger o las partes de canci n son demasiado suaves 2 Gire el mando Balance hacia Keyboard si cree que la interpretaci n de solo...

Страница 83: ...plitPnt Punto de divisi n en la p 104 Consulte en p gina 102 la forma de ajustar el volu men de los sonidos de Upper y Lower 3 Para asignar otro sonido a la parte Lower pulse los botones Split y Layer...

Страница 84: ...lor por tanto no es una buena opci n 5 Pulse el bot n Exit para salir de esta p gina 6 Si fuera necesario utilice los botones Tempo para cambiar el tempo 7 Pulsar el bot n Metronome dos veces para des...

Страница 85: ...sertado en la disquetera del KR111 El n mero de canciones disponibles depende del disquete evidentemente Nota El KR111 tambi n puede leer archivos Roland de for mato i 3 Use para seleccionar la canci...

Страница 86: ...de reproducci n Puede hacerlo durante la reproducci n o con el Graba dor detenido 1 Pulse el bot n Count Marker En pantalla se visualiza el siguiente mensaje 2 Pulse para seleccionar el siguiente par...

Страница 87: ...Cuando se ilumina un indicador se escucha n la s pista s correspon diente s es decir sin enmudecer Nota La parte Upper no adopta autom ticamente el Tono y los ajustes relacionados de la parte de mel d...

Страница 88: ...tas sta es la forma para subir o bajar el volumen de las pistas de canci n La gama de ajustes va de 64 63 Estos par metros de volumen se aplican a las pistas res pectivas de la canci n que est reprodu...

Страница 89: ...r pida mente un valor m s alto o m s bajo La forma m s r pida de recorrer los ajustes disponibles es mante niendo pulsado mientras pulsa bajar el volu men o pulsando mientras pulsa subir el volu men 5...

Страница 90: ...p gina 95 6 Pulse el bot n REC su indicador parpadear La pantalla tendr el siguiente aspecto Los iconos RECORD y 1 16 parpadean El indi cador del bot n REC parpadea Ahora se encuen tra en el modo New...

Страница 91: ...lte la p 112 6 Pulse el bot n Play Stop para iniciar la graba ci n el bot n REC se ilumina fijo Su interpretaci n en solo se graba en la pista 1 y queda asignada al bot n Whole Lo mismo sucede si grab...

Страница 92: ...po de percusi n a la parte Upper la interpretaci n de percusi n se grabar en la pista 16 Modo de grabaci n Solo Este modo puede usarse para a adir nuevas partes a una canci n ya existente que deber to...

Страница 93: ...de canci n 1 Pulse el bot n REC su indicador parpadear 2 Pulse de forma que en la pantalla se visualice lo siguiente El icono de pista parpadeante s lo uno depende de la primera pista que ya contiene...

Страница 94: ...be basarse en el pedal que desee usar para activar y desactivar la grabaci n S lo es nece sario asignar uno Utilice los botones para seleccionar PunchI O Pulse Exit para salir del modo Function del KR...

Страница 95: ...a utilizar la parte Lower pero el recono cimiento de acordes sigue estando activo para todo el teclado 6 Pulse el bot n Start Stop para iniciar la reproduc ci n del Arranger Tambi n puede pulsar una...

Страница 96: ...s para seleccionar la opci n de voces que desee Nota El ajuste Melody Intelligence puede guardarse en una memoria de Programa de Usuario 6 Pulse el bot n Exit para salir del modo Funci n del KR111 Bas...

Страница 97: ...ra seleccio nar otro Tone dentro del mismo grupo Nota Este ajuste puede guardarse en un User Program consulte la p 106 Sonidos de percusi n y efectos de sonido SFX Grupos de percusi n Los ltimos sonid...

Страница 98: ...qu secci n s debe apli carse la funci n Transpose 3 Pulse para seleccionar una de las siguientes opciones 4 Para volver a desactivar la funci n Transpose repita los pasos 1 y 2 esta vez introduciendo...

Страница 99: ...ive el bot n Piano los pedales izquierdo y cen tral volver n temporalmente a sus funciones de piano oficial 1 Pulse el bot n Function su indicador se ilumi nar 2 Utilice los botones para seleccionar u...

Страница 100: ...ionar Basic vuelve a pulsar el pedal no regresar al nivel Full MelInt On Off El pedal tiene la misma funci n que el bot n Melody Intelligence Fade Esta funci n le permite realizar un fun dido de entra...

Страница 101: ...vel m s alto de Reverb mientras que 0 significa que no oir el efecto 5 Pulse el bot n Exit para salir de esta p gina Nota Este ajuste puede guardarse en un User Program con sulte la p 106 Utilizar el...

Страница 102: ...m Cho Tremolo Chorus es un efecto de chorus con Tremolo a adido modulaci n c clica del volumen StChorus Se trata de un chorus est reo Space D Un Chorus m ltiple que no da la impresi n de modulaci n pe...

Страница 103: ...salir de esta p gina Activar desactivar el efecto de Chorus Utilice el siguiente procedimiento si no desea el efecto Chorus para ninguna de las partes del KR111 o para seleccionar otro tipo de Chorus...

Страница 104: ...a parte o secci n cuyo volumen desea cambiar 3 Utilice para ajustar el volumen deseado 0 127 Recuerde que si mantiene pulsado o e incluso mientras pulsa y viceversa podr cambiar el volumen m s r pidam...

Страница 105: ...n la parte inferior del KR111 2 Pulse el bot n Function su indicador se ilumi nar 3 Use los botones para seleccionar el siguiente par metro 4 Use para seleccionar On para cambiar el control V LINK Las...

Страница 106: ...unciones deseadas a los pedales Para m s informaci n consulte la Utilizar los pedales como conmutadores en la p 97 Nota El pedal izquierdo o central s lo utilizar la funci n asignada si a continuaci n...

Страница 107: ...cambiar la afinaci n de cada nota en una octava C C D Eb E Los ajustes que defina aqu se aplican a todas las notas del mismo nombre es decir a cada Do cada Do etc La mayor parte del tiempo probablemen...

Страница 108: ...desea guardarlos La pantalla ahora responde con el mensaje Complete Tenga en cuenta que los User Programs que escriba tambi n pueden hacer referencia a un estilo musical de un disquete Si selecciona...

Страница 109: ...n Piano del KR111 El pedal izquierdo actuar como un damper para la mitad izquierda y el pedal derecho funcionar como un pedal damper para la mitad derecha Nota Cuando modifique cualquier ajuste en el...

Страница 110: ...acteres disponibles son 7 Pulse el bot n Enter para guardar el grupo de User Program Pulse Exit si despu s de todo ya no desea guardarlo Posibles mensajes de error Load Set Esta funci n le permite tra...

Страница 111: ...tilice para seleccionar el grupo de User Pro gram que desea cargar El mensaje Ent que se encuentra a su lado empezar a parpadear 6 Pulse el bot n Enter para cargar el archivo selec cionado Nota Pulse...

Страница 112: ...iano digital inteligente transmitir datos MIDI al z calo MIDI OUT o al puerto USB Si conecta el z calo MIDI OUT al z calo MIDI IN de otro instrumento ese instrumento podr tocar las mismas notas que un...

Страница 113: ...ficar el banco que tiene el sonido que desea seleccionar Los instrumentos que tienen m s de 128 sonidos como el KR111 utilizan varios bancos Send LSB 0 127 Ajuste por defecto 0 Utilice este par metro...

Страница 114: ...archivo de canci n S ltese este paso si desea actualizar una canci n ya existente Aseg rese de introducir un nombre original si no desea sobrescribir un SMF ya existente le permiten mover el cursor h...

Страница 115: ...el dis quete que va a utilizar est formateado para IBM PC no es necesario formatearlo aunque el acceso al disco ser m s r pido con discos formateados en el KR111 En caso contrario proceda de la sigui...

Страница 116: ...omprar dos cables Roland PJ 1M Nota Al conectar los jacks Output no necesita desactivar el sis tema de amplificaci n del KR111 Puede conectar un pedal de expresi n opcional EV 5 EV 7 al jack Expresi n...

Страница 117: ...nga pulsados los botones Intro Ending y Start Stop mientras vuelve a activar el KR111 La pantalla r pidamente visualiza DISABLED Ahora es imposible iniciar parar la reproducci n de las canciones con l...

Страница 118: ...ador de 16 pistas 3 modos f ciles ALL SOLO PUNCH IN OUT Canciones internas m s de 50 Programas de usuario 34 Efectos Reverb 8 tipos Chorus 8 tipos Multi FX 47 tipos Almacenamiento de datos Disquetera...

Страница 119: ...a communication MIDI avec votre ordinateur et bien d autres fonctions inestimables Pour tirer parti de toutes les fonctions de votre KR111 et lui assurer de nombreuses ann es de bons et loyaux service...

Страница 120: ...s sons des morceaux et des programmes utilisateur Signalons encore que le KR111 est dot d un mode Piano Arranger permettant de jouer des accords sur tout le clavier Arrangeur hors pair Le KR111 contie...

Страница 121: ...objets du mat riel inflammable de la monnaie des trombones ou des liquides eau limonades etc ne p n trent l int rieur de ce produit En pr sence de jeunes enfants un adulte doit tre pr sent jusqu ce q...

Страница 122: ...ation Toute accumu lation de poussi re entre la prise murale et la fiche d ali mentation peut nuire l isolation et causer un incendie Ne montez jamais sur ce produit et vitez d y d poser des objets lo...

Страница 123: ...arrangeur 146 Enregistrer sans accompagnement 147 Autres fonctions d enregistrement 148 A propos des modes d enregistrement 148 Infos suppl mentaires concernant le mode New Song 148 Mode d enregistrem...

Страница 124: ...chiffon l g rement humide Essuyez toute la sur face en exer ant une force gale et en suivant les lignes du bois Si vous frottez trop fort un endroit particulier vous risquez d endommager la finition N...

Страница 125: ...es sur la disquette Les disquettes contenant d importantes donn es pour cet instru ment doivent toujours tre verrouill es prot g es avant d tre ins r es dans le lecteur d un autre instrument l except...

Страница 126: ...rogramme utilisa teur Vous disposez de 34 m moires pour program mes utilisateur Voyez page 164 J Boutons Style Orchestrator Appuyez sur un de ces boutons afin de choisir le type d orchestration voulue...

Страница 127: ...les boutons de la section Record Playback Le KR111 est livr avec plusieurs morceaux internes T Bouton Music Assistant Ce bouton permet de travailler avec des r glages pr programm s des programmes util...

Страница 128: ...Voyez page 139 c Bouton Melody Intelligence Ce bouton permet d activer de couper la fonction Melody Intelligence Melody Intelligence sert ajou ter une partie d harmonie la m lodie que vous jouez Voyez...

Страница 129: ...E Prise Expression Vous pouvez y brancher une p dale d expression EV 5 ou EV 7 optionnelle pour piloter le volume F Prise Pedal Cette prise permet de brancher le c ble du p dalier Le p dalier du KR111...

Страница 130: ...que le pupitre est bien stable Avant de d placer le KR111 n oubliez pas de replier le pupitre par mesure de pr caution Ouvrir fermer le couvercle du clavier 1 Pour ouvrir le couvercle du KR111 saisiss...

Страница 131: ...au casque ce qui vient point pour les le ons de piano ou le jeu quatre mains Cela vous permet en outre de jouer sans d ranger votre entourage notamment le soir Branchez les casques aux prises Phones...

Страница 132: ...et plus vaste Le KR111 simule cette r sonance sympathique P dale sostenuto centre Cette p dale maintient la note des touches action n es avant que vous n appuyiez sur la p dale P dale douce gauche Lo...

Страница 133: ...sente maintenant comme ceci Le KR111 lance la reproduction de tous les morceaux de d monstration les uns apr s autres 2 Si n cessaire appuyez sur le bouton Start Stop pour arr ter la reproduction 3 A...

Страница 134: ...puissante pour l utilisation que vous voulez en faire vous pou vez vous servir de ses sorties Output Envoi de signaux audio des appareils externes Avant de brancher le KR111 un autre appareil coupez...

Страница 135: ...yez sur le bouton pour augmenter le tempo par unit s 5 Jouez de la main droite une m lodie sur l accom pagnement Pour en savoir plus sur les fonctions de l arrangeur voyez page 134 6 Appuyez nouveau s...

Страница 136: ...la fonda mentale et la troisi me touche sa droite Pour des accords de septi me il suffit de jouer la fon damentale et la deuxi me touche sa gauche 4 Jouez un autre accord ou une autre note pour chang...

Страница 137: ...le musi cal L cran affiche l ic ne correspondant au bouton actionn et son t moin s allume En outre la zone d accord de l cran indique le nom du dernier accord jou C est l accord utilis par l accompagn...

Страница 138: ...AND SWING LATIN GOSPEL TRAD KIDS Il s agit des familles de styles r sidant en m moire ROM interne du KR111 Ces styles ne peuvent pas tre supprim s en revanche vous pouvez les modifier en temps r el av...

Страница 139: ...sir le mode Arrangeur 2 S lectionnez le style musical que vous souhaitez utiliser pour jouer ou utilisez le style actuellement choisi Voyez page 136 3 Appuyez sur un des boutons suivants l ic ne cor r...

Страница 140: ...les que vous jouez vous m me 1 Tournez la commande Balance vers Accomp si le volume de l arrangeur ou du morceau est trop bas 2 Tournez la commande Balance vers Keyboard si vous souhaitez augmenter le...

Страница 141: ...tage la p 162 Voyez page 160 pour savoir comment r gler la balance entre les parties Upper et Lower 3 Pour changer le son de la partie Lower appuyez sur les boutons Split et Layer pour activer la part...

Страница 142: ...A viter donc 5 Appuyez sur le bouton Exit pour quitter cette fonction 6 Si n cessaire vous pouvez changer le tempo avec les boutons Tempo 7 Appuyez de nouveau sur le bouton Metronome pour d sactiver...

Страница 143: ...squette ins r e dans le lecteur du KR111 Le total de morceaux disponibles d pend bien entendu de la disquette Remarque Le KR111 peut aussi lire des fichiers de format Roland i 3 Utilisez pour choisir...

Страница 144: ...aux Remarque L utilisation du bouton Reset Bwd ou Fwd rappelle aussi le tempo pr programm du mor ceau Fonction Repeat Le Recorder enregistreur du KR111 propose une autre fonction int ressante la progr...

Страница 145: ...n reste teint corres pondent des pistes vides Il est videmment impossible de couper ou d activer de telles pistes 2 Appuyez sur le bouton de la piste couper son t moin s teint La reproduction de la pi...

Страница 146: ...lage de r glage 64 63 Ces param tres de volume s appliquent aux pistes cor respondantes du morceau actuellement reproduit Dans la majorit des cas vous souhaiterez sans doute chan ger le volume de la p...

Страница 147: ...soit en maintenant ou enfonc pour choisir rapidement une valeur nette ment plus lev e basse La mani re la plus rapide de parcourir les r glages disponibles consiste mainte nir enfonc pendant que vous...

Страница 148: ...famille Voyez aussi page 153 6 Appuyez sur le bouton REC son t moin cli gnote L cran devrait ressembler ceci Les ic nes RECORD et 1 16 clignotent Le t moin du bouton REC clignote aussi Vous vous trou...

Страница 149: ...p 170 6 Appuyez sur le bouton Play Stop pour lancer l enregistrement le bouton REC reste allum Votre jeu solo est enregistr sur la piste 1 qui est assi gn e au bouton Whole C est galement le cas lors...

Страница 150: ...Remarque Si vous avez assign un kit de batterie la partie Upper votre partie de batterie est enregistr e sur la piste 16 Mode d enregistrement Solo Ce mode permet d ajouter de nouvelles parties un mor...

Страница 151: ...11 contient d j des donn es 1 Appuyez sur le bouton REC son t moin cli gnote 2 Appuyez sur pour obtenir l affichage suivant L ic ne de piste clignotante une seule est celle de la premi re piste conten...

Страница 152: ...dale centrale Cela vous permet de choisir la p dale activant et cou pant l enregistrement Il n en faut qu une Utilisez les boutons pour choisir PunchI O Pour quitter le mode Function du KR111 appuyez...

Страница 153: ...nnaissance d accords reste active sur le clavier envier 6 Appuyez sur le bouton Start Stop pour lancer l arrangeur Vous pouvez aussi appuyez sur une ou plusieurs tou ches la fonction Start Sync est ac...

Страница 154: ...lody Intelligence dans un programme utilisateur 6 Appuyez sur le bouton Exit pour quitter le mode Function du KR111 Bass Inversion BassInv Cette fonction permet de changer la mani re dont l arrangeur...

Страница 155: ...lage dans un programme utilisateur voyez p 164 Sons de batterie et effets sonores SFX Kits de batterie Les derniers sons sont des kits de batterie ou Drum Sets Quand vous choisissez un de ces kits un...

Страница 156: ...sp cifier la ou les parties affect es par la fonction Transpose 3 Appuyez sur pour choisir une des options sui vantes 4 Pour d sactiver la fonction Transpose r p tez les tapes 1 et 2 en entrant la va...

Страница 157: ...as une mauvaise id e Remarque Quand vous activez le bouton Piano les p dales gauche et centrale retrouvent momentan ment leur fonction officielle de piano 1 Appuyez sur le bouton Function son t moin d...

Страница 158: ...ic si Advanced est en cours Apr s avoir s lectionn Basic cependant vous ne retournez pas Full lorsque vous appuyez sur la p dale MelInt On Off La p dale a la m me fonction que le bou ton Melody Intell...

Страница 159: ...r 0 127 127 repr sente le niveau de r verb ration maxi mum avec 0 l effet est inaudible 5 Appuyez sur le bouton Exit pour quitter cette fonction Remarque Vous pouvez sauvegarder ce r glage dans un pro...

Страница 160: ...rus avec du tr molo modulation cyclique du volume StChorus Chorus st r o Space D Un chorus multiple qui ne donne pas une impression de modulation mais produit un chorus transparent un parfait faiseur...

Страница 161: ...cette fonction Activer couper l effet chorus Pour couper compl tement le chorus pour toutes les parties du KR111 ou choisir un autre type de chorus proc dez comme suit 1 Appuyez sur le bouton Function...

Страница 162: ...ls aux effets sonores et conf rer plus d expression encore votre ex cution En utilisant le KR111 avec un Edirol DV 7PR vous pou vez changer les images clips avec le clavier l octave la plus haute du K...

Страница 163: ...de l octave la plus haute pour changer de clip Dynamique du clavier Dissolve Time CC23 Le toucher appliqu aux touches de l octave la plus haute pilote la vitesse de transition entre les images Remarqu...

Страница 164: ...r CNT Utilisez ces param tres pour assigner une fonction aux p dales Voyez Utiliser les p dales comme commutateurs au pied la p 155 pour en savoir plus Remarque La p dale gauche ou centrale ne pilote...

Страница 165: ...accord musique orientale baroque etc Vous pouvez changer la hauteur de toutes les notes d une octave Do Do R Mib Mi Les r glages que vous effectuez ici s appliquent toutes les notes du m me nom c d ch...

Страница 166: ...lez plus sauvegarder L cran affiche alors le message Complete Notez que les programmes utilisateur que vous sau vegardez peuvent aussi faire r f rence un style musical sur disquette Pour pouvoir trava...

Страница 167: ...ramme vous activez le mode Twin Piano du KR111 La p dale de droite sert de p dale forte pour la section droite du clavier et la p dale de gauche sert de p dale forte pour la section gauche du clavier...

Страница 168: ...r sauvegarder le set de pro grammes utilisateur Si vous ne voulez plus le sau vegarder appuyez sur Exit Messages d erreur ventuels Load Set Elle permet de transf rer un set de 34 programmes uti lisate...

Страница 169: ...e si disponible 5 Choisissez le jeu de programmes utilisateur rap peler avec Le message Ent c t de celui ci se met clignoter 6 Appuyez sur le bouton Enter pour charger le fichier choisi Remarque Appuy...

Страница 170: ...ar ties du KR111 choisir des sons etc Remarque Le KR111 re oit des messages sur tous les canaux MIDI assign s aux diverses parties Le KR111 contient les param tres MIDI suivants qui font partie du gro...

Страница 171: ...met de sp cifier le groupe contenant le son voulu Les instruments d autres fabricants peuvent aussi utili ser ce message CC32 pour choisir la banque le KR111 n utilise que la valeur 2 Send PC 1 128 De...

Страница 172: ...e morceau Sautez cette tape si vous voulez modifier un mor ceau existant Veillez entrer un nom original si vous ne voulez pas craser un SMF par inadvertance vous permet d amener le curseur sur le cara...

Страница 173: ...ous voulez utiliser est format e pour IBM PC il est inutile de la formater quoique l acc s est plus rapide avec des disquettes format es avec le KR111 Sinon proc dez comme suit 1 Chargez une disquette...

Страница 174: ...ous pro curer deux c bles PJ 1M de Roland Remarque Le fait de brancher un c ble aux prises Output ne d sactive pas le syst me d amplification du KR111 Vous pouvez brancher une p dale d expression opti...

Страница 175: ...es boutons Intro Ending et Start Stop enfonc s tout en remettant le KR111 sous tension L cran affiche bri vement DISABLED Vous ne pouvez plus lancer arr ter l arrangeur ni les mor ceaux de d monstrati...

Страница 176: ...reur 16 pistes 3 modes simples ALL SOLO PUNCH IN OUT Morceaux internes plus de 50 Programmes utilisateur 34 Effets R verb 8 types Chorus 8 types Multi FX 47 types Archivage des donn es Lecteur de disq...

Страница 177: ...5 Organ 5 32 2 18 76 OrganBss 40 2 17 77 ChorsOr2 8 2 18 78 ChrchOr1 0 2 20 79 ChrchOr3 16 2 20 80 OrgnFlte 24 2 20 81 TrmFlute 32 2 20 82 PuffOrgn 16 2 21 83 Accordn 46 2 22 84 ItalFolk 47 2 22 85 Me...

Страница 178: ...242 Ocarina 0 2 80 243 Shakuhch 0 2 78 244 Bagpipe 0 2 110 245 Shanai 0 2 112 Others Drum SFX CC00 CC32 PC 246 Fantasia 0 2 89 247 Fantsia2 1 2 89 248 Crystal 0 2 99 249 Warm Pad 0 2 90 250 SawWave 9...

Страница 179: ...2 2 124 362 Bird 2 3 2 124 363 Kitty 4 2 124 364 Growl 5 2 124 365 Telphn 1 0 2 125 366 Telphn 2 1 2 125 367 DoorCrk 2 2 125 368 Door 3 2 125 369 Scratch 4 2 125 370 WndChims 5 2 125 371 Scratch2 7 2...

Страница 180: ...ne Splash Cym Cowbell Crash Cym 2 Vibraslap Ride Cymbal Bongo High Bongo Lo Mute H Conga Conga Hi Opn Conga Lo Opn High Timbale Low Timbale Agogo Agogo Cabasa Maracas ShrtWhistle LongWhistle Short Gui...

Страница 181: ...es of this chord Cm7 5 C C D E E F CM7 C M7 DM7 E M7 EM7 FM7 C7 C 7 D7 E 7 E7 F7 Cm C m Dm E m Em Fm Cm7 C m7 Dm7 E m7 Em7 Fm7 Cdim C dim Ddim E dim Edim Fdim Dm7 5 Em7 5 Caug C aug Daug E aug Eaug Fa...

Страница 182: ...A A B B F M7 GM7 A M7 AM7 B M7 BM7 F 7 G7 A 7 A7 B 7 B7 F m Gm A m Am B m Bm F m7 Gm7 A m7 Am7 B m7 Bm7 F dim Gdim A dim Adim B dim Bdim Gm7 5 Am7 5 Bm7 5 F aug Gaug A aug Aaug B aug Baug F sus4 Gsus4...

Страница 183: ...O O O O O O O O O O O Reverb O Chorus O O Bank Select Modulation Portamento Time Data Entry Volume Panpot Expression V Link control Hold 1 Portamento Sostenuto Soft Filter Resonance Release Time Attac...

Страница 184: ...la Farmacia 5ta Avenida 1 Cuadra al Lago 503 Managua Nicaragua TEL 505 277 2557 PANAMA SUPRO MUNDIAL S A Boulevard Andrews Albrook Panama City REP DE PANAMA TEL 315 0101 PARAGUAY Distribuidora De Inst...

Страница 185: ...communications However there is no guarantee that interference will not occur in a particular installation If this equipment does cause harmful interference to radio or television reception which can...

Страница 186: ...602 00 0127 RES 488 05 E Sp F...

Отзывы: