Roland JUNO-Gi Скачать руководство пользователя страница 7

7

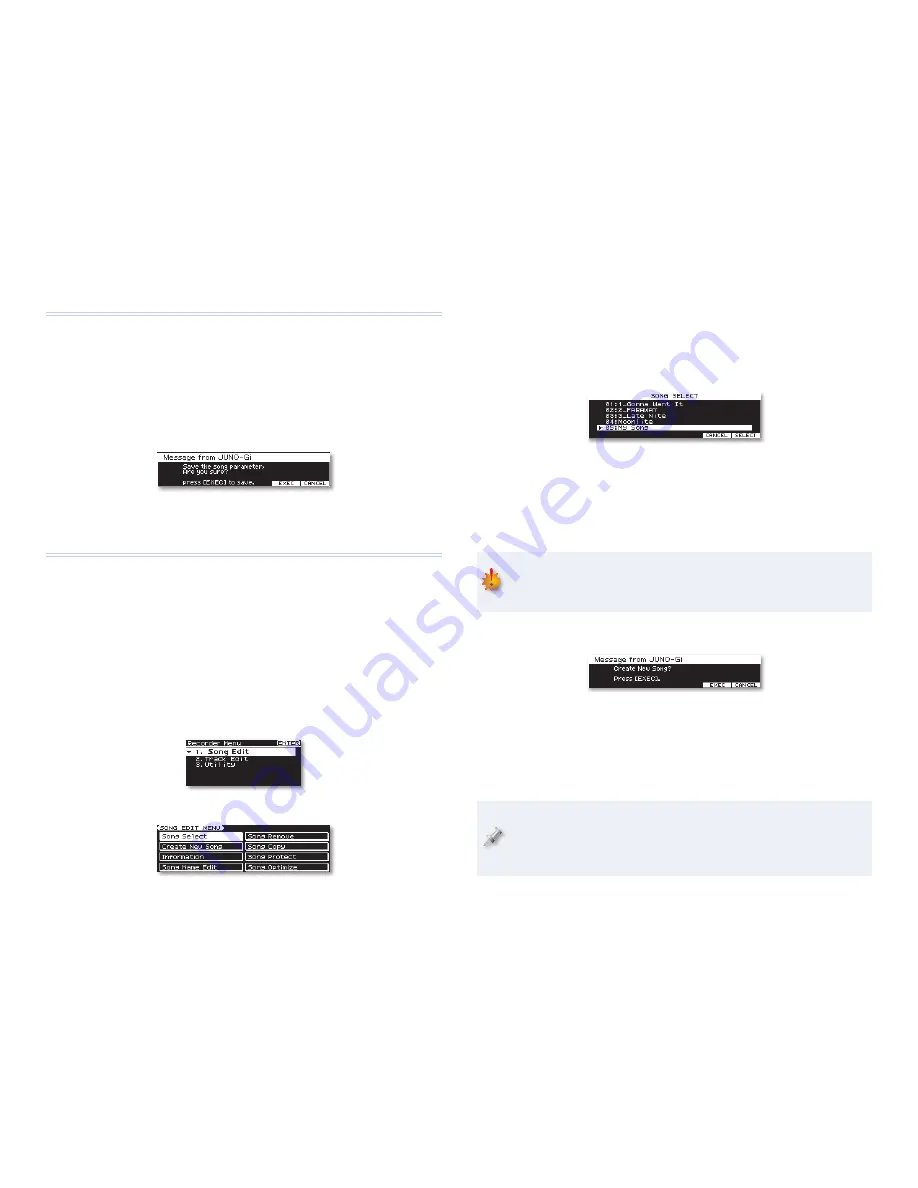
Turn the dial to highlight the desired song tool, and then press ENTER 
to display its screen.

Here’s what each song tool does.

Song Select

We described this tool in the 

Getting to Know the JUNO-Gi

 booklet. To load a 

song from your card, highlight the song on this screen, hit ENTER, and then 
press 5 (EXEC) to confirm your intentions, or 6 (CANCEL) if you’re not sure.

When  you  load  a  new  song,  it  replaces  the  song  currently  loaded  in  the 
JUNO-Gi, which is stored on your SD card.

If you’ve made any changes to the currently loaded song since doing 
any recording, be sure to save the song—as described at the left of this 
page—before loading a new one to avoid losing your work.

Create New Song

To  create  a  brand-new  song,  press  5  (EXEC),  and  then  press  it  again  for 
confirmation, or press 6 (CANCEL) if you’re note sure you want to proceed.

When you create a new song, it’s set up on your SD card, and loaded into 
the JUNO-Gi, where it replaces the currently loaded song, which is stored on 
your SD card for future use.

When  the  JUNO-Gi  sets  up  a  new  song  on  your  SD  card,  it  creates  a 
folder for the song inside the RECORDER folder, which is itself inside 
the  card’s  ROLAND  folder.  All  of  the  files  required  for  the  song—
including your recordings—are placed in this folder.

Saving a Song as You Work

While  the  JUNO-Gi  automatically  saves  your  song  each  time  you  record 
something new, there will be times when you want to store changes you’ve 
made to the song between recordings, such as when you’re working on its 
mix or effects. You can save a song at any time. Here’s how:

Press RECORDER VIEW until you see the RECORDER screen.

Press the WRITE button just to the left of the RECORDER VIEW button. 
The JUNO-Gi asks if you’re sure you want to proceed.

Press 5 (EXEC) to finish updating the song on your SD card.

Editing Songs and Tracks—The Recorder Menu

When the RECORDER VIEW button’s lit, you can press the MENU button to 
reveal the Recorder Menu. It’s in this menu that you’ll find tools

• 

for working with entire songs—

in the Song Edit submenu.

• 

for working with individual V-Tracks—

in the Track Edit submenu.

Song Tools

Press  the  RECORDER  VIEW  button  until  the  RECORDER  screen  is 
visible.

Press the MENU button and select 

Song Edit

, as shown here.

Press the ENTER button to display the SONG EDIT MENU screen.

Содержание JUNO-Gi

Страница 1: ...ghts reserved No part of this publication may be reproduced in any form without the written permission of Roland Corporation U S iTunes is a trademark of Apple Inc Apple Inc is not associated or affiliated with Roland in any manner JUNOGiWS05 JUNO Gi Mobile Synthesizer and Digital Recorder ...

Страница 2: ...ible damage to your equipment your data or yourself About SD Cards You Use for Recording The JUNO Gi s digital recorder records directly to an SD memory card installed in your JUNO Gi You can use standard SD or SDHC format cards Included with your JUNO Gi is a 2 GB gigabyte SD card You ll want to purchase additional cards if you plan to get into the digital recorder For simplicity s sake we ll ref...

Страница 3: ...Start by using a small Phillips head screwdriver to remove the two screws holding in the SD card protector that covers the SD card slot Remove the two screws This protector keeps the card in place during shipping you may want to use the protector to keep a card safely installed onstage and or when you move your JUNO Gi 2 Press the edge of the installed card all the way into its slot until you hear...

Страница 4: ...r Formatting an SD card completely erases the card If there s anything you want to preserve on your card copy it to your computer after inserting the card in your computer s SD slot or a compatible memory card reader connected to the computer STOP NOW AND DEAL 6 If you want to proceed with the formatting operation press 5 EXEC If you don t press 6 CANCEL Backing Up Your Recordings You can copy a c...

Страница 5: ...ings before recording begins 4 Press the PLAY button to start playback 5 When you get to a location just before the spot at which you want to start re recording press REC to punch in 6 Play or sing what you want to fix 2 Locate the ROLAND folder on your computer that you want to copy to the card 3 Drag the folder onto the JUNO Gi device s icon 4 When the computer tells you the device already conta...

Страница 6: ...ORDER VIEW to go to the RECORDER screen and then press the REPEAT A3 4B button once Clear A B appears momentarily onscreen 7 As soon as you re done press REC again to punch out 8 Press STOP and go back to listen to your punch If it s not good enough repeat Steps 3 7 to try again You can attempt a punch as many times as you need to A connected foot switch like a Roland DP 2 DP 10 or FS 5U makes man...

Страница 7: ...r SD card it creates a folder for the song inside the RECORDER folder which is itself inside the card s ROLAND folder All of the files required for the song including your recordings are placed in this folder Saving a Song as You Work While the JUNO Gi automatically saves your song each time you record something new there will be times when you want to store changes you ve made to the song between...

Страница 8: ...ess 5 EXEC Each copy you make of a song takes up the same amount of space on the SD card in essence doubling the space taken up by the song Information The SONG INFORMATION screen provides information regarding the current song s status on your SD card Folder Name tells you the name of the song s folder on your SD card Each song s folder is assigned a number instead of using the song s title as di...

Страница 9: ...ong on your SD card If you d like to do some practice work on it playing along or experimenting with its mix and or effects You won t be able to record anything new and you won t be able save anything you do while the song is protected Protecting a song can also be useful when a song s completed and you want to make sure nothing happens to it When you select Song Protect on the SONG EDIT MENU scre...

Страница 10: ... B in the TRACK ERASE screen The target track and V Track are where your copy will go 4 Set the desired Target Track and Target V Track 5 Set the time location within the target track V Track at which you want the copy placed 6 You can place multiple copies of the source material end to end on the target track Set Repeat setting to the number of copies you want to make 7 Press 6 EXEC to initiate t...

Страница 11: ...art in bars and beats or in time Track Exchange Track Exchange allows you to swap the location of a pair of V Tracks You might want to do this for organizational purposes To use it 1 Set Source Track and Source V Track to the first V Track 2 Set Target Track and Target V Track to the second V Track 3 Press 6 EXEC and when the JUNO Gi asks if you re sure press 5 EXEC to proceed with the swap or pre...

Страница 12: ...bining everything in a new V Track or a stereo pair of V Tracks You can bounce only specific sections of a song or the entire song Take care not to place the imported audio onto a track and V track that already contains a recording you want to use in your song 3 Press 6 EXEC 4 When the JUNO Gi asks if you re sure you want to proceed press 5 EXEC to complete the importing process or 6 CANCEL Track ...

Страница 13: ...he track and then customize the effect by pressing 6 EFFECT on the RECORDER screen and adjusting the effect s settings as desired 2 If you re comping find the bits you want to use and play the song a few times to rehearse switching between source tracks using the digital recorder s faders There are a few reasons you might want to bounce You can free up V Tracks for more recording When you bounce t...

Страница 14: ...ounce 1 On the RECORDER screen press 1 MODE until neither BOUNCE or MASTERING appear in the upper right corner This means you re back in Normal mode In Normal mode there s nothing here like this 3 If you re addingliveaudio usetheInputLevelsettingsontheKEYBOARD INPUT or AUDIO INPUT SELECT screens to set your input level relative to your source tracks bouncing the rhythm pattern sound use its fader ...

Страница 15: ...of the screen 2 Press the button beneath each bounced source track s fader so it s not lit in order to mute that track 3 Press 9 to return to the top of the song or use and or to navigate to just before the bounced section of the song 4 Press PLAY to listen to your bounce Once you re done bouncing you can set the source tracks so that they play new empty V Tracks instead of the ones containing the...

Страница 16: ... a stereo 16 bit 44 1 kHz WAV file that can be burned onto a CD converted for use on a personal music player uploaded or emailed Editing a Mastering Effect Patch 1 After selecting a mastering effect patch to start with press 6 and then 3 and or 4 to highlight an effect module whose settings you want to change 3 Use the 3 4 5 and or 6 buttons to highlight the Target Track value as shown on the next...

Страница 17: ...ch respectively 7 Select a memory location for the effect 8 Press 6 WRITE followed by 5 EXEC to store the effect 9 Return to Step 10 of Mastering Your Mix above to continue the mastering process Listening to Your Mastered Tracks To listen to your mastered mix properly you ll want to hear it as it really is alone without listening to your now mastered tracks and effects alongside it To do this 1 On...

Отзывы: