background image


OS Version 2

G-70 Music Workstation 

r

9

ENGLISH

ENGLISH

ENGLISH

ENGLISH

Note: 

If you assign several song tracks to the same Style track, 

a bullet (“

”) appears next to the Style track name in the table 

to indicate that the Style track in question is already assigned 
to another song track. (Though this is perfectly possible, the 
result is usually not convincing.)

If necessary, press the 

[INIT¥VALUE]

 field to return to 

the default assignments if that produces the best 
result after all.

Auditioning the tracks

Press the 

[Jump≈to≈1st≈note]

 field to jump to the first 

note of the selected song track (the one that appears 
on a blue background). Playback starts automatically 
from that point and you will hear all song tracks. 
Press the RECORDER 

[PLAY÷STOP¥®÷ª]

 button to stop 

playback (or to start it again).

Note: 

If the selected track contains no data at all, playback is 

started from the very first song measure.

Muting tracks

Sometimes, it may be necessary to mute certain parts 
so as to concentrate on what the other tracks do, and 
to decide which tracks should be converted into a 
Music Style. To do so, press the 

[MUTE]

 field and then 

the lines of the song tracks you don’t want to hear. 
Such tracks are flagged with an “M”.

Press the 

[MUTE]

 field again to switch off the func-

tion of the same name.

Solo

To listen to one track in isolation, press the 

[SOLO]


field and the field of the track you want to solo, then 
start playback. This mutes all other tracks, while the 
selected track is flagged with an “S”. 

Press the 

[SOLO]

 field again to switch off the func-

tion of the same name.

(6) Press the 

[CONVERT]

 field to jump to the following 

page.

Here, you can listen to the selected tracks, specify 
which excerpt should be extracted and set the pat-
terns that should contain the selected data. The most 
logical order for proceeding is as follows:

(7) Press the RECORDER 

[TOP¥|√]

 button, followed by 

[PLAY÷STOP¥®÷ª]

 to start song playback.

[FWD]

 and 

[BWD]

 are also available for rewinding and 

fast-forwarding.

(8) While listening to the song, press the 

[MARK¥A]


field at the beginning of first measure to be con-
verted, and 

[MARK¥B]

 when the G-70 reaches the 

last measure you need.

Alternatively, you can stop playback, press the FROM 

[A]

 or 

[B]

 “display” field and enter the measure num-

ber with the 

[DATA÷ENTRY]

 dial or the 

[DEC]

/

[INC]


buttons.

(9) Stop playback by pressing 

[PLAY÷STOP¥®÷ª]

.

(10) Switch on the 

[LOOP]

 button icon.

This function allows you to listen to the selected 
excerpt (between 

[A]

 and 

[B]

) repeatedly. 

That way, you can check whether the last notes of 
your pattern-to-be allow for a smooth transition to 
other Music Style patterns, or sound natural when 
the pattern is repeated. Sometimes, quantizing the 
last few notes of an excerpt may be helpful to avoid 
including notes that were played a little ahead of the 
beat (and therefore sound on the last beat you con-
vert). 

(11) Press the RECORDER 

[PLAY÷STOP¥®÷ª]

 button to 

start playback.

The selected passage is repeated over and over until 
you stop playback. 

(12) If necessary, use the 

[MUTE]

 and 

[SOLO]

 fields to 

temporarily switch off or isolate certain tracks. 

This is only for checking purposes. The on/off status 
does not affect the selection that will be converted. 

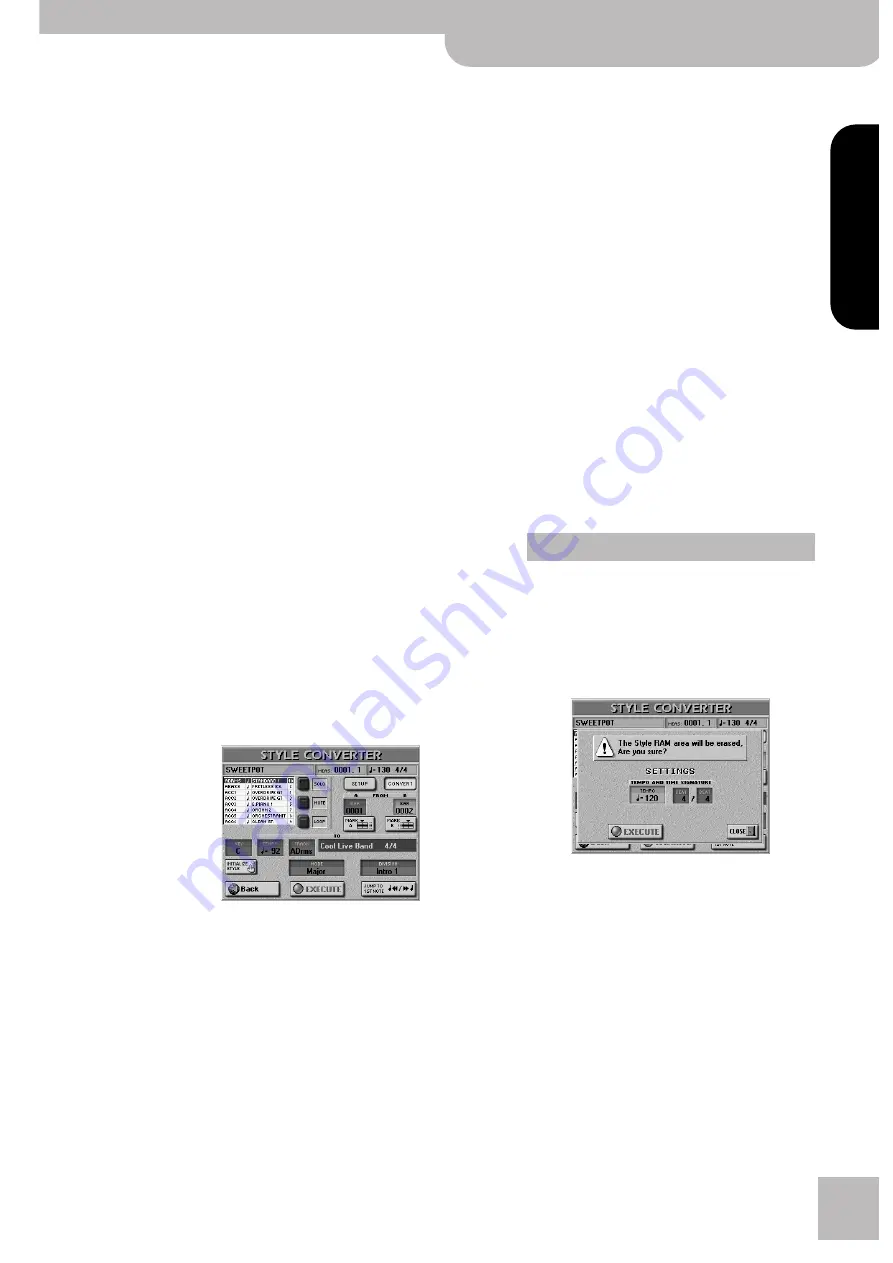
The 

[INITIALIZE¥STYLE]

 field on this page is usually 

used only once: before converting the first song 
tracks. If you don’t use this field, the tracks you con-
vert are added to the Style data already present in 
the G-70’s Style RAM area. If you need to start from 
scratch, however (to create an entirely new Style)…

• Press the 

[INITIALIZE¥STYLE]

 field.

• Press the 

[TEMPO]

 and use the 

[DATA÷ENTRY]

 dial or 

the 

[DEC]

/

[INC]

 buttons to enter the desired value.

• Press the two TIME SIGNATURE fields (one after the 

other) and use the 

[DATA÷ENTRY]

 dial or the 

[DEC]

/

[INC]

 buttons to enter the desired value.

Note: 

This is your first and last chance to specify the new 

Style’s time signature. The only way you can do this is by ini-
tializing the Style RAM area. So be sure to set this value before 
your very first conversion. (The Style’s time signature can also 
be changed using the Style Composer, however, but that forces 
you to change modes.)

• After setting everything to your liking, press the 

[EXECUTE]

 field to initialize the Style RAM area.

(Press 

[CLOSE]

 to leave this page without initializing 

the data in RAM.)

Initializing the Style RAM memory

All manuals and user guides at all-guides.com

Содержание G-70

Страница 1: ...Addendum English Deutsch Fran ais All manuals and user guides at all guides com a l l g u i d e s c o m...

Страница 2: ...All manuals and user guides at all guides com...

Страница 3: ...tch the Guitar mode on or off If you selected this page by pressing EASY SETTING ARR PIANO it is already set to on Playing realistic guitar parts Guitar mode 3 First steps 4 Additional ARPEGGIO functi...

Страница 4: ...Press the first C key to the right of the CHORD area This sounds the note a guitarist would play on the low E string The key you are pressing now belongs to the ARPEGGIO section 5 Now press the D to...

Страница 5: ...h icon allows you switch the Guitar mode on or off If you selected this page by pressing EASY SETTING ARR PIANO it is already set to on 2 Press the ELECTRIC or ACOUSTIC switch icon to specify whether...

Страница 6: ...guitars a downward strum that is muted almost instantly and accompanied by a knocking sound Up slow Ab5 This is a slow upward strum Down slow mute A5 Here s a slightly slower down ward strum that is...

Страница 7: ...r is off you may need even more flexibility than this basic system can provide In that case switch on this parame ter and try out different inversions to discover how that affects your guitar AUTO SUS...

Страница 8: ...ments for the remaining patterns Always set the correct KEY page 10 Only then will the Style really work as expected when used with the G 70 s Arranger Your new Style resides in the G 70 Style RAM mem...

Страница 9: ...be con verted and MARK B when the G 70 reaches the last measure you need Alternatively you can stop playback press the FROM A or B display field and enter the measure num ber with the DATA ENTRY dial...

Страница 10: ...ver also extract each track separately Mode Allows you to select the mode of your pattern Major major m minor or 7th seventh Choose the mode that matches the chord being used in the excerpt You can al...

Страница 11: ...16 TRK SEQUENCER button 2 Press the INITIALIZE SONG field The display changes to Assigning the Vocal Harmonist to track 16 by initializing the song RAM memory The VOCAL HARMONIST ON TRACK 16 field all...

Страница 12: ...dure Melody Intelligence This function has become more flexible Selecting a Harmony Type also means that the G 70 automatically assigns a suitable sound to the MELODY INTELL part e g a trumpet and sa...

Страница 13: ...MELODY INTELL sound Note While the MELODY INTELL button on the front panel is off the 2ND TONE name appears on a gray back ground if available In this state you cannot select a different sound Switch...

Страница 14: ...nt to help you find the part whose volume you want to change or that you want to switch off see below Note If the Solo function is on while you save a User Program all tracks except the soloed one wil...

Страница 15: ...hat file and there fore become regular song or Style data Before saving your settings Before saving your made up song or Style to the internal memory a card or a floppy disk you can but you don t have...

Страница 16: ...to odd jumps of certain parts Nearest Refers to a new more musical system for real time shifts of the recorded Style notes during Arranger playback Select if the selected pattern should ignore this se...

Страница 17: ...m sets to floppy disk in addition to the internal memory and a memory card This applies to the Copy function in Disk Media mode Other changes to this environment are Delete Use these functions to dele...

Страница 18: ...indicate the pattern s duration Break Mute function for the ASSIGN SW buttons Break Mute This function can only be accessed via the ASSIGN SW button you assign it to When you press that button Arrange...

Страница 19: ...board use the CC00 value 92 The CC32 value to use can be found in the documentation that came with the expansion board you installed Note You can select sounds of an SRX series expansion board for an...

Страница 20: ...OS Version 2 20 r G 70 Music Workstation All manuals and user guides at all guides com...

Страница 21: ...sschalten Wenn Sie diese Seite mit EASY SETTING ARR PIANO aufrufen ist er bereits eingeschaltet Spielen von realistischen Gitarrenparts Guitar Modus 21 Schnellstart 22 Weitere ARPEGGIO Funktionen 23 V...

Страница 22: ...Parts MBS LW2 LW1 linke H lfte und UP3 rechte Seite im Upper3 Split Bereich spielen Sogar die Akkorderkennung des Arrangers bleibt aktiv Noten die Sie im CHORD Bereich spielen werden nicht von der Gi...

Страница 23: ...m Off zu w hlen Sie k nnen aber auch ein User Programm aufrufen das den Guitar Modus nicht verwendet Andere Gitarrenkl nge w hlen Jetzt da Sie bereits mehrere Gitarrenfunktionen ken nen wollen wir and...

Страница 24: ...hs Saiten nahezu gleichzeitig erklingen jetzt aber von der h chsten zur tiefsten Saite e Schnell abw rts ged mpft a schnell aufw rts Eb5 Dieser Abw rtsschlag wird unmittelbar nach Dr cken der Taste wi...

Страница 25: ...ersehen Sie k nnen sie auch abschalten ADAPT CHORD Schalten Sie diesen Parameter ein wenn sich die Stimmf hrung der virtuellen Gitarre nach den im CHORD Bereich gespielten Umkehrungen rich ten soll Je...

Страница 26: ...ist sollten Sie sich auf kleine aber aussagef hige Einheiten beschr nken Beispiel Die Struktur der meisten Songs beruht auf 4 taktigen Bl cken Daher w re es etwas eigenwillig wenngleich m glich 6 Tak...

Страница 27: ...em S gekennzeichnet und alle anderen Spuren werden stummgeschaltet Dr cken Sie das SOLO Feld noch einmal um diese Funktion auszuschalten 6 Dr cken Sie das CONVERT Feld um folgende Seite aufzurufen Hie...

Страница 28: ...r f r die Echtzeit tauglichkeit eines Pattern Die Akkorderkennung des Arrangers geht n mlich davon aus dass alle Pattern in C Dur sind Wenn Sie ein C im INTELLIGENT Modus oder einen C Akkord im Erkenn...

Страница 29: ...n Namen und dr cken Sie erneut EXECUTE 18 Dr cken Sie den EXIT Taster um zur Hauptseite zur ckzukehren Aufnahme von Harmonist und Gitarrenparts 16 Spur Sequenzer Der 16 Spur Sequenzer wurde um mehrere...

Страница 30: ...ird 8 Geben Sie an wie die neuen Daten w hrend der Aufnahme hinzugef gt werden sollen REC MODE Alle weiteren Arbeitsschritte entnehmen Sie bitte der Bedienungsanleitung Melody Intelligence Diese Funkt...

Страница 31: ...te aus ist erscheint der 2ND TONE Name falls ver f gbar auf grauem Hintergrund Dann l sst sich kein anderer Klang w hlen Schalten Sie den MELODY INTELL Taster ein um die gleichnamige Funktion zu aktiv...

Страница 32: ...llung kann nicht gespeichert werden Sie dient lediglich dazu nderungsbed rftige Parts schneller zu identifizieren siehe unten Anmerkung Wenn die Solo Funktion beim Speichern eines User Programms aktiv...

Страница 33: ...Style Daten umfunktionieren Vor dem Speichern von Einstellungen Bevor Sie einen selbst erstellten Song oder Style im internen Speicher auf einer Karte oder Diskette sichern k nnen Sie Ihre nderungen b...

Страница 34: ...arts sehr unmu sikalisch hin und her Nearest Verweist auf ein musikalischeres System f r den Echtzeit Versatz der aufgezeichneten Style Noten w hrend der Arranger Wiedergabe W hlen Sie wenn das gew hl...

Страница 35: ...r einer Karte kopieren Diese M glichkeit bezieht sich auf die Copy Funktion im Disk Media Modus Andere nderungen in diesem Bereich sind Delete Mit diesen Funktionen k nnen Sie den gew hlten User Progr...

Страница 36: ...w rts 4 3 usw um die L nge des Pattern anzuzeigen Break Mute Funktion f r die ASSIGN SW Taster Break Mute Diese Funktion m ssen Sie einem ASSIGN SW Taster zuordnen Wenn Sie ihn dr cken wird die Arrang...

Страница 37: ...rufen der Patches einer SRX Wellenformpla tine via MIDI Drum Sets eines Expansion Boards der SRX Serie ver wenden den CC00 Wert 92 Den CC32 Wert finden Sie in der Dokumentation des verwendeten Expansi...

Страница 38: ...Systemversion 2 38 r G 70 Music Workstation All manuals and user guides at all guides com...

Страница 39: ...cette page en appuyant sur EASY SETTING ARR PIANO le mode est d j activ Jouer de la guitare Mode guitare 39 Prise en main 40 Fonctions ARPEGGIO suppl mentaires 40 Quitter le mode guitare du G 70 41 S...

Страница 40: ...op ration suivante 4 Appuyez sur la premi re touche Do droite de la zone CHORD Cela produit la note qu un guitariste jouerait sur la corde Mi grave La touche que vous actionnez main tenant appartient...

Страница 41: ...iliser les techniques STRUMM dispo nibles la p 41 1 Appuyez simultan ment sur les boutons EASY SET TING ARR et PIANO Remarque Vous pouvez aussi choisir cette page en appuyant sur MENU GUITAR MODE Dans...

Страница 42: ...t un grattement vers le haut qui n est pas touff e Bas rapide a haut rapide touff E5 Vous obte nez le r sultat inverse du motif pr c dent le grattement vers le haut est touff mais pas celui vers le ba...

Страница 43: ...D Comme vous le savez chaque accord peut tre jou de diverses fa ons sur un clavier et sur une guitare Bien que le mode guitare pro duise toujours l accord d une mani re propre la guitare m me quand ce...

Страница 44: ...Exemple la plupart des morceaux font appel une structure de blocs de 4 mesures La conversion de 6 mesures est donc un peu trange bien que parfaite ment possible Pr parez un motif simple pour MAIN 1 et...

Страница 45: ...S Appuyez nouveau sur la case SOLO pour d sac tiver la fonction 6 Appuyez sur la case CONVERT pour passer la page suivante Elle vous permet d couter les pistes s lectionn es de sp cifier les passages...

Страница 46: ...notes originales du motif pas de transposition en temps r el Si ce motif est en Fa et si vous oubliez d en avertir le G 70 vous entendez un Fa quand vous jouez un Do ou un accord Do Remarque Il est in...

Страница 47: ...ronnement du s quenceur 16 pistes dont la plus impor tante est la facult d enregistrer des donn es Vocal Harmonist et du mode Guitar 1 Appuyez sur le bouton RECORDER 16 TRK SEQUENCER 2 Appuyez sur la...

Страница 48: ...les donn es sont ajout es la piste durant l enregistrement REC MODE Voyez le Mode d emploi pour savoir comment effec tuer le reste de la proc dure Fonction Melody Intelligence Cette fonction est deven...

Страница 49: ...as de son MELODY INTELL Remarque Quand le bouton MELODY INTELL en face avant est coup le nom 2ND TONE appara t sur fond gris si disponible Dans cet tat vous ne pouvez pas changer de son Activez le bou...

Страница 50: ...la partie dont vous voulez chan ger le volume ou qu il faut couper voyez plus loin Remarque Si la fonction Solo est activ e durant la sauve garde d un programme utilisateur toutes les pistes l excep...

Страница 51: ...chier et devenir des donn es de style et mor ceau normales Avant de sauvegarder vos r glages Avant de sauvegarder un morceau ou style de votre cru dans la m moire interne sur carte ou sur disquette vo...

Страница 52: ...ons de style en temps r el durant la reproduction Bas sur les fondamentales des accords jou s durant la reproduction de l arrangeur il provoque parfois des sauts bizarres Nearest Nouveau syst me plus...

Страница 53: ...es Fonctions Disk Media Copier des sets de programmes utilisateur sur disquette Il est d sormais possible de copier des sets de program mes utilisateur sur disquette en plus de la m moire interne et d...

Страница 54: ...age principale affiche un d compte 4 3 etc pour indiquer la dur e du motif Ending Fonction Break Mute pour les boutons ASSIGN SW Break Mute Cette fonction n est accessible que par le bouton ASSIGN SW...

Страница 55: ...cartes d extension SRX via MIDI Les kits de batterie de la carte d extension SRX utilisent la valeur CC00 92 La valeur CC32 se trouve dans la documentation accompagnant la carte d extension que vous a...

Страница 56: ...R 602000129 RES 474 05 Printed in Italy 07 05 G 70 Addendum Ver 2 0 E F D All manuals and user guides at all guides com a l l g u i d e s c o m...

Отзывы: