


28
QUICK GUIDE
Knappen vil lyse og displayet viser de rytmer som findes i den valgte kategori.
2. Tryk på [INC] eller [DEC] knapperne for at vælge andre rytmer på listen. Rytmen som
vælges står med negativ skrift.
3. Du kan også anvende [UP] og [DOWN] knapperne hvis du vil ”bladre ” i listen, inden
du bestemmer dig for hvilken rytme du ønsker. Tryk [ENTER] for at vælge rytme.
4. Hvis du ønsker at skifte til anden rytmefamilie, så tryk på den ønskede [RHYTHM
FAMILY] knap og gå til punkt 2.
5. Tryk [EXIT] for at forlade [RHYTHM] delen.
Indstil balancen mellem arrangement og live parterne
Du kan bruge [Balance] knapperne til at bestemme forholdet mellem arrangement
og de parter, som du spiller sammen med arrangementet (liveparter). Tryk på knap-
pen [Backing], hvis du vil have arrangementet højere i lydstyrke eller tryk på knappen
[Keyboard], hvis du vil have liveparterne højere.
Displayet viser, hvordan balancen er indstillet, når du trykker kort på en af knapperne.
Playing with Automatic Accompaniments
24
[AUTO FILL IN]
When this button lights, the BK-3 plays a transition before switching
to the newly selected VARIATION pattern. Example: if the VARIATION
[1] pattern is running, pressing the [4] button will not switch to that
pattern right away—the BK-3 first plays a fill-in to announce the
new song section.
NOTE
The duration of the fill-ins (transitions) can be halved if you like.
See “Fill In Half Bar” on p. 49. You can also speed up or slow
down playback during a fill-in. See “Fill Ritardando” on p. 49.
Selecting Rhythms
1.
Press a RHYTHM FAMILY button to select the rhythm
family.
NOTE
By pressing and holding one of these buttons, you activate the
lock function for rhythm selection, which means that rhythms
no longer change when you select Performance memories (see
p. 39).
The display shows a list of the rhythms that belong to this family. If
the currently selected rhythms belongs to the family whose button
you pressed, its name is displayed in reverse and the indicator of
the button you pressed lights:
If you press a different RHYTHM FAMILY button, the display shows
the beginning of the associated list (but the indicator of the
associated family button doesn’t light):
2.
Press the [INC] or [DEC] button to select another desired
Rhythm in the list.
The name of selected Rhythm is displayed in reverse.
3.
You can also use the [UP] or [DOWN] button to move the
cursor in the list and then press [ENTER] to select the
Rhythm.
In this case the Rhythm is recalled when you press the [ENTER]
button.
4.
If you need select a Rhythm of another family, press
another Rhythm button and repeat the step 2.
5.
Press [EXIT] to leave the Rhythm selection page.
MEMO
Rhythms can also be selected by simply pressing the [NUMERIC]
key and entering their number (p. 20).
Playing Back Rhythms
1.
Set the BK-3’s [VOLUME] knob to a reasonable level (about
1/4).
2.
Press the [SPLIT] button if you want to play in Split mode.
MEMO
The default setting for the split point is note number 60 (C4).
You can change the split point to a different note (see “Split
Point” p. 47.
3.
Select the rhythm you want to use.
4.
Press the VARIATION [1], [2], [3] or [4] button to select the
complexity of the verse pattern.
For example press the VARIATION [2].
5.
Press the [INTRO] /
[
&
]
button (it lights) to start rhythm
playback with an introduction.
Adjusting the Sound Volume
17
Demo of the BK-3
Your BK-3 contains a demo that introduces all of its highlights. It might be
a good idea to try it out now. The demo is self-explanatory, so we’ll just
show you how to start and stop it.
1.
Simultaneously press the [MENU] and [EXIT] buttons.
Playback starts automatically with the demo song.
2.
Press the [EXIT] button to leave the demo function.
NOTE
No data for the music that is played back will be output from
MIDI OUT.
NOTE
All rights reserved. Unauthorized use of this material for
purposes other than private, personal enjoyment is a violation
of applicable laws.
NOTA
When the BK-3 has been switched off by “Auto Off” , you need
to press the [POWER] button, wait a few seconds, then press the
button again to switch the BK-3 back on. (Do not switch it on
too quickly.)
Adjusting the Sound Volume
Here’s how to adjust the volume of your keyboard playing or the playback
volume of an internal song.
If headphones are connected, use the [Volume] knob to adjust the
headphone volume.
1.
Turn the [Volume] knob to adjust the overall volume.
Adjust the volume while you play the keyboard to produce sound.
Turning the knob toward the right will increase the volume, and
turning it toward the left will decrease the volume.
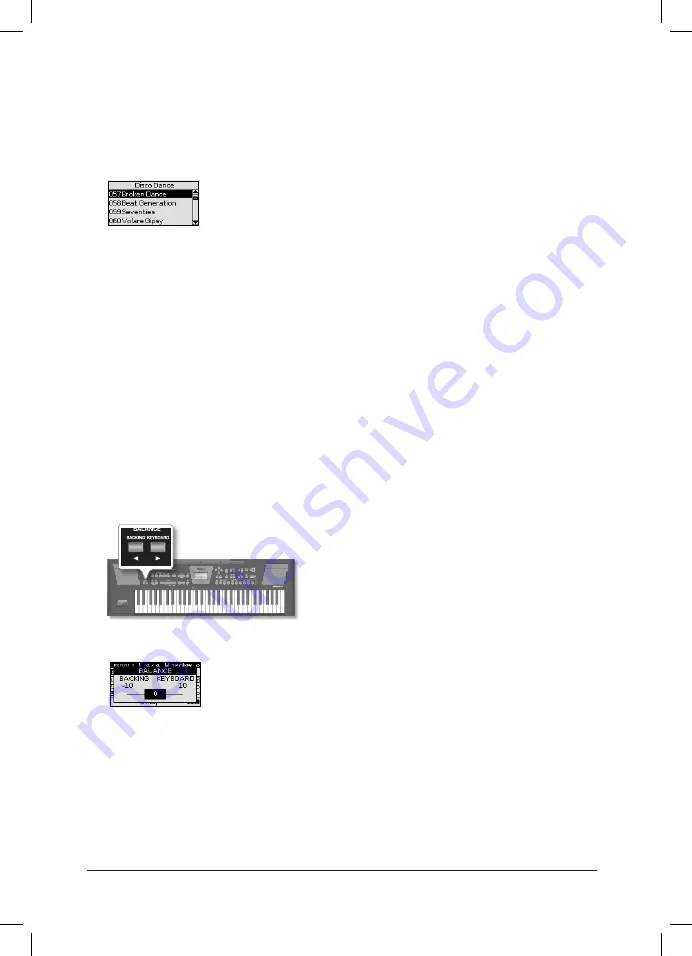
Volume balance between the
backing and the real-time parts
If the rhythm accompaniment or song is too loud or too soft with
respect to the real-time parts you are using, you can change the
balance with the [BACKING] and [KEYBOARD] buttons:
When the [BACKING] or [KEYBOARD] button is pressed, the
“BALANCE” pop-up window appears, showing the current setting:
After about 3 seconds, the pop-up window disappears again.
Press the [BACKING] and [KEYBOARD] buttons together to center
the volume balance.
Adjusting the Sound Volume
17
Demo of the BK-3
Your BK-3 contains a demo that introduces all of its highlights. It might be
a good idea to try it out now. The demo is self-explanatory, so we’ll just
show you how to start and stop it.
1.
Simultaneously press the [MENU] and [EXIT] buttons.
Playback starts automatically with the demo song.
2.
Press the [EXIT] button to leave the demo function.
NOTE
No data for the music that is played back will be output from
MIDI OUT.
NOTE
All rights reserved. Unauthorized use of this material for
purposes other than private, personal enjoyment is a violation
of applicable laws.
NOTA
When the BK-3 has been switched off by “Auto Off” , you need
to press the [POWER] button, wait a few seconds, then press the
button again to switch the BK-3 back on. (Do not switch it on
too quickly.)
Adjusting the Sound Volume
Here’s how to adjust the volume of your keyboard playing or the playback
volume of an internal song.
If headphones are connected, use the [Volume] knob to adjust the
headphone volume.
1.
Turn the [Volume] knob to adjust the overall volume.
Adjust the volume while you play the keyboard to produce sound.
Turning the knob toward the right will increase the volume, and
turning it toward the left will decrease the volume.
Volume balance between the
backing and the real-time parts
If the rhythm accompaniment or song is too loud or too soft with
respect to the real-time parts you are using, you can change the
balance with the [BACKING] and [KEYBOARD] buttons:
When the [BACKING] or [KEYBOARD] button is pressed, the
“BALANCE” pop-up window appears, showing the current setting:
After about 3 seconds, the pop-up window disappears again.
Press the [BACKING] and [KEYBOARD] buttons together to center
the volume balance.
Содержание BK-3
Страница 1: ... DK NO BK 3 ...
Страница 2: ......
Страница 42: ...42 QUICK GUIDE NOTER ...
Страница 43: ...QUICK GUIDE 43 NOTER ...


