background image

R&S FSV-B30/-B31

DC Power Supply R&S FSV-B30

Installation Guide 1310.9900.00 - 04

5

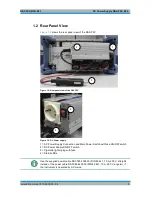
1.2 Rear Panel View

Figure 1-2

shows the rear panel view of the R&S FSV.

Figure 1-2: Rear panel view of the R&S FSV

Figure 1-3: DC Power supply

1 = AC Power Supply Connection and Main Power Switch with fuse ON/OFF switch
2 = DC Power Supply ON/OFF switch
3 = Cigarette lighter plug with fuse
4 = Status LEDs

Use the supplied power cable DS 0025.2365.00 (DIN 49 441, 10 A, 250 V, straight)
instead of the power cable DS 0086.4400.00 (DIN 49 441, 10 A, 250 V, angular), if
the instrument is operated by AC mains.

1

2

3

2

4

Содержание R&S FSV-B30

Страница 1: ...R S FSV B30 B31 DC Power Supply Installation Guide 1310 9900 00 04 Test and Measurement Installation Guide ...

Страница 2: ... 49 89 41 29 0 Fax 49 89 41 29 12 164 E mail info rohde schwarz com Internet http www rohde schwarz com Printed in Germany Subject to change Data without tolerance limits is not binding R S is a registered trademark of Rohde Schwarz GmbH Co KG Trade names are trademarks of the owners The following abbreviations are used throughout this manual R S FSV B30 B31 is abbreviated as R S FSV B30 B31 ...

Страница 3: ...f the product The product is used for its designated purpose if it is used in accordance with its product documentation and within its performance limits see data sheet documentation the following safety instructions Using the product requires technical skills and in some cases a basic knowledge of English It is therefore essential that only skilled and specialized staff or thoroughly trained pers...

Страница 4: ... dangers Indicates a hazardous situation which if not avoided will result in death or serious injury Indicates a hazardous situation which if not avoided could result in death or serious injury Indicates a hazardous situation which if not avoided could result in minor or moderate injury Indicates information considered important but not hazard related e g messages relating to property damage In th...

Страница 5: ...not observed either at all or to the extent necessary electric shock fire and or serious personal injury or death may occur 1 Prior to switching on the product always ensure that the nominal voltage setting on the product matches the nominal voltage of the AC supply network If a different voltage is to be set the power fuse of the product may have to be changed accordingly 2 In the case of product...

Страница 6: ...t be fuse protected in such a way that anyone who has access to the product as well as the product itself is adequately protected from injury or damage 14 Use suitable overvoltage protection to ensure that no overvoltage such as that caused by a bolt of lightning can reach the product Otherwise the person operating the product will be exposed to the danger of an electric shock 15 Any object that i...

Страница 7: ...e masks and protective clothing must be worn 7 Laser products are given warning labels that are standardized according to their laser class Lasers can cause biological harm due to the properties of their radiation and due to their extremely concentrated electromagnetic power If a laser product e g a CD DVD drive is integrated into a Rohde Schwarz product absolutely no other settings or functions m...

Страница 8: ...an permitted 5 If a cell develops a leak the fluid must not be allowed to come into contact with the skin or eyes If contact occurs wash the affected area with plenty of water and seek medical aid 6 Improperly replacing or charging cells or batteries that contain alkaline electrolytes e g lithium cells can cause explosions Replace cells or batteries only with the matching Rohde Schwarz type see pa...

Страница 9: ... substances or fuels can cause health problems and lead to environmental damage For additional information about environmental protection visit the Rohde Schwarz website Instrucciones de seguridad elementales Es imprescindible leer y cumplir las siguientes instrucciones e informaciones de seguridad El principio del grupo de empresas Rohde Schwarz consiste en tener nuestros productos siempre al día...

Страница 10: ...e el uso del producto Deberán tenerse en cuenta todas las demás informaciones de seguridad como p ej las referentes a la protección de personas que encontrarán en el capítulo correspondiente de la documentación del producto y que también son de obligado cumplimiento En las presentes informaciones de seguridad se recogen todos los objetos que distribuye el grupo de empresas Rohde Schwarz bajo la de...

Страница 11: ... producto se emplea de forma sinónima el término CUIDADO Las palabras de señal corresponden a la definición habitual para aplicaciones civiles en el área económica europea Pueden existir definiciones diferentes a esta definición en otras áreas económicas o en aplicaciones militares Por eso se deberá tener en cuenta que las palabras de señal aquí descritas sean utilizadas siempre solamente en combi...

Страница 12: ... la tensión preseleccionada en el producto coincida con la de la red de alimentación eléctrica Si es necesario modificar el ajuste de tensión también se deberán cambiar en caso dado los fusibles correspondientes del producto 2 Los productos de la clase de protección I con alimentación móvil y enchufe individual solamente podrán enchufarse a tomas de corriente con contacto de seguridad y con conduc...

Страница 13: ...r efectuadas por un electricista especializado 13 En el caso de dispositivos fijos que no estén provistos de fusibles interruptor automático ni otros mecanismos de seguridad similares el circuito de alimentación debe estar protegido de modo que todas las personas que puedan acceder al producto así como el producto mismo estén a salvo de posibles daños 14 Todo producto debe estar protegido contra s...

Страница 14: ...mpresario operador tiene la obligación de evaluar y señalizar las áreas de trabajo en las que exista un riesgo elevado de exposición a radiaciones 6 Tenga en cuenta que en caso de incendio pueden desprenderse del producto sustancias tóxicas gases líquidos etc que pueden generar daños a la salud Por eso en caso de incendio deben usarse medidas adecuadas como p ej máscaras antigás e indumentaria de ...

Страница 15: ...or ni fuego Debe evitarse el almacenamiento a la luz directa del sol Las celdas y baterías deben mantenerse limpias y secas Limpiar las conexiones sucias con un paño seco y limpio 3 Las celdas o baterías no deben cortocircuitarse Es peligroso almacenar las celdas o baterías en estuches o cajones en cuyo interior puedan cortocircuitarse por contacto recíproco o por contacto con otros materiales con...

Страница 16: ...ivos eléctricos usados no se deben desechar con los residuos domésticos sin clasificar sino que deben ser recogidos por separado Rohde Schwarz GmbH Co KG ha elaborado un concepto de eliminación de residuos y asume plenamente los deberes de recogida y eliminación para los fabricantes dentro de la UE Para desechar el producto de manera respetuosa con el medio ambiente diríjase a su servicio de atenc...

Страница 17: ...rument up to date and to be informed about new application notes related to your instrument please send an e mail to the Customer Support Center stating your instrument and your wish We will take care that you will get the right information Europe Africa Middle East Phone 49 89 4129 12345 customersupport rohde schwarz com North America Phone 1 888 TEST RSA 1 888 837 8772 customer support rsa rohde...

Страница 18: ... 1 2 Rear Panel View 5 1 3 Putting into Operation 5 1 3 1 Connecting the DC Power 6 1 3 2 Switching the Instrument On and Off 6 2 NiMH Battery Pack R S FSV B31 7 2 1 Installing the Battery Pack 7 2 2 Rear panel view 8 2 3 Putting into Operation 8 2 3 1 Charging the Battery Pack 8 2 3 2 Connecting the DC Power 10 2 3 3 Switching the Instrument On and Off 10 ...

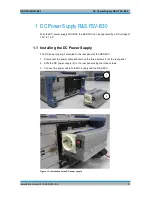
Страница 19: ... voltage of 10 V to 15 V 1 1 Installing the DC Power Supply The DC power supply is mounted to the rear panel of the R S FSV 1 Disconnect the power cable and remove the three screws 1 at the rear panel 2 Affix the DC power supply 2 to the rear panel using the three screws 3 Connect the power cable to the DC supply and the R S FSV Figure 1 1 Installation of the DC power supply 1 2 ...

Страница 20: ... S FSV Figure 1 3 DC Power supply 1 AC Power Supply Connection and Main Power Switch with fuse ON OFF switch 2 DC Power Supply ON OFF switch 3 Cigarette lighter plug with fuse 4 Status LEDs Use the supplied power cable DS 0025 2365 00 DIN 49 441 10 A 250 V straight instead of the power cable DS 0086 4400 00 DIN 49 441 10 A 250 V angular if the instrument is operated by AC mains 1 2 3 2 4 ...

Страница 21: ...he instrument on 1 Press the DC power switch at the DC power supply to position I A green LED indicates that the DC supply is ready for operation 2 In case of overvoltage or undervoltage the DC power supply is automatically switched off A red LED and a buzzer indicates this 3 Press the AC power switch on the rear panel to position I The instrument is supplied with AC power 4 Press the ON OFF key a...

Страница 22: ...31 the R S FSV3 or R S FSV7 can be operated independently from an AC supply 2 1 Installing the Battery Pack The battery pack is fixed to the instrument top 1 Place the battery pack 1 on the top of the instrument 2 Push the pack towards the front until it engages and fix it using the two knurled screws 2 Figure 2 1 Installation of the battery pack 1 2 ...

Страница 23: ...le insulation for main supply circuits in accordance to DIN EN IEC 61010 UL 61010B 1 CSA C22 2 No 1010 1 or DIN EN IEC 60950 UL 1950 CSA C22 2 No 950 Before switching on the instrument check the connection for correct polarity 2 3 1 Charging the Battery Pack The battery pack with charger is powered from an external power supply which is supplied with the option R S FSV B31 The battery pack can be ...

Страница 24: ...r is connected The charging state is indicated by the LED named CHARGE Charging The LED is on Charging is in progress The LED is off Charging is completed Fault The LED flashes The battery temperature is outside the permissible range or the battery voltage is too low battery deeply discharged or defective Note After charging has been completed LED is off trickle charging is performed at a reduced ...

Страница 25: ...tage or undervoltage the DC power supply is automatically switched off A red LED and a buzzer indicates this 3 Press the AC power switch on the rear panel to position I The instrument is supplied with AC power 4 Press the ON OFF key at the front panel After booting the instrument is ready for operation A green LED above the ON OFF key indicates this Switching the instrument off 1 Press the ON OFF ...

Отзывы: