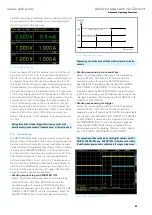
46
Selecting the Parameters
46
Selecting the Parameters
display value (MEAS) is the measured current and voltage
value.
4.2 Selecting the parameters
Each function and operating mode of the power supply
can be selected with the keys on the front panel of the
instrument. Use the respective function key to select the
measurement function. An active measurement function is
highlighted by an illuminated white LED. Subsequent set-
tings refer to the selected measurement function.
To set the signal parameters, three options are available:
❙Numeric keypad
❙Knob
❙Arrow keys
Use the soft menu keys to select the respective menu item.
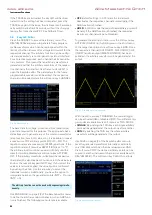
4.2.1 Numeric Keypad
The easiest way to enter a value precisely and promptly is
to use the numeric keypad with numeric keys (0...9) and
the decimal point key. Pressing the SHIFT key activates
the numeric keypad. If the corresponding channel has
been selected (CH1, CH2 or CH3) and the soft menu key
VOLTAGE or CURRENT has been pressed to enter the
parameter, you can use the activated SHIFT key to enter
the value via keypad. After entering the voltage or current
value, press the corresponding unit to confirm the entry
(soft menu key). Before confirming the parameter unit,
you can delete any value that has been entered incorrectly
by pressing the key (SHIFT + SETUP key). The ESC key
allows you to cancel the operation to enter parameters.
This will close the editing window. If no values have been
entered, the instrument will automatically switch back
after 20 seconds without data entry (see chapter 8.3.7 Key
Fallback Time). Press the ENTER key (SHIFT + HELP key)
to confirm characters in text edit mode.
The R&S®HMC8041 and R&S®HMC8042 also offer the
option to set predefined voltages by continuously pressing
the corresponding key for the output (e.g. 3.3 V). Custom
settings can be assigned to the USER1 and USER2 keys.
This requires you to press the corresponding key for an
extended period. This will store both current and voltage
value as well as channel specific settings (such as FUSE,
OVP etc.). Briefly pressing the USER1 or USER2 key will
load the settings. To avoid destruction of an externally con-
nected circuit due to operating errors, the output will be
deactivated before changing the output voltage. This must
be reactivated manually.
Fig. 4.2: Numeric
keypad with
function keys
4.2.2 Knob with Arrow Keys
You can also use the knob to enter the parameter values.
The input will be modified gradually, and the respective
input parameter will be set instantly. The nominal value is
increased by turning the knob to the right, and it is
decreased by turning it to the left. Dimensionless values,
such as while setting the display, are changed via knob.
You can select the desired decimal point via arrow keys.
4.3 Soft Menu Keys
The soft menu keys on the upper right of the screen allow
you to use the shown menu field in the display. Use the
numeric keypad or the knob to set the respective selected
parameter. If a menu field has been selected via soft menu
keys, this function will be marked in yellow and will be
activated to set the parameter and function. If a specific
setting makes an instrument setting unavailable, the
respective soft menu key will be deactivated and the label
will be displayed in gray. With the lowest soft menu key
a menu can be closed or a lower menu level can be
returned.
4.4 Display of Measurement Values
The R&S®HMC804x power supply has a TFT color display.
Depending on the instrument type, up to 3 channels will
be shown on the display. The figure in chapter 4.1 shows
an overview of the screen layout of the power supply with
possible function displays and descriptions.
4.5 Adjustable Maximum Values
Depending on the instrument type different maximum
values are adjustable at the power supply:
❙
R&S®HMC8041:
For the R&S®HMC8041, CH1 continuously provides 0 V to
32 V / 10 A (100 W max.).
❙
R&S®HMC8042:
For the R&S®HMC8042, CH1 and CH2 continuously
provide 0 V to 32 V / 5 A (50 W max. per channel).
❙
R&S®HMC8043:
For the R&S®HMC8043, CH1, CH2 and CH3 continuously
provide 0 V to 32 V / 3 A (33 W max. per channel).
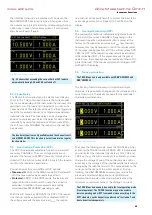
For instance, if the display shows a voltage of 10.028 V (cursor on
the 3rd digit from the right), it is possible to press the knob to set
the digits to the right of the cursor to 0 (10.000 V).
Fig. 4.3 Value display R&S®HMC8043
www.allice.de
Allice Messtechnik GmbH
Содержание 3593.1006.02
Страница 2: ...www allice de Allice Messtechnik GmbH ...
Страница 3: ...71 Appendix 71 Appendix www allice de Allice Messtechnik GmbH ...
Страница 37: ...35 Anhang 35 Anhang www allice de Allice Messtechnik GmbH ...
Страница 39: ...www allice de Allice Messtechnik GmbH ...
Страница 40: ...71 Appendix 71 Appendix www allice de Allice Messtechnik GmbH ...
Страница 73: ...68 Appendix 68 Appendix www allice de Allice Messtechnik GmbH ...
Страница 74: ...69 Appendix 69 Appendix www allice de Allice Messtechnik GmbH ...
Страница 75: ...70 Appendix 70 Appendix www allice de Allice Messtechnik GmbH ...


