Rohde & Schwarz 1802.0001K04 Скачать руководство пользователя страница 42

Operating the instrument

R&S

®

RTO6

42

Getting Started 1801.6670.02 ─ 04

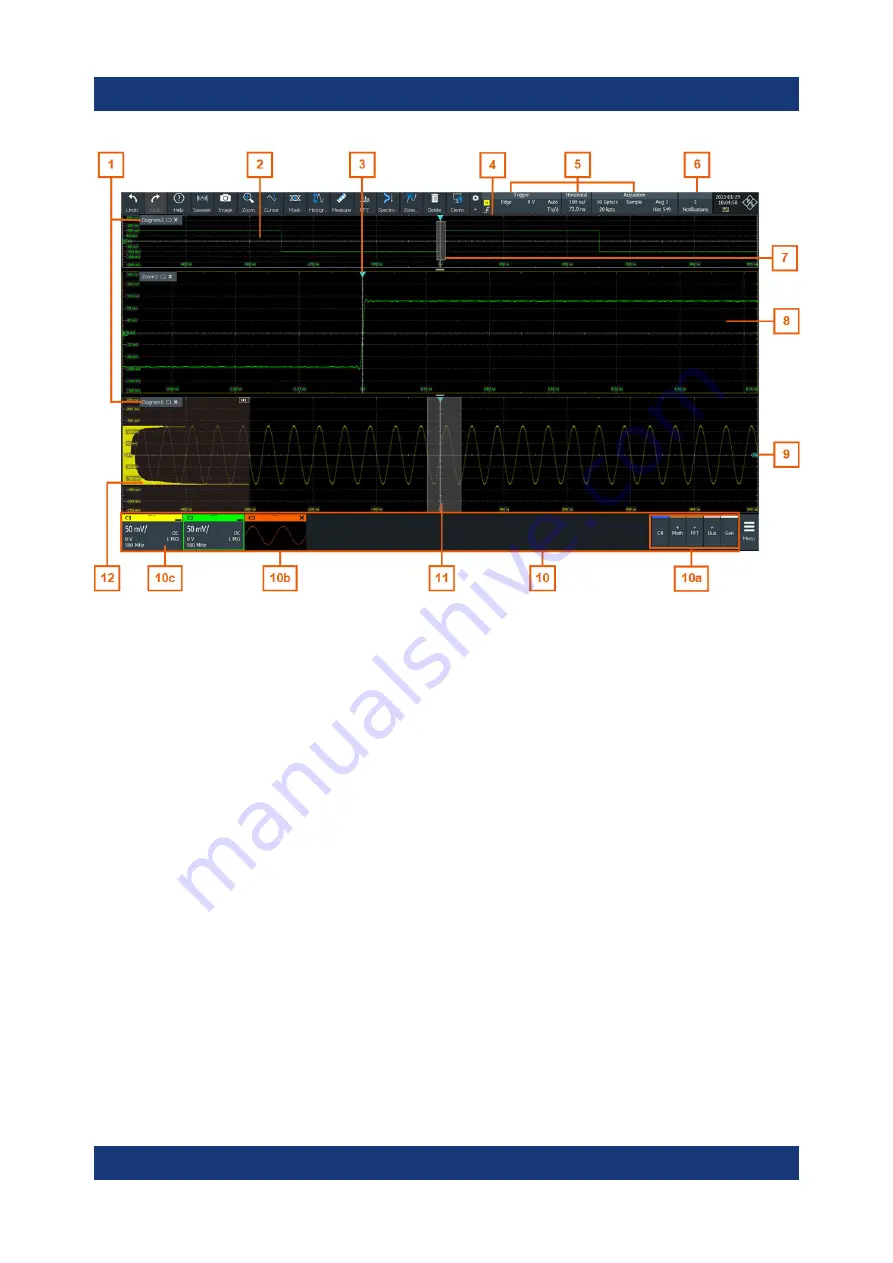
Figure 6-1: Display information

1 = Diagram
2 = Grid
3 = Trigger position
4 = Reference point (distance from trigger position to reference point = horizontal position)
5 = Trigger, horizontal and acquisition label
6 = Notifications
7 = Zoom area
8 = Zoom diagram
9 = Trigger level
10 = Signal bar with inactive waveforms (10a), minimized live waveform (10b) and signal icon

with vertical settings (10c)

11 = Histogram area
12 = Histogram

Diagram

A diagram shows one or more waveforms: channel, reference, and math wave-
forms together with histograms, masks etc. Zoom details, XY-waveforms, spectra
and other special waveforms are shown in separate diagrams.
By default, the diagram name contains the diagram number and the short names
of the waveforms shown inside. To change the diagram name, touch and hold the
tab name. The on-screen keyboard opens to enter the new name. Names must
be unique.

Touchscreen display

Содержание 1802.0001K04

Страница 1: ...R S RTO6 Oscilloscope Getting Started 1801667002 Version 04 B1 2 Ihr Ansprechpartner Your Partner dataTec AG E Mail info datatec eu www datatec eu...

Страница 2: ...ce limits is not binding R S is a registered trademark of Rohde Schwarz GmbH Co KG The terms HDMI and HDMI High Definition Multimedia Interface and the HDMI Logo are trademarks or registered trademark...

Страница 3: ...tation overview 15 3 1 Manuals and instrument help 15 3 2 Data sheet and brochure 16 3 3 Release notes open source acknowledgment 17 3 4 Application notes application cards videos 17 4 Preparing for u...

Страница 4: ...Applications 47 6 4 Working with waveforms 48 6 5 Rohde Schwarz SmartGrid 51 6 6 Toolbar 52 6 7 Displaying results 61 6 8 Using dialogs 63 6 9 Entering data 64 6 10 Instrument information and notifica...

Страница 5: ...f potential dangers and gives instructions on how to prevent personal injury or damage caused by dangerous situations Safety information is provided as follows In Chapter 1 1 Safety instructions on pa...

Страница 6: ...elf Use the instrument handles to move or carry the instrument Do not use the mounted accessories instead of the handles Accessories are not designed to carry the weight of the instrument To move the...

Страница 7: ...cting to power and grounding The mains power supply input of the instrument complies with overvoltage cate gory II It has to be connected to a fixed installation used to supply energy con suming equip...

Страница 8: ...ed the value specified in the data sheet Observe all voltage and current ratings of the instrument the probes and the accessories Limits and ratings are marked on the products and listed in the data s...

Страница 9: ...ive measures to pre clude direct contact with the measurement setup Do not touch exposed connections and components when power is applied Switch off the test circuit while connecting and disconnecting...

Страница 10: ...out rated measurement category For measurements performed on circuits not directly connected to mains for example electronics circuits powered by batteries and specially protected secondary circuits T...

Страница 11: ...sk of electric shock fire personal injury or even death Protective conductor terminal Connect this terminal to a grounded external conductor or to protective ground This protects you against electric...

Страница 12: ...result in death or serious injury if not avoi ded CAUTION Potentially hazardous situation Could result in minor or moderate injury if not avoided NOTICE Potential risks of damage Could result in dama...

Страница 13: ...Safety and regulatory information R S RTO6 13 Getting Started 1801 6670 02 04 1 5 Korea certification class A A Korea certification class A...

Страница 14: ...h quality line of probes For a detailed specification refer to the data sheet The R S RTO6 oscilloscope brings various benefits in your daily work It helps you to Find signal anomalies quickly with un...

Страница 15: ...re basic functionality and applications User manual Instrument Describes all instrument functions in detail It also provides an introduction to remote control a complete description of the remote cont...

Страница 16: ...Safety instructions Provides safety information in many languages The printed document is deliv ered with the product Instrument security procedures manual Deals with security issues when working with...

Страница 17: ...nts and known issues of the cur rent firmware version and describe the firmware installation The open source acknowledgment document provides verbatim license texts of the used open source software It...

Страница 18: ...cking material Use it when transporting or shipping the product later 3 Using the delivery notes check the equipment for completeness 4 Check the equipment for damage If the delivery is incomplete or...

Страница 19: ...B environments If class A equipment causes radio disturbances take appropriate measures to eliminate them 4 4 Setting up the product When setting up the instrument follow the safety instructions Sett...

Страница 20: ...radia tors or other products 4 4 2 Mounting the product in a rack The instrument can be installed in a rack using a rack adapter kit The order num ber is given in the data sheet The installation inst...

Страница 21: ...t Follow the instructions provided with the adapter kit 4 5 Considerations for test setup Observe safety instructions see Performing measurements on page 8 Cable selection and electromagnetic interfer...

Страница 22: ...omponents and initiates a new alignment to ensure proper instrument functioning Then it restores the user settings to the state before the disturbance 4 6 Connecting to power For safety information se...

Страница 23: ...ress the Power key on the front panel The instrument performs a system check boots the operating system and then starts the R S RTO6 firmware The Power key turns green and the illuminated keys on the...

Страница 24: ...entry of data You can connect or disconnect all USB devices during operation of the instrument The number of USB connectors can be increased by using USB hubs USB devices are plug play the operating s...

Страница 25: ...ons 5 To configure the mouse a Type mouse b Select Mouse settings 4 8 2 Connecting external monitors You can connect one or two external monitors or projectors to the R S RTO6 The following connectors...

Страница 26: ...To access Windows display settings tap Additional settings The touchscreen of the R S RTO6 has a screen resolution of 1920x1080 pixels pixel Many external monitors have a higher screen resolution If t...

Страница 27: ...ll function keys and connectors 5 1 Front panel The front panel of the R S RTO6 is shown in Figure 5 1 The function keys are grouped in functional blocks to the right of the touchscreen Below the scre...

Страница 28: ...nterface The input impedance is selectable the values are 50 and 1 M The maximum input voltage is 200 V peak 150 V RMS at 1 M input impedance and 5 V RMS at 50 input impedance 5 1 2 Other front panel...

Страница 29: ...l The rear panel of the R S RTO6 is shown in Figure 5 2 Figure 5 2 Rear panel of R S RTO6 1 USB device connector type B 2 USB connectors type A 3 LAN connector 4 HDMI connector for external monitor 5...

Страница 30: ...ate cable The AC main power switch also interrupts the power supply of the OCXO When you power up the instrument be sure to comply with the warm up phase specified in the data sheet before you start m...

Страница 31: ...t signal select the Trigger out action for the trigger or test You can adjust polarity and length of the pulse The default is a positive pulse of 100 ns The delay is 800 ns Mixed signal option R S RTO...

Страница 32: ...connectors Out 2 92 mm connectors K type for pulse signal output Ref 2 92 mm connectors K type for reference signal output GBIP option R S RTO6 B10 The GBIP option provides a GBIP interface and conne...

Страница 33: ...ons are not fulfilled Norm The instrument acquires a waveform only if a trigger occurs The Norm LED lights up in green Source Opens a dialog box where you can select the trigger source Press the key a...

Страница 34: ...nob The current value is shown in the input box in the upper right corner of the screen You can select if the knob changes the position or the reference point in Menu Settings Frontpanel Knobs Horizon...

Страница 35: ...selects a channel If the channel is active the key lights up in the corresponding channel color The effect of the keypress depends on state of the channel If channel is off turns on the channel and s...

Страница 36: ...o the protocol setup The key lights up if the decoding of a serial bus is active If serial buses are active pressing the key toggles these buses when the Apps dialog or the Serial Bus dialog is open F...

Страница 37: ...the vertical scale in Volts per division The vertical scale defines the dis played amplitude of the selected waveform The knob lights up in the color of the selected waveform Turn clockwise to stretc...

Страница 38: ...ialog boxes or the transparency of result boxes Press the Intensity key and turn the Multiuse knob Press the Intensity key again to toggle between the three settings The controlled parameter and its v...

Страница 39: ...efine preset config urations and save them to a file The Preset key can be configured to set either factory defaults or a user defined preset configuration Camera Performs the action that is assigned...

Страница 40: ...computers with non Windows operating systems a remote desktop connection is possible using RDP applications For details refer to the user manual chapter Remote Desktop Connection Remote monitoring an...

Страница 41: ...waveform Spread or pinch two fingers horizontally to change the horizontal scale timebase Spread or pinch two fingers vertically to change the vertical scale of the active waveform Function keys and...

Страница 42: ...minimized live waveform 10b and signal icon with vertical settings 10c 11 Histogram area 12 Histogram Diagram A diagram shows one or more waveforms channel reference and math wave forms together with...

Страница 43: ...veform Trigger position and trigger level The blue markers show the horizontal position of the trigger and the vertical trig ger level You can touch and move the trigger markers in the diagram to set...

Страница 44: ...p the button See also Chapter 6 10 Instrument information and notifications on page 66 Zoom diagram and zoom area Zoomed waveforms are shown in separate zoom diagrams in addition to the waveform diagr...

Страница 45: ...1 the signal icons C1 and C2 show the main settings and the wave forms are displayed in diagrams Other waveforms are minimized and shown as signal preview Figure 6 5 Signal label 1 Vertical scale 2 O...

Страница 46: ...a dialog box 3 Dialog box 4 Result table docked 5 Signal bar 6 Menu Not shown Input box Toolbar 1 The icons on the toolbar provide quick and easy access to the most important functionality For a deta...

Страница 47: ...6 7 Displaying results on page 61 Signal bar 5 The signal bar summarizes all waveforms as described in Signal bar on page 45 Menu 6 The menu provides access to the complete functionality of the R S RT...

Страница 48: ...orms Up to three waveforms per input channel can be shown For a four channel instrument 12 channel waveforms are available Reference waveforms Four waveforms can be used as reference for comparison an...

Страница 49: ...to a waveform Settings Menu Settings Appearance Colors tab Waveforms can be minimized to signal icons showing a real time signal pre view Thus more space in the diagram area is available without swit...

Страница 50: ...select the channel and tap Channel On The waveform is now active selected and is shown in the diagram To select a waveform Choose one of the following ways Tap the waveform in the waveform diagram To...

Страница 51: ...her the upper selected waveform is switched off 6 5 Rohde Schwarz SmartGrid The Rohde Schwarz SmartGrid helps to create and arrange the diagrams on the screen with drag drop The diagram layout depends...

Страница 52: ...will be placed 2 Drop the waveform in the target area The waveform appears in an existing or in a new diagram and it is selected for further actions 3 To change the size of a diagram tap the handle be...

Страница 53: ...ons To use analyzing functions interactive actions 1 If several waveforms are shown in the diagram select the waveform that you want to analyze See To select a waveform on page 50 2 Tap the icon of th...

Страница 54: ...he instrument and you can save it in the user preferences and user defined preset 1 To open the toolbar configuration tap the icon in the toolbar 2 Select the required toolbar functions Disable the fu...

Страница 55: ...rsor Recall Mask Test Save Histogram Image Measure Report Quick meas Clear FFT Autoset and Preset Annotate Run Stop and Single Save Reference Find Level Save Waveform Force Trigger Zone trigger Demo S...

Страница 56: ...a parameter in a dialog To open the corresponding help topic tap the Show Help button in the lower right corner of the tooltip See also Chapter 6 11 Getting help on page 68 Recall Opens a window to s...

Страница 57: ...e trigger level to the middle of the signal peaks Force Trigger Starts an immediate single acquisition If the acquisition is running in nor mal mode and no valid trigger occurs use Force Trigger to co...

Страница 58: ...duplicate to the required position Fingertip zoom Zoom Magnifies the waveforms around your fingertip Tap the icon and put your finger on the waveform The touched part of the wave form is displayed in...

Страница 59: ...the measurement types and measured waveform Tap the diagram with the waveform to be measured To define a mea surement gate draw a rectangle on the screen You can run up to 8 automatic measurement gro...

Страница 60: ...ave Recall Save tab Waveform Setup tab The filename is created according to the autonaming pattern Tap the icon and then tap the waveform to be exported If you tap the display background the focused w...

Страница 61: ...the default position of the results Open the Menu Settings Appearance dialog Automatic measurements select Measurement tab Result position Cursor measurements select Cursor tab Result position Protoco...

Страница 62: ...left or right To open the corresponding settings 1 Double tap one of the result values If a result box is shown you can also tap the icon The overlay menu appears and provides the most important setti...

Страница 63: ...re sponding dialog For direct access to important control and measurement functions use the toolbar see Chapter 6 6 Toolbar on page 52 Each dialog has four icons in the upper right corner Go back open...

Страница 64: ...ion and level knobs The instrument has dedicated rotary knobs to set vertical and horizontal positions and scales and the trigger level When you turn a knob the input box opens in the upper right corn...

Страница 65: ...p Min or Max respectively To increase the displayed value in fixed steps tap Inc To decrease the value in fixed steps tap Dec To toggle between small steps and large steps tap the Steps icon To get th...

Страница 66: ...e that was used before the keyboard opened tap Cur The arrow buttons move the cursor left or right Bksp deletes the last character before the cursor 3 Tap Enter to complete the entry 6 10 Instrument i...

Страница 67: ...lar information They are displayed for a few seconds and saved The color of the dot before the text indicates the severity gray for information orange for warnings and red for errors To read the notif...

Страница 68: ...p To display tooltips and context help 1 Enable the Help icon on the toolbar 2 Tap the parameter for which you need information The tooltip opens 3 To open the corresponding help topic tap the Show He...

Страница 69: ...forward To increase or decrease the font magnifier with or sign respectively To navigate the Help use the touchscreen To search for a topic in the index The index is sorted alphabetically You can bro...

Страница 70: ...ing of several words enclose it in quotation marks For example a search for trigger qualification finds all topics with exactly trigger qualification A search for trigger qualification finds all topic...

Страница 71: ...or the first time After a firmware update Once a week When major temperature changes occur 5 1 Warm up the instrument before you start the self alignment The minimum warm up time is indicated in the d...

Страница 72: ...oxes result boxes and other screen information is displayed A reboot of the instrument is not necessary 1 Open the Menu Settings System dialog 2 Select the Localization tab 3 Tap the Language button T...

Страница 73: ...ct contact our customer support center A team of highly qualified engineers provides support and works with you to find a solution to your query on any aspect of the operation program ming or applicat...

Страница 74: ...r key 38 Cursors 58 Customer support 73 D Data entry 64 Data sheet 16 Delete 60 Demo 57 Diagrams 42 Dialog boxes Usage 63 Dialogs 46 Digital waveforms 48 Display Overview 41 Display elements 46 Diagra...

Страница 75: ...ource acknowledgment 17 Operation Concepts 40 Manual 40 Options R S RTO6 B1 MSO 31 R S RTO6 B1E for R S RT ZVC 31 R S RTO6 B6 waveform and function generator 31 R S RTO6 B10 GBIP 32 P Position 36 Hori...

Страница 76: ...oom 58 Hide show icons 54 Histogram 59 Load saveset 56 Masks 58 Measure 59 Overview 54 Quick measurement 59 Redo 56 Run Stop 57 Save Reference 60 Save Waveform 60 Search 58 Show tooltips 56 Single 57...

Страница 77: ...02 04 Switch off 51 Switch on 50 Web interface 40 X XY waveforms 48 Z Zone key 34 Zone trigger 34 60 Zoom Area 44 Diagram 44 Key 35 Quick access 57 Waveforms 48 Ihr Ansprechpartner Your Partner dataT...

Отзывы: