


Page 13
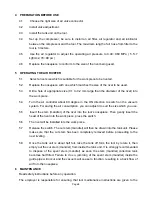
6
Oil filling was not performed
correctly, so that there is excess
hydraulic oil inside the tool
Loosen the bleed plug to allow
the excess hydraulic oil to drain
out.
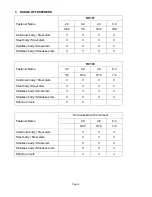
1
The rivet length is not correct for
the work piece thickness
Use rivets which match the work
piece thickness
2
Compressor air pressure is
incorrect.
Check the air pressure.
3
Jaw case in incorrectly
assembled.
Check the jaw case setting
position.
4 Jaws are worn.
Replace the jaws.
Number of switch
operations increases
before riveting is
complete
5
Insufficient hydraulic oil, causing
a shorter stroke
Add hydraulic oil.
Fault Cause
Countermeasure
a. Remove the rear part of
change plug and push spool 2~3
mm with a soft plastic stick. In
case of no improvement, take
the “b” measure.
1
Spool is not moving properly
b. Clean the spool and apply
grease to the O-rings.
2 Air outlet hole muffler is blocked
Replace the muffler.
Piston does not
operate, or
returns very
slowly, or
operation is not
smooth
3
The inside of the cylinder is dirt
so that the air piston cannot
return to its proper position
Clean inside the cylinder, and
apply grease inside the cylinder
and to the O-ring.
1
The air controller is not open far
enough
Turn the air controller at least
1/4 of a turn.
2
There are too many cut
mandrels inside the tank unit
Remove the tank from the tool
and empty out the cut mandrels
from inside the tank out.
3
The guide pipe is blocked with
cut mandrels.
Take out the guide pipe and
remove the cut mandrels which
are blocking it.
4
The nozzle is dirty, causing the
suction power to drop.
Clean the nozzle.
The suction
power is weak
and the shafts can
not be drawn out.
5
Oil filling was not performed
correctly, so that there is excess
hydraulic oil inside the tool, and
the air holes are misaligned,
causing the suction power to
drop.
Loosen the bleed plug to allow
the excess hydraulic oil to drain
out.