10.
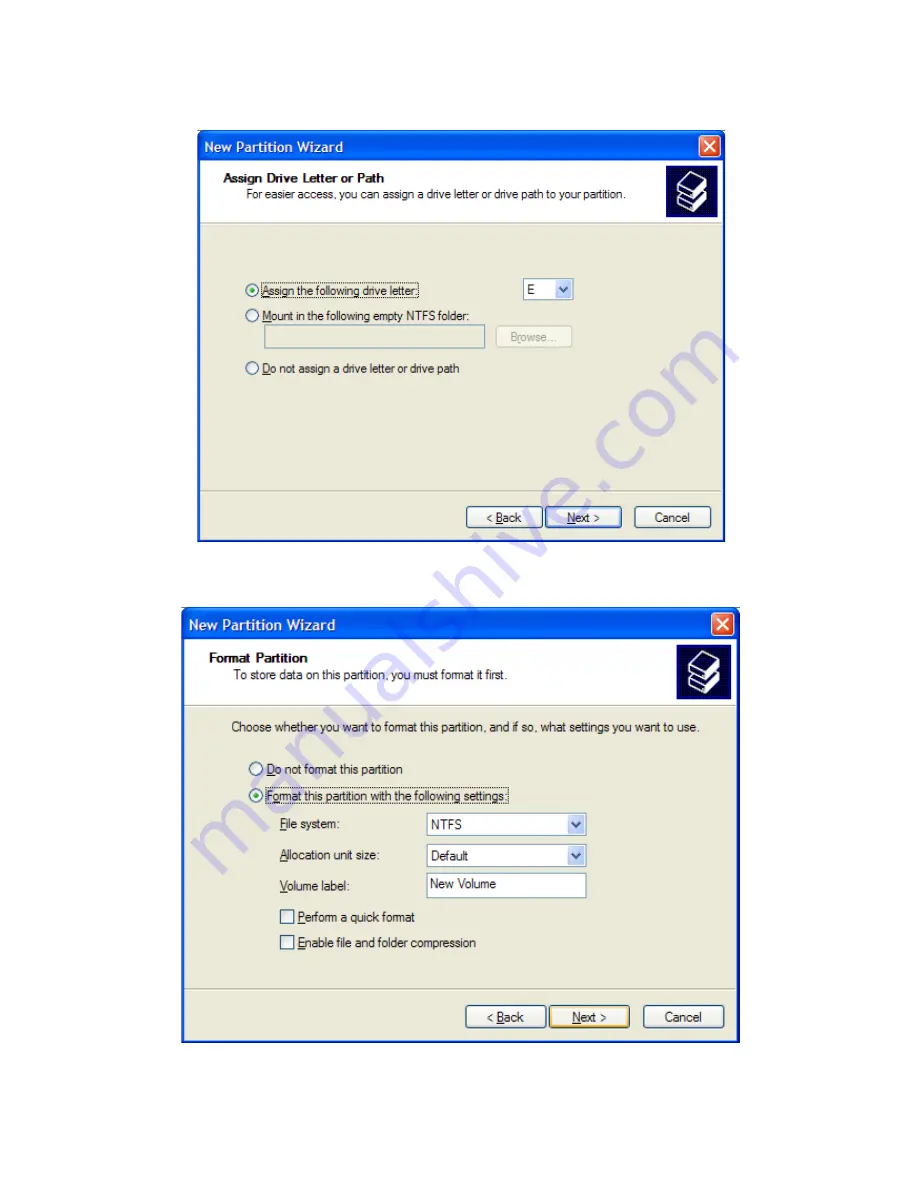
Under “Assign Drive Letter or Path,” accept the default letter and click “Next”.
11.
In the “Format Partition,” accept the default setting.
ROCSECURE
|
AMPHIBIOUS X5 user manual
Page | 47
Страница 1: ...secure your future AMPHIBIOUS X5 User Manual...
Страница 2: ..._____________________________________________________ 13 INSTALLATION 14 How to Connect the Interface Cables Connecting the Drive ___________________ 14 Connecting X5 to a computer via USB port 14 Con...
Страница 3: ...A MAC OS 30 Warning _____________________________________________________________ 30 Important Notes 30 Instructions for Partitioning and Formatting from FAT 32 to HFS _______________ 31 PARTITIONING...
Страница 4: ...tion Table FAT and FAT 32 __________________________________ 72 o HFS Plus or HFS 73 LIMITED WARRANTY 74 TECHNICAL SUPPORT 77 ACKNOWLEDGEMENTS 78 Trademarks ___________________________________________...
Страница 5: ...operating specifications Rocstor accepts no liability for any loss of data or the inability of X5 to work with equipment that are not compatible with the operating specifications Capacity Disclaimer...
Страница 6: ...Do not drop or cause shock to your Amphibious drive Do not spill any liquid or insert any object into the device Do not attempt to disassemble and service the Amphibious drive during the warranty peri...
Страница 7: ...ny loss in disk performance Users simply use their computers as usual with the assurance and complete peace of mind that their data is fully protected in the unfortunate event that their hard drives a...
Страница 8: ...ou need to keep your data secure and safe Choose Rocsecure drives and secure your future or Box Contents External hard disk drive USB cable 9 pin to 9 pin FireWire 800 1394b cable Installation user Gu...
Страница 9: ...e 800 IEEE 1394b port x2 You may connect FireWire 800 to a FireWire 400 port via a special cable also read page 12 USB 2 0 port x1 Mini USB 2x FireWire 800 400 Connector Connectors Hardware FireWire 8...
Страница 10: ...tion Password via built in keypad Encryption AES 256 hardware based real time CBC or ECB mode Key Management User configurable password Admin password for administrative mode Certifications and Standa...
Страница 11: ...ss hard on the keypad key pad works with soft touch Authentication and accessing the data The device has one administration password and three user passwords all password are user defined and is recom...
Страница 12: ...OUT after 3 incorrect PIN password attempts Your password will be VOIDED automatically The keypad works on the principle of touch and users should need NOT exert force on a button to register a key pr...
Страница 13: ...EE 1394b 9 Pin FireWire 800 connector FireWire 400 can transfer data between devices at 800 Mbits sec USB supports three data transfer rates USB 2 0 A Hi Speed USB 2 0 rate of 480 Mbits s 60 MB sec US...
Страница 14: ...SB connector to your computer s USB port Using only one interface cable at a time insert the USB cable s mini Type B end to X5 s USB port Ensure correct connector orientation to obtain a snug fit The...
Страница 15: ...cable s 9 pin connector to X5 s FireWire port You may connect to either port Ensure correct connector orientation to obtain a snug fit 1 The unit s ACTIVE STATUS and ERROR indicators will light up in...
Страница 16: ...rtcard must be inserted and password to be retyped for authentication Amphibious X5 encrypts all the date that is being written into the drive at all time Notes on using USB port Do not attempt to con...
Страница 17: ...touch on the button Status LED indicators Note The keypad works on the principle of touch and users should need NOT exert force on a button to register a key pressed It is recommended to avoid exertin...
Страница 18: ...or each user is 12345678 To log into X5 simply press the user ID together with the password followed by the Enter button For example a user logs in as 112345678 ENTER is identified as User ID 1 with a...
Страница 19: ...as long as the drive is Powered ON or in Hibernation the data is ACCESSIBLE For maximum security do not leave X5 connected in authenticated mode while you are away from your computer SECURITY Note If...
Страница 20: ...drive The drive will be recognized by the operating system and may be accessed as per normal Note When using an existing drive ensure that the drive s file system is compatible with your Operating Sys...
Страница 21: ...nd select the device you would like to remove 3 Click Stop 4 Click OK to confirm drive disconnection 5 Click Close 6 Windows will inform you that it is safe to disconnect the device 7 You may now safe...
Страница 22: ...The Status LED blinks twice to notify that you may press the new password Example 112345678 Enter 5 Enter the user ID together with the new password and press Enter The Status LED blinks twice to not...
Страница 23: ...ss Enter The Status LED blinks twice to notify that you may press the confirmed new Admin password 6 Enter the new confirmed 8 digit Admin password and press Enter 7 The Status LED will blink three ti...
Страница 24: ...5 Enter the user ID together with the desired user password and press Enter The Status LED blinks twice to notify that you may press the confirmed new password Example 187654321 Enter 6 Enter the new...
Страница 25: ...MPORTANT NOTE As long as the drive is ON it performs as any standard external drive therefore all the data which is being read decrypted is open to be accessed at all times while the drive is in ON an...
Страница 26: ...the drive in either FAT32 or NTFS 8 The drive is ready to be used once formatting completes Mac 1 Connect and authenticate into Amphibious X5 2 Enter the Applications folder followed by the Utilities...
Страница 27: ...ding or writing data This may cause damage to Amphibious X5and it is possible that the data that is read from or written to the device becomes corrupted Do not place this device near a heat source or...
Страница 28: ...SB 1 1 To avoid damaging your hardware and losing data never simultaneously connect the drive to the computer using more than one data cable Amphibious as a bootable device If you intend to use the dr...
Страница 29: ...le with most modern Windows and Macintosh operating systems However you can use your normal disk management tools to erase or reformat the drive if needed For example Windows users may want to reforma...
Страница 30: ...erwise stated on the retail box WARNING Formatting and Partitioning the Amphibious Drive will destroy all of its data To protect your data back it up before formatting or partitioning this device IMPO...
Страница 31: ...the computer via a port 2 The drive will appear as an icon on the Desktop on the middle right side figure 1 0 below the icon will represent the method of connection USB or FireWire Figure 1 0 USB Con...
Страница 32: ...t is connected via FireWire port it would then indicate FireWire as figure 1 2 on the Macintosh HD icon The same procedures would also apply to the following steps 3 Once the icon appears on the Deskt...
Страница 33: ...4 In the Macintosh HD menu click on the Applications icon 5 In the Applications menu click on the Utilities icon figure 3 0 Figure 3 0 ROCSECURE AMPHIBIOUS X5 user manual Page 33...
Страница 34: ...6 In the Utilities menu click on the Disk Utility icon figure 4 0 Figure 4 0 ROCSECURE AMPHIBIOUS X5 user manual Page 34...
Страница 35: ...of the Disk Utility menu is a list of available drives figure 5 0 One will show as Rocstor drive Click on the icon showing the disk capacity figure 5 1 Figure 5 0 Figure 5 1 ROCSECURE AMPHIBIOUS X5 u...
Страница 36: ...lable under Volume Scheme 10 If you are using Panther proceed to 13 below 11 If you are using Tiger Leopard Snow Leopard or Lion click on Options on the lower center of the window Select the Partition...
Страница 37: ...e Information select a name for your drive figure 7 0 Figure 7 0 13 Format Click on either the Format area or the Blue up down arrows Select Mac OS extended journal ROCSECURE AMPHIBIOUS X5 user manual...
Страница 38: ...ting the type of format click the Apply tab in the lower right of the screen figure 7 1 On the next screen Partition Disk click Partition figure 8 0 Figure 7 1 Figure 8 0 ROCSECURE AMPHIBIOUS X5 user...
Страница 39: ...upon completion the same icon that first appeared on the Desktop will reappear with your designed name on the Desktop figure 9 0 Figure 8 1 Figure 9 0 16 You can now Exit or close to return to the des...
Страница 40: ...ng from FAT 32 to NTFS A fast way of reaching Disk Management is to right click My Computer icon and left click on Manage in the drop down menu The next window is Computer Management In the left menu...
Страница 41: ...or double click on the icon Under Other Places click on Control Panel Under Windows XP under Vista Windows 7 OS 2 If the icon My Computer does not show on your desktop click on the Start icon on the...
Страница 42: ...n the Settings link and then click on the Control Panel link 4 Click on the Start icon on the lower left of your screen Click on Run Delete anything listed in the Open window Type the following compmg...
Страница 43: ...L a After reaching the Control Panel click on Administrative Tools b After reaching Administrative Tools click on Computer Management c After reaching Computer Management click on Disk Management ROCS...
Страница 44: ...select Delete Partition WARNING Formatting and Partitioning the Amphibious Drive will destroy all of its data To protect your data back it up before formatting or partitioning this device 2 The next w...
Страница 45: ...lower menu as an Unallocated disk 5 Right click anywhere in the Unallocated disk area in the lower menu 6 Click on New Partition 7 You are taken to Welcome to the New Partition Wizard Click Next ROCS...
Страница 46: ...partition it should be selected as the default partition Click Next 9 Under Specific Partition Size click Next to accept the default setting which is the maximum size allowed ROCSECURE AMPHIBIOUS X5 u...
Страница 47: ...10 Under Assign Drive Letter or Path accept the default letter and click Next 11 In the Format Partition accept the default setting ROCSECURE AMPHIBIOUS X5 user manual Page 47...
Страница 48: ...ou now reached the Completing the New Partition Wizard screen It displays the various settings you previously selected If you are satisfied with your selections click Finish to complete the new format...
Страница 49: ...the Rocstor drive will show up as New Volume To rename the volume at this time right click New Volume and click Properties You can now change the volume name up to 11 characters Click OK 16 You can a...
Страница 50: ...problems under certain criteria and or situations Should you experience a problem with your Amphibious X5 please review the Manual and read the possible solutions that fit your problem The User Manua...
Страница 51: ...fails Is the Error LED blinking A wrong password has been entered Press the Esc button to restart the authentication process The drive is not recognized Does the Status LED stay on all the time Ensure...
Страница 52: ...rom your drive The drive might be experiencing trouble spinning up due to insufficient power from the USB port s Connect both USB connectors directly into your PC s USB ports Do not connect them to ex...
Страница 53: ...that the cables be detached and reattached and that the computer be shut off for 20 seconds and then restarted Ensure that the Amphibious drive has been properly reformatted by reviewing the User Manu...
Страница 54: ...d tear of the internal hard drive by having the hard drive stop spinning when the Amphibious is not accessed for a certain amount of time sleeping mode Under Mac OS 10 you it might cause an error plea...
Страница 55: ...l support department at 888 877 7716 Problem The FireWire ports would not mount work with Windows 2000 Solution You may require installing Windows 2000 Service pack 4 You may download the Service Pack...
Страница 56: ...uter Solution Review the minimum system requirements for your computer to ensure it supports Supper Speed USB 2 0 General Notes When connecting the device to USB 2 0 port in your computer please be su...
Страница 57: ...ependent of the OS or the host system BIOS and thus supports any OS X5 does not involve any tedious and error prone software installation and configuration Just plug X5 in the computer authenticate yo...
Страница 58: ...ause X5 uses hardware for the authentication and encryption processes it is operating system independent As long as your choice of operating system supports the USB Mass Storage class specification an...
Страница 59: ...System OS independent Mac Windows Linux Low Cost of Ownership Low cost per Gigabytes Secured by AES 256 CBC or ECB Real Time Hardware Encryption The encryption chipset bears certifications from the NI...
Страница 60: ...5 3 x 3 4 x 0 9 inches 132 x 8 30 x 2 6 centimeters Weight 8 ounces 0 25 Kilogram Transfer rates FireWire 800 up to 800 MB s and USB 2 0 up to 480 Mbits s or USB 1 1 up to 12 Mbits s ROCSECURE AMPHIBI...
Страница 61: ...rive adopt A Several security schemes are popularly employed to protect data including Password security without hardware encryption This basic OS software solution blocks unauthorized data access by...
Страница 62: ...llowing illustration best describes how the security chipset functions Q What is the secure key and why use it A The secure key or digital key or key token is a physical key that contains the secret k...
Страница 63: ...h net resources aes_no60 htm a These hardware algorithms are certified to provide reliable security at full strength it is virtually impossible to access the encrypted data by guessing or deriving the...
Страница 64: ...and is independent from and invisible to all known Operating Systems including embedded OS As long as the drive is SATA1 0a 2 0 compliant X Wall MX will work in the system Once authenticated its opera...
Страница 65: ...Features Power On Self Test POST ability to ensure product reliability Versatile Key Management through either serial interface or built in API Application Programming Interface 100 hardware AES ECB m...
Страница 66: ...reWire 400 Daisy Chain allows you to connect multiple devices such as cameras external read write drives and other external devices such as hard disk drive to your computer via FireWire ports Daisy ch...
Страница 67: ...t computer that supports FireWire 400 9 to 6 Pin cable Host Computer FireWire 400 port 9 to 9 Pin cable X5 FireWire Port 1 FireWire Port 2 X5 or other devices FireWire Port 1 FireWire Port 2 ROCSECURE...
Страница 68: ...gh up to 16 cables can be daisy chained using active repeaters external hubs or internal hubs often present in FireWire equipment The S400 standard limits any configuration s maximum cable length to 2...
Страница 69: ...d 6 pin connectors of FireWire 400 However while the IEEE 1394a and IEEE 1394b standards are compatible the FireWire 800 s connector is different from FireWire 400 s connector making the two cables in...
Страница 70: ...ufacturer specific individual device drivers to be installed USB can connect computer peripherals such as external hard drives storage devices keyboards PDAs scanners digital cameras printers personal...
Страница 71: ...for 100m 12 25 V 15 W 63 FireWire 800 786 98 25 100 11 m 12 25 V 15 W 63 FireWire 400 393 49 13 15 Ft 4 5 m 12 25 V 15 W 63 USB 2 0 480 60 5 14 m 5 V 2 5 W 127 USB 3 0 4800 600 TBD 5 V 2 5 W 127 Ultr...
Страница 72: ...to FAT32 file systems of any size but the format program included in Windows 2000 and higher can only create FAT32 file systems of 32 GB or less This limitation is by design and was imposed because ma...
Страница 73: ...imilar to NTFS though almost no software takes advantage of forks other than the data fork and resource fork HFS Plus also uses a full 32 bit allocation mapping table rather than HFS s 16 bits This wa...
Страница 74: ...urchase or lease date You may be required to provide proof of purchase or lease as a condition of receiving warranty service You are entitled to warranty service according to the terms and conditions...
Страница 75: ...ve been made in connection with your purchase or lease of the Rocstor branded product No change to the conditions of this Limited Warranty is valid unless it is made in writing and signed by an author...
Страница 76: ...nty extends only to the original purchaser or lessee of this Rocstor branded product and is not transferable to anyone who obtains ownership of the Rocstor branded product from the original purchaser...
Страница 77: ...with respect to software distributed by Rocstor under the Rocstor brand name are set forth in the applicable end user license or program license agreement Non Rocstor hardware and software products a...
Страница 78: ...are the slogan marks of Rocstorage Inc Apple the Apple logo Mac Power Macintosh FireWire and Mac Pro Leopard Snow Leopard are trademarks of Apple Computer Inc in the United States and other countries...
Страница 79: ...is to help our U S A and Canadian customers find a storage solution that best serves their needs We will help you determine your best purchasing options For more information please contact the appropr...
Страница 80: ...Thank you for purchasing Amphibious X5 Rocstor Ver 0610I ROCSECURE AMPHIBIOUS X5 user manual Page 80...