background image

18

18V POLE CHAIN SAW 

EN

alignment or binding of moving parts. Check for 

broken or damaged parts. Do not use chain saw if 

damage affects safety or operation. Have damage 

repaired by authorized service center. 

3.   Maintain chain saw with care.

•   Never expose saw to rain.

•   Keep chain sharp, clean, and lubricated for better  

  and safer performance.

•   Follow steps outlined in this manual to sharpen  

 chain.

•   Keep handles dry, clean, and free of oil and grease.

•   Keep all screws and nuts tight.

4.   When servicing, use only identical replacement  

 parts.

5.   When not in use, always store chain saw

•   in a high or locked place, out of children’s reach

•   in a dry place

Bar Maintenance

To maximize bar life, the following bar maintenance is 

recommended.

The bar rails that carry the chain should be cleaned 

before storing the tool or if the bar or chain appear to 

be dirty.  

The rails should be cleaned every time the chain is 

removed.

Turn the bar over, top rail becoming bottom and bottom 

rail becoming top, around every 5 hours of use 

To clean the Bar rails:

1.  Remove chain cover and bar and chain.

2.  Using a wire brush, screwdriver or similar tool, 

clear the residue from the inner groove of the bar. (See 

Fig. L)

3.  Make sure to clean oil passages thoroughly

Conditions which require Guide Bar maintenance:

•  Saw cuts to one side or at an angle.

•  Saw has to be forced through the cut.

•  Inadequate supply of oil to the bar and chain.

Check the condition of the Guide Bar each time the 

chain is sharpened. A worn Guide Bar will damage the 

chain and make cutting difficult.

After each use, remove battery pack and clean all 

sawdust from the Guide Bar and sprocket hole.

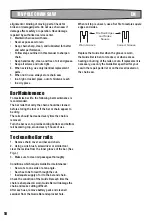
When rail top is uneven, use a flat file to restore square 

edges and sides.

Replace the Guide Bar when the groove is worn, 

the Guide Bar is bent or cracked, or when excess 

heating or burring of the rails occurs. If replacement is 

necessary, use only the Guide Bar specified for your 

saw in the repair parts list or on the decal located on 

the chain saw.

File Rail Edges 

and Sides

Square

Worn Groove

Correct Groove

Содержание RG8356.9

Страница 1: ...RG8356 9 18V POLE CHAIN SAW EN...

Страница 2: ......

Страница 3: ...1 2 3 4 5 9 8 7 10 6...

Страница 4: ...RG8356 9 f a a 5 b b d c g A1 A2 A3 A4 A5 A6 B1 B2 B3 C1 C2 C3...

Страница 5: ...RG8356 9 f h 12 15 14 13 16 1 2 Red light Green light C4 C5 C6 C7 D E1 E2 E3 F1 F2 G H1...

Страница 6: ...Z Y kg Z Y 2 to 4 5 a 10cm 15 cm 6 W Y Z X Y 1 3 H2 H3 H4 H5 H6 I J K L RG8356 9...

Страница 7: ...ow the warnings and instructions may result in electric shock fire and or serious injury Save all warnings and instructions for future reference The term power tool in the warnings refers to your main...

Страница 8: ...t unintentional starting Ensure the switch is in the off position before connecting to power source and or battery pack picking up or carrying the tool Carrying power tools with your finger on the swi...

Страница 9: ...den wiring Saw chains contacting a live wire may make exposed metal parts of the power tool live and could give the operator an electric shock 4 Wear safety glasses and hearing protection Further prot...

Страница 10: ...e harness provided 5 Keep the machine a sufficient distance away from overhead electrical power lines SAFETY WARNINGS FOR BATTERY PACK a Do not dismantle open or shred cells or battery pack b Do not s...

Страница 11: ...is being made 3 Felling back cut Make the felling back cut Y at least 50 mm higher than the horizontal notching cut as illustrated in Figure 1 Keep the felling back cut parallel to the horizontal not...

Страница 12: ...ER WARNING Read all safety warnings and all instructions Failure to follow the warnings and instructions may result in electric shock fire and or serious injury Save all warnings and instructions for...

Страница 13: ...s as they can overheat and break 16 Longer life and better performance can be obtained if the battery pack is charged when the air temperature is between 18 C and 24 C Do not charge the battery pack i...

Страница 14: ...ne head See Fig A1 A4 The bulge c at the end of the pole should be exactly inserted into the hole d inside the machine head See Fig A2 A3 3 Tighten the sleeve e securely by turning clockwise NOTE Make...

Страница 15: ...5 and tighten it by turning the chain tensioning knob 4 clockwise until it is tight See Fig C6 6 Use the provided spanner to slightly tighten the screw hole by turning it clockwise to tension the cha...

Страница 16: ...e voltage and current supply The voltage and current supply must comply with the ratings on the product plate For switching on the tool press the Lock off Button then fully press the On Off Switch and...

Страница 17: ...when reentering a previous cut Use only the low kickback chain and Guide Bar that were supplied with this chain saw Never use a dull or loose chain Keep chain sharp with proper tension How to use Saw...

Страница 18: ...r top rail becoming bottom and bottom rail becoming top around every 5 hours of use To clean the Bar rails 1 Remove chain cover and bar and chain 2 Using a wire brush screwdriver or similar tool clear...

Страница 19: ...n Internal wiring defective On Off switch defective Contact service agent Dry chain No oil in reservoir Vent in oil filler cap clogged Oil passage clogged Refill oil Clean cap Clean oil passage outlet...

Страница 20: ...POSITEC AUSTRALIA PTY LTD ABN 14 101 682 357 MADE IN PRC Copyright 2018 Positec All Rights Reserved...

Отзывы: