9
BELT SANDER
EN
Pull out the belt tension lever (11) then remove the
existing belt (8) by sliding it clear of the sanding plate
(12). Line up the new belt so the arrow on the underside
of the belt is pointed in the same direction as the arrows
located on the rear roller (a) then slide the belt into
position over both rollers. Press the belt tension lever
in firmly ensuring that it goes all the way back to the
locked position.
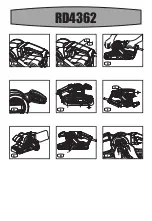
6. BELT CENTERING CONTROL (SEE FIG. F)
WARNING! Wear eye protection before
carrying out a belt centering adjustment.
Turn the machine upside down, hold it firmly with one
hand, start the motor and release the switch immediately
after observing tracking of sanding belt. If abrasive
belt runs outward, turn belt centering control knob (7)
counter-clockwise and clockwise if belt runs inward.
Adjust the belt until the outer edge of the belt is even
with the outer edge of the base-plate. Belt life will be
greatly increased by keeping the tracking adjustment
set properly.
7. DUST BAG (SEE FIG. G)
You must use the dust bag (5) provided to collect the
dust produced during sanding. The dust bag (5) plastic
bracket slides down onto the dust extraction outlet (4)
on the belt sander. When the dust collection bag is full,
remove and empty by opening the zip on the dust bag
(8).
8. DRIVE BELT REPLACEMENT(SEE FIG. H,I)
WARNING! Remove the main plug from the
socket before carrying out a drive belt
replacement.
Remove the two screws (a) and the belt cover (6) as
shown (See Fig. H)
Carefully cut the old drive belt if not already broken
and remove from your belt sander. Fit your new drive
belt around the large pulley. Then install onto the small
pulley by rotating clockwise and pushing the drive belt
shown around the small pulley at the same time. The
drive belt will be a tight fit. (See Fig. I)
Fit the belt cover (6) and two screws (a).
TROUBLESHOOTING
1. If your sander will not operate, check the power at
the power source.
2. If the sander does not abrade surface, check the
sanding belt. If the sanding belt has been worn,
replace the new sanding belt and try again. The
sanding belt must be kept in a dry place.
3. If a fault can not be rectified, return the sander to an
authorized dealer for repair.
WORKING HINTS FOR YOUR BELT
SANDER
If your power tool becomes too hot, especially when
used at low speed, set the speed to maximum and run
with no load for 2-3 minutes to cool the motor. Avoid
prolonged usage at very low speed. Always use a
sanding belt suited to the material you wish to sand.
Always ensure the work-piece is firmly held or clamped
to prevent movement. Support large panels close to
the sanding area. Any movement of the material may
affect the quality of the sanding finish. Start your sander
before sanding and turn off only after stopping sanding.
For best results sand wood in the direction of the grain.
Do not start sanding without the sanding belt fitted.
Empty the dust bag every 5 minutes or sooner to ensure
efficient dust collection.
MAINTENANCE
Remove the plug from the socket before carrying
out any adjustment, servicing or maintenance.
Your power tool requires no additional lubrication or
maintenance. There are no user serviceable parts in
your power tool. Never use water or chemical cleaners
to clean your power tool. Wipe clean with a dry cloth.
Always store your power tool in a dry place. Keep the
motor ventilation slots clean. Keep all working controls
free of dust.
If the supply cord is damaged, it must be replaced by
the manufacturer, its service agent or similarly qualified
persons in order to avoid a hazard.
Содержание RD4362
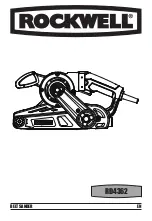
Страница 1: ...RD4362 BELT SANDER EN...
Страница 2: ......
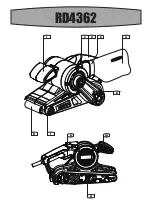
Страница 3: ...RD4362 6 5 1 3 7 11 8 4 2 9 10...
Страница 4: ...RD4362 2 a a 2 9 12 A B C D E F G H I...
Страница 10: ......
Страница 11: ......
Страница 12: ...POSITEC AUSTRALIA PTY LTD ABN 14 101 682 357 MADE IN PRC Copyright 2018 Positec All Rights Reserved...

