background image

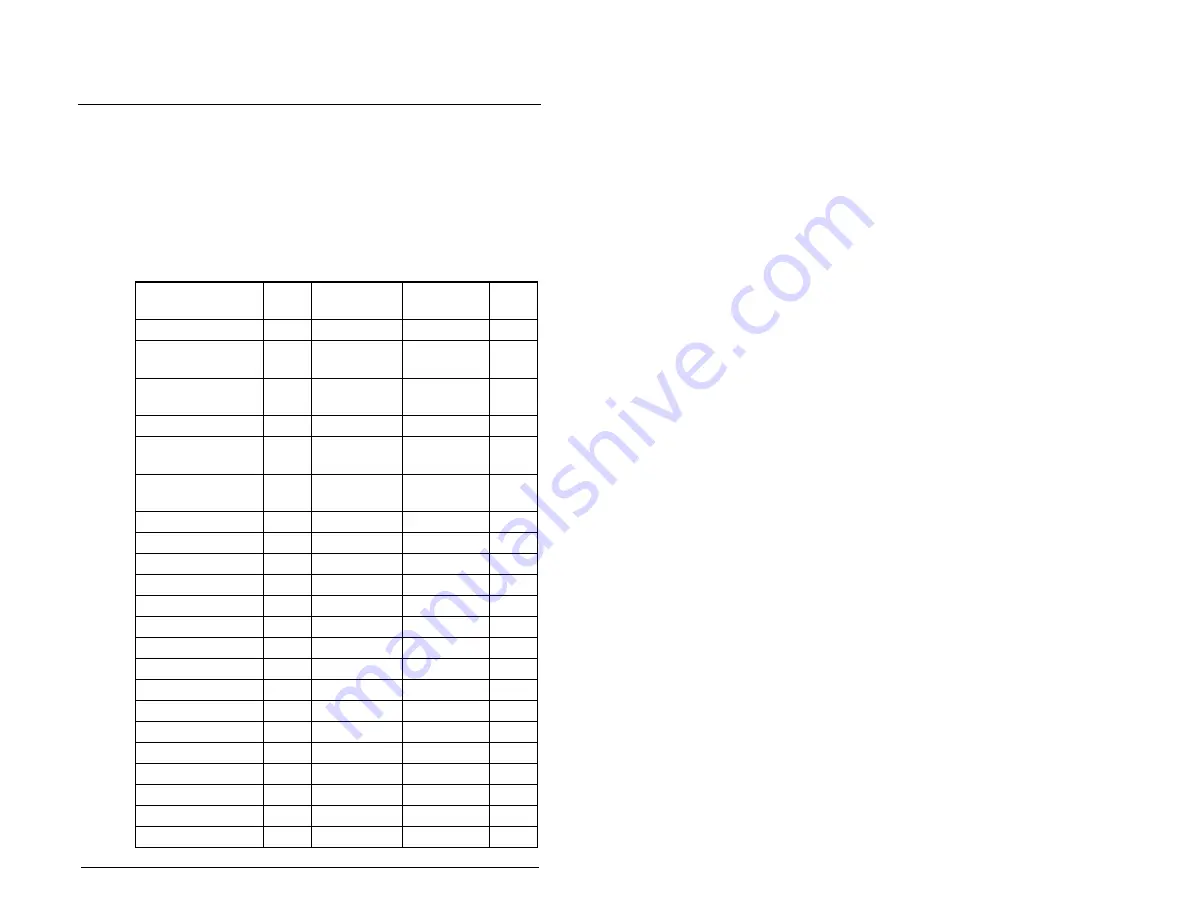
Parameters Cross-Referenced by Name

C-1

A

PPENDIX

 C

Parameters

Cross-Referenced

by Name

Parameter Name

No.

Parameter 

Group

Default 

Value

Page

 No.

0 - 10 V Analog Input

d020

Display

Read Only

9-32

0 - 10 V Analog Input 
High

A111

Advanced

100.0%

9-24

0 - 10 V Analog Input 
Low

A110

Advanced

0.0%

9-24

4 - 20 mA Analog Input

d021

Display

Read Only

9-32

4 - 20 mA Analog Input 
High

A113

Advanced

100.0%

9-25

4 - 20 mA Analog Input 
Low

A112

Advanced

0.0%

9-25

Accel Time 1

P039

Basic

5.0 sec

9-7

Accel Time 2

A067

Advanced

10.0 sec

9-11

Auto Restart Delay

A093

Advanced

1.0 sec

9-19

Auto Restart Tries

A092

Advanced

0

9-18

Comm Data Rate

A103

Advanced

4 = 19.2 K

9-22

Comm Format

A107

Advanced

0 = RTU 8-N-1

9-23

Comm Loss Action

A105

Advanced

0 = Fault

9-22

Comm Loss Time

A106

Advanced

5.0

9-23

Comm Node Address

A104

Advanced

1

9-22

Comm Status

d015

Display

Read Only

9-31

Commanded Frequency

d002

Display

Read Only

9-27

Compensation

A097

Advanced

1 = Electrical

9-20

Control Input Status

d013

Display

Read Only

9-30

Control Source

d012

Display

Read Only

9-29

Control SW Version

d016

Display

Read Only

9-31

Current Limit

A089

Advanced

Amps x 1.8

9-17

Содержание MD60

Страница 1: ...Instruction Manual MD60 AC Drive User Manual Version 3 0 D2 3499 3 ...

Страница 2: ...TTENTION The drive can operate at and maintain zero speed The user is responsible for assuring safe conditions for operating personnel by providing suitable guards audible or visual alarms or other devices to indicate that the drive is operating or may operate at or near zero speed Failure to observe this precaution could result in severe bodily injury or loss of life ATTENTION The drive contains ...

Страница 3: ...er Grounding 4 2 Chapter 5 Installing Power Wiring 5 1 Opening the Cover 5 1 5 2 Verifying Drive AC Input Ratings Match Available Power 5 2 5 2 1 Ungrounded Distribution Systems 5 2 5 2 2 Input Power Conditioning 5 4 5 3 Power Wiring Specifications 5 5 5 4 Power Terminal Block Connections 5 5 5 5 Fuses and Circuit Breakers 5 6 5 6 Motor Cable Types Acceptable for 200 600 Volt Installations 5 8 5 7...

Страница 4: ... 8 6 Chapter 9 Parameter Descriptions 9 1 Basic Program Group Parameters 9 2 9 2 Advanced Group Parameters 9 8 9 3 Display Group Parameters 9 27 Chapter 10 Troubleshooting the Drive 10 1Fault Codes 10 1 10 1 1Manually Clearing Faults 10 2 10 1 2Automatically Clearing Faults Auto Restart Feature 10 2 10 2Troubleshooting Tables 10 6 10 2 1Problem Drive Does Not Start From Terminal Block Start or Run...

Страница 5: ...Contents III Appendix D CE Conformance Requirements D 1 Appendix E Accessories E 1 Appendix F RS485 MDI Protocol F 1 Appendix G RJ45 Splitter Cable G 1 Index Index 1 ...

Страница 6: ...IV MD60 AC Drive User Manual ...

Страница 7: ...3 Override Priority for the Speed Reference Command 6 8 Figure 6 4 Accel Decel Selection 6 9 Figure 8 1 Integral Keypad 8 1 Figure 9 1 Accel Time 1 P039 9 7 Figure 9 2 Decel Time 1 P040 9 7 Figure 9 3 Accel Time 2 A067 9 11 Figure 9 4 Decel Time 2 A068 9 12 Figure 9 5 DC Brake Level A081 9 14 Figure 9 6 S Curve A083 Examples 9 15 Figure 9 7 Start Boost A084 9 16 Figure 9 8 Motor OL Select A090 9 1...

Страница 8: ...VI MD60 AC Drive User Manual ...

Страница 9: ...ifications 6 3 Table 6 3 Typical Multiple Drive Connection Examples 6 7 Table 8 1 LED Descriptions 8 2 Table 8 2 Key Descriptions 8 3 Table 8 3 Viewing and Adjusting Basic P and Advanced A Parameters 8 5 Table 8 4 Viewing the Display d Parameters 8 6 Table 9 1 Trip Points for Digital Output Relay 9 11 Table 9 2 Selecting the Reference Source Using Presets 9 13 Table 10 1 Fault Descriptions and Cor...

Страница 10: ...VIII MD60 AC Drive User Manual ...

Страница 11: ...tore com or http www reliance com docs_onl online_stdrv htm 1 1 Getting Assistance from Reliance Electric If you have any questions or problems with the products described in this instruction manual contact your local Reliance Electric sales office For technical assistance call 1 800 726 8112 Before calling please review the troubleshooting section of this manual and check the Reliance Standard Dr...

Страница 12: ...1 2 MD60 AC Drive User Manual ...

Страница 13: ...d the drive nameplate The model number includes the drive and any options Drive model numbers are provided in table 2 1 Figure 2 1 Identifying the Drive by Model Number Reserved 6MD V N 1P5 1 1 1 6MD MD60 Drive 115V 230 VAC 1P5 1 5 A 0 25 HP 2P3 2 3 A 0 5 HP 4P5 4 5 A 1 HP 6P0 6 0 A 1 5 HP 8P0 8 A 2 HP 012 12 A 3 HP 017 17 5 A 5 HP 460 VAC 1P4 1 4 A 0 5 HP 2P3 2 3 A 1 HP 4P0 4 A 2 HP 6P0 6 A 3 HP ...

Страница 14: ...1 0 4 5A 6MDVN 4P5101 B 1 1 1 5 6 0A 6MDVN 6P0101 B 230V 50 60 Hz 1 Phase With Integral EMC Filter 0 2 0 25 1 5A 6MDAN 1P5111 A 0 37 0 5 2 3A 6MDAN 2P3111 A 0 75 1 0 4 5A 6MDAN 4P5111 A 1 5 2 0 8 0A 6MDAN 8P0111 B 230V 50 60 Hz 1 Phase No Filter 0 2 0 25 1 5A 6MDAN 1P5101 A 0 37 0 5 2 3A 6MDAN 2P3101 A 0 75 1 0 4 5A 6MDAN 4P5101 A 1 5 2 0 8 0A 6MDAN 8P0101 B 230V 50 60 Hz 3 Phase 0 2 0 25 1 5A 6MD...

Страница 15: ...M Copy Cat Keypad includes 1 0 meter cable MD1CC1 Bezel Kit panel mount for Remote Handheld OIM MDBZL N1 OIM Cable 1 0 meter OIM to RJ45 cable MDCBL CC1 OIM Cable 2 9 meter OIM to RJ45 cable MDCBL CC3 RJ45 Cable 2 0 meter RJ45 to RJ45 cable male to male connectors MDCBL RJ45 Serial Cable 2 0 meter serial cable with a locking low profile connector to connect to the serial converter and a 9 pin sub ...

Страница 16: ...ore the drive follow these recommendations to prolong drive life and performance Store the drive within an ambient temperature range of 40 to 85 C Store the drive within a relative humidity range of 0 to 95 non condensing Do not expose the drive to a corrosive atmosphere ...

Страница 17: ...th the drive installation ATTENTION Only qualified electrical personnel familiar with the construction and operation of this equipment and the hazards involved should install adjust operate or service this equipment Read and understand this manual and other applicable manuals in their entirety before proceeding Failure to observe this precaution could result in severe bodily injury or loss of life...

Страница 18: ... clearances Refer to section 3 1 3 for drive mounting dimensions Table 3 1 Ambient Operating Temperatures and Mounting Clearances Ambient Temperature Enclosure Rating Minimum Mounting Clearances Minimum Maximum 10 C 14 F 40 C 104 F IP 20 Open Type Use Mounting Option A figure 3 1 IP 30 NEMA 1 UL Type 11 Use Mounting Option B figure 3 1 50 C 122 F IP 20 Open Type Use Mounting Option B figure 3 1 1 ...

Страница 19: ... F G Shipping Weight A 80 3 15 185 7 28 136 5 35 67 2 64 152 5 98 59 3 2 33 140 5 51 1 4 3 1 B 100 3 94 213 8 39 136 5 35 87 3 43 180 7 09 87 4 3 44 168 6 61 2 2 4 9 Figure 3 2 Drive Dimensions Front View 1 Height dimension includes NEMA 1 IP30 Kit see figure 3 3 2 Height dimension without NEMA 1 IP30 Kit A G E D C B F 5 5 0 22 Front Side NEMA 1 IP30 Kit Figure 3 3 Drive Dimensions Bottom View 59 ...

Страница 20: ...3 2 1 Protecting the Drive from Debris A plastic top panel is included with the drive Install the panel to prevent debris from falling through the vents of the drive housing during installation Remove the panel for IP 20 Open Type applications Table 3 2 Mounting Specifications Minimum Panel Thickness Screw Size Mounting Torque 1 9 mm 0 0747 in M4 8 32 1 56 1 96 N m 14 17 in lb ...

Страница 21: ...e AC input ground conductor should be grounded independently and directly to this point bar ATTENTION The following information is merely a guide for proper installation Rockwell Automation cannot assume responsibility for the compliance or the noncompliance to any code national local or otherwise for the proper installation of this drive or associated equipment A hazard of personal injury and or ...

Страница 22: ... a shield terminating or EMI clamp to connect the shield to the safety ground terminal The NEMA 1 IP30 Kit may be used with a cable clamp for a grounding point for the cable shield When shielded cable is used for control and signal wiring the shield should be grounded at the source end only not at the drive end 4 1 RFI Filter Grounding Using single phase drives with integral filter or an external ...

Страница 23: ...figure 5 1 ATTENTION The user isresponsible for conforming with all applicable local and national codes Failure to observe this precaution could result in damage to or destruction of the equipment ATTENTION To avoid a possible shock hazard caused by induced voltages unused wires in the conduitmustbegroundedatbothends Forthesame reason if a drive sharing a conduit is being serviced or installed all...

Страница 24: ...t power to the drive corresponds to the drive nameplate voltage and frequency 5 2 1 Ungrounded Distribution Systems To prevent drive damage the MOVs connected to ground should be disconnected if the drive is installed on an ungrounded distribution system where the line to ground voltages on any phase could exceed 125 of the nominal line to line voltage Figure 5 2 Removing the Finger Guard V T2 T L...

Страница 25: ...d 5 4 Step 1 Open the cover Step 2 Locate the screw below and to the left of the power terminal block Step 3 Turn the screw counterclockwise to loosen Step 4 Pull the jumper completely out of the drive chassis Step 5 Tighten the screw to keep it in place Figure 5 3 Jumper Location A Frame Shown Figure 5 4 Phase to Ground MOV Removal Important Tighten screw after jumper removal Jumper R L1 S L2 T L...

Страница 26: ...branch and sized to handle the total current of the branch circuit Table 5 1 Corrective Actions for Input Power Conditions Input Power Condition Corrective Action Low line impedance less than 1 line reactance Install line reactor1 or Install isolation transformer Greater than 120 kVA supply transformer Line has power factor correction capacitors Line has frequent power interruptions Line has inter...

Страница 27: ...minal Block Specifications Frame Maximum Wire Size1 1 Maximum minimum sizes that the terminal block will accept These are not recommendations Minimum Wire Size1 Torque A 3 3 mm2 12 AWG 0 8 mm2 18 AWG 1 7 2 2 Nm 16 19 in lb B 5 3 mm2 10 AWG 1 3 mm2 16 AWG Terminal Description R L1 S L2 1 Phase Input R L1 S L2 T L3 3 Phase Input U T1 To Motor U T1 Switch any two motor leads to change forward directi...

Страница 28: ... with input fuses The ratings in table 5 4 are the minimum recommended values for use with each drive rating The devices listed in this table are provided to serve as a guide If fuses are chosen as the desired protection method refer to the recommended types listed below If available amp ratings do not match the tables provided the closest fuse rating that exceeds the drive rating should be chosen...

Страница 29: ...1 0 75 1 0 4 5 90 126 2 25 18 0 30 30 50 6MDVN 6P0101 1 1 1 5 6 0 90 126 3 0 24 0 40 40 70 200 240V AC 1 Phase Input 0 230 V 3 Phase Output 6MDAN 1P5111 0 2 0 25 1 5 180 265 0 75 5 0 10 5 25 6MDAN 2P3111 0 37 0 5 2 3 180 265 1 15 6 0 10 10 30 6MDAN 4P5111 0 75 1 0 4 5 180 265 2 25 10 0 15 15 50 6MDAN 8P0111 1 5 2 0 8 0 180 265 4 0 18 0 30 25 80 200 240V AC 3 Phase Input 0 230 V 3 Phase Output 6MDB...

Страница 30: ...llations in 40 C ambient 600V 75 C or 90 C wire is recommended Use copper wire only Wire gauge requirements and recommendations are based on 75 C Do not reduce wire gauge when using higher temperature wire Unshielded THHN THWN or similar wire is acceptable for drive installation in dry environments provided adequate free air space and or conduit fill rates limits are provided Do not use THHN or si...

Страница 31: ...mil single helical copper tape 25 overlap min with three bare copper grounds in contact with shield PVC jacket Class I II Division I II Tray rated 600V 75 C or 90 C 167 F or 194 F RHH RHW 2 Three tinned copper conductors with XLPE insulation 5 mil single helical copper tape 25 overlap min with three bare copper grounds in contact with shield PVC copper grounds on 10 AWG and smaller Table 5 5 Shiel...

Страница 32: ...p the motor A device that routinely disconnects then reapplies output power to the motor for the purpose of starting and stopping the motor should not be used If it is necessary to disconnect power to the motor while the drive is providing output power an auxiliary contact should be used to simultaneously disable drive control run commands ...

Страница 33: ...es the transistor power device drivers until the motor comes to a stop and then turns off the power devices In addition to the operational stop you must provide a hardwired emergency stop external to the drive The emergency stop circuit must contain only hardwired electromechanical components Operation of the emergency stop must not depend on electronic logic hardware or software or on the communi...

Страница 34: ...tion rating of 600V or greater is recommended Control and signal wires should be separated from power wires by at least 0 3 meters 1 foot ATTENTION A contactor or other device that routinely disconnects and reapplies the AC line to the drive to start and stop the motor can cause drive hardware damage The drive is designed to use control input signals that will start and stop the motor If used the ...

Страница 35: ...e earth ATTENTION Driving the 4 20 mA analog input from a voltage source could cause component damage Verify proper configuration prior to applying input signals Table 6 1 Recommended Control and Signal Wire1 1 If the wires are short and contained within a cabinet which has no sensitive circuits the use of shielded wire may not be necessary but is always recommended Wire Type s Description Minimum...

Страница 36: ... to chassis ground when using the RS485 communications port 3 Only one analog frequency source may be connected at a time If more than one reference is connected at the same time an undetermined frequency reference will result 4 RS485 port is used to connect the drive to a personal computer running VS Utilities via a Serial Converter module and for connection to the Remote Nema 4x 12 or Copy Cat K...

Страница 37: ...ce 3 4 20mA Input 2 Wire SRC Control Non Reversing P036 Start Source 2 3 or 4 Input must be active for the drive to run When input is opened the drive will stop as specified by P037 Stop Mode If desired a User Supplied 24 V DC power source can be used Refer to the External Supply SRC example Internal Supply SRC External Supply SRC 2 Wire SNK Control Non Reversing Internal Supply SNK Figure 6 2 I O...

Страница 38: ...he drive as specified by P037 Stop Mode Internal Supply SRC External Supply SRC 3 Wire SNK Control Non Reversing Internal Supply SNK 3 Wire SRC Control Reversing P036 Start Source 1 A momentary input will start the drive A stop input to I O Terminal 01 will stop the drive as specified by P037 Stop Mode I O Terminal 03 determines direction Internal Supply SRC External Supply SRC Input Output Connec...

Страница 39: ...s important to connect I O Terminal 04 common together for all drives If they are to be tied into another common such as earth ground or separate apparatus ground only one point of the daisy chain of I O Terminal 04 should be connected MultipleAnalog Connections When connecting a single potentiometer to multiple drives it is important to connect I O Terminal 14 common together for all drives I O T...

Страница 40: ...ive A051 or A052 2 Yes Drive will start and run at jog speed Direction comes from Terminal 03 Dir Run REV Local Remote input enabled and active A051 or A052 5 Yes Start speed and direction commands come from integral keypad Comm Select input enabled and active A051 or A052 6 Yes Start speed and direction commands come from RS485 port P038 Speed Reference 4 or 5 Yes Run as specified by P038 Speed R...

Страница 41: ... used No P039 Accel Time 1 Decel Time 1 are used RS485 port controls speed Yes Active when A067 Accel Time 2 A068 Decel Time 2 selected by RS485 port No Input is programmed as Accel 2 Decel 2 A051 or A052 1 Yes A067 Accel Time 2 A068 Decel Time 2 is active when input is active No Speed is controlled by Preset Freq x A051 or A052 4 Yes P039 Accel Time 1 P040 Decel Time 1 A067 Accel Time 2 A068 Dece...

Страница 42: ...6 10 MD60 AC Drive User Manual ...

Страница 43: ... understand this manual in its entirety before proceeding Failure to observe this precaution could result in severe bodily injury or loss of life ATTENTION The drive contains high voltage capacitors that take time to discharge after removal of mains supply Before working on the drive ensure isolation of mains supply from line inputs R S T L1 L2 L3 Wait three 3 minutes for capacitors to discharge t...

Страница 44: ...ive will not start Important If I O Terminal 01 is used as a stop input the jumper between I O Terminals 01 and 11 must be removed 7 2 Powering Up After Installation is Complete To verify that the drive is installed correctly and is receiving the proper line voltage apply AC power and control voltages to the drive Become familiar with the integral keypad features before setting any parameters Refe...

Страница 45: ...is required to start stop change direction or control speed directly from the integral keypad This chapter provides an overview of the integrated keypad and how to use it to program and control the MD60 drive Parameter descriptions are provided in chapter 9 8 1 Keypad Components Figure 8 1 Integral Keypad RUN FWD REV VOLTS AMPS HERTZ PROGRAM FAULT PROG MIN MAX Refer to tables 8 1 and 8 2 for the L...

Страница 46: ...ded to change direction Indicates actual motor direction while decelerating to zero Steady Red Indicates the commanded motor direction VOLTS AMPS HERTZ Steady Red Indicates the units of the parameter value being displayed PROGRAM Steady Red Indicates the drive is in program mode and the parameter value can be changed FAULT Flashing Red Indicates drive is faulted Pot Status Steady Green Indicates p...

Страница 47: ...value of a flashing digit In Display Mode increases decreases internal frequency parameter if that parameter is currently controlling the drive commanded speed Enter Display value of P or A parameter Save a change to a parameter value Scroll through display d parameters Potentiometer Control drive speed Default is active Controlled by parameter P038 Start Start the drive Default is active Controll...

Страница 48: ... is true Example Drive Status d006 Numeric Parameters These parameters have a single numerical value for example 0 1 volts Example Motor NP Volts P031 Parameters are also either configurable or tunable or read only Configurable parameters can be adjusted or changed only while the drive is stopped Tunable parameters can be adjusted or changed while the drive is running or stopped Read only paramete...

Страница 49: ... group is displayed The PROGRAM LED will turn on to indicate the drive is in program mode Step 2 Press to scroll through the parameters in the selected parameter group Step 3 Press to view the value of the displayed parameter Step 4 Press or The adjustable value will flash on the display Step 5 Use to adjust the value Step 6 Press to accept the value The value stops flashing Step 7 Press to return...

Страница 50: ...s displayed by default when power is re applied Table 8 4 Viewing the Display d Parameters Procedure Sample Display Step 1 Press to scroll through the parameter menus until the Display Group parameters are displayed The PROGRAM LED will be off to indicate the drive is in display mode Step 2 Press to scroll through the Display Group parameters until the desired Display parameter is displayed Step 3...

Страница 51: ...eter Number Unique number assigned to each parameter Parameter Name Unique name assigned to each parameter Range Predefined parameter limits or selections Note that a negative Hz value indicates reverse rotation Default Factory default setting See also Associated parameters that may provide additional or related information Symbol Meaning Drive must be stopped before changing parameter value 32 bi...

Страница 52: ... for 3 seconds Sets the lowest frequency the drive will output continuously Sets the highest frequency the drive will output P031 Motor NP Volts Range 20 VAC to Drive Rated Volts Default Based on Drive Rating See also A084 P032 Motor NP Hertz Range 10 to 240 Hz Default 60 Hz See also A084 P033 Motor OL Current Range 0 0 to Drive Rated Amps x 2 Default Based on Drive Rating See also A089 A090 A098 ...

Страница 53: ...tart after a stop input loss of power or fault condition 0 Keypad Default Integral keypad controls drive operation I O Terminal 01 Stop on terminal block coast to stop When 0 is selected the Reverse key is also active unless disabled by A095 Reverse Disable 1 3 Wire I O Terminal 1 Stop stop according to the value set in P037 Stop Mode Refer to figure 6 2 for wiring examples 2 2 Wire I O Terminal 1...

Страница 54: ... will follow the commanded direction from I O terminal 03 On firmware version 1 05 and later the commanded direction will be provided via the RS485 communications port Important When sending a continuous start command via the RS485 communications port on drives with firmware version 1 04 or earlier a maintained stop input is required to stop the drive Once the stop input is inactive the drive will...

Страница 55: ...ult Default Coast to stop Stop command clears active fault and resets the drive 2 DC Brake Clear Fault DC injection braking stop Stop command clears active fault and resets the drive 3 DC Brake w Shutoff Clear Fault DC injection braking stop with auto shutoff Standard DC injection braking for value set in A080 DC Brake Time OR Drive shuts off if current limit is exceeded Stop command clears active...

Страница 56: ...069 Internal Frequency 2 0 to 10 V Input Remote Potentiometer External frequency command from the 0 to 10 V analog input or remote potentiometer 3 4 to 20 mA Input External frequency command from the 4 to 20 mA analog input 4 Preset Frequency 0 to 3 External frequency command as defined by A070 A073 Preset Frequency x when A051 and A052 Digital Inx Select are programmed as Preset Frequencies and t...

Страница 57: ...on causes an F48 Params Defaulted fault P039 Accel Time 1 Range 0 1 to 600 0 sec Default 5 0 sec See also P038 P040 A051 A052 A067 A070 A073 Figure 9 1 Accel Time 1 P039 P040 Decel Time 1 Range 0 1 to 600 0 sec Default 5 0 sec See also P038 P039 A051 A052 A068 A070 A073 Speed 0 Time Maximum Freq Accel Time Decel Time 0 A c c e le r a t io n D e c e le r a t io n Figure 9 2 Decel Time 1 P040 P041 R...

Страница 58: ... A valid Start command will override this input 3 Auxiliary Fault When enabled an F2 Auxiliary Input fault will occur when the input is removed 4 Preset Frequencies Default See Preset Frequency x A070 to A073 Important Digital Input 1 or 2 has priority for frequency control when it is programmed as a Preset Speed and is active 5 Local When active sets the integral keypad as the start source and th...

Страница 59: ... command 12 Jog Reverse Drive accelerates to Jog Frequency A078 according to Jog Accel Decel A079 and ramps to stop when input becomes inactive A valid start will override this command 13 10V In Ctrl Selects 0 10V or 10V control as the frequency reference Start source is not changed 14 20mA In Ctrl Selects 4 20mA control as the frequency reference Start source is not changed 15 25 Reserved 26 Anlg...

Страница 60: ...Current Drive exceeds the current Amps value set in Relay Output Level A056 Important Value for Relay Output Level must be entered in percent of drive rated output current 8 Above DC Bus Volts Drive exceeds the DC bus voltage value set in Relay Output Level A056 9 Retries Exhausted Value set in Auto Restart Tries A092 is exceeded 10 Above Anlg V Analog input voltage I O Terminal 13 exceeds the val...

Страница 61: ... Accel Time Accel Rate A056 Relay Output Level Range 0 0 to 9999 see table 9 1 Default 0 0 See also A055 32 Table 9 1 Trip Points for Digital Output Relay A055 Setting Range 6 Above Frequency 0 to 240 Hz 7 Above Current 0 to 180 8 Above DC Bus Volts 0 to 815 V 10 0 to 100 20 0 to 1 A067 Accel Time 2 Range 0 0 to 600 0 sec Default 10 0 sec See also P039 Figure 9 3 Accel Time 2 A067 Speed 0 Time Max...

Страница 62: ...d Reference P038 is set to 1 Internal Frequency When enabled this parameter will change the frequency command in real time using the integral keypad keys when in program mode A068 Decel Time 2 Range 0 1 to 600 0 sec Default 10 0 sec See also P040 Figure 9 4 Decel Time 2 A068 Speed 0 Time Maximum Freq Accel Time Decel Time 0 A c c e l e r a t i o n D e c e l e r a t i o n A069 Internal Frequency Ra...

Страница 63: ... 3 Range 0 0 to 240 0 Hz Default 0 0 See also P038 A051 A052 1 To activate Preset Frequency 0 set P038 Speed Reference to option 4 Preset Frequency 0 3 Table 9 2 Selecting the Reference Source Using Presets Input State of Digital In 1 I O Terminal 05 Input State of Digital In 2 I O Terminal 06 Frequency Source Accel Decel Parameter Used1 0 0 Preset Freq 0 Accel Time 1 Decel Time 1 1 0 Preset Freq ...

Страница 64: ...vel Range 0 0 to Drive Amps x 1 8 Default Amps x 0 5 See also P037 A080 ATTENTION If a hazard of injury due to movement of equipment or material exists an auxiliary mechanical braking device must be used ATTENTION This feature should not be used with synchronous or permanent magnet motors Motors may be demagnetized during braking Figure 9 5 DC Brake Level A081 DC Injection Braking Mode Volts Speed...

Страница 65: ...me will be 10 x 0 5 5 seconds Total time will be 10 5 15 seconds A082 DB Resistor Select Range 0 Disabled 1 Reliance Electric Standard Resistor 5 Duty Cycle 2 No Protection 100 Duty Cycle 3 to 99 Duty Cycle Limited 3 to 99 Duty Cycle Default 0 Disabled See also N A A083 S Curve Range 0 to 100 Default 0 Disabled See also N A Figure 9 6 S Curve A083 Examples 1 2 S Curve Time 2 5 Seconds Total Time t...

Страница 66: ...Start Boost Range Settings in of base voltage at 50 of Motor Nameplate Hertz P032 Variable Torque 1 30 0 2 35 0 3 40 0 4 45 0 Constant Torque 5 0 0 no IR Compensation 6 0 0 7 2 5 8 5 0 9 7 5 10 10 0 11 12 5 12 15 0 13 17 5 14 20 0 Default 8 5 0 7 2 5 for 5 HP drives only See also P031 Figure 9 7 Start Boost A084 Motor NP Hertz Motor NP Volts 100 50 1 2 Base Volts 1 2 Base Freq 4 3 2 1 0 50 100 Set...

Страница 67: ...ted Volts Default Drive Rated Volts See also N A A089 Current Limit Range 0 1 to Drive Rated Amps x 1 8 Default Drive Rated Amps x 1 8 See also N A A090 Motor OL Select Range 0 No Derate 1 Minimum Derate 2 Maximum Derate Default 0 No Derate See also P032 Figure 9 8 Motor OL Select A090 Min Derate 0 80 100 60 40 20 No Derate 0 80 100 60 40 20 of Motor NP Hertz of Motor OL Curent of Motor NP Hertz M...

Страница 68: ...the Auto Restart Run feature A091 PWM Frequency Range 2 0 to 16 0 kHz Default 4 0 kHz See also N A Figure 9 9 Derating Guidelines Based on PWM Frequency A091 Selection 68 84 88 80 76 96 100 92 72 64 60 56 52 8 7 6 5 4 3 2 1 15 14 16 13 12 11 10 9 A092 Auto Restart Tries Range 0 to 9 Default 0 See also A093 ATTENTION Equipment damage and or personal injury may result if this parameter is used in an...

Страница 69: ...ables disables the function that allows the direction of motor rotation to be changed The reverse command may come from a digital command the keypad or a serial command All reverse inputs including two wire Run Reverse will be ignored with reverse disabled A093 Auto Restart Delay Range 0 0 to 120 0 sec Default 1 0 sec See also A092 A094 Start At Power Up Range 0 Disabled 1 Enabled Default 0 Disabl...

Страница 70: ...nations have mechanical resonances which can be excited by the drive current regulator This setting slows down the current regulator response and attempts to correct this condition A096 Flying Start Enable Range 0 Disabled 1 Enabled Default 0 Disabled See also N A ATTENTION When starting with this feature enabled the motor may temporarily run up to the maximum speed setting before settling at the ...

Страница 71: ...s fault codes from parameters d007 through d009 Protects parameters against change by unauthorized personnel A098 SW Current Trip Range 0 0 to Drive Rated Amps x 2 Default 0 0 Disabled See also N A A099 Process Factor Display Scaling Range 0 1 to 999 9 Default 30 0 See also d010 A100 Fault Clear Range 0 Ready Idle 1 Reset Fault 2 Clear Buffer d007 d009 Fault x Code Default 0 Ready See also d007 d0...

Страница 72: ...er changing this parameter for the value to take effect Selects the drive s response to a loss of the communication connection or excessive communication errors A102 Testpoint Select Range 0400 to FFFF Default 0400 See also d019 A103 Comm Data Rate Range 0 1200 1 2400 2 4800 3 9600 4 19 2 K 5 38 4 K Default 4 19 2 K See also N A A104 Comm Node Address Range 1 to 247 Default 1 See also N A A105 Com...

Страница 73: ...ed in RAM Sets the time that the drive will remain in communication loss before implementing the option selected in Comm Loss Action A105 Determines details related to the specific RS485 protocol used by the drive Important Cycle power after changing this parameter for the value to take effect A106 Comm Loss Time Range 0 1 to 60 0 Default 5 0 See also d015 A105 A107 Comm Format Range 0 RTU 8 N 1 3...

Страница 74: ...eaches maximum frequency at the voltage setting in parameter A111 The value is based on 10V Therefore to set the maximum frequency at 9 V set A110 to 90 Use parameter d020 0 10 V Analog Input to verify the analog input signal Setting this parameter to a value less than 0 10 V Analog Input Low A110 inverts the analog signal A110 0 10 V Analog Input Lo Range 0 0 to 100 0 Default 0 0 See also A111 d0...

Страница 75: ...current setting in parameter A113 The value is based on 4 20 mA Therefore to set the maximum frequency at 18 4 mA set A112 to 90 Use parameter d021 4 20 mA Analog Input to verify the analog input signal Setting this parameter to a value less than 4 20 mA Analog Input Low A112 inverts the analog signal Enables compensation for the inherent slip in an induction motor If motor shaft speed decreases s...

Страница 76: ...Display D010 indicates the duration of the process Scales the time value when the drive is running at Maximum Freq P035 When set to a value other than zero Process Display D010 indicates the duration of the process A115 Process Time Lo Range 0 0 to 99 99 Default 0 00 See also N A A116 Process Time Hi Range 0 0 to 99 99 Default 0 00 See also N A ...

Страница 77: ...ence Control for more information The output current present at terminals T1 T2 and T3 U V and W The output voltage present at terminals T1 T2 and T3 U V and W d001 Output Frequency Range 0 0 to Maximum Frequency Default Read Only See also d002 d010 P034 P035 d002 Commanded Frequency Range 0 0 to Maximum Frequency Default Read Only See also d001 P034 P035 P038 d003 Output Current Range 0 00 to Dri...

Страница 78: ...ts will be recorded only once Refer to chapter 10 for the fault code descriptions d005 DC Bus Voltage Range Based on Drive Rating Default Read Only See also N A d006 Drive Status Range 0 Condition False 1 Condition True See figure 9 10 Default Read Only See also A095 Figure 9 10 Drive Status d006 Bit Definitions d007 d008 d009 Fault 1 Code Fault 2 Code Fault 3 Code Range F2 to F122 Default Read On...

Страница 79: ...ils d010 Process Display Range 0 00 to 99999 Default Read Only See also d001 A099 32 d012 Control Source Range 0 to 9 See figure 9 11 Default Read Only See also P036 P038 A051 A052 Figure 9 11 Control Source d012 Bit Definitions Start Command Digit 0 0 Keypad 1 3 Wire 2 2 Wire 3 2 Wire Level Sensitive 4 2 Wire High Speed 5 RS485 Port 9 Jog Speed Reference Digit 1 0 Drive Potentiometer 1 A069 Inter...

Страница 80: ...he drive When this bit is a 1 the drive can be started When this bit is a 0 the drive will stop Figure 9 12 Control Input Status d013 Bit Definitions Start Run FWD Input I O Terminal 02 Digit 0 Direction Run REV Input I O Terminal 03 Digit 1 Stop Input 1 Control Terminal 01 Digit 2 Reserved Digit 3 d014 Digital Input Status Range 0 Input Not Present 1 Input Present See figure 9 13 Default Read Onl...

Страница 81: ...015 Comm Status Range 0 Condition False 1 Condition True See figure 9 14 Default Read Only See also A103 through A107 Figure 9 14 Comm Status d015 Bit Definitions Receiving Data Bit 0 Transmitting Data Bit 1 RS485 Option Connected Bit 2 Fault Occurred Bit 3 d016 Control SW Version Range 1 00 to 99 99 Default Read Only See also N A d017 Drive Type Range 1001 to 9999 Default Read Only See also N A d...

Страница 82: ... 20 mA analog input Displays the present operating temperature of the drive power section d019 Testpoint Data Range 0 to FFFF Default Read Only See also A102 d020 0 10 V Analog Input Range 0 0 to 100 0 Default Read Only See also A110 A111 d021 4 to 20 mA Analog Input Range 0 0 to 100 0 Default Read Only See also A112 A113 d024 Drive Temp Range 0 to 1200 C Default Read Only See also N A ...

Страница 83: ...ddition parameters d007 d009 act as a fault log See the parameter descriptions in chapter 9 for more information ATTENTION Thedrivecontainshighvoltagecapacitorsthat take time to discharge after removal of mains supply Before working on the drive ensure isolation of mains supply from line inputs R S T L1 L2 L3 Wait three 3 minutes for capacitors to discharge to safe voltage levels Darkened display ...

Страница 84: ...ture The Auto Restart feature provides the ability for the drive to automatically perform a fault reset followed by a start attempt without user or application intervention This allows remote or unattended operation This feature can only be used for auto resettable faults see table 10 1 When this type of fault occurs and A092 Auto Restart Tries is set to a value greater than 0 a user configurable ...

Страница 85: ... DC bus voltage fell below the minimum value Monitor the incoming AC line for low voltage or line power interruption F5 OverVoltage Y DC bus voltage exceeded maximum value Monitor the AC line for high line voltage or transient conditions Bus overvoltage can also be caused by motor regeneration Extend the decel time or install dynamic brake option F6 Motor Stalled Y Drive is unable to accelerate mo...

Страница 86: ...ng to the drive output terminals for a grounded condition F33 Auto Restart Tries N Drive unsuccessfully attempted to reset a fault and resume running for the programmed number of Auto Restart Tries in A092 Correct the cause of the fault and manually clear F38 Phase U to Gnd N A phase to ground fault has been detected between the drive and motor in this phase Check the wiring between the drive and ...

Страница 87: ...red F81 Comm Loss N RS485 port stopped communicating If module was not intentionally disconnected check wiring to the port Replace wiring port expander module or complete drive as required Check connection A module was intentionally disconnected Turn off using A105 Comm Loss Action F100 Parameter Checksum N The checksum read from the board does not match the checksum calculated Set P041 Reset to D...

Страница 88: ...lear fault by using one of the following methods Press Stop Cycle power Set A100 Fault Clear to 1 Clear Faults Cycle digital input if A051 A052 Digital Inx Select is set to option 7 Clear Fault Incorrect programming P036 Start Source is set to option 0 Keypad or option 5 RS485 Port A051 A052 Digital Inx Select is set to option 5 Local and the input is active None Check parameter settings Incorrect...

Страница 89: ... Does Not Respond to Changes in Speed Command Cause s Indication Corrective Action No value is coming from the source of the command The RUN LED is on and output is 0 Hz Check d012 Control Source for correct source If the source is an analog input check wiring and use a meter to check for presence of signal Check d002 Commanded Frequency to verify correct command Incorrect reference source is bein...

Страница 90: ... A089 Current Limit Remove excess load or reprogram P039 Accel Time 1 or A067 Accel Time 2 Check for improper A084 Start Boost setting Speed command source or value is not as expected None Verify d002 Commanded Frequency Check d012 Control Source for the proper Speed Command Programming is preventing the drive output from exceeding limiting values None Check P035 Maximum Frequency to ensure that s...

Страница 91: ... s Indication Corrective Action Digital input is not selected for reversing control None Check Digital Inx Select Choose correct input and program for reversing mode Digital input is incorrectly wired None Check input wiring Motor wiring is improperly phased for reverse None Switch two motor leads Reverse is disabled None Check A095 Reverse Disable ...

Страница 92: ...10 10 MD60 AC Drive User Manual ...

Страница 93: ...ve rating based on 4 kHz Frequency Accuracy Digital Input Within 0 05 of set output frequency Analog Input Within 0 5 of maximum output frequency Speed Regulation Open Loop with Slip Compensation 2 of base speed across a 40 1 speed range Stop Modes Multiple programmable stop modes including Ramp Coast DC Brake Ramp to Hold and S Curve Accel Decel Two independently programmable accel and decel time...

Страница 94: ...ive Rating 0 5 A at 30 V DC 0 5 A at 125 V AC 0 5 A at 240 V AC Fuses and Circuit Breakers Recommended Fuse Type UL Class J CC T or Type BS88 600 V 550 V or equivalent Recommended Circuit Breakers HMCP circuit breakers or equivalent Protective Features Motor Protection I2 t overload protection 150 for 60 sec 200 for 3 sec Provides Class 10 protection Overcurrent 200 hardware limit 300 instantaneou...

Страница 95: ... 480 V AC Input Trip occurs at 390 V DC bus voltage equivalent to 275 V AC incoming line Control Ride Through Minimum ride through is 0 5 sec typical value 2 sec Faultless Power Ride Through 100 milliseconds Dynamic Braking Internal brake IGBT included with all ratings Approvals UL LISTED 966X IND CONT EQ UL508C UL LISTED 966X IND CONT EQ C CSA 22 2 EMC Directive 89 336 LV EN 50178 EN 60204 EMC EN...

Страница 96: ...A 4 MD60 AC Drive User Manual ...

Страница 97: ...lts Varies 9 2 P032 Motor NP Hertz 60 Hz 9 2 P033 Motor OL Current Varies 9 2 P034 Minimum Frequency 0 Hz 9 2 P035 Maximum Frequency 60 Hz 9 2 P036 Start Source 0 Keypad 9 3 P037 Stop Mode 1 Coast Clear Fault 9 5 P038 Speed Reference 0 Drive Potentiometer 9 6 P039 Accel Time 1 5 0 sec 9 7 P040 Decel Time 1 5 0 sec 9 7 P041 Reset to Defaults 0 Idle State 9 7 ...

Страница 98: ... Frequency 3 0 0 Hz 9 13 A078 Jog Frequency 10 0 Hz 9 13 A079 Jog Accel Decel 10 0 sec 9 13 A080 DC Brake Time 0 0 sec 9 14 A081 DC Brake Level Amps x 0 5 9 14 A082 DB Resistor Select 0 Disabled 9 15 A083 S Curve 0 Disabled 9 15 A084 Start Boost 8 5 0 9 16 A088 Maximum Voltage Rated Volts 9 17 A089 Current Limit Amps x 1 8 9 17 A090 Motor OL Select 0 No Derate 9 17 A091 PWM Frequency 4 0 kHz 9 18 ...

Страница 99: ... Loss Action 0 Fault 9 22 A106 Comm Loss Time 5 0 9 23 A107 Comm Format 0 RTU 8 N 1 9 23 A110 0 10 V Analog Input Low 0 0 9 24 A111 0 10 V Analog Input High 100 0 9 24 A112 4 20 mA Analog Input Low 0 0 9 25 A113 4 20 mA Analog Input High 100 0 9 25 A114 Slip Compensation 2 0 Hz 9 25 A115 Process Time Lo 0 00 9 26 A116 Process Time Hi 0 00 9 26 No Parameter Name Default Value Page No User Setting ...

Страница 100: ...B 4 MD60 AC Drive User Manual ...

Страница 101: ...5 0 sec 9 7 Accel Time 2 A067 Advanced 10 0 sec 9 11 Auto Restart Delay A093 Advanced 1 0 sec 9 19 Auto Restart Tries A092 Advanced 0 9 18 Comm Data Rate A103 Advanced 4 19 2 K 9 22 Comm Format A107 Advanced 0 RTU 8 N 1 9 23 Comm Loss Action A105 Advanced 0 Fault 9 22 Comm Loss Time A106 Advanced 5 0 9 23 Comm Node Address A104 Advanced 1 9 22 Comm Status d015 Display Read Only 9 31 Commanded Freq...

Страница 102: ...y Read Only 9 28 Fault 3 Code d009 Display Read Only 9 28 Fault Clear A100 Advanced 0 Ready 9 21 Flying Start Enable A096 Advanced 0 Disabled 9 20 Internal Frequency A069 Advanced 0 0 Hz 9 12 Jog Accel Decel A079 Advanced 10 0 sec 9 13 Jog Frequency A078 Advanced 10 0 Hz 9 13 Maximum Frequency P035 Basic 60 Hz 9 2 Maximum Voltage A088 Advanced Rated Volts 9 17 Minimum Frequency P034 Basic 0 Hz 9 2...

Страница 103: ... Ready Not Faulted 9 9 Reset to Defaults P041 Basic 0 Idle State 9 7 Reverse Disable A095 Advanced 0 Reverse Enabled 9 19 S Curve A083 Advanced 0 Disabled 9 15 Slip Compensation A114 Advanced 2 0 Hz 9 25 Speed Reference P038 Basic 0 Drive Potentiometer 9 6 Start At Power Up A094 Advanced 0 Disabled 9 19 Start Boost A084 Advanced 8 5 0 9 16 Start Source P036 Basic 0 Keypad 9 3 Stop Mode P037 Basic ...

Страница 104: ...C 4 MD60 AC Drive User Manual ...

Страница 105: ...61800 3 Second Environment Adjustable speed electrical power drive systems Part 3 EMC product standard including specific test methods General Notes If the top panel is removed or the optional conduit box is not installed the drive must be installed in an enclosure with side openings less than 12 5 mm 0 5 in and top openings less than 1 0 mm 0 04 in to maintain compliance with the LV Directive Ref...

Страница 106: ...nduit or equivalent attenuation Allowable cable length in table D 1 is not exceeded Table D 1 Allowable Cable Length1 Filter Type EN61800 3 First Environment3 Restricted Distribution or Second Environment EN61800 3 First Environment Unrestricted Distribution4 Integral 5 meters 16 feet 1 meter 3 feet External Short2 5 meters 16 feet 1 meter 3 feet External Long2 100 meters 328 feet 5 meters 16 feet...

Страница 107: ...000 3 2 without additional external mitigation Figure D 1 Connections and Grounding R L1 S L2 T L3 U T1 V T2 W T3 EMI Fittings and Metal Conduit IP 30 NEMA 1 UL Type 1 Option Kit Shielded Enclosure 1 Building Structure Steel Enclosure Ground Connection 2 EMI Filter L1 L2 L3 L1 L2 L3 Shielded Motor Cable 1 First Environment Unrestricted Distribution installations require a 2 Integral EMI filters ar...

Страница 108: ...D 4 MD60 AC Drive User Manual ...

Страница 109: ...2 091P500 0 75 1 0 60 AK R2 091P500 1 1 1 5 60 AK R2 091P500 240V 50 60 Hz 1 Phase 0 2 0 25 AK R2 091P500 0 4 0 5 AK R2 091P500 0 75 1 0 60 AK R2 091P500 1 5 2 0 60 AK R2 091P500 240V 50 60 Hz 3 Phase 0 2 0 25 AK R2 091P500 0 4 0 5 AK R2 091P500 0 75 1 0 60 AK R2 091P500 1 5 2 0 60 AK R2 091P500 2 2 3 0 48 AK R2 047P500 3 7 5 0 32 AK R2 047P500 480V 50 60 Hz 3 Phase 0 4 0 5 AK R2 360P500 0 75 1 0 ...

Страница 110: ...del Number A AK R2 091P500 AK R2 047P500 AK R2 360P500 B AK R2 030P1K2 AK R2 120P1K2 335 0 13 19 60 0 2 36 30 0 1 18 17 0 0 67 59 0 2 32 13 0 0 51 405 0 15 94 386 0 15 20 316 0 12 44 61 0 2 40 31 0 1 22 ROCKWELL AUTOMATION C US SURFACES MAY BE ROCKWELL AUTOMATION C US Frame A Frame B ...

Страница 111: ...DF 018BL 1 1 1 5 6MDF 025CL 240V 50 60 Hz 1 Phase 0 2 0 25 2 2 These ratings can be ordered with internal S Type filters 6MDF 010AL 0 4 0 5 3 3 These ratings can be ordered with internal S Type filters 6MDF 010AL 0 75 1 0 2 6MDF 010AL 1 5 2 0 2 6MDF 018BL 240V 50 60 Hz 3 Phase 0 2 0 25 6MDF 021BS4 4 Filter must be Series B 6MDF 9P5AL 0 4 0 5 6MDF 021BS5 5 Filter must be Series B 6MDF 9P5AL 0 75 1 ...

Страница 112: ...e User Manual Figure E 2 Frame A EMC Line Filters Dimensions Dimensions are in mm and in Model Numbers 6MDF 9P5AS AL 6MDF 5P7AS AL 5 5 0 22 17 8 0 70 24 0 94 60 2 36 80 3 15 50 1 97 29 8 1 17 220 8 66 208 8 19 208 8 19 ...

Страница 113: ...gure E 3 Frame B EMC Line Filters Dimensions 5 5 0 22 17 8 0 70 24 0 0 94 78 3 07 100 3 94 50 1 97 29 8 1 17 229 9 02 216 8 50 217 8 54 Dimensions are in mm and in Model Numbers 6MDF 012BS BL 6MDF 021BS BL 6MDF 018BS BL ...

Страница 114: ...yCat capable IP66 NEMA 4x12 indoor use only includes 2 9 meter cable MD4ALCD Remote Handheld OIM digital speed control full numeric keypad CopyCat capable IP30 NEMA Type 1 includes 1 0 meter cable panel mount with optional Bezel Kit MD1CC Bezel Kit panel mount for Remote Handheld OIM MDBZL N1 OIM Cable 1 0 meter OIM to RJ45 cable MDCBL CC1 OIM Cable 2 9 meter OIM to RJ45 cable MDCBL CC3 ...

Страница 115: ...Accessories E 7 Figure E 4 Remote OIM M N MD4ALCD Dimensions are in mm and in 67 0 2 63 60 0 2 36 77 0 3 03 77 0 3 03 53 5 2 11 19 1 0 75 4 8 0 19 93 0 3 66 25 0 0 98 2 0m mm in 180 0 7 08 ...

Страница 116: ... MD60 AC Drive User Manual Figure E 5 NEMA Type 1 Bezel M N MDBZL N1 Dimensions Dimensions in mm and in 93 3 66 25 2 0 99 2m 180 7 09 11 1 0 44 19 1 0 75 4 8 0 19 154 6 06 77 3 03 23 5 0 93 67 2 64 60 2 36 ...

Страница 117: ...etwork Wiring Network wiring consists of a shielded 2 conductor cable that is daisy chained from node to node See figure F 2 Only pins 4 and 5 on the RJ45 plug should be wired The other pins on the MD60 RJ45 socket contain power etc for other Rockwell Automation peripheral devices and must not be connected Figure F 1 Sample Network Controller Figure F 2 Network Wiring Diagram Master MD60 Drive Nod...

Страница 118: ...ere are two PE terminals on the drive Parameter Configuration The following MD60 parameters are used to configure the drive to operate on a network Table F 1 MD60 Network Parameters Parameter Details P036 Start Source Set to 5 RS485 MDI Port if Start is controlled from the network P038 Speed Reference Set to 5 RS485 MDI Port if the Speed Reference is controlled from the network A103 Comm Data Rate...

Страница 119: ... registers are numbered starting at 1 Depending on the Modbus Master used the register addresses listed on the following pages may need to be offset by 1 For example Logic Command may be register address 8192 for some master devices e g ProSoft 3150 MCM SLC Modbus scanner and 8193 for others e g PanelViews Table F 2 Supported Modbus Function Codes Modbus Function Code Command 03 Read Holding Regis...

Страница 120: ... Start 2 1 Jog 0 No Jog 3 1 Clear Faults 0 Not Clear Faults 5 4 00 No Command 01 Forward Command 10 Reverse Command 11 Change Direction Toggle 6 Not Used 7 Not Used 9 8 00 No Command 01 Accel Rate 1 Enable 10 Accel Rate 2 Enable 11 Hold Accel Rate Selected 11 10 00 No Command 01 Decel Rate 1 Enable 10 Decel Rate 2 Enable 11 Hold Decel Rate Selected 14 13 12 000 No Command 001 Freq Source P036 Star...

Страница 121: ...cription 8193 A decimal value entered as xxx x where the decimal point is fixed For example a decimal 100 equals 10 0 Hz and 543 equals 54 3 Hz Table F 5 Logic Status Data Logic Status Address Decimal Bit s Description 8448 0 1 Ready 0 Not Ready 1 1 Active Running 0 Not Active 2 1 Cmd Forward 0 Cmd Reverse 3 1 Rotating Forward 0 Rotating Reverse 4 1 Accelerating 0 Not Accelerating 5 1 Decelerating...

Страница 122: ...network by sending Function Code 03 reads to register address 8451 Feedback Table F 6 Feedback Feedback1 1 Returns the same data as Reading 03 Parameter d001 Output Freq Address Decimal Description 8451 A xxx x decimal value where the decimal point is fixed For example a decimal 123 equals 12 3 Hz and 300 equals 30 0 Hz ...

Страница 123: ...uxiliary Input 3 Power Loss 4 Undervoltage 5 Overvoltage 6 Motor Stalled 7 Motor Overload 8 Heatsink Overtemperature 12 HW Overcurrent 300 13 Ground Fault 29 Analog Input Loss 33 Auto Restart Tries 38 Phase U to Ground Short 39 Phase V to Ground Short 40 Phase W to Ground Short 41 Phase UV Short 42 Phase UW Short 43 Phase VW Short 63 Software Overcurrent 64 Drive Overload 70 Power Unit Fail 80 Aut...

Страница 124: ...d Writing 06 Drive Parameters To access drive parameters the Modbus register address equals the parameter number For example a decimal 1 is used to address parameter d001 Output Freq and decimal 39 is used to address parameter P039 Accel Time 1 ...

Страница 125: ...h a drive that has an internal network communication module installed Since only one additional peripheral can be added the second peripheral can be connected directly to the RJ45 port on the drive The internal Comm is always the Master therefore the external peripheral must be configured as Auto for temporary connections or Slave for permanent connections If two peripherals will be powered up at ...

Страница 126: ...Splitter Cable M N AK U0 RJ45 SCI Slave Port Master Port PIN 8 PIN 1 M S Figure G 2 RJ45 Two Position Terminal Block Module M N AK U0 RJ45 TB2P TB2 PIN 5 TB1 PIN 4 PIN 8 PIN 1 Figure G 3 RJ45 Module With Integrated Termination Resistor M N AK U0 RJ45 TR1 PIN 8 PIN 1 ...

Страница 127: ...tter Cable MD60 Handheld OIM or Parameter 9 Device Type set to Auto default or Master and connected to Master port M on RJ45 Splitter Cable Figure G 5 Connecting One Temporary Peripheral and One Permanent Peripheral M MD60 Drive S Serial Converter NEMA 4 Panel Mount OIM or NEMA 1 Bezel with Handheld OIM Parameter 9 Device Type set to Master and connected to Master port M on RJ45 Splitter Cable Par...

Страница 128: ...t M on RJ45 Splitter Cable Parameter 9 Device Type set to Slave and connected to Slave port S on RJ45 Splitter Cable Figure G 7 Connecting an RS485 Network AK U0 RJ45 TR1 Terminating Resistor end of network AK U0 RJ45 TB2P Two position Terminal Block or MD60 Drives or Customer supplied RJ45 male to RJ45 male cables with wires connected at pins 4 and 5 only Both the Master M and Slave S ports on th...

Страница 129: ...9 22 Comm Status d015 9 31 Commanded Frequency d002 9 27 Compensation A097 9 20 control and signal wiring recommendations 6 3 Control Input Status d013 9 30 Control Source d012 9 29 Control SW Version d016 9 31 control terminal block wiring 6 4 control wiring installing 6 1 to 6 9 control 2 and 3 wire 6 7 Current Limit A089 9 17 D d parameters 9 27 to 9 32 DB Resistor Kit 2 3 DB Resistor Select A0...

Страница 130: ...t Enable A096 9 20 frames and ratings 2 2 fuses 5 6 to 5 7 A 2 G Ground Fault 10 4 ground fault monitoring 4 2 grounding the drive 4 1 to 4 2 H Heatsink OverTemp fault 10 4 HW OverCurrent fault 10 4 I I O Board Fail fault 10 5 I O wiring 6 4 I O wiring examples 6 5 6 7 input potentiometer 6 5 input power conditioning 5 4 installation 7 1 Internal Frequency A069 9 12 J Jog Accel Decel A079 9 13 Jog...

Страница 131: ...2 A072 9 13 Preset Frequency 3 A073 9 13 Process Display d010 9 29 Process Factor A099 9 21 Process Time Hi A116 9 26 Process Time Lo A115 9 26 Program Lock A101 9 21 protective features A 2 PWM Frequency A091 9 18 R reflective wave protection 5 9 Relay Output Level A056 9 11 Relay Output Select A055 9 9 Reset to Defaults P041 9 7 Reverse Disable A095 9 19 RJ45 Splitter Cable G 1 to G 4 RS485 MDI ...

Страница 132: ...60 AC Drive User Manual U UnderVoltage fault 10 3 ungrounded distribution systems 5 2 unshielded power cables 5 8 W weight drive 3 3 wiring I O examples 6 7 wiring specifications control and signal 6 3 power 5 5 ...

Страница 133: ...er you have completed this form please return it to Reliance Electric Standard Drives Technical Documentation 6040 Ponders Court Greenville SC 29617 Fax 864 284 5483 Thank you for your comments Publication Name MD60 AC Drive User Manual Publication Number D2 3499 3 Publication Date September 2003 Comments Your Name Date Company Name Phone Address E mail Technical Writing Internal Use Date DIF Numb...

Страница 134: ......

Страница 135: ......

Страница 136: ...Publication D2 3499 3 September 2003 2003 Rockwell International Corporation All rights reserved ...

Отзывы: