background image

20

Publication CC-QS015A-EN-P - November 2009

Chapter 1

       Product Integration

4.

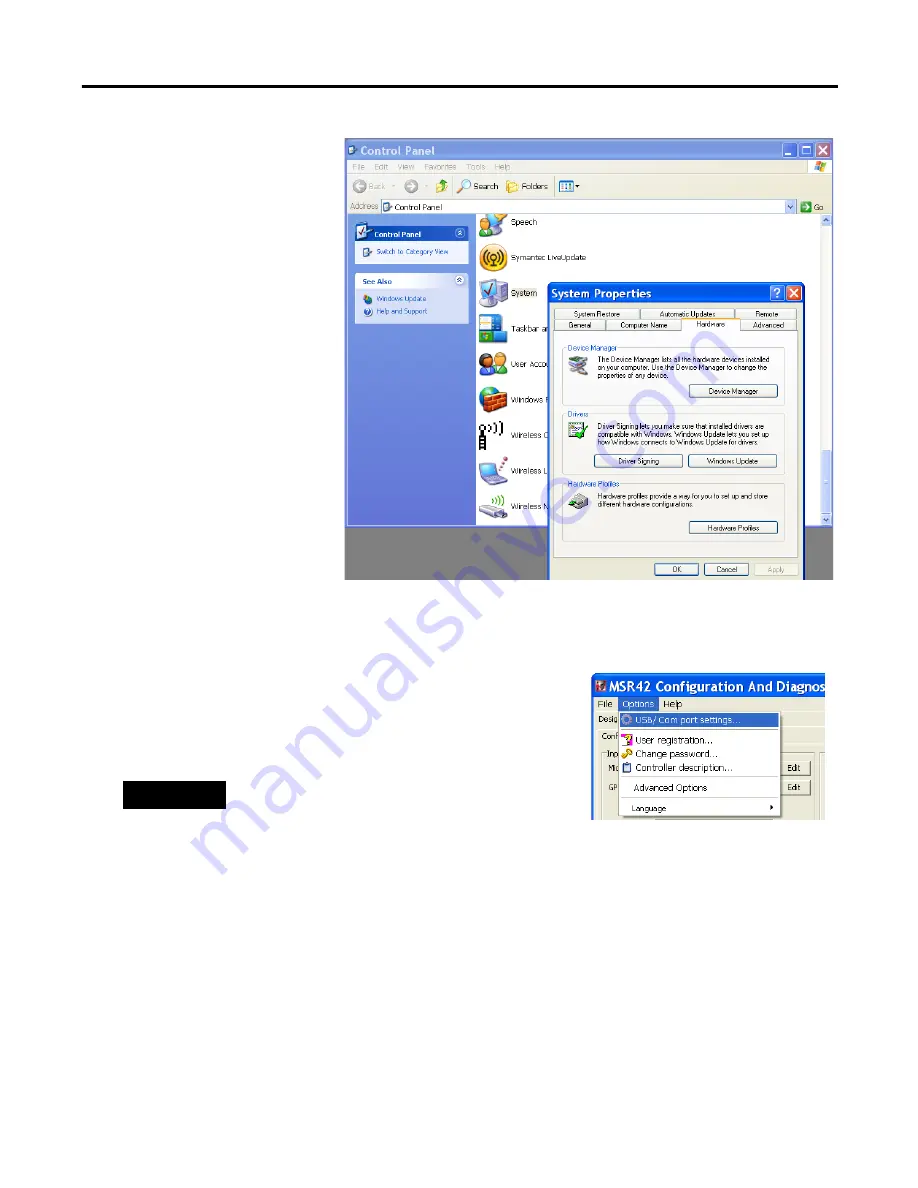
In Microsoft Windows, 
open the Control Panel.

5.

Double-click on System.

6.

On the System Properties 
dialog box, click 
Hardware.

7.

Click Device Manager.

8.

Expand Ports (COM & 
LPT).

9.

Plug the USB connector of 
the Optical Interface into 
an available USB port on 
your personal computer.

10.

Note the new COM port 
that appears in the list.

This is the port assigned to 
the Optical Interface, which you will need to select in the Configuration and Diagnostic 
software as part of the download procedure.

11.

Close the Control Panel.

12.

In the Configuration and Diagnostic software, choose 
Options>USB/Comport settings.

TIP

If USB/Comport settings is not available, check 
Support Mode active and choose 
Options>USB/Comport settings.

Содержание Allen-Bradley GuardShield Micro 400

Страница 1: ...Bidirectional 4 sensor T type Muting With MSR42 Relay Connected Components Building Block Catalog Numbers MSR42 MicroLogix 1100 GuardShield Micro 400 Light Curtains Quick Start...

Страница 2: ...by Rockwell Automation Inc with respect to use of information circuits equipment or software described in this manual Reproduction of the contents of this manual in whole or in part without written pe...

Страница 3: ...nnected Components Building Block Outline Follow the path below to complete your connected components building block ESC OK Chapter 1 Product Integration Chapter 2 System Validation and Application Ti...

Страница 4: ...4 Publication CC QS015A EN P November 2009 Where to Start...

Страница 5: ...hese Steps 10 Understand the Safety Function 10 Set Up the Configuration and Diagnostic Software 12 Configure the MSR42 Safety Relay 13 Download the Configuration 19 Confirm the Configuration 22 Chapt...

Страница 6: ...6 Publication CC QS015A EN P November 2009 Table of Contents...

Страница 7: ...Connected Components Building Blocks Overview CD publication CC QR001 The CD provides bills of materials BOM CAD drawings for panel layout and wiring control programs Human Machine Interface HMI scre...

Страница 8: ...ding Blocks Overview CD publication CC QR001 Provides files for the Connected Components Building Blocks Position Control Connected Components Building Block Quick Start publication CC QS003 Provides...

Страница 9: ...ublication CC QS001 verifying that you have completed the hardware design and installation as well as software installation What You Need Personal computer Connected Components Building Blocks Overvie...

Страница 10: ...nd the Safety Function Two separate safety functions are provided 1 The GuardShield Micro 400 light curtains and MSR42 safety relay provide a bidirectional four sensor T type muting function 2 The E s...

Страница 11: ...anelView START RESET button may be used to start or reset the safety systems just like the Start Reset push button Safety Systems Diagram IMPORTANT If the operator stationed at the PanelView terminal...

Страница 12: ...Curtains a Go to Related Links on the right side of the page and choose Safety Software ZIP b Save the zip file to your personal computer c Unzip the file d Run the SetupDiagnosticAndConfiguration_Vx...

Страница 13: ...ct Micro 400 Light Curtain from the Micro 400 Inputs pull down menu 2 Edit the settings as shown a Choose Manual b Leave Stop Delay set to No c Choose Resolution 30 mm d From the Protective height pul...

Страница 14: ...s have been added to the Design Output diagram 4 On the Configuration dialog box select Start from the IN1 Inputs pull down menu In addition to the Micro 400 Light Curtains a NO momentary push button...

Страница 15: ...lication the Start Release circuit goes from 24V through one auxiliary normally closed NC contact of each 100S contactor to the MSR42 relay Similar to EDM if either or both of these NC contacts are op...

Страница 16: ...d passes in sequence the last two sensors An object passing the sensors in the proper sequence and within the configured time constraints is permitted to pass though the light curtains without trigger...

Страница 17: ...oad into consideration when mounting the sensors The minimum load must be long enough to be in front of both S1 and S2 or S3 and S4 sensors simultaneously The Muting Help dialog box also provides defi...

Страница 18: ...the light curtain is muted the load must interrupt the light curtain within 3 seconds Therefore the second sensor must be placed within 3 seconds travel time from the light curtain t espe should be no...

Страница 19: ...save the configuration as 4sensor T type muting 16 Do not exit the MSR42 configuration and diagnostic software Download the Configuration 1 Write down the device number from the label on the side of...

Страница 20: ...face into an available USB port on your personal computer 10 Note the new COM port that appears in the list This is the port assigned to the Optical Interface which you will need to select in the Conf...

Страница 21: ...gned by Windows Device Manager 15 Click OK 16 From the File menu choose PC MSR42 Download 17 When prompted type the password ABGM 18 On the Controller Description dialog box type the six digit Device...

Страница 22: ...og box review the configuration and check the confirmation box 2 Click Continue 3 When prompted to print the document click No The software saves a copy that can be printed later from the File menu 4...

Страница 23: ...elpful diagnostic features that are described in the MSR42 Safety Base Module Operation Manual publication 440R IN017 and the Configuration Tool for MSR42 GS Micro 400 and Safe 2 4 Light Curtains Soft...

Страница 24: ...24 Publication CC QS015A EN P November 2009 Chapter 1 Product Integration Notes...

Страница 25: ...nt Verify that all components of the system are assembled and wired per the Bill of Materials Assembly Diagrams and Wiring Diagrams provided for this Connected Components Building Block and as require...

Страница 26: ...ng The 100S contactors do not energize Guarded motion does not start The red stacklight is on 3 Press and release the Start Reset button 4 Check the following The 100S contactors energize Guarded moti...

Страница 27: ...he green stacklight is on Light Curtain Function 1 Break the light curtain beam and keep it broken taking care not to block any sensors 2 Check the following The two 100S contactors de energize Guarde...

Страница 28: ...heck the following S4 switches as the load passes S3 switches as the load passes The muting lamp turns on The load passes through the light curtain without the system shutting off The muting lamp turn...

Страница 29: ...break the light curtain beam taking care not to block any sensors 4 Check the following The safety output turns off The two 100S contactors de energize Guarded motion stops The red stacklight turns o...

Страница 30: ...not blinking The green stacklight turns on 3 As soon as the load clears the light curtain break the light curtain beam taking care not to block any sensors 4 Check the following The safety output turn...

Страница 31: ...as the signals driving them change The following pages illustrate a typical sequence of PanelView screens Confirm that the system and PanelView screens operate as expected by following this sequence...

Страница 32: ...ss START RESET for three seconds and release The system should start running Note that the START RESET button is green only when the system is ready for a Start Reset It is no longer green once the sy...

Страница 33: ...cation Tips Chapter 2 As the load leaves S2 muting ends 4 Press the E stop The screen updates in response 5 Press MORE INFO 6 Press RETURN 7 Twist and release the E stop 8 Press START RESET for three...

Страница 34: ...interrupted 10 Press MORE INFO 11 Press RETURN 12 Remove the object interrupting the light curtain Once the light curtain is no longer interrupted the display returns to the Ready for START RESET scr...

Страница 35: ...configured t espe the time it should take a load to travel between S2 and the light curtain the muting lamp begins to blink The screen reflects the muting error 16 Press MORE INFO 17 Press RETURN 18 M...

Страница 36: ...red t mdo expires 23 Carefully disconnect then reconnect one of the light curtain cables from the MSR42 relay at its RJ45 socket TIP When the START RESET button is green it may be used in place of the...

Страница 37: ...Publication CC QS015A EN P November 2009 37 System Validation and Application Tips Chapter 2 24 Press MORE INFO 25 Press RETURN 26 Press and hold START RESET for 10 seconds...

Страница 38: ...38 Publication CC QS015A EN P November 2009 Chapter 2 System Validation and Application Tips Notes...

Страница 39: ......

Страница 40: ...l You can contact Customer Support for initial help in getting your product up and running New Product Satisfaction Return RockwellAutomationtestsallofitsproductstoensurethattheyarefullyoperationalwhe...

Отзывы: