background image

Rockwell Automation Publication 193-UM009B-EN-P - February 2013

63

Chapter

 15

DeviceNet™ Scanner Menu

DeviceNet™ Scanner Menu

The DeviceNet™ Scanner Menu is available for Allen-Bradley DeviceNet™ 
scanners. The scanner menus give the operator some basic information about the 
scanner’s configuration and the ability to adjust a few of the scanner attributes. 
The scanner menus do not allow the operator to perform complete configuration 
of a scanner. RSNetWorx for DeviceNet™ must be used for initial scanner 
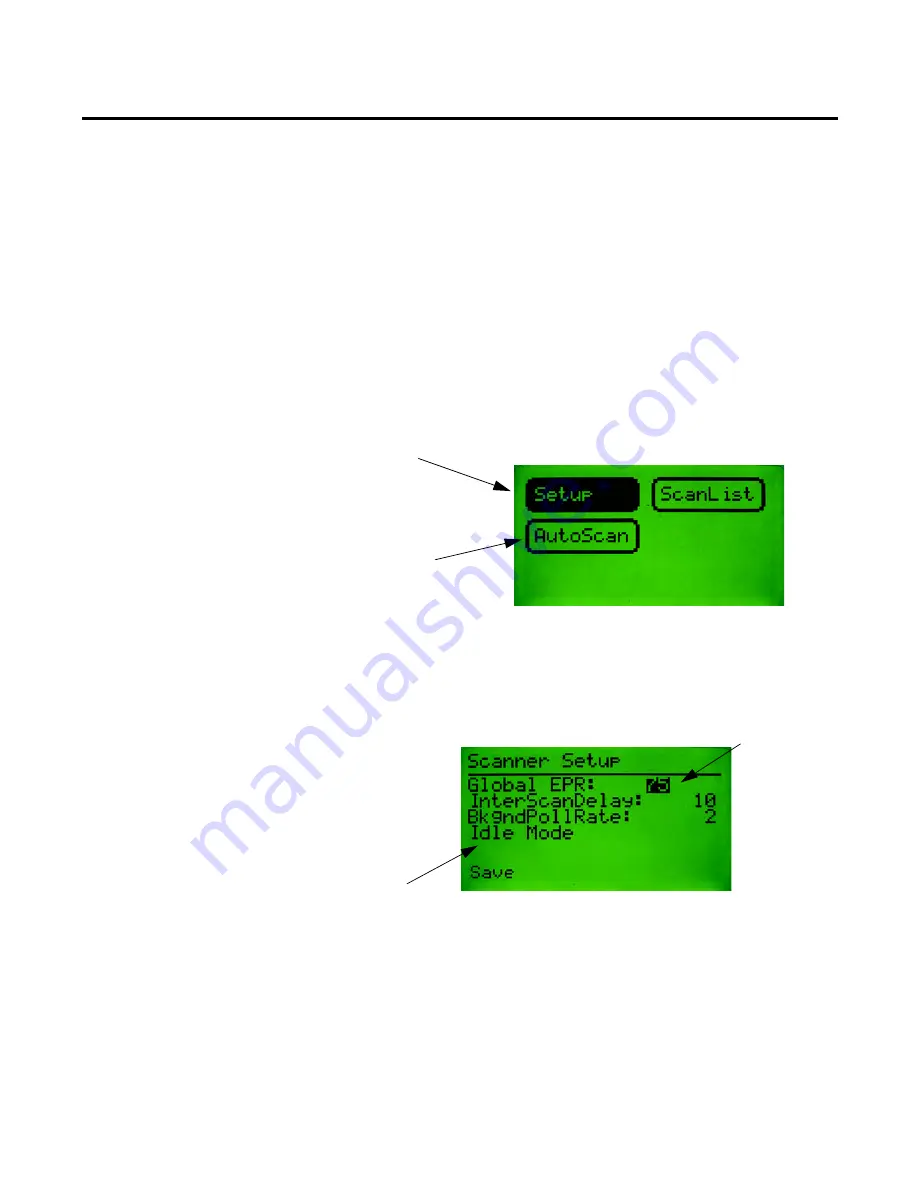
configuration for a system. The DeviceNet™ Scanner Menu is invoked from the 
Device Choices Menu and is shown below:

Scanner Setup

This function allows the operator to view and set some of the global settings of 
the scanner.

Currently selected function

This will appear only if the 
scanner supports it

This line reflects the 
status of the Processor, 
IDLE or RUN Mode.

Press the 

Sel

 key 

to move to the 
next selection

Select Save and 
press 

Enter

 to 

save the changes 
to the scanner.

Содержание Allen-Bradley DeviceNet 193-DNCT

Страница 1: ...DeviceNet Configuration Terminal Catalog Numbers 193 DNCT User Manual...

Страница 2: ...Configuration Terminal...

Страница 3: ...rences between solid state equipment and electromechanical devices that should be taken into consideration when applying products such as those described in this publication Reproduction of the conten...

Страница 4: ...ulary In this manual we refer to the Bulletin 193 DeviceNet Configuration Terminal as 193 DNCT DNCT terminal Configuration Terminal or HIM Human Interface Module Programmable Logic Controller as a Pro...

Страница 5: ...193 CM1 Physical Connections 7 193 DNCT BZ1 Physical Connections 8 Powering the 193 DNCT 8 Chapter3 PhysicalFeatures Physical Features 9 Communication Port 9 Key Descriptions 10 Shifted Key Descriptio...

Страница 6: ...ay Value Enumerated 28 Chapter7 CopyCatMenu Copy Cat 29 Copy Cat Uploading 29 Copy Cat Downloading 31 Copy Cat Downloading and Product Revisions 33 Copy Cat Downloading and Product Current Ratings 34...

Страница 7: ...ting a New Function Block 52 Function Blocks 53 Assigning Source Bits to Function Block Inputs 53 Chapter13 DiscreteI OStatus Discrete I O Status 55 Chapter14 ZoneInterlockProtocol ZIP Zone Interlock...

Страница 8: ...ring a Password 72 Resetting Forgotten Passwords 72 Auto Display 72 AutoDisplay Setup 73 AutoDisplay Test 73 Programmable User Function Key Setup 74 Function Key Setup Screen 75 LCD Contrast 75 Chapte...

Страница 9: ...and network bandwidth statistics to the user Bill of Material The 193 DNCT product package includes the following items Accessories Item Description Quantity 193 DNCT DeviceNet Configuration Terminal...

Страница 10: ...6 Rockwell Automation Publication 193 UM009B EN P February 2013 Chapter 1 Product Overview Notes...

Страница 11: ...for mounting the terminal to a panel door 193 CB1 Physical Connections The 193 CB1 cable that ships with the Configuration Terminal has a plug connection to the terminal on one end and color coded bar...

Страница 12: ...C source through the communication cable The 24V DC connections should be made to the V and V pins wires in the above cable pinout wire definitions ATTENTION When mounting in a door or panel mounted b...

Страница 13: ...nication Port The communication port is used to connect the DNCT to a DeviceNet network through use of a communication cable or bezel mount kit Cat No 193 DNCT BZ1 Additionally 24V DC power is provide...

Страница 14: ...ber Used to negate a numeric value Used to add a sign character when editing a value Programmable function keys See Chapter 16 Function Key Setup Screen Programmable Reset key See Chapter 16 Function...

Страница 15: ...etup screen described in the following section Once the baud rate is determined and a network address has been set the terminal will display the Network Who screen which displays a list of all devices...

Страница 16: ...r return arrow to invoke the Device Choices menu Device Choices Menu This menu allows the user to choose what operation is to be performed for the selected device The terminal only displays choices th...

Страница 17: ...d output status display Scanner If the selected device is a DeviceNet scanner provides access to simple scanner configuration values and access to the scan list Parameter Monitoring and Editing Parame...

Страница 18: ...ted device When a parameter value is selected pressing the ESC key will deselect the parameter value and allow movement within the parameter list or group Pressing the ESC key will delete changes and...

Страница 19: ...view devices on the network display menu Displays version information AllowstheusertoperformFaulted Node Recovery for nodes that fail the Dup Mac ID test Displays and latches Network Diagnostic inform...

Страница 20: ...plays the device information for devices that support a DeviceNet sub net When the DeviceNet Subnet choice is selected and the Enter key is pressed the Subnet Who Menu will be displayed Selecting a de...

Страница 21: ...on Screen appears when Version is selected from the Device Choices Menu It displays the major revision minor revision and if supported the build number of the selected device If multiple instances of...

Страница 22: ...a buffer of fault information From the Fault Object the 193 DNCT is able to read the size of the fault buffer the trip fault the fault codes and the fault name strings Other optional information may a...

Страница 23: ...information such as a timestamp and a help string about the warning are also available The menu has a Clear Buffer command which will clear all of the entries in the buffer but it will not clear any c...

Страница 24: ...by sending a clear warning command to the devices Warning Object Figure 3 Warning Buffer without optional attributes supported Warning code numberand name Warning code number and name Use the SEL key...

Страница 25: ...advances the user to the selected item The Esc key returns the user to the Device Choices Menu Groups Screen This screen allows the operator to select a group of parameters to be monitored edited The...

Страница 26: ...through the currently active group of OR Parameter number Indicates that this parameter is Read Only and its value cannot be edited Parameter units Paramete r name Parameter value This c indicates th...

Страница 27: ...d only if accessed through the Num List Changing a Parameter Value Changing a parameter value is done by pressing the Sel key to highlight the parameter value then using the Inc Dec keys or numeric ke...

Страница 28: ...Parameter Choices Menu parameter value is selected pressing the Esc key will deselect the parameter value and allow the parameter number to be changed Press Sel key to select the Parameter Value Pres...

Страница 29: ...eter Choices Menu Chapter 6 Enumerated Parameters Parameters that display Value Enumerated data values appear as follows Enumerated Parameter value To change a value press the Sel key to select the En...

Страница 30: ...rameters with Bit Enumerated data values are displayed as follows Floating Point Parameters Parameters with Floating Point values will be displayed as follows Bit enumerated parameter value Bit select...

Страница 31: ...a list of parameters that are not at their default value will be displayed The Inc and Dec keys allow the operator to move up and down through the non default parameters Pressing the Enter key allows...

Страница 32: ...EN P February 2013 Chapter 6 Parameter Choices Menu Parameter Display Value Enumerated Certain parameters have enumerated values that are not bit enumerated values the following screen is displayed an...

Страница 33: ...ameter Object or devices that support the Scanner Object The Copy Cat menu uses the acronym HIM in many of its menu selections and screens HIM stands for Human Interface Module and is used to refer to...

Страница 34: ...s the Enter key to start uploading Selected file New unnamed empty file Existing Copy Cat file names File name the Copy Cat data will be saved to Selected Character use the Sel key to move the cursor...

Страница 35: ...When the upload is complete the screen will appear as follows Copy Cat Downloading To download complete device configuration files that have been stored in the Configuration Terminal select HIM Dev at...

Страница 36: ...creen will appear when the downloading starts After parameters are downloaded the DeviceLogix program is downloaded When the download is complete the screen will appear as follows Mismatch type This c...

Страница 37: ...played with minor changes The title line will say CopyCat Error Params and when Inc or Dec is pressed the user will only view the next parameter that had an error during the download Copy Cat Download...

Страница 38: ...Logix the status bar on the Download Status screen will not reach 100 The Download Complete line above the status bar will be the indication that the download was indeed completed Copy Cat Downloading...

Страница 39: ...s such as FLA current settings whose min max range is outside the FLA current setting that was downloaded When this occurs the following screen appears Pressing the Enter key will bring the operator t...

Страница 40: ...y Cat Memory The Copy Cat memory screen displays how many files are stored in the DeviceNet HIM and how many blocks of memory are left for copying The maximum number of files that can be stored in the...

Страница 41: ...em is selected in the Tools Menu invokes the Node Commissioning screen Node commissioning allows the operator to change the Mac ID and or the baud rate for the currently selected device Class Instance...

Страница 42: ...l to become a simple graphing device From the Graph Setup Screens the user sets up to four Class Instance or Attributes to be monitored and displayed as a scrolling graph similar CIACopyandPaste is av...

Страница 43: ...aphed Trace number 1 4 Max is the CIA s value that will be represented as the top of the screen Min is the CIA s value that will be represented as the bottom of the screen In this example a CIA value...

Страница 44: ...mbly Consumed Produced Menu The Assembly choice can be selected from the Tools Menu This menu allows the user to choose between the consumed input and produced output assemblies available in the unit...

Страница 45: ...menu will advance the 193 DNCT to the next menu This menu lists all of the available assemblies to view The format for the Assembly List menu is as follows The Assemblies Tag Menu is similar to the IO...

Страница 46: ...42 Rockwell Automation Publication 193 UM009B EN P February 2013 Chapter 8 Tools Menu Notes...

Страница 47: ...ng screens an I O message timing screen that monitors I O messaging timing between the selected device and a DeviceNet scanner and Discrete I O statistics The Advanced Functions Menu is shown below On...

Страница 48: ...44 Rockwell Automation Publication 193 UM009B EN P February 2013 Chapter 9 Advanced Functions Menu Notes...

Страница 49: ...can be found in the Tools Menu The user can enable or disable the Heartbeat feature and modify the scanning interval from the Setup Menu The Heartbeat Monitor menu displays the contents of the last r...

Страница 50: ...46 Rockwell Automation Publication 193 UM009B EN P February 2013 Chapter 10 Notes...

Страница 51: ...or the currently selected device It is accessed by selecting I O Msg and pressing the Enter key at the Advanced Functions Menu Press the INC DEC key to switch between consumed and produced data Type o...

Страница 52: ...48 Rockwell Automation Publication 193 UM009B EN P February 2013 Chapter 11 I O Message Monitoring Notes...

Страница 53: ...g all programmed function blocks Discrete Output Points DOP and Produced Network Bits PNB Text string for inputs outputs PNBs and fault bits are displayed for devices that support the DeviceLogix Data...

Страница 54: ...wn Counter IN3 and IN4mayor may not be present Value of input or output Function block number and type Negated Active Low inputs Press the SEL key to highlight the function block s inputs and outputs...

Страница 55: ...eviceLogix Editor allows the operator to create or edit a DeviceLogix program Function blocks are displayed in the same format as in the Time base 1 mSec or 10 mSec Press the Selkey to highlight the p...

Страница 56: ...gate function block First invoke the Device Logix editor One of two displays will appear either a display of a function block or a screen displaying No FB s programmed At this point press the Enter ke...

Страница 57: ...ection on it which is used to display and edit additional data that is specific to the type of function block Theavailableanalogfunctionblocksare Arithmetic Alarm Compare Masked Compare Timing Diagnos...

Страница 58: ...he Enter key while the desired input is selected The following screen appears Press the Enter key when Edit is selected and the following screen appears The Assignment text will disappear after three...

Страница 59: ...ts DIP s Discrete Output Points DOPs and Produced Network Bits PNBs that are implemented in the currently selected device This screen will be available if any one of the DIPs DOPs or PNBs are supporte...

Страница 60: ...56 Rockwell Automation Publication 193 UM009B EN P February 2013 Chapter 13 Discrete I O Status Notes...

Страница 61: ...internal ZIP Data Table the ZIP Data Table is where a DeviceLogix program accesses ZIP data Devices that support ZIP can define the number of zones from which they can consume at one time In this man...

Страница 62: ...yte in the internal ZIP data table is selected enter a Node number using the numeric keys on the keypad of the node whose I O is to be mapped this example maps Node 5 data to byte 0 of the ZIP data ta...

Страница 63: ...Enter key to edit the IO Msg field value After editing the value the screen will appear as follows EPR Expected Packet Rate allows theexpectedpacketrateoftheI O data from node Node 5 tobe changed Thi...

Страница 64: ...ation parameters for this zone The following screen shows the Security field highlighted The following screen shows the Zone Security Key field highlighted When each byte in the ZIP data table is high...

Страница 65: ...eted Security Key is the value of the last 2 bytes of the I O data produced by this device if security is Produce Rate is the cyclic rate at which this device will produce data Inhibit Rate is the min...

Страница 66: ...ft arrow keys to select the various bytes in the ZIP data table If no Zone has been mapped to the selected byte in the ZIP data table the display will appear as follows No I O data beingconsumed is ma...

Страница 67: ...e operator to perform complete configuration of a scanner RSNetWorx for DeviceNet must be used for initial scanner configuration for a system The DeviceNet Scanner Menu is invoked from the Device Choi...

Страница 68: ...scanlist without changing the scanner configuration data for that node i e I O mapping keying and connection type To enter this screen select the correct node in the ScanList screen and press the Ent...

Страница 69: ...Configuration Terminal firmware Offline Connection Set This function allows the operator to perform Faulted Address Recovery FAR for nodes that fail the Duplicate MAC ID test To get to this function...

Страница 70: ...fline Change Address Screen Use the Inc Dec keys in the above screen to select a faulted device Then pressing the Enter key invokes the Offline Change Address Screen Simply change the device s address...

Страница 71: ...stats percentage of bus loading stats CAN errors per second and total CAN errors Latching of statistics for some readings begins when the screen is entered and stops when exiting the screen Statistic...

Страница 72: ...68 Rockwell Automation Publication 193 UM009B EN P February 2013 Chapter 16 Terminal Choices Menu Notes...

Страница 73: ...ed When configuring the Node Address Auto Addressing can be enabled or disabled and the node address number can be set When Auto Addressing is enabled the 193 DNCT will operate as follows the first Du...

Страница 74: ...y passwords can be configured to limit the features that are associated with that password so when a secondary password is entered the operator will only gain access to limited features in the 193 DNC...

Страница 75: ...tion The following menu is used to configure secondary passwords To associate privileges to a specific secondary password press the Sel key until the cursor appears on the bit field Setting a bit to a...

Страница 76: ...word in the DNCT The old password can then be viewed and changed from the DNCT The password is only overridden until the DNCT is powered down Auto Display The auto display feature allows the 193 DNCT...

Страница 77: ...l key to select different fields to edit AutoDisplay Test This function gives the operator an easy way to view and test the AutoDisplay setup data without powering down the 193 DNCT after setting up e...

Страница 78: ...stop key on the 193 PCT It sets Discrete Output Point instance 2 to the OFF state CIA 0x09 0x02 0x03 0 Reset Sets Fault Reset to the ON state CIA 0x29 0x01 0x0C 0 Each key has the following configurat...

Страница 79: ...e Information Values Value sent when the key is pressed ON 1 or OFF 0 Save will appear after changing the settings for any key Pressing Enter will save the information for all the keys Mode of key Mom...

Страница 80: ...76 Rockwell Automation Publication 193 UM009B EN P February 2013 Chapter 17 Terminal Setup Menu Notes...

Страница 81: ...rner will appear The small P in the upper right hand corner will only appear after CIA data has been copied and will only appear on menus that support CIA data paste feature When a copy or paste is ac...

Страница 82: ...reen The screen should appear something like this depending on the parameter copied The follow table documents which menus support the copy and or paste feature SCREEN COPY Support PASTE Support Param...

Страница 83: ...text associated with them To view help text press the Shift key followed by the Help key Zero key Press the ESC or Enter key to close the help screen Some menus that are complicated such as graph set...

Страница 84: ...80 Rockwell Automation Publication 193 UM009B EN P February 2013 Chapter 19 Menu Help Feature Notes...

Страница 85: ...n Force 453 g 16 oz Operational Life 1 million operations Communications Communication Protocol DeviceNet 125 250 500 Kbaud selectable Electrical Input Voltage Range 11 25 0V DC Input Power typical 1...

Страница 86: ...0 Specifications Dimensions Height 116 mm 4 57 in Width 70 mm 2 76 in Depth 15 5 mm 67 in Weight 85 g 3 oz Agency Approvals UL 508 cUL CSA C22 2 No 14 CE EN61000 6 2 2005 EN61000 6 4 2001 RoHS This pr...

Страница 87: ...me Data Type Value 1 Get Revision UINT 1 Attribute ID Access Rule Name Data Type Value 1 Get Vendor UINT 1 or 625 2 Get Device Type UINT 115 Generic Type 3 Get Product Code UINT 208 4 Get Revision Maj...

Страница 88: ...DeviceNet Object A single instance of the DeviceNet Object instance 1 will be supported The following instance attributes will be supported The following services will be implemented for the DeviceNe...

Страница 89: ...icit Message 3 Get Transport Class Trigger USINT 0x83 Server Transport Class 3 4 Get Produced Connection ID UINT DependsonmessagegroupandMessage ID 5 Get Consumed Connection ID UINT Dependsonmessagegr...

Страница 90: ...86 Rockwell Automation Publication 193 UM009B EN P February 2013 Appendix A DeviceNet Objects Notes...

Страница 91: ......

Страница 92: ...tallation Assistance If you experience a problem within the first 24 hours of installation review the information that is contained in this manual You can contact Customer Support for initial help in...

Отзывы: