background image

RVDG7M

7


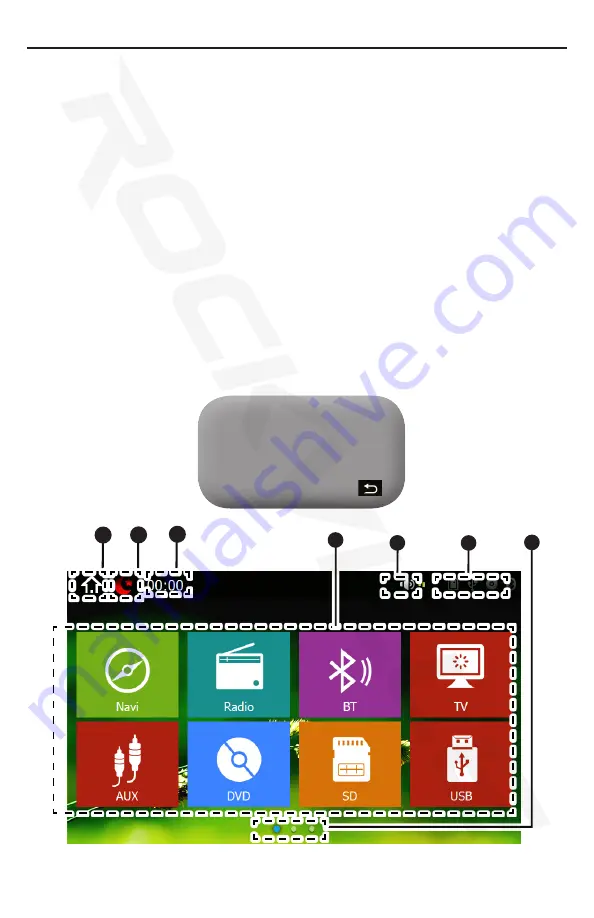
1. Home

Return to the home screen.

2. Sleep

Turns off the screen.

3. Time

Displays the current time.

4. Application Tiles

Press and drag to rearrange apps (*apps cannot be added, installed, or 

uninstalled).

5. Volume

Displays current volume level.

6. Status 

Shows the status of SD, USB, DVD and Bluetooth devices.

7. Scroll

Touch one of the three dots for the next or previous page in the home 

screen.

Tip: At anytime within an 

app press the return button 

to go back. 

The icon can be found in the 

top right corner.

Tip: At anytime within an 

app press the return button 

to go back. 

The icon can be found in the 

top right corner.

Graphical User Interface (GUI)

5

6

7

4

1

2

3

Содержание RVDG6.2

Страница 1: ...RVDG7M RVDG7 0 RVDG6 2 TOUCHSCREEN MULTIMEDIA ENTERTAINMENT SYSTEMS WITH GPS USER S MANUAL...

Страница 2: ...engineered by a team of car audio enthusiasts We have spared no expense in manufacturing these head units to meet the highest quality standards With proper care and installation this unit will provid...

Страница 3: ...lc DVD EQ Games IPOD Music Playback Navi Radio SD Setting Set Navi Set Time Sound USB Video Wall Paper Wheel Installation Guide Wiring 3 4 6 7 8 8 9 10 10 11 12 12 13 14 16 17 17 18 19 19 19 20 20 20...

Страница 4: ...quipment does cause harmful interference to radio recep tion which can be determined by turning the equipment off and on the user is encouraged to consult an experienced radio technician for help 5 Ap...

Страница 5: ...een display Activated when the unit is powered on 16 Dim Lower the brightness of the display 17 SD Insert SD card to access media 18 GPS GPS card included Contains map data 19 RESET Reset the unit to...

Страница 6: ...gation 4 SD Insert SD card to access media GPS GPS card included Contains map data USB Plug in a flash drive mp3 player to access media RST Reset the unit to the factory default settings 5 Display Tou...

Страница 7: ...e Remove a CD or DVD Press to recline the display and reveal the unit s CD DVD SD and GPS card slots 7 USB Plug in a flash drive mp3 player to access media 8 Disc Drive Insert a CD or DVD 9 SD Insert...

Страница 8: ...nt volume level 6 Status Shows the status of SD USB DVD and Bluetooth devices 7 Scroll Touch one of the three dots for the next or previous page in the home screen Tip At anytime within an app press t...

Страница 9: ...drest of the vehicle or flip down monitor 1 Customization Use the settings to adjust and optimize the display quality 8 1 Turn the engine key to the ACC or ON position 2 Press and hold the power butto...

Страница 10: ...ontact End the current call Redial the last phone number Place contact on hold other call 4 Quick options Delete a contact Download phonebook Switch between car speaker mic and phone speaker mic Searc...

Страница 11: ...rrows to view past or future months 2 Selected dates are highlighted in blue 1 Answer Calculation is displayed 2 Input Use the provided keys to input simple math problems Press the equal sign to displ...

Страница 12: ...resume watching Stop the DVD Select chapter number by manually typing in the number Go to the next page of DVD menu options Return to the DVD main menu Rewind and fast forward Adjust playback audio s...

Страница 13: ...hree games BoxMan ClearMine Tetris WARNING DO NOT ATTEMPT TO USE THESE APPLICATIONS WHILE OPERATING THE VEHICLE Games 1 2 EQ Tip Use the EQ to adjust the tone or fre quency response of the audio syste...

Страница 14: ...se Music Song List Play List Artist Album Current Song 2 Track Listing Scroll through the list of tracks in the currently playing CD or playlist 2 Equalizer Adjust the tone or frequency response of th...

Страница 15: ...the splash screen will be displayed for a few seconds Wait for the progress bar to fully load 2 Configuration Wizard In order to best setup the navigation to the vehicle the configuration wizard will...

Страница 16: ...you deviate from the selected route the unit will automatically recalculate the directions to get things back on track Tip If you deviate from the selected route the unit will automatically recalculat...

Страница 17: ...of the planned route will be displayed overhead 10 More Access more settings for route 11 Go Begin route guidance 12 Route Details The route details on the right can be customized using the configurat...

Страница 18: ...tly station 3 Favorite Stations Press and hold one of six favorite slots to save a station for later 1 Browsing Files File location is displayed Use to return the previous folder 2 Selecting Files The...

Страница 19: ...ions from the home screen Note The subwoofer should be set to on The factory default PIN to access certain settings is set to 0 0 0 0 1 3 2 DO NOT change cockpit settings as it will cause the unit to...

Страница 20: ...Date and Time Use the up and down arrows to set the date and time accordingly From left to right Year Month Day Hour Minute Browse to select the location of the GPS Map Files 1 Fade Balance Hold and...

Страница 21: ...ness Contrast and Hue Press hold and drag to adjust the brightness contrast or hue of the display 2 Presets Select to automatically adjust the display settings Wallpaper Note Wallpapers can be importe...

Страница 22: ...ircuits during installation Cautions on Installation 1 Prepare all articles necessary for installing the main unit before starting 2 Install the unit within 30 of the horizontal plane 3 If you have to...

Страница 23: ...the windshield Wipe off the dirt of the mounting surface before installing the GPS antenna GPS antenna has magnetic mount and can be installed on the hood leading edge trunk leading edge or vehicle r...

Страница 24: ...RVDG2 RVDG7 0 23 TO STEERING BUTTON CONTROL TO REVERSE LIGHT Wiring AMP REMOTE TURN ON...

Страница 25: ...wn SW GROUND Connect to vehicle chassis CAM VIDEO IN Camera switch connector FUSE POWER B Connect to the plus side of car battery GROUND Connect to the minus side of car battery SPEAKER REAR R Connect...

Страница 26: ...L outputs GROUND Tied to Rear R L outputs GROUND Tied to R L Audio Inputs GROUND Tied to Video Out 1 2 SW KEY 1 SW KEY 2 CAN BUS TXD CAN BUS RXD SPEAKER FRONT L VIDEO OUT 1 VIDEO OUT 2 CAMERA SIGNAL O...

Страница 27: ...car battery GROUND B Connect to the minus side of car battery AMP REMOTE TURN ON Connect to amplifier remote turn on AUTO ANTENNA Connect to power antenna up and down BACK Connect to the plus side of...

Страница 28: ...Visit us at RockvilleStore com Due to constant improvements these specifications are subject to change without notice Copyright 2013...

Отзывы: