12
Storing Presets
o Storing Presets to Exisiting Location:
Once you have achieved a sound that you like, you may want to save it for later use. If any parameter has been
modified, the STORE LED will light. Press the STORE (EXECUTE) button. The STORE (EXECUTE) LED will
start flashing. If you would like to store the changed sound at the current or exisiting preset - press the store button
again to execute the change or complete the store.
o Storing Presets to a different location:
If you would like to save the changed sound to a different preset - press the STORE (EXECUTE) button. The
STORE (EXECUTE) LED will start flashing. Now turn the preset knob to the number where you want to save or
choose the location number on your MIDI Footcontroller. You will now hear the sound of the preset location which
you selected when turning the knob. Now hit the STORE/EXECUTE button to execute the change. At this point
the LED will turn OFF and the sound that you had created will be stored to that preset location.
Note: To cancel any store, turn the "AMP" select knob in any direction and the store will be cancelled.
Note: The RepliTone MP's unique function requires that the modulation effect be adjusted last before storing a
preset. The modulation effects are Chorus, Flanger, Tremolo 1, Tremolo 2, Phaser, Rotary and Detune/Pitch.
Therefore, when you find a sound that you like and you would like to add Chorus, turn the "Effect Select" to Chorus
Level or Depth - which ever you want to adjust - make the adjustment and hit "store".
When editing a preset that uses a modulation effect - after editing the preset, the "EFFECTS SELECT" knob must
be turned back to the modulation effect used in the preset before storing for it to "store" the effect.
To restore any or all of the 128 user presets to their factory settings, place the PRESET switch in the MANUAL
position with the unit OFF. Press and hold the RATE (RESTORE) button while turning on the power switch. The
STORE/EXECUTE LED and the RATE/RESTORE LED will start flashing. Release the RATE (RESTORE)
button.
To restore all presets press the STORE (EXECUTE) button. The LED's will flash, indicating success, after restore
is complete.
To restore a single preset, set the PRESET knob to the desired preset to restore (1-15). Press the STORE (EX-
ECUTE) button. LED's will flash, indicating success. To restore a single preset to factory settings on presets 16-
128 you will need to use the Replitone MP's PC Interface on our website or dump to a MIDI Sysex file. You can
then save all of your presets and then restore all presets on the RepliTone MP following the instructions above.
Then using the PC interface you can download the presets you want to use back into your RepliTone MP - instruc-
tions how to do this can be found in the manual or on the website. www.rocktron.com
Restoring Factory Presets
8. MIDI Implementation
There are 128 user programmable presets. The first 15 are accessible from the front panel PRESET knob and
correspond to MIDI program change numbers 1 to 15. ("Manual" is not a MIDI accessible preset.) The remaining
113 user presets are accessible only via MIDI program changes (program numbers 16 to 128) through a footcontroller.
The MIDI IN jack is a 7-pin DIN for phantom powering MIDI controllers, however, 5-pin DIN cables can be used
and are most common. The MIDI channel will be permanently set to OMNI, you can plug in any MIDI pedal and it
will work. However for the best function we recommend the Rocktron MIDI Mate or MIDI I.T. and the RMM900 7-
pin MIDI Cable.
Содержание REPLITONE MP
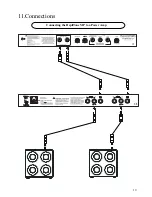
Страница 19: ...19 Connecting the RepliTone MP to a Power Amp Connections 11 ...
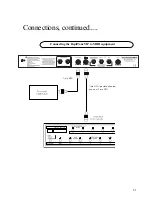
Страница 20: ...20 Connecting the RepliTone MP to effects equipment Connections continued ...
Страница 25: ...25 ...
Страница 26: ...26 ...
Страница 27: ...27 ...


