background image

104

7.1  Cleaning your Accu-Chek Active meter

Cleaning and disinfection in the professional environment

Be sure to observe all relevant Health and Safety regulations.

A potential infection risk exists. Medical staff and other 
persons using Accu-Chek Active to test blood glucose from 
more than one patient must be aware that any item coming into 
contact with human blood is a potential source of infection.
(Please see ”Protection of Laboratory Workers from Infectious 
Diseases Transmitted by Blood, Body Fluids, and Tissues”; 
Second Edition, Tentative Guideline, 1991, Document M29-T2, 
National Committee for Clinical Laboratory Standards).

man_04493168001_02_EnUK.indd   104

1/12/2006, 11:29:22 ðì

Содержание ACCU-CHECK Active

Страница 1: ...ACCU CHEK Active BLOOD GLUCOSE SYSTEM Reference Manual...

Страница 2: ...g as it does not incorporate any features to guard against cross infection On packaging on the type plate and in the parts of this manual dealing with your Accu Chek Active meter you may encounter the...

Страница 3: ...e manual 12 2 Modes 14 2 1 Test Mode 15 2 2 Memory Mode 16 2 3 Set Mode 17 3 Initial steps before testing 18 3 1 After opening the pack 18 3 2 Basic settings 19 Turning the meter on in Set Mode 23 Set...

Страница 4: ...ing by healthcare professionals 59 5 Using Accu Chek Active as an electronic diary 60 5 1 Results memory 60 5 2 Retrieving results 62 Finding the 7 or 14 day average of glucose results 67 Clearing era...

Страница 5: ...Active meter 112 8 1 About the display messages 112 8 2 Messages and symbols 113 8 3 Troubleshooting 117 8 4 Possible sources of error 120 9 Accu Chek Softclix 123 9 1 The Accu Chek Softclix at a glan...

Страница 6: ...Parts summary Accu Chek Active 8 7 1 3 2 9...

Страница 7: ...1 2 3 4 5 6 7 8 9 Liquid crystal display LCD M emory button S et button Test strip slot with switch Measurement optics Test strip guide Battery compartment Battery Coding chip 1 5 4 6...

Страница 8: ...Parts summary Accu Chek Active 10...

Страница 9: ...Coding chip slot Infrared interface 10 11 11...

Страница 10: ...ther information please study this reference manual This manual may tell you a lot of what you know already but it will also introduce many features that will be new to you At the end of this introduc...

Страница 11: ...lood 1 to 2 L if you apply the blood drop to the middle of the test pad If at any time the drop you apply is too small the meter will detect this and issue a warning Easy to operate No need to press b...

Страница 12: ...lts Application of blood to the test strip starts a colour reaction The final colour is accurately read measured photometrically by the meter s optical system and the result is converted to a blood gl...

Страница 13: ...s give you additional easy to follow instructions Intelligent power supply Accu Chek Active shuts off automati cally after 1 2 minutes of non use Naturally all of your results and other data remain sa...

Страница 14: ...top condition you need to comply with the care instructions in addition to following the correct operating procedures Accu Chek Active is a precision instrument Dirt or the wrong cleaning agent can i...

Страница 15: ...help you get the most out of your meter We recommend that you start by familiarizing yourself with all of the elements of your Accu Chek Active shown on pages 4 7 of this manual Practise all of the op...

Страница 16: ...al functions which fall into three groups Mode refers to a group of functions that you can call upon You select a mode simply by turning on the meter or by the way in which you turn it on Detailed inf...

Страница 17: ...main mode in which you will use your Accu Chek Active meter and is used exclusively for testing your blood glucose By inserting a test strip in the test strip guide you automatically enter this mode 2...

Страница 18: ...r by pressing the M emory button You can retrieve up to 200 results Your Accu Chek Active meter can calculate the average of your glucose results over the last 7 or 14 days You can download your resul...

Страница 19: ...ccu Chek Active meter by pressing the S et button You can choose the format in which you wish the date and time to be displayed You can enter the date and time required once only You can enable and di...

Страница 20: ...the film covering the battery The film is visible at the top of your Accu Chek Active meter projecting from the battery compartment Simply pull the film directly away from the top of the meter This w...

Страница 21: ...settings which you can change Display format for the date day month DD MM or alternatively month day MM DD Display format for the time 24h or alternatively 12h Year year of manufacture Date 0 0 or al...

Страница 22: ...s set to display mmol L for millimoles per litre above the large numerals in the display 888 Ask your doctor if you do not know which is the right unit for you If this is not displayed please contact...

Страница 23: ...If you see the correct unit please enter the date and time as described Only then can your results be properly saved in memory with the correct date and timestamp...

Страница 24: ...3 2 Basic settings...

Страница 25: ...ly press the S button for less than 3 seconds Accu Chek Active is now turned on and in Set Mode In the display you see the following the current time display format 24h 12h flashing the current time o...

Страница 26: ...3 2 Basic settings...

Страница 27: ...depend on the chosen display format If you wish to change the time display format press the M button now This allows you to choose between 24h and 12h display format When you see the desired format pr...

Страница 28: ...3 2 Basic settings...

Страница 29: ...flash indicating that it is ready to be changed Use the M button to modify the unit of time selected Pressing the M button once will increment the value of the unit by one one hour one minute etc Sett...

Страница 30: ...3 2 Basic settings...

Страница 31: ...ext unit of time which again flashes Use the same procedure to set all the remaining units of time The date and time are set in the following sequence hours minutes year month day The year is already...

Страница 32: ...3 2 Basic settings...

Страница 33: ...button to turn the beep tone on and off Press the S button to complete the settings procedure Check that all the settings now shown on the display are correct Press the S button again to turn off you...

Страница 34: ...er because of batch to batch differences Your Accu Chek Active meter must be programmed to allow for these differences in properties in a process known as coding All the information relating to the st...

Страница 35: ...ion for your new strips so test results will be incorrect Leave the coding chip in the meter until you have used up all of the test strips from a particular pack Check that the three digit code e g 13...

Страница 36: ...3 3 Coding...

Страница 37: ...of the meter see parts summary Ensure that you push the coding chip fully home That s all there is to it When you subsequently perform your first blood glucose test with the new coding chip and new te...

Страница 38: ...chip from a suitable finger pricker such as the Accu Chek Softclix finger pricker and Accu Chek Softclix Lancet With your Accu Chek Active meter use only Accu Chek Active test strips Any other test st...

Страница 39: ...solution instead of blood Carefully read the pack inserts that came with the test strips and the finger pricker Thoroughly wash and dry the site you intend to collect blood from Any moisture remainin...

Страница 40: ...4 3 Performing a blood glucose test...

Страница 41: ...the application area and arrows are facing upwards Gently push the test strip in the direction of the arrows into the test strip slot of your meter until you hear it click into place Inserting the te...

Страница 42: ...4 3 Performing a blood glucose test...

Страница 43: ...check that you really did insert the coding chip from the new pack If you are using the right coding chip but the number in your display is wrong please call the Accu Chek Customer Careline free on 0...

Страница 44: ...4 3 Performing a blood glucose test...

Страница 45: ...significant causing the wrong therapeutic decision to be taken and so producing adverse health effects When the display test has been successfully completed and the code number matches your Accu Chek...

Страница 46: ...as follows Massage a fingertip to stimulate the circulation and make blood collection easier Use the finger pricker to prick the side of the massaged fingertip Without pressing too hard encourage a sm...

Страница 47: ...to spread the blood If you suspect the amount of blood may not suffice you may apply a second drop within 5 seconds Your Accu Chek Active meter beeps briefly provided the beep tone is enabled to ackno...

Страница 48: ...4 3 Performing a blood glucose test...

Страница 49: ...gress The meter beeps again after about 5 seconds to signal that the test is complete The result appears in the display and is automatically saved together with the date and time Remove the test strip...

Страница 50: ...4 3 Performing a blood glucose test...

Страница 51: ...f you applied too little blood please repeat the test with a new test strip Now perform a plausibility check It is important that this check be performed within 30 60 seconds after blood was applied A...

Страница 52: ...4 3 Performing a blood glucose test...

Страница 53: ...tained Compare the colour of the control window with the colour you selected on the label The colours must be a fairly close match If there is a great disparity repeat the test If you cannot obtain a...

Страница 54: ...hek Active meter are you using only Accu Chek Active test strips Have you really used a test strip from a pack with the same code number as that displayed by your Accu Chek Active meter Did you apply...

Страница 55: ...y hot or cold weather If the answer to all these questions is yes carry out a quality control check with a new test strip as described in Chapter 6 If this check confirms the meter is working properly...

Страница 56: ...4 3 Performing a blood glucose test...

Страница 57: ...given there up to the point where you are instructed to apply blood Clean and massage the site you intend to collect blood from for example an ear lobe This will stimulate the circulation and make blo...

Страница 58: ...d test strip are flashing You now have 20 seconds to apply blood to the test strip and re insert it before the meter switches off After 15 seconds a beep tone once per second indicates that the time f...

Страница 59: ...e test strip back into the test strip slot of your Accu Chek Active meter until you feel it click into place Your Accu Chek Active meter beeps briefly to acknowledge application of blood and to announ...

Страница 60: ...4 3 Performing a blood glucose test...

Страница 61: ...ecially developed Accu Chek Softclix Pro or Safe T Pro lancet devices Collect used lancets and test strips in a sturdy sharps container with lid Be sure to observe all relevant Health and Safety regul...

Страница 62: ...d time You do not need to save a result specially the meter does it all for you Once all the memory locations are full the meter automatically erases the oldest entry All results in memory are consecu...

Страница 63: ...r example results flagged as control results are displayed together with a bottle symbol incorporating the letter C Results obtained at a temperature outside the permitted range are displayed together...

Страница 64: ...5 2 Retrieving results...

Страница 65: ...e meter you must turn it on in Memory Mode Briefly press the M button for less than 3 seconds In the display you see the following at top left mem short for memory followed by the most recent result i...

Страница 66: ...5 2 Retrieving results...

Страница 67: ...he number of the memory location is displayed As soon as you release the button the result appears By holding down the S button you can scroll quickly through the results As soon as you release the bu...

Страница 68: ...5 2 Retrieving results...

Страница 69: ...meter can calculate and display average values for the last 7 or 14 days Start by pressing the M button to turn on your Accu Chek Active meter in Memory Mode Then press the M and S buttons at the sam...

Страница 70: ...5 2 Retrieving results...

Страница 71: ...erts to the last result shown before the average value Averages can only be calculated as long as you have set the date and time see Chapter 3 2 Without these settings the meter cannot identify the re...

Страница 72: ...5 2 Retrieving results longer than 3 seconds...

Страница 73: ...e information are erased though the memory location remains occupied An average value cannot be displayed when the most recent result has been erased from memory Results arising after a value has been...

Страница 74: ...5 2 Retrieving results longer than 3 seconds longer than 5 seconds...

Страница 75: ...played Keep the M and S buttons pressed together for longer than 5 seconds You will hear 5 beeps All information relating to the current result is cleared and set to zero The memory location remains o...

Страница 76: ...nd the memory functions integrated in your Accu Chek Active meter Such programs enable you and your doctor to manage your data more effectively and through graph and table views make it easier for you...

Страница 77: ...9600 Ireland see Chapter 10 4 Data can only be evaluated on a PC as long as you have set the full date and time see Chapter 3 2 Your Accu Chek Active meter has an inbuilt infrared interface 11 see ill...

Страница 78: ...5 3 Downloading data to a PC longer than 3 seconds...

Страница 79: ...start data transfer with a mouse click Position your Accu Chek Active meter about 10 cm from the infrared cable Point the two infrared windows towards one another Turn on your Accu Chek Active meter...

Страница 80: ...5 3 Downloading data to a PC...

Страница 81: ...tive downloading PC remains constant in the display On completion of downloading End appears in the display Following the download you can turn off your Accu Chek Active meter with the M button if the...

Страница 82: ...ntrol testing with control solution To ensure your results are always dependable you must periodically check the performance of your Accu Chek Active meter Perform a quality control test 6 Checking Ac...

Страница 83: ...new pack of Accu Chek Active test strips and consequently replaced the coding chip after you have inserted a new battery after you have cleaned your Accu Chek Active meter if you have reason to doubt...

Страница 84: ...6 2 Preparing for the quality control test...

Страница 85: ...Chek Active meter with the coding chip inserted the pack of Accu Chek Active test strips you took the coding chip from the Accu Chek Active Control solutions Carefully read the pack inserts that came...

Страница 86: ...eft open rendering the test strips unusable Check the round control window on the back of the test strip against the colour scale printed on the test strip container The colour of the control window m...

Страница 87: ...ek Active meter until you hear it click into place Inserting the test strip automatically puts the meter in Test Mode Please remember that your Accu Chek Active meter automatically turns off after abo...

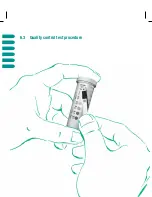
Страница 88: ...6 3 Quality control test procedure...

Страница 89: ...ppens call your customer support and service centre The current code number then appears in the display Is this the number printed on the test strip container If not check that you really did insert t...

Страница 90: ...6 3 Quality control test procedure...

Страница 91: ...trol solution blood in the case of a real test To make quality control results stand out later from blood glucose test results you can place what is known as a flag against them Press the S button onc...

Страница 92: ...6 3 Quality control test procedure...

Страница 93: ...f solution and to announce the start of testing After 5 seconds a second beep tone indicates that testing is complete and the result appears in the display If you have not already flagged this quality...

Страница 94: ...tainer and locate the Accu Chek Active Control table The table has two rows listed as 1 and 2 as well as two columns giving ranges in mmol L and mg dL ACCU CHEK Active Control mg dL mmol L 1 36 66 2 0...

Страница 95: ...check be performed within 30 60 seconds after control solution was applied Any later than this and comparison is no longer possible owing to excessive discolouration of the test strip If the result i...

Страница 96: ...6 3 Quality control test procedure...

Страница 97: ...colours must be a fairly close match If there is a great disparity repeat the test If you cannot obtain a close match even after several attempts at testing please call your customer support and servi...

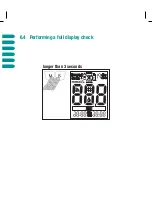
Страница 98: ...6 4 Performing a full display check longer than 3 seconds...

Страница 99: ...d down the M and S buttons together for longer than 3 seconds All the elements of the liquid crystal display LCD are shown at once Either mmol L or mg dL will be visible depending on the country speci...

Страница 100: ...eter has no moving parts and so will not suffer any mechanical wear and tear As with any precision instrument however you will need to look after it carefully to keep it at its best 7 Keeping your met...

Страница 101: ...s being clean Be sure to clean the meter therefore whenever it is showing signs of soiling however slight especially on the test strip guide or the measurement optics located below it whenever you ope...

Страница 102: ...7 1 Cleaning your Accu Chek Active meter...

Страница 103: ...r cleaning agents may damage the meter or impair its measuring function Slide off the test strip guide towards you see illustration After removal of the test strip guide from the meter clean it with c...

Страница 104: ...7 1 Cleaning your Accu Chek Active meter...

Страница 105: ...0 alcohol Make sure that no liquid enters the meter itself Avoid scratching the measurement optics as this will impair the measuring function When all of the components are thoroughly dry you may slid...

Страница 106: ...d other persons using Accu Chek Active to test blood glucose from more than one patient must be aware that any item coming into contact with human blood is a potential source of infection Please see P...

Страница 107: ...water and cotton swabs 6 formal dehyde solution may be used for disinfection Please take into account the time it takes for the agents used to act Any other cleaning agents may damage the meter or imp...

Страница 108: ...7 2 Battery life and battery replacement...

Страница 109: ...cold surroundings can affect its performance even further Insert a new battery into the meter as follows Turn your Accu Chek Active meter over At the top you see the recess for opening the battery com...

Страница 110: ...te the date and time settings will be retained All of the other results will be retained however long it takes to replace the battery Think of the environment Please take your used batteries to a coll...

Страница 111: ...rmed at the limits of the permitted range between 5 C and 10 C or 40 C and 45 C but the result should be interpreted with caution If the temperature range is at limits a is displayed Tests cannot be p...

Страница 112: ...use it to give incorrect results Light conditions Do not carry out a test where the meter and test strips are exposed to direct sunlight If the light is too bright a symbol will appear in the display...

Страница 113: ...to turn on your Accu Chek Active Allow the meter to return slowly to room temperature and never keep it in a room that is likely to harbour condensation e g a bathroom Sources of interference Strong...

Страница 114: ...ay messages what they mean and what action you should take in case you see an error message Please watch out for any messages displayed when you use the meter Every message provides you with important...

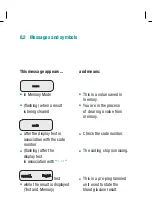
Страница 115: ...ring a value from memory after the display test in Check the code number association with the code number flashing after the The coding chip is missing display test in association with during the disp...

Страница 116: ...ayed is was close to the limit Test and Memory at the time of testing Do not use the result as a basis for therapeutic decisions in all modes When this symbol first appears the battery still has power...

Страница 117: ...means during testing The test is in progress during testing when This is was a enabled quality control test attached to results in memory in Memory Mode The figure is the 7 14 day average in Set Mode...

Страница 118: ...t is too bright testing is not possible Please move to another location flashing in Test Apply a drop of blood Mode now in Test Mode The test strip is inserted flashing in Test Re insert the test Mode...

Страница 119: ...he wrong coding chip is inserted This coding chip does not belong to Glucose test strips from the Glucotrend or Accu Chek Active blood glucose systems Remove this coding chip insert the correct coding...

Страница 120: ...strip Repeat the test with a new Accu Chek Active test strip The measurement optics are dirty or you have inserted a test strip that has already been used or is expired Clean the measurement optics C...

Страница 121: ...t and cannot be used Please call your customer support and service centre You applied too little blood to the test strip or the test strip was not lying flat and straight in the test strip guide Repea...

Страница 122: ...tive test strips Does the battery still have enough power and is it properly inserted Have you carefully read the reference manual and carried out tests as instructed Have you read the pack inserts th...

Страница 123: ...u Chek Active meter especially the test strip guide and measurement optics as instructed in Chapter 7 1 Have you used only test strips with a code number matching that displayed by the meter If you ha...

Страница 124: ...th their meaning Please read this note with special care For single use only The lancets may only be used up to the expiry date specified on the box Lot number The lancets have been sterilised with at...

Страница 125: ...thout pain Penetration depth can be adjusted precisely to suit individual skin requirements The Accu Chek Softclix finger pricker is intended for patient self monitoring by a single person It must not...

Страница 126: ...ftclix at a glance A Cap B Comfort Dial for selecting penetration depth C Notch D Protective cap E Accu Chek Softclix lancet F Lancet holder G Semi circular cutout H Ejector I Transparent release butt...

Страница 127: ...A B D C E F H I G...

Страница 128: ...settings marked with dots enable a particularly precise adjustment of Accu Chek Softclix to suit individual skin type The markings on the device shows the depth of penetration selected Penetration de...

Страница 129: ...ecting the individual penetration depth it is recommended to start with level 1 or 2 to see if the amount of blood obtained is enough to carry out the test Thicker skin will require a higher level Rec...

Страница 130: ...s the Accu Chek Softclix cap on again until it clicks Be sure to align the notch on the cap with the centre of the semicircular cutout on the ejector 3 Rotate the Comfort Dial on the Accu Chek Softcli...

Страница 131: ...nt edge of the test strip against the blood If you do not obtain sufficient blood try the test again with progressively higher settings After obtaining the blood sample wipe the puncture site with a d...

Страница 132: ...g Subsequent Treatment of the Puncture Site Wipe the puncture site with a dry clean tissue If it continues to bleed apply gentle pressure to the puncture site with a plaster to protect it from dirt or...

Страница 133: ...use of other lancets may prevent or impair proper function of Accu Chek Softclix Important note for Healthcare Professionals If handling devices returned after use by patients please ensure that the p...

Страница 134: ...hen using different specimen material please refer to the package insert that came with the Accu Chek Active test strips Measuring range 0 6 33 3 mmol L Measuring time approx 5 seconds in meter dosing...

Страница 135: ...ic humidity up to 85 relative humidity Storage temperature 40 C to 70 C Electromagnetic compatibility This device meets the electromagnetic immunity requirements as per ISO 15197 Annex A The chosen ba...

Страница 136: ...rol testing of your Accu Chek Active meter use only Accu Chek Active Control solutions see Chapter 6 For virtually pain free blood sampling we recommend the Accu Chek Softclix finger pricker and Accu...

Страница 137: ...afe T Pro disposable lancet devices All of the system components are carefully matched With your Accu Chek Active meter use only Accu Chek Active test strips Any other test strips will give incorrect...

Страница 138: ...arranty card Your statutory rights are not affected The meter and finger pricker must have been subjected to normal use No claim will be entertained if the meter or finger pricker has been improperly...

Страница 139: ...n no way affects your statutory rights or any warranty claims you may have against the seller of the meter under the terms of your sales contract Be sure to fill out your warranty card that came with...

Страница 140: ...ly by persons who have been authorised by Roche Diagnostics If you suspect that the meter has a fault please start by contacting the Accu Chek Customer Careline Our staff will attempt to identify and...

Страница 141: ...on 10 43ff 55ff 59 116 Blood collection 37 44 55 128 Causes of error 120ff Cleaning the meter 99ff Coding 10 32ff Coding chip 7 10 32ff 35ff 41 81 83 117ff Colour comparison 39 49 51 59 Colour scale 3...

Страница 142: ...9 75 123 Interferences 111 Leap year 29 Light conditions 110 111 Measurement optics 10 52 95 105 118 Measuring blood glucose 36ff Measuring conditions 109ff 120 Measuring principle measuring procedure...

Страница 143: ...t off automatic 47 73 93 97 133 Special testing situations 55 59 Storage conditions 109ff 120 Sun symbol 110 116 Symbols 11 112 113ff System components 134ff Technical data 132ff Temperature range 61...

Страница 144: ...nd SOFTCLIX are trademarks of Roche 2006 Roche Diagnostics All rights reserved Distributed by Roche Diagnostics Limited Charles Avenue Burgess Hill West Sussex RH15 9RY www accu chek co uk UK Freephon...

Отзывы: