


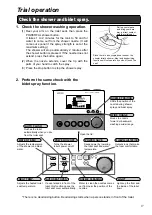
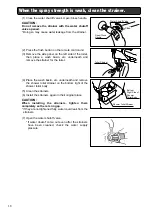


9
(4) Fix the drain socket with the screws.
(5) Align the collar of the mounting base with the collar
of the drain socket to fix the position of the mounting
base.
(6) Drill a pilot hole (S10) for the mounting base, and
strike the locally procured plastic anchor (S10).
(7) Apply silicone on the edge of the drain socket to seal
it. See the figure on the previous page for the area
to apply silicone.
CAUTION:
Fix the mounting base on the floor before silicone
becomes hardened.
* If silicone becomes hardened, the mounting base will
not be fit into the drain socket.
(8) Align the collar of the mounting base with the collar
of the drain socket. Fix the mounting base with the
screw.
3. Mounting the toilet
(1) Insert the toilet drain pipe in the rubber drain joint of
the drain socket, then fasten the toilet down using
anchor nuts and cover the nuts with decorator caps
(large).
(2) Fasten the toilet to the toilet mounting base at the
front using a toilet mounting wood screw, then install
the decorator cap (small).
CAUTION:
Do not tighten the screws too tightly against the
ceramic.
* There is danger of the ceramic cracking.
Drain Socket
Collar
Washer
Wood Screw
Mounting
Base
Collar
Decorator
Cap (small)
Toilet Mounting Wood Screw
Rubber
Drain Joint
Washer
Anchor Nut
Decorator
Cap (large)
Toilet Drain Pipe
Drain Socket
Drain Pipe
parallel
Seal
Washer
Wood Screw
Plastic
Anchor
(S10)
Plastic Anchor (S10)
Pilot Hole (S10)
Pilot Hole
(S10)


