background image

8

6.3 Map building

6.3.1 Preparations

1) Make sure it a vacant area or with limited people within the area;

2) Clear up all the frequently movable objects in the area;

3

Regarding to those objects may reflect, transmit and absorb lights, under some conditions permissible, stick several

ordinary materials on the plane domain area where laser radar may reflect;

6.3.2 Frequently Disturbed Objects

Before starting mapping, you should figure out what kind of objects that may have an influence on the laser radar that

requires us to do several precautions as the case may be. Generally speaking, 70% of light reflective rate will be up to the

limit that radar data manual instructs. Attention should be focused that all the environment we are talking is inside the room

/indoor environment. Below are several interfered objects:

3) Low reflective objects, e.g. light absorbing wall in black, furniture, etc.;

4) Glasses;

5) Mirror, stainless steel that reflects the objects;

6) Other reflective objects.

6.3.3 Mapping Steps

1

Push robots to the

Starting Point

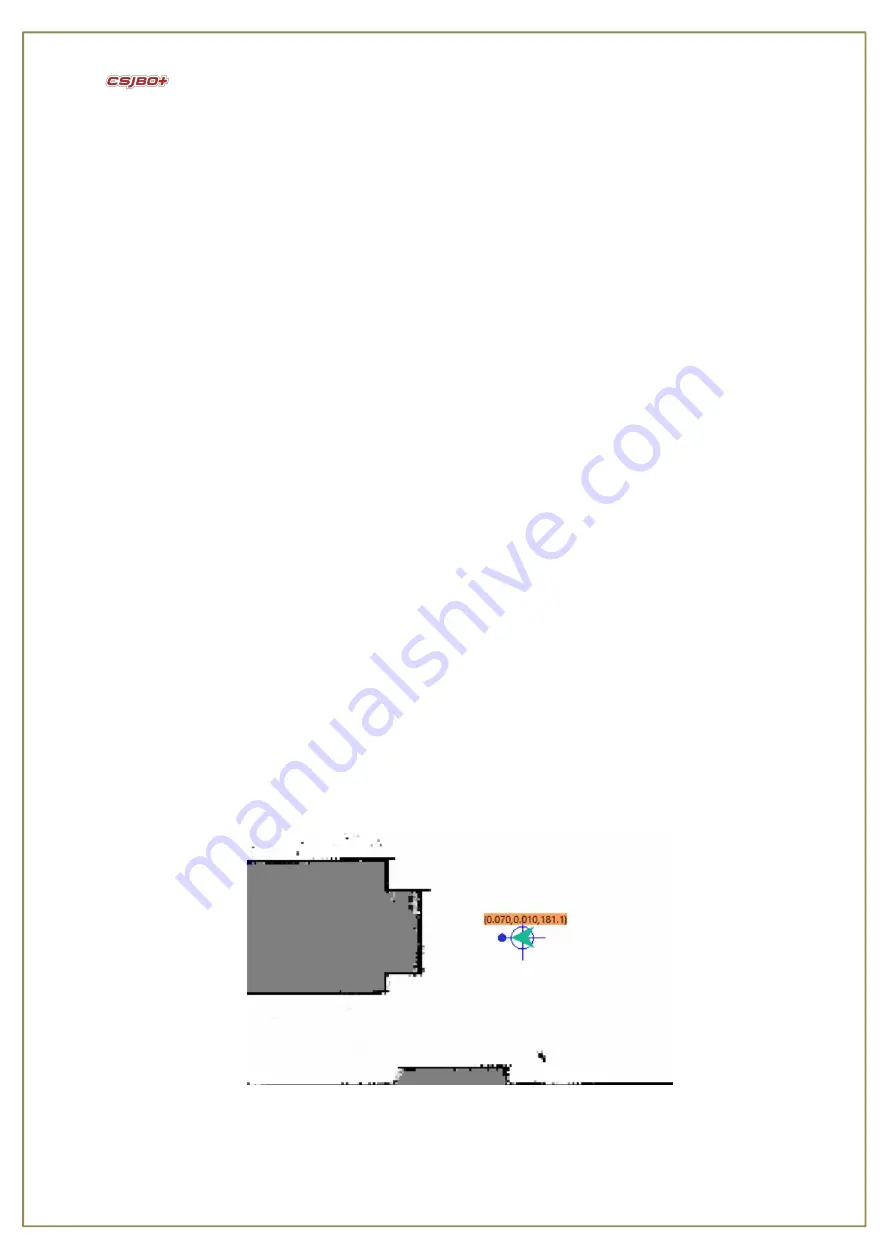
where you turn on the robot. In order to generate a high-quality map, make sure the

direction to which robot is facing towards a vertical straight wall (not a curve wall or closed loop area) among the area, no

obstacles surround the robot within 1m in case of not interrupt robot to get more valid points, shown as below Pic 4;

Pic 4 Starting Point

2

Connect your PC to the WIFI released by the robot router, shown as below Pic 5;

Содержание CSJBO+

Страница 1: ...AMY DISH DELIVERY ROBOT USER OPERAETING MANUAL VERSION V2 4 Suzhou Pangolin Robot Corp Ltd ...

Страница 2: ...ing interface 8 7 2Network setting 13 7 3speed setting 14 7 4charging management 15 7 5 language setting 15 7 6 saving the map 16 7 7 restore the map 16 7 8 password management 17 7 9 updating 19 7 10 Scene statement setting 19 7 11 About BOT 21 7 12 Terminal control 22 7 13 Function switch 22 7 14 Waiting point setting 23 7 15 Waiting time setting 24 7 16 Synchronous Data 25 7 167 Table number se...

Страница 3: ... 1 Multi table delivery 27 8 2 Recycling table delivery 28 Chapter 9 Maintance 31 9 1 Charging 31 9 2 Motor wheel chean 31 Chapter 10 Packing and handling 31 10 1 Short distance trasnportation 31 10 1 Long distance transportation 32 ...

Страница 4: ...tent copyright trademarks and some other intellectual properties you shall not be allowed to use our products or related documents until or only if you get the approval or authorization from Pangolin Robot however which don t belong to Pangolin Robot s responsibility 3 Pangolin Robot will reserve all rights to this manual and users shouldn t disseminate copy or modify any contents of this manual C...

Страница 5: ...einafter referred to as IPC with which the screen is adopted with touch screen technology Please DO NOT frequently cut the power voltage during the system starts up in case of any machine breakdown 2 Only if or unless urgent situation please DO NOT press the Emergency Stop Switch in protection of the machine life expectancy 3 DO NOT assembly and disassembly the robot or any spare part of the robot...

Страница 6: ...s We apologize for any inconvenience caused 14 Any problems please directly contact with our customer service Chapter 5 Safety Precautions Before installing using carrying maintenance and repairing please make sure read carefully and master the content of this manual and relevant appendix Make sure operate after you are fully familiar with all equipment safety precaution and matters need attention...

Страница 7: ...om food material Please keep the minors and the elderly out of reach the product unless being under the custody Attention Some of the illustrations in this manual are drafted upon uncovering the robot shell to more specify the robot therefore when you are working with this kind of parts ensure to recover the shell and operate it adhere to the specification Graph and pics in this manual is only for...

Страница 8: ...c 1 and back to normal work Way to relieve the emergency stop as following Right turn the emergency stop button shown as Pic 2 Pic1 Emergency Stop Pic2 Free Emergency Stop Chapter 6 On Off button and Map building 6 1 On off Button 6 1 1 Firstly confirm if it has freed the emergency stop if not gently rotate the red button to relieve the emergency stop state refer to Chapter 5 6 1 2 Press the On Of...

Страница 9: ... the limit that radar data manual instructs Attention should be focused that all the environment we are talking is inside the room indoor environment Below are several interfered objects 3 Low reflective objects e g light absorbing wall in black furniture etc 4 Glasses 5 Mirror stainless steel that reflects the objects 6 Other reflective objects 6 3 3 Mapping Steps 1 Push robots to the Starting Po...

Страница 10: ...the IP address 192 168 99 2 shown as below Pic 4 then make it connected to enter the mapping page Cancel the gray button of Pause Mapping under SLAM shown as below Pic 7 Pic 7 Connect Robot 5 Should you need to map a large vast area it is better to control robot walk to the closed loop area then scan the details within the area shown as below Pic 8 ...

Страница 11: ...udio Shown as pic 4 1 Should you double confirm there is none obstacles wipe the gray area red circle off with the help of white eraser to manually render it a detected area shown as below Pic 9 Pic 9 Undetected gray area Below red circled shows the white eraser as pic 10 Pic 10 White Eraser 7 Use eraser to clear movable objects people or physical objects shown as pic 11 ...

Страница 12: ... match up with as more reference points as possible which will eventually enhance the completeness of mapping shown as pic 12 Pic 12 Incomplete Mapping 9 When it finished map scanning please save it before you are about to walk here and there in the mapping area Click Robot Studio to sync up the map then click Pause Mapping to stop her continuous mapping shown as Pic 13 Pic 13 Sync Up Pause Mappin...

Страница 13: ...rtual tracks that robot will walk along shown as below Pic 15 Pic 15 Virtual Track 12 At last save the map Chapter 7 System setting 7 1 Enter Setting Interface Click the Settings button to enter the password verification interface The manufacturer default password of the robot is csjbot which can be modified by the user in the setting interface See the below pic 16 for details ...

Страница 14: ...an realize many functions set network set walk speed set language save the map and manage the power and so on See the below pic 17 for details Pic 17 7 2 Network Setting Click the Network Settings icon to go to the page shown as below Pic 18 ...

Страница 15: ...e the below pic 19 for details Pic 19 7 3 Speed Setting Click the speed setting button to enter the speed setting interface At present the speed range is 0 4 0 7m s and the default speed is 0 5m s If the safety speed is exceeded there will be a risk warning Please set it carefully Please see the below pic 20 21 for details Pic 20 Pic 21 ...

Страница 16: ... pile the robot will be there for charging automatically Charging immediately Click the button of charging immediately regardless of whether the battery reaches the threshold the robot will go for charging immediately If there is a charging pile the robot will go to charging pile to charge immediately If no charging pile the robot will return to the starting point for charging immediately Please s...

Страница 17: ...the robot next time Please see the below pic 22 for details Pic 22 7 7 Restore the Map The robot will pop up the reloading map box in the screen when you boot the robot You can turn on the robot at any point within 20 meters from the starting point But you should try to choose a point where the reference object is obvious otherwise the map reloading may not be successful Please see the below pic 2...

Страница 18: ... of reloading map from the interface page to reload the map Please see the below pic 24 for details Pic 24 7 8 Password Management Enter the page of password setting to set the login password and the gesture password Please see the below pic 25 for details ...

Страница 19: ...hen the password are consistent in 2 times the robot will remind that the password change is successful Please see the below pic 26 for details Pic 26 Click Reset Graphic Password to enter the interface of the reset graphic password The default graphic password of the robot is L The administrator can modify it according to the actual situation For resetting the graphic password you need to draw th...

Страница 20: ... corresponding interface The administrator can upgrade the APP and Linux system Please see the below pic 29 for details Pic 29 7 10 Situation Statement Setting Click the situation settings option to enter the situation statement settings interface The interface is mainly for setting up ...

Страница 21: ...r details Pic 32 Pic 33 Pic 34 Pic 35 2 If it is not custom context statement The robot will use the default context statement content setting the new context statement content and turn off the use default then use the new context statement content set the new context statement content and turn on the use default then add the custom context statement after the default statement as full context sta...

Страница 22: ...ed off after the custom context statements are set 4 Click the yellow speaker icon on the right we can preview the complete statement the robot will speak out Please see the below pic 36 37 for details Pic 36 Pic 37 7 11 About BOT Click on the About BOT to enter the About BOT interface where you can see basic information about the robot Robot service version UI version SN and so on Please see the ...

Страница 23: ...esponding box Then the user can use the APP to control the robot Please note that the terminal device needs to connect the same network with robot s Please see the below pic 39 for details Pic 39 7 13 Function switch Click the function switch option to enter the function switch interface The functions can be turned on or off ...

Страница 24: ...g point of dish delivery task When using the robot for the first time the system will prompt you to set the waiting point you can use the delivery function only after the wait point was set The user can set up three waiting points at most and only one waiting point can be used in one time The user can add new waiting point to the system or change the current waiting point to a different waiting po...

Страница 25: ... the customer touches the robot s hand during the waiting time the robot will return to the waiting point or delivers the meal to the next table number multi point delivery model 2 After broadcasting the user doesn t touch the robot s hand within the waiting time the robot will return to the waiting point or delivery to the next table number multi point delivery model Please see the below pic 44 f...

Страница 26: ...ic 45 for details Pic 45 7 17 Table Number Setting Click the table number setting option to enter the table number settings interface The administrator can add table number modify and delete table number in this interface See below Pic Two points need to be noted 1 the table number corresponds to the map After the new map is set up the table number information needs to be reset 2 you need to set u...

Страница 27: ...able number option to restore the saved table number information 7 20 Background Music Setting Click the background sound settings option to enter the background sound settings interface The administrator can choose the multimedia files for the robot The background audio and video come from the operation platform audio and video and picture management when the files are updated The user can use th...

Страница 28: ...de and circle mode for normal delivery please confirm whether the map is restored whether the table number and waiting point is set whether the data needs to be synchronized Whether the background music settings scene statements lock screen switch settings are correct During the delivery if the power is low the current delivery task will be cancelled and charged according to the charging managemen...

Страница 29: ...een stay on the home page the interface display delivery task or rotated pictures Once the dining lock screen is opened and users need to unlock the gesture when they want to operate During the delivery users can click Cancel Task button to cancel the delivery task Click back to wait point the robot can immediately return to the waiting point 8 2 Circle Mode Click the Set Up button to add the tabl...

Страница 30: ...ther operations you need the unlock gesture Click Cancel button to cancel the cycle delivery Click Back button to return to the waiting point Chapter 9 Maintenance 9 1 Charge It takes as long as 10 hours each time for charging to ensure robot run for 12 hours or more please promptly charge in time 9 2 Motor Clean In the robot s normal walking process it is inevitable to stick debris on robot s whe...

Страница 31: ...following operating practices and procedures will be fixed in the robot Tools and then the corresponding handling and loading and unloading work 1 Two adult men height 1 6 meters above from the sides of the robot one hand at the bottom of the box the other hand holding the middle of the box at the same time raised 15 25cm high moved to the top of the special handling tools In the middle of the too...

Отзывы: