background image

Before attaching the servo arms to the servos, the servos 
must be calibrated and centered to ensure accurate po-
sitioning.  The easiest way to calibrate your servos is to 
connect them to the Robodyssey Advanced Motherboard 
with a BasicX or Basic Stamp microcontroller.  A RC 
receiver and transmitter combination would work just as 
well, but is not covered in this documentation.

Insert your microcontroller into the Zero Insertion Force 
Socket by lifting the small lever, placing the microcon-
troller in the socket, and then locking the lever in the 
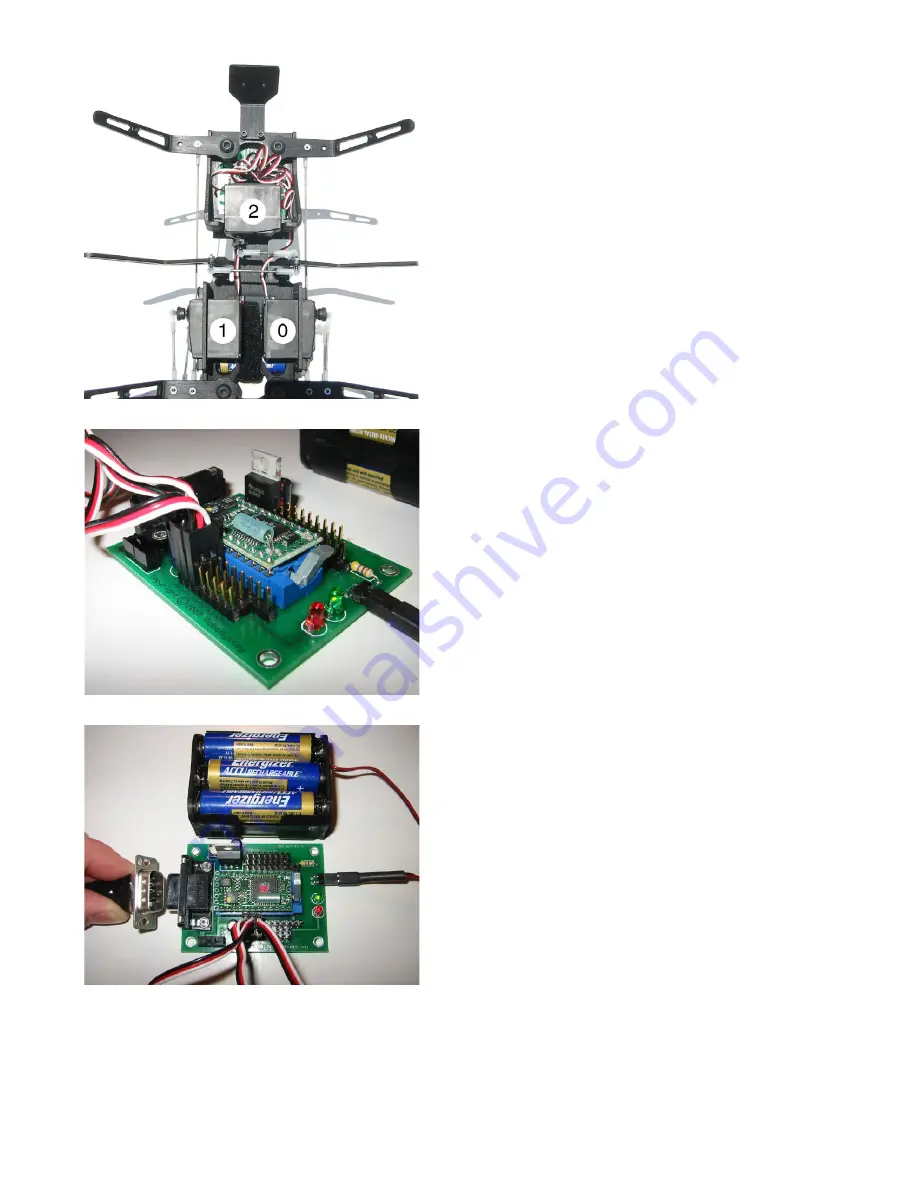
down position.  Next, connect the three servo wires as 
shown in Figure 38.  

Connect the servos to the motherboard as follows:


Right Servo: Pin 0 on Motherboard


Left Servo: Pin 1 on Motherboard


Center Servo: Pin 2 on Motherboard

Note that the white wire, which is the signal pin for the 
servo, should always be connected to the microcontroller 
side of the pins (always toward the 
center of the board).

Connect the battery cable to the motherboard as shown 
in Figure 39.  The green light on the motherboard will 
turn on when the batteries are connected properly.  If the 
green light does not turn on, do not proceed with the fol-
lowing steps until the batteries are oriented properly.

Connect the motherboard to your computer using a serial 
DB9 cable as shown in Figure 40.  Install the BasicX 
Development Software (Available on the Roboydssey 
CD, or on http://www.basicx.com), or the Basic Stamp 
Development Software (Available on the Robodyssey 
CD, or on http://www.parallaxinc.com).

We can now program the microcontroller to center 
our three servos automatically.  For the BasicX, use 
the code shown below in Figure 41, and for the Basic 
Stamp, use the code shown in Figure 42.  The code 
may also be found on the Robodyssey Development 
Software CD, or under the “Resources” section of http:
//www.robodyssey.com.

Once you’re ready to go, turn on the motherboard, down-
load the servo centering routine, execute the routine, and 
then turn off and disconnect the motherboard from the 
servos.

Figure 38

Figure 39

Figure 40

Содержание Roach

Страница 1: ...odyssey Roach Assembly Instructions Version 1 03 Modified 7 31 2002 Robodyssey Systems LLC Phone Fax 609 585 8535 20 Quimby Avenue Web www robodyssey com Trenton New Jersey 08610 Email info robodyssey com ...

Страница 2: ...Copyright 2002 Robodyssey Systems LLC All rights reserved Basic Express and BasicX are trademarks of NetMedia Inc Basic Stamp is a trademark of Parallax Inc ...

Страница 3: ... and provide plenty of power to get the Roach moving Anodized Laser Cut Aluminum Chassis The Roach body is made from anodized aluminum which pro vides the best combination of durability weight and appear ance No rusting corroding or broken parts to deal with Numerous Tapped Mounts Need to mount some extra sensors The Roach body has numerous tapped mounting positions for your components You can eve...

Страница 4: ...Small Parts Bag Screws Washers Nuts 5 Roach Head 11 Small Parts Bag Ball Pins Sockets Connectors 6 Battery Case 12 Linkages 2 Not Pictured Item s Velcro Battery Strap Small Parts Bag 9 13 Center Leg Spacers 2 14 Primary Leg Bushings Spacers 4 15 Servo Arms 3 16 Center Leg Bushings 2 Smaller than primary leg bushings Not Pictured Item s Metal Spacer Washers ...

Страница 5: ... 6 26 Small Nuts 12 The following components may have come with your kit depending on your ordered configuration NetMedia BasicX Sharp GP2D12 IR Sensors Advanced Motherboard for Basic Stamp and BasicX 1 Serial Connector 2 Power Switch 3 Unregulated I O and Power Pins 4 Microcontroller Operation LED 5 Correct Battery Polarity LED 6 Zero Insertion Force Socket 7 Battery Connector Pins 8 Regulated 5V...

Страница 6: ...Pliers optional Small amount of Super Glue optional Leg Preparation Attach Ball Pins 23 using the Small Nuts 26 to the holes in the Center Legs 3 Note that one leg has two ball pins while the other only has one Assemble as shown in Figures 1 2 Take care not to over tighten the ball pins Figure 1 Figure 2 Now attach six Ball Pins 23 using the Small Nuts 26 to the holes in the Primary Legs 2 Note th...

Страница 7: ...h that the ball pin and white spacer are going to attach to the back of the Roach body The back of the Roach body is the end with the rectangular openings cutout for servos Then use the Long Alan Wrench 8 to screw the leg into place as shown in Figure 7 Perform the same procedure on the other side of the body using the center leg that has two ball pins attached Again make sure the white spacer and...

Страница 8: ...o to the body as shown in Figures 10 11 with four Servo Screws 20 Be sure to secure all four screws Pay attention to the orientation of the servos Figure 9 Figure 10 Figure 11 Figure 12 Attach a second servo to the other side of Roach in the same fashion as seen in Figure 12 Figure 13 After attaching the two servos your Roach should like Figure 13 ...

Страница 9: ...re 14 from the plastic servo case This is easily accomplished with a small hobby knife Cut out the two notches one on each side of the center servo with the technique shown in Figures 15 16 Your final result should look like Figure 17 Figure 14 Figure 15 Figure 16 Figure 17 ...

Страница 10: ... are in The servo is designed to attach snugly onto the body so you may need to squeeze the body a little bit as shown in Figure 21 to properly align the other two holes Once they are aligned and the screws are set tighten all four screws to secure the servo in position Primary Leg Installation Figure 22 To attach the rear legs the legs that have two ball pins you will need to attach the Primary L...

Страница 11: ...s Figure 24 Figure 25 Figure 26 Figure 27 For the front legs gather the two remaining Primary Legs 2 along with the two remaining sets of Primary Leg Bushings and Spacers 12 as shown in Figure 26 Attach the legs to the Roach in the same manner as before but this time be sure to use the Short Leg Screws 4 Take care not to over tighten the leg screws The Roach with all six legs assembled should look...

Страница 12: ...in as shown in Figure 30 Figure 30 Figure 31 Attach this end of the linkage to the inside pin of the rear leg as shown in Figure 31 Now thread another Link age Socket 22 onto the other end and with the legs in a centered position adjust the length of the linkage until the sockets line up perfectly with the ball pins on the legs Figure 32 Once both side linkages are attached your Roach will look li...

Страница 13: ...pin on the second center leg By tightening the socket on the linkage as neccessary the end result should line up and snap in just like Figure 36 Figure 34 Figure 35 Figure 36 Now the Servo Arms 15 must be prepared and attached to each of the three servos To start we need to attach Ball Pins 23 to each arm Attach the ball pins to the servo arms using the Small Washers 25 and Small Nuts 26 as shown ...

Страница 14: ... the center of the board Connect the battery cable to the motherboard as shown in Figure 39 The green light on the motherboard will turn on when the batteries are connected properly If the green light does not turn on do not proceed with the fol lowing steps until the batteries are oriented properly Connect the motherboard to your computer using a serial DB9 cable as shown in Figure 40 Install the...

Страница 15: ...6 and 7 on the 24 pin microcontroller Const LeftServoMid As Single 0 0015 Const RightServoMid As Single 0 0015 Const CenterServoMid As Single 0 0015 Const ServoCommandSleep As Single 0 02 Const ServoPulses As Byte 17 Main Procedure Sub Main Do Call PulseOut LeftServo LeftServoMid 1 Call PulseOut RightServo RightServoMid 1 Call PulseOut CenterServo CenterServoMid 1 Sleep ServoCommandSleep Loop End ...

Страница 16: ...ly pins 5 6 and 7 on the Basic Stamp 2 pulses con 17 number of pulses for each servo cmd delay con 20 pause between pulses and ir timeout in ms sendsevocmndsps con 10 pause between servo commands ms temp_byte var byte temporary storage space Center Legs start for temp_byte 1 to pulses pulsout right_servo mid_pos_r right leg position pulsout left_servo mid_pos_l left leg position pulsout center_ser...

Страница 17: ... servo out of it s centered position The final result for this servo should resemble Figure 43 Do the same for the left side of Roach The final result should resemble Figure 44 Now attach the remaining servo arm to the center servo as shown in Figure 45 For additional torque to lift large loads you should mount the ball pin on the innermost hole of the center servo Your Roach should now resemble F...

Страница 18: ...hreaded For the center servo linkage cut a piece 1 inch long and screw the Linkage Sockets 22 onto each end 3 4 of the way in With the Center Legs as straight as possible adjust the size of the linkage by tightening or loosening the Link age Sockets 22 The easiest way to test the sizing is to sit the Roach on a desktop and snap the linkage into position to see how it fits The center servo linkage ...

Страница 19: ... 51 Figure 52 Use the Small Allen Wrench 7 and two Short Mount ing Screws 21 to attach the head to the Roach body as shown in Figures 51 52 Figure 53 From the bottom your Roach should now resemble Fig ure 53 ...

Страница 20: ...f velcro to the Roach body as shown in Figure 56 to create the battery strap Attach the Battery Case 6 to the Roach and connect it to the Motherboard Figure 55 Reattach the screws you removed from each servo as shown in Figure 55 The screws should be tightened enough so the servo arms do not twist Your Roach is complete Now check out the Robodyssey Roach Programming Guide to start programming your...

Отзывы: