10
USE UL HINTS
To obtain the best performance it is advisable to switch ‘ N’ the cooker hood a few minutes (in the
boost setting) before you start cooking and you should leave it running for approximately 15 minutes after
nishing.
IM ORTANT NE ER O LAM
COOKIN UN ER THIS COOKER HOO
S
O
E
MAINTENANCE
Before carrying out any maintenance or cleaning isolate the cooker hood from the mains supply.
The cooker hood must be kept clean a build up of fat or grease can be a re hazard.
Casing
ipe the cooker hood frequently with a clean cloth, which has been immersed in warm water containing
a mild detergent and wrung out.
Never use excessive amounts of water when cleaning particularly around the control panel.
Never use scouring pads or abrasive cleaners.
Always wear protective gloves when cleaning the cooker hood.
M
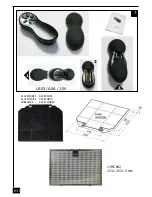
The metal grease lters absorb grease and dust during cooking to help keep the cooker hood clean
inside. The grease lters should be cleaned once a month or more frequently if the hood is used for more
than 3 hours per day.
T
Remove the metal grease lters one at a time by releasing the catches on the lters the lters can
now be removed.
The metal grease lters should be washed, by hand, in mild soapy water or in a dishwasher.
Allow to dry before replacing.
A
C
The charcoal lter cannot be cleaned. The lter should be replaced at least every three months or more
frequently if the hood is used for more than three hours per day.
T
Remove the metal grease lters.
Press against the two retaining clips, which hold the charcoal lter in place and this will allow the lter
to drop down and be removed.
Clean the surrounding area and metal grease lters as directed above.
Insert the replacement lter and ensure the two retaining clips are correctly located.
Replace the metal grease lters.
Extraction tube
.
Check every 6 months that the dirty air is being extracted correctly. Comply
-
tions
with regard to the extraction of ventilated air.
Lighting
.
If the lamp fails to function check to ensure it is tted correctly into the holder. If lamp failure has occurred
then it should be replaced with identical replacement.
GB
Содержание Escale Murale
Страница 17: ...A4 700 421 DESSOUS HOTTE au centre PLAN TRAVAIL 170 113 6 260 40 293 200...
Страница 18: ...A5 291 164 40 50 56 527 128 898 459 mini 1154 maxi 784 359 20 433 38 54 150 mini 650 35 506 ESCALE Murale INOX...
Страница 19: ...A6 291 164 40 50 56 527 128 898 459 mini 1154 maxi 784 359 20 433 43 59 150 mini 650 35 506 ESCALE Murale VERRE...
Страница 20: ...A7...
Страница 21: ...A8 2 2 1 85 421 293 40 700...
Страница 22: ...A9 3 4 10 10 30 1102 260 4 A...
Страница 23: ...A10 5 6 6 R 7b 7a...
Страница 26: ...A13 Composants Components Bauelemente Componenti Componentes Onderdelen 2 4 6 5 8 R B 7...
Страница 28: ...A15 8...

