background image


23


Cleaning and Maintenance 

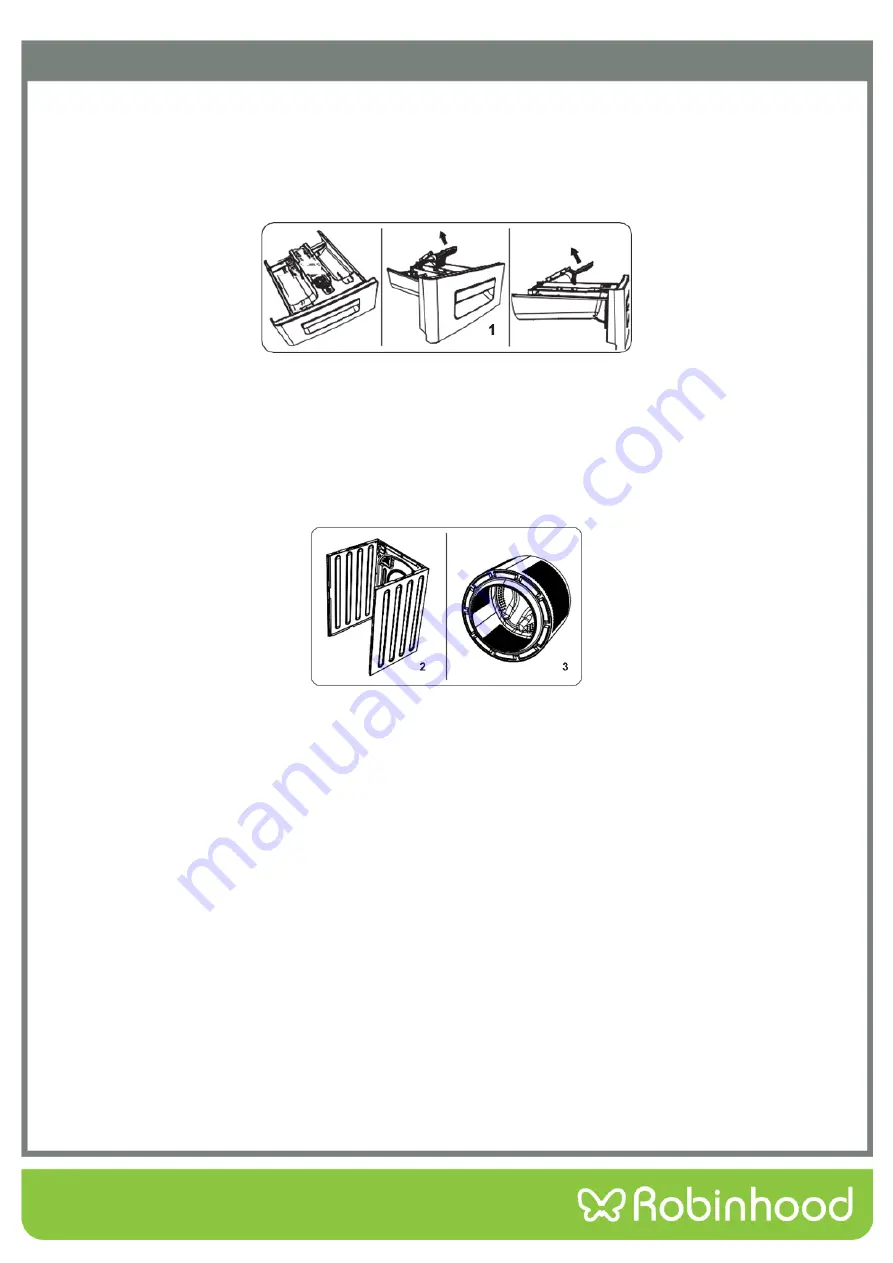
FLUSH STOPPER/ BODY / DRUM 

1-


FLUSH STOPPER 

Remove the detergent drawer and disassemble the flush stopper. Clean thoroughly to completely remove any softener 
residue. Refit the flush stopper after cleaning and check that it is seated properly. 


2-


BODY 

Use a mild, non-abrasive cleaning agent, or soap and water, to clean the external casing. Wipe and dry with a soft cloth. 


3-


DRUM 

Do not leave metallic objects such as needles, paper clips, coins etc. in your machine. These objects lead to the 
formation of rust stains in the drum. To clean such rust stains, use a non-chlorine cleaning agent and follow the 
instructions of manufacturer of the cleaning agent. Never use wire wool or similar hard objects for cleaning rust stains. 


Содержание WDCA845W

Страница 1: ...Installation and Operating Instructions Issue 1 Description ROBINHOOD WASHER DRYER COMBO 8 4 5KG WHITE Model Number WDCA845W Actual unit may vary from above model picture ...

Страница 2: ...velopment Shriro reserves the right to alter specifications or appearances without notice Important Safety Instructions 1 Technical Specifications 4 Overview 5 Installation Instructions 6 Operating Instructions 10 Cleaning and Maintenance 21 Troubleshooting 24 Warranty Certificate New Zealand 26 Warranty Certificate Australia 27 DISPOSAL INFORMATION Most of the packing materials are recyclable Ple...

Страница 3: ...stalling your Washer Dryer Your machine is for domestic use only Using it for commercial purposes will void your warranty This manual has been prepared for more than one model therefore your appliance may not have some of the features described within For this reason it is important to pay particular attention to any figures whilst reading the operating manual GENERAL SAFETY WARNINGS Before settin...

Страница 4: ...ld only be done by qualified personnel Never remove the plug from the socket by pulling the cord Always hold the plug Never touch the power cord plug with wet hands as this could cause a short circuit or electric shock Do not touch your Washer Dryer if your hands or feet are wet Call the nearest authorized service company for assistance if the power cord malfunctions Explosion Risk EXPLOSION RISK ...

Страница 5: ... Dryer is for domestic use only and is only intended to wash and dry items which are specified by the manufacturer to be machine washable and dryable on the label and textiles composed of hand washable wool or wool blend fabrics as well as satin lace silk and other hand washable garments Do not use your Washer Dryer for any purpose not expressly specified in this user guide This appliance can be u...

Страница 6: ...washing and spinning kWh cycle 0 76 Water consumption washing spinning drying l cycle 107 EN 50229 standard compliant control programmes Washing programme 2 Programme Cotton Eco temperature 60 C maximum spinning speed 1400 rpm 8 kg laundry Drying Programmes 1 Drying 13 Programme Cotton dry Drying level additional function selection Drying Level 2 Load group 4 kg with a load group including 1 sheet...

Страница 7: ... display 3 Program Button 4 Upper Tray 5 Detergent Drawer 6 Door 7 Pump Filter Cover 8 Power Cord 9 Drain Hose 10 Transport Screws 11 Adjustable Feet 12 Plastic Drain Hose Holder Do not remove the holder the operation of the machine will be affected ...

Страница 8: ... The removed transit screws should be stored in case you need to transport your Washer Dryer in the future NOTE You must remove the transit screws from your machine before first use Faults occurring in machines operated with transit screws still fitted are outside the scope of the warranty Fit the plastic blanking caps supplied in the accessories bag into the gaps left by the removal of the transp...

Страница 9: ... Never insert cardboard wood or other similar materials under the machine to level it When cleaning the ground on which the machine is located take care not to disturb the level of the machine Electrical Connection Your Washer Dryer requires a 220 240V 50Hz mains supply The mains cord of your machine is fitted with a grounded plug The plug should always be inserted to a grounded socket of 10 amper...

Страница 10: ...water inlet on the rear of the machine and hand tighten Screw the other end of the water inlet hose onto a 3 4 water tap and hand tighten If in any doubt consult a qualified plumber Turn the cold water supply on and check for any leaks Water flow with pressure of 0 1 1 MPa will allow your machine to operate at optimum efficiency pressure of 0 1 MPa means that more than 8 liters of water per minute...

Страница 11: ...bow of a household sink using additional equipment The hose must be placed between 0 cm and 80 cm from the ground Never attempt to extend the water drain hose Do not put the water drain hose from your machine into a container bucket or bathtub Make sure that the water drain hose is not bent buckled crushed or extended ...

Страница 12: ...To turn the appliance on or off press the on off button 3 Additional Function Buttons Use these buttons to select additional functions for the laundry program See Additional Functions for more information 4 Start Pause button Start or pause the selected program Detergent Drawer General View 1 Liquid Detergent Attachments 2 Main Wash Detergent Compartment 3 Softener Compartment 4 Pre Wash Detergent...

Страница 13: ...ing on the machine purchased FABRIC CONDITIONER STARCH DETERGENT COMPARTMENT This compartment is for softeners conditioners or starch Follow the instructions on the packaging If softeners leave residue after use try diluting them orusing a liquid softener PRE WASH DETERGENT COMPARTMENT This compartment should be used only when the pre wash feature is selected We recommend that the pre wash feature...

Страница 14: ...g temperature cold 30 C 40 C 60 C 90 C and the level of dirtiness less dirty dirty very dirty Never wash colored and white laundry together Dark textiles may contain excess dye and should be washed separately several times before being included in a mixed load Ensure that there are no metallic materials on your laundry or in the pockets if so remove them WARNING Any malfunction occurring due to fo...

Страница 15: ...e loading door of your machine Check inside the drum There may be laundry left inside from previous washes If there is empty your machine before selecting a program Load your laundry into the drum ensuring it is loosely packed Fold large objects like quilts and blankets into the drum as shown below ...

Страница 16: ...ed The amount of the detergent you will use will increase as the amount of your laundry increases Put the softener in the softener compartment in the detergent drawer Do not exceed the MAX level otherwise the softener may flow into the washing water Softeners with high density must be thinned before being put in the drawer High density softener will clog the flush and block the flow of the softene...

Страница 17: ...re Selection When you select a program the maximum temperature for that program is automatically selected To adjust the temperature press the water temperature adjustment button until the desired temperature is displayed on the digital display You can gradually reduce the washing water temperature between the maximum temperature and cold washing by pressing the water temperature adjustment button ...

Страница 18: ... select the drying option press the drying option button until the symbol is displayed Option 2 135 min Recommended for laundry that requires hanging To select the drying option press the drying option button until the symbol is displayed Option 3 305 min Recommended for laundry that will be folded and put into a wardrobe at the end of the program To select the drying option press the drying optio...

Страница 19: ... FACTORY PRESET SELECTABLE OPTIONS Cotton S Cotton dry Option 1 Option 2 Option 3 Cotton eco S Cotton dry Option 1 Option 2 Option 3 Eco 20 C S Cotton dry Option 1 Option 2 Synthetics S Gentle dry Option 1 Option 2 Option 3 Wool NS Curtain NS Rinse S Cotton dry Option 1 Option 2 Option 3 Anti allergic S Cotton dry Option 1 Option 2 Spin S Cotton dry Option 1 Option 2 Option 3 Super Rapid12 S Cotto...

Страница 20: ... the Delay button until the desired delayed time appears on the display If you have skipped the delay time you wanted to set keep pressing the Delay button until the desired delay time is displayed again For the delay timer function to work you must press Start Pause button To activate the time delay press Start Pause button To cancel the time delay once it has been set press the Delay button once...

Страница 21: ...EL position and another program is selectedthe previously selected program continues from where it was left To deactivate the child lock press and holdbutton 3 and 4 simultaneously for at least 3 seconds until the CL symbol on the electronic display disappears Cancelling Programme To cancel a running program at any time Turn the program dial to the CANCEL position Your machine will stop the washin...

Страница 22: ...and linen textiles Due to the short washing time of this programme we recommend that less detergentis used than with other programmes The programme may last longer than 12 minutes if your Washing Machine detects an uneven load DAILY FAST 60 MIN 60 4 5 4 5 2 60 Soiled cotton colored and linen textiles GENTLE DRY 3 5 2 100 Delicate laundry bearing the suitable for machine dry label COTTON DRY 4 5 2 ...

Страница 23: ...ilter A second water inlet filter is located in the tap end of the water inlet hose To remove the second water inlet filter use a pair of long nosed pliers to gently pull on the plastic bar in the filter Clean the filter thoroughly with a soft brush and wash with soapy water and rinse thoroughly Re insert the filter by gently pushing it back into place CAUTION The water inlet filters can become cl...

Страница 24: ...ump cover 2 Lodge the end of the powder spade or liquid detergent level plate in the opening of the cover and gently press backwards The cover will open 3 Pull the black rubber hose forward and detach it from its clamp place a container under it and remove the plug from the hose 4 Collect the water drained from your machine in a container NOTE Depending on the amountof water inside the machine you...

Страница 25: ...ODY Use a mild non abrasive cleaning agent or soap and water to clean the external casing Wipe and dry with a soft cloth 3 DRUM Do not leave metallic objects such as needles paper clips coins etc in your machine These objects lead to the formation of rust stains in the drum To clean such rust stains use a non chlorine cleaning agent and follow the instructions of manufacturer of the cleaning agent...

Страница 26: ...on of yourmachine Your machine is overloaded with laundry or the laundry is not distributed evenly Do not overload your machine Make sure the laundry is spread out Your machine is located on a hardsurface Avoid installing your machine on a hard surface When installing your machine leave a 2 cm gap between walls or hard surfaces Excessive foam is formed in the detergent drawer Too much detergent ha...

Страница 27: ...left open Shut the door properly unitl you hear the click If thefault persists turn off your machine unplug it and contact the nearest authorised service immediately E02 The water pressure or the water levelinside the machine is low Check that the cold water tap is fully turned on and that mains water is not cut off If the fault persists your machine will stop automatically Unplug the machine turn...

Страница 28: ...pads and strongly alkaline or acidic cleaners Heat damage including from washing the product at high temperatures Impact or mishandling the product including the impact caused by objects scraped along thrown or dropped on the product surface or excessive weight being placed on the product Structural or support changes in or affecting the building or the application where the product has been insta...

Страница 29: ...care robinhood com au www robinhood com au Attention Customer Services Manager Warranty exclusions 1 The warranty does not apply where in Shriro s opinion The defect is caused by misuse wear and tear dirt fire or accidental damage The product has been repaired or serviced by an unauthorized person The product was not installed in accordance with our instructions The product was purchased overseas ...

Отзывы: