


21
Table Legs and Leg Mounts
The table(s) can be set up to use either for front seating or rear lounge area for dining, computer, gaming, or other recreational use. (See Pictures
and Further Description on Pages 21 and 22.) The table legs are stored in the closet to the rear of the washroom. (Picture 21.3)
The leg keys into a T-Nut fitting in the slot of the floor plate(s). (Picture 21.1) *
Note – All table leg floor plates come with covers; remove and
store covers in a safe place before inserting T-Nut into the floor plate.
*
To install the table leg in the floor plate, unscrew the T-Nut all the way on the end of the table leg and insert the T-Nut into the slot in the floor
plate. Rotate the table leg clockwise until the table leg is secure and does not wobble. If it does not tighten after 2-3 turns, remove the table leg,
unscrew the T-Nut all the way, and repeat. (Picture 21.2)
If it's set up correctly, the table leg will lock in place with little effort. If not setup correctly, don’t force the T-Nut. Remove and ensure that the
T-Nut is fully extended, and check the keyway on the floor for any obstructions.
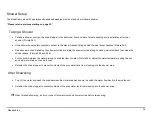
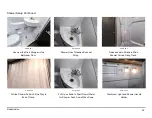
Leg Mount Bases Located in Coach Rear
(Shown Here) and in Front Between 2
nd
Row Seating and Refrigerator.
Picture 21.1
T-Nut Fully Extended – Leg Mount Base.
Picture 21.2
Picture 21.3
Double Table Leg Storage Inside Closet to
the Rear of the Washroom.
Roadtrek Inc.


