2
English
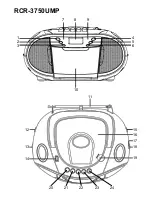
LOCATION OF CONTROLS
1. SKIP + BUTTON
2. SKIP - BUTTON
3. MODE BUTTON
4. PLAY / PAUSE BUTTON
5. STOP BUTTON
6. ALBUM BUTTON
7. POWER INDICATOR
8. LCD DISPLAY
9. FM STEREO INDICATOR
10. CASSETTE DOOR
11. FM ANTENNA
12. FUNCTION SELECTOR
13. VOLUME CONTROL
14. USB SLOT
15. BAND SELECTOR
16. CD DOOR
17. DIAL POINTER
18. TUNING CONTROL
19. CD OPEN / CLOSE
20. TAPE PAUSE BUTTON
21. TAPE STOP / EJECT BUTTON
22. TAPE FAST FORWARD BUTTON
23. TAPE REWIND BUTTON
24. TAPE PLAY BUTTON
AC POWER
You can power your portable system by plugging the detachable AC power cord into the AC
inlet at the back of the unit and into a wall AC power outlet. Check that the rated voltage of
your appliance matches your local voltage. Make sure that the AC power cord is fully
inserted into the appliance.
BATTERY POWER
Insert 8 x UM2 size batteries into the battery compartment. Be sure that the batteries are
inserted correctly to avoid damage to the appliance. Always remove the batteries when
appliance will not be used for a long period of time, as this will cause leakage to the batteries
and subsequently damage to your set.
IMPORTANT:
this unit is equipped with ErP circuit (Stand-By power Management) when
not operative for some time it switch OFF automathically. To re-activate the unit, move the
Function Selector to TAPE/OFF then move it again to CD / Radio mode.
RADIO OPERATIONS
1. Set the FUNCTION SELECTOR (12) to “RADIO” mode.
2. Select desired band by using the BAND SELECTOR (15).
3. Adjust radio frequency to your desired station by using the TUNING CONTROL (18).
4. Adjust the VOLUME CONTROL (13) to the desired level.


