background image

Rhein - Nadel Automation GmbH 

Date: 14.04.2014 

VT-BA-GL-GB 


Notice


The resonant frequency of the linear feeder may not correspond to the mains frequency 

 
In case the conveying capacity decreases after loosening the spring fastening screw, proceed as described under 

point 5.1

 
In case, however, the conveying capacity, increases, proceed as described under 

point 5.2


Notice


The adjustment is, however, more easy with an electronic frequency converter, which you can buy from 
our range of accessory parts.  

 
The  linear  feeder  should  be  adjusted  that  the  required  conveying  capacity  is  achieved  at  a  controller  position  of 
approx. 80% at the control unit.  
 

5.1 

The conveying speed decreases? 

 
Mount additional springs (with distance plates). Start with one additional spring (with washer) at one spring 
assembly. In case the conveying speed still  

decreases, although an additional fastening screw is loosened, 

install one additional spring in each individual spring assembly (one after the other).  
 

5.2 

The conveying speed increases? 

 
Remove the springs. First remove one spring (with washer) from a spring assembly. In case the conveying speed 
still increases, although an additional fastening screw is loosened, remove one spring from each individual spring 
assembly (one after the other). 


Notice


The side plates must always be mounted for test runs 


Notice


At a turning knob position of 100 % at the control unit and correctly adjusted magnetic gap the magnet 
may not dash against the armature when switching on the device. 

The aim of the adjustment is: 

 
If  the  required  conveying  speed  is  achieved  at  a  controller  position  of  80  %,  the  conveying  speed  must  always 
decrease when the spring fastening screw is loosened.  


Notice


Take care that the number of springs per spring assembly does not differ by more than 2-3 springs. 

 
After removing and mounting of the leaf springs the linear feeder must be readjusted. 
 

Adjustment of the linear feeder type GL 01: 

 
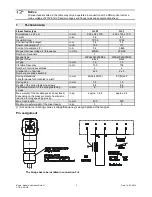
Tighten the spring fastening screws with the specified tightening torque (see "technical data" chapter 1). Control and 
keep to the mounting dimension (oscillator height) of 85 mm at all four edges of the linear feeder. Before starting 
the side plates must be mounted.  

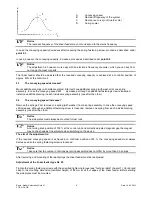
Conveying speed 

Resonant frequency of the system 

Resonance curve (not true to scale) 

Spring power


Содержание GL 01

Страница 1: ...Rhein Nadel Automation GmbH 1 Date 14 04 2014 VT BA GL GB Operating instructions Linear feeder GL 1 GL 01 BA Rhein Nadel Automation GmbH...

Страница 2: ...intenance Page 8 8 Stockkeeping of spare parts and after sales service Page 8 9 What to do if Page 8 Instructions for trouble shooting Declaration of conformity as defined by Low voltage directive 201...

Страница 3: ...pe WZAW040X00D05 WZAW060X00D25 Magnet colour black black Air gap in mm 1 5 1 0 Vibration frequency in Hz 100 100 Number of spring assemblies 2 2 Standard no of springs Number per spring assembly 2 x 4...

Страница 4: ...ed mass produced parts as well as for the proportioned feeding of bulk material The intended use also includes the observance of the operating and servicing instructions Please take the technical data...

Страница 5: ...actuation takes place by electromagnets The following schematic diagram shows the function of a linear feeder The linear feeder is a device of the familiy of vibratory bowl feeders It is however equi...

Страница 6: ...ce where it is used The substructure must be dimensioned in a way that no vibrations of the linear feeder can be carried away Linear feeder are fastened to the vibration buffers from below part G in t...

Страница 7: ...th low speed In exceptional cases it may become necessary to compensate the fluttering of the track at the ends by modifying the counter weight In case the workpieces make little jumps at the discharg...

Страница 8: ...ne spring with washer from a spring assembly In case the conveying speed still increases although an additional fastening screw is loosened remove one spring from each individual spring assembly one a...

Страница 9: ...the material to be conveyed does not run one piece on top of the other or becomes wedged together The track should be located in the middle of the oscillator By no means it may be installed in a way t...

Страница 10: ...and technical data chap 1 After a longer operating time the linear feeder does no longer come up to the conveying capacity required Fastening screws of the linear track have worked loose Screws at one...

Страница 11: ...werk ergolding rna de PSA Zuf hrtechnik GmbH Dr Jakob Berlinger Weg 1 D 74523 Schw bisch Hall Tel 49 0 791 9460098 0 Fax 49 0 791 9460098 29 Email info psa zt de HSH Handling Systems AG Wangenstr 96 C...

Отзывы:

Похожие инструкции для GL 01