


Riviera Srl Genova
Manuale istruzioni
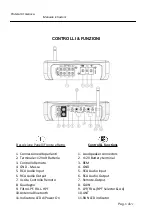
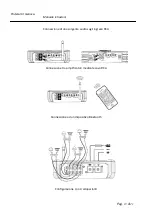
11. RUN Indicator:
This LED will light up when amplifier work properly. It will flash or shut
down once amplifier in self testing or malfunction.
12. Alarm indicator:
This LED will light up when amplifier detect a fault or shut down to
protect itself from permanent damage. This may caused by one of the
following: Excessive
heat, reverse polarity, short circuit or overload. If this
happens please shut off the
amplifier and check problem.
13. Bluetooth Working Indicator:
When the amplifier is switched to the Bluetooth digital
audio signal
input and working properly, The indicator will keep Slowly flashing. Short-
circuit, Overload, Overheat or under voltage protection, The indicator will
be off. Note:
When the amplifier is under protection status, please shut it
down and start
troubleshooting to avoid damage.
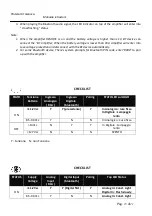
PRE INSTALLAZIONE DELL’ AMPLIFICATORE
Procurarsi il cavo di alimentazione nella lunghezza necessaria a connettere l’amplificatore alla
batteria, adatto a sopportare carichi continui sui 40 A. Ciò significa che il cavo deve essere di
sezione adeguata in funzione della corrente e della sua lunghezza, in modo da evitare cadute
eccessive di tensione durante il funzionamento ad elevati regimi che manderebbero in
protezione l’ amplificatore. Non si dimentichi di inserire nella linea di alimentazione un fusibile di
sicurezza. A titolo indicativo si consiglia un cavo da 4 – 8 AWG ( 8 – 21 mm² ) e un fusibile da 40
A.
Per la connessione audio cablata usate cavi RCA schermati onde evitare disturbi ed in ogni caso la
lunghezza più corta possibile.
Installare i cavi con la massima cura, evitando che la guaina possa sfregare su pareti metalliche
con precoce usura dell’isolante
Assicurarsi di collegare a massa l’amplificatore sfruttando l’intelaiatura o chassis
dell’imbarcazione
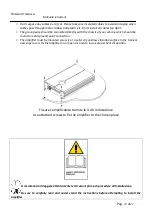
Fissare in maniera sicura e stabile l’amplificatore, al riparo da possibili fonti di umidità e
vibrazione e in spazi dove sia permessa un’appropriata dissipazione del calore emesso.
AMPLIFIER Pre-INSTALLATION
Please prepare sufficient space for the layout in car before installation. We recommend to have
the installation done by an Authorized Riviera Dealer.
Please use good insulated power cable to endure long-term above 40A electric current. The +12
Volt power cable must be connected with a fuse in line near 8lnch of terminal. Required
current, power cable and proper external fuse listed as following: 4 – 8 AWG ( 8 – 21 mm² ) and
40 A fuse.
Please use car audio RCA cables, otherwise it may be disturbed. Keep these cables as short as
possible. To avoid disturbances from your car electronics, please don‘t close the existing car
cables when you install the RCA cables.
Pag.
9
di
21


