


Riviera Srl Genova
Manuale istruzioni
INSTALLAZIONE DELL’ AMPLIFICATORE
1. Scegliere un posto piano e ventilato dove installare l’amplificatore.
2. Utilizzare le viti in dotazione per fissare l’amplificatore.
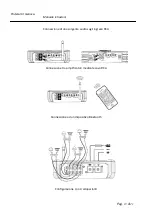
3. Connettere i cavi degli altoparlanti nei rispettivi morsetti e secondo la configurazione
desiderata.
4. Connettere il cavo di alimentazione nei rispettivi morsetti.
5. Connettere il Cavo al morsetto ‘REM’ dal positivo di alimentazione interponendo un interruttore .
Questo consentirà di porre l’amplificatore in stato di ‘ON’ o Stand-by.
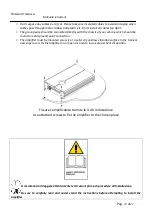
6. Una volta terminate le connessioni elettriche e ultimate le tarature, fissare sui due lati le
coperture di plastica in dotazione come da illustrazioni sotto.
7. Installare l’antenna avvitandola sul connettore in senso orario
AMPLIFIER INSTALLATION
1. Choose a flat and ventilated place to install amplifier.
2. Using attached screws to fix the amplifier to the chosen place.
3. Connect the loudspeaker’s cables in to the proper connectors based on the wished configuration.
4. Connect the Power cable in to the proper connector.
5. Connect the REM cable to the ‘+’ of battery via a proper main switch, to put the amplifier in ON
or Stand-by condition.
6. Each plastic end cap has 5 buckles that match 5 buckle holes on the amplifier. Hold two ends of
the plastic end cap and push it towards the amps horizontally.
7. Stick the 2 plastic caps to the ends of amplifier in parallel and then press the plastic caps
downward forcefully
8. Antenna installation : Clockwise screw to tighten the antenna
Fissaggio delle coperture in plastica : fase 1
Fixing plastic caps : step 1
Pag.
11
di
21