LearninG about Your
1.5 cuP mini choPPer
beFore First use
1.
Remove all packaging materials before using.
2.
Wash lid, blade and bowl in warm soapy water; rinse and dry
thoroughly, see CARE AND CLEANING.
assembling the unit
On a flat surface place the bowl, without lid and chopping blade,
on the base and turn clockwise to lock into position.
note:
Rotate the bowl until it snaps into place.
1.
Slide the chopping blade down over the drive shaft, rotating if
necessary to drop into place.
2.
Place the lid on the bowl, and then turn clockwise into lid locking
slot. Continue turning the lid into the lid locking slot as far as it will
go so that the dot on the lid lines up with the dot on the base.
note:
For your protection, this unit has a safety lock lid. The unit
will not operate unless the lid and base dots align. Do not attempt
to operate the unit without locking the lid in place.
chopping
1.
Cut food into approximately 1.5 cm (1/2 inch) pieces and place
up to 1.5 cups of dry food in the bowl at a time.
2.
Place the lid on the bowl and turn to lock into place.
3.
Plug the cord into an outlet. Press and hold the Pulse Button
for 5–10 seconds and then release; the motor will stop. Repeat
for a finer consistency.
note:
For more chopping accuracy, press the pulse button for
2-3 seconds and then release.
4.
When finished chopping, allow chopping blade to stop rotating
before removing contents.
5.
Remove the lid and grasp the stem of the chopping blade.
Carefully remove it from the bowl. Remove the bowl from the
base and empty the processed food.
note:
Do not use bowl for storing food.
-4-
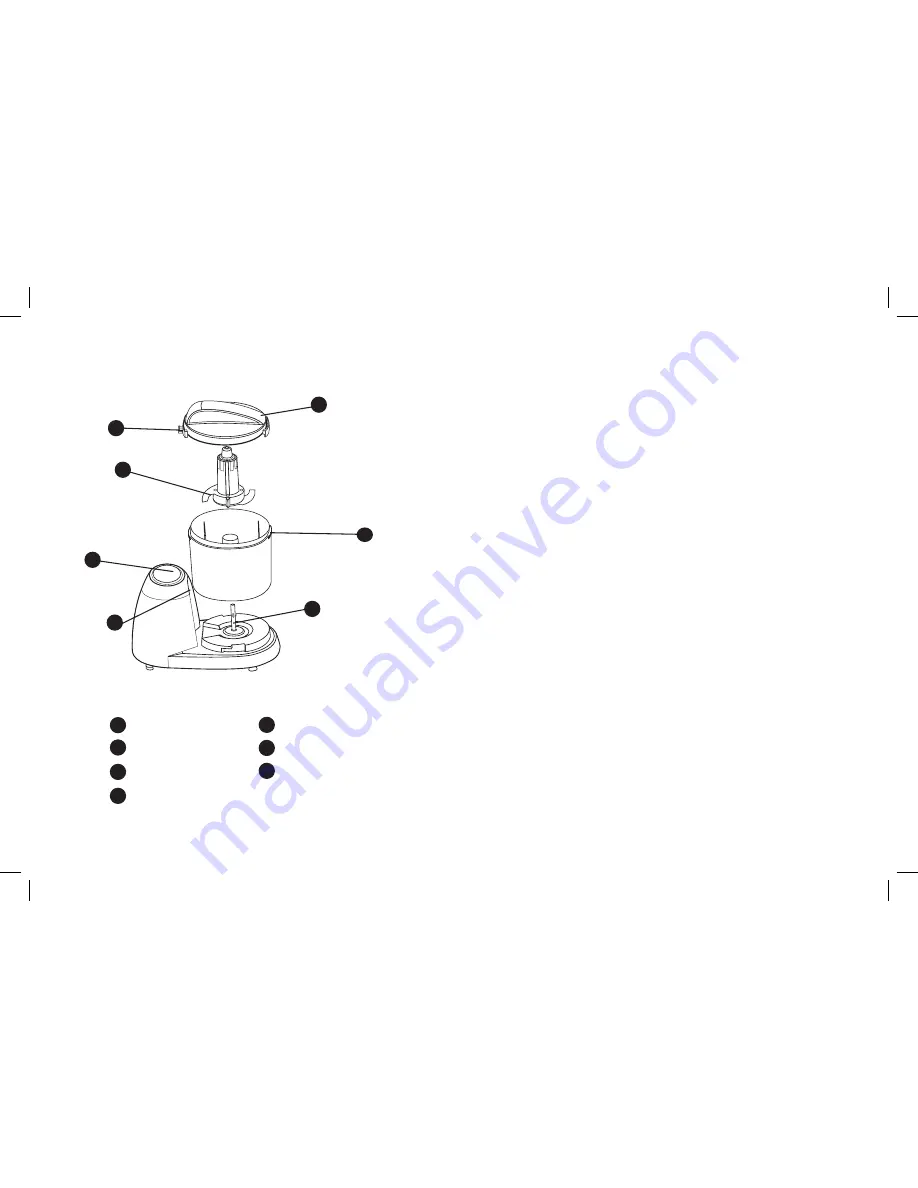
a
b
e
f
g
c
d
Lid
Lid Locking Tabs
Chopping Blade
Bowl
Pulse Button
Locking Slot
Drive Shaft
b
a
d
g
f
e
c
-5-


