background image

19

TS 8-SV Montageanleitung/TS 8-SV assembly instructions/Notice de montage TS 8-SV

2.1

3.2

1.1

1.2

1.3

3.1

1.4

M

D

 = 5 Nm

2x (5,5 x 13)

2.2

M

D

 = 5 Nm

2x (5,5 x 13)

TX25

mm

1

1

2

2

3

3

Hinweis/Note/Remarque 

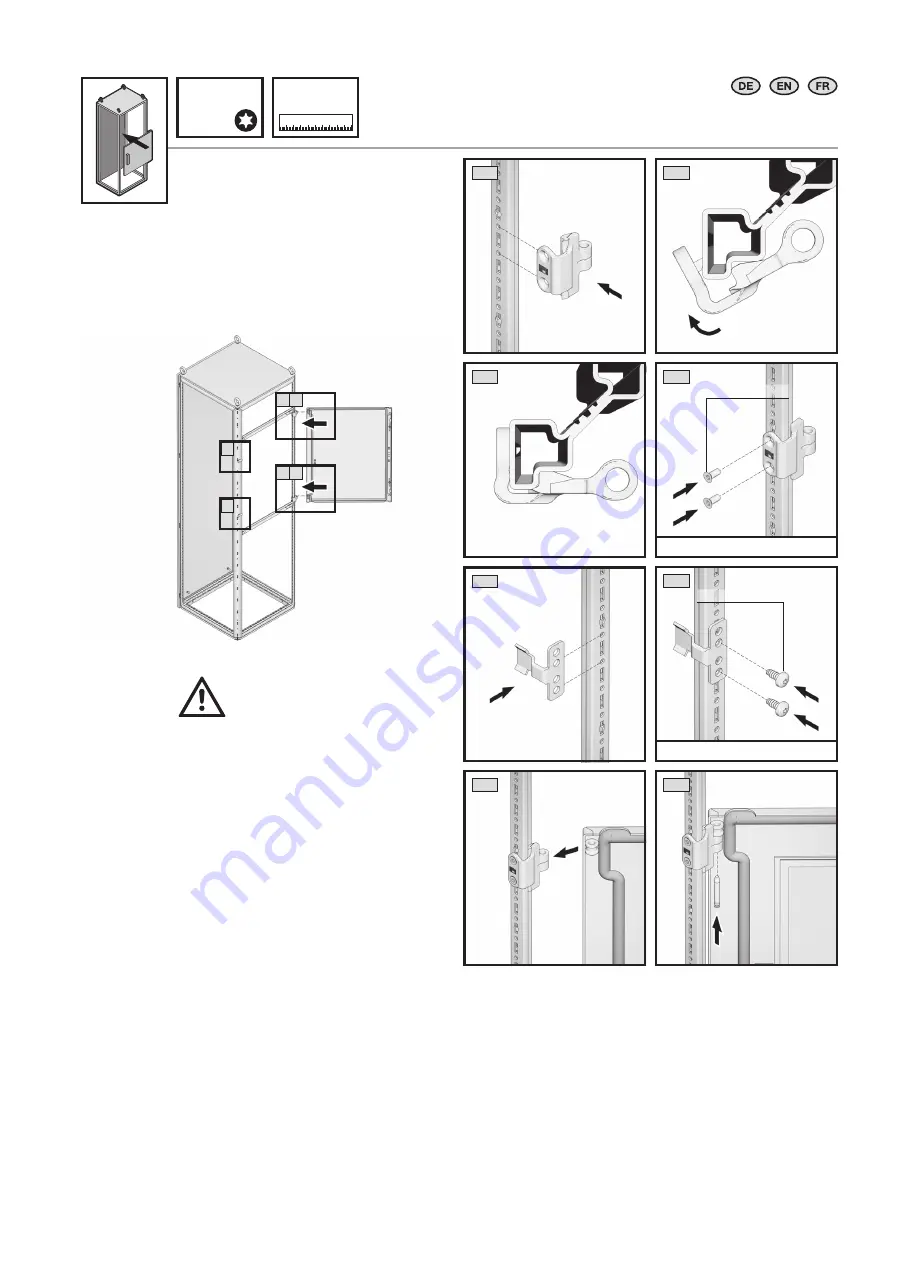
Positionsmaße, siehe Seite 20/21 

Position details, see page 20/21 

Cotes de position, voir page 20/21

4.8 Teiltüren montieren

4.8 Fitting the partial doors

4.8 Montage des portes partielles

4. Montage und Aufstellung

4. Assembly and siting

4. Montage et implantation

Содержание SV 9666.915

Страница 1: ...ons Notice de montage et d emploi SV 9666 915 SV 9666 925 SV 9666 955 SV 9666 965 SV 9670 005 SV 9670 006 SV 9670 025 SV 9670 106 SV 9670 107 SV 9670 108 SV 9670 127 SV 9670 206 SV 9670 208 SV 9670 226 SV 9670 406 SV 9670 408 SV 9670 426 SV 9670 428 SV 9670 606 SV 9670 608 SV 9670 626 SV 9670 628 SV 9670 806 SV 9670 808 SV 9670 826 SV 9670 828 ...

Страница 2: ...t 24 4 14 Fitting the perforated mounting strip 25 4 15 Earthing partial door 25 4 16 Removing the rear panel 26 4 17 Removing the roof plate 27 4 18 Fitting the gland plates 28 4 19 Fitting the 180 hinges 29 4 20 Installing mounting angle systems 30 4 21 Fitting the side panels 31 4 22 Baying 32 34 4 23 Earthing and potential equalisation 35 4 24 Earthing connection points TS 8 SV enclosures 36 3...

Страница 3: ... SV Montageanleitung TS 8 SV assembly instructions Notice de montage TS 8 SV Inhaltsverzeichnis Contents Sommaire 4 12 41 47 13 14 15 16 17 18 19 21 22 23 25 25 26 27 28 F 35 38 39 40 40 180 24 29 30 31 32 34 ...

Страница 4: ...or who is then responsible for the storage of the documents so that they are readily available when needed 1 3 Symbols used Please observe the following safety instructions and other notes in this guide Danger Immediate danger to life and limb Caution Potential threat to the product and its environment Note Useful information and special features 1 4 Other applicable documents These assembly instr...

Страница 5: ...t att stå på maskinens ytor Ska installeras av behörig elektriker Ska installeras av behörig montör Vid utvecklingen av ihopbyggnadsskåp TS 8 SV har säkerhetskritiska punkter utvärderats och undvikits redan på konstruktionsstadiet genom en riskbe dömning enligt DIN EN ISO 12100 Eftersom vissa kvarvarande risker inte kan undvikas helt ska följande information observeras Lådan måste säkras vid trans...

Страница 6: ...ува потенциална опасност за здравето и живота Предупреждение об опасности при закрывании механических частей машины установки Предупреждение об опасности движущихся механических частей Прочитать руководство Становиться на поверхность запрещается Установка силами специалистов по электрике Установка силами специалистов по механике При разработке линейного шкафа TS 8 SV в ходе оценки рисков согл DIN ...

Страница 7: ...nje na površino je prepove dano Namestitev lahko izvajajo samo usposo bljeni strokovnjaki za elektrotehnična dela Namestitev lahko izvajajo samo usposo bljeni strokovnjaki za mehanična dela Pri razvijanju vrstne omare TS 8 SV so bili že v fazi izdelave ovrednoteni in odpravljeni varnostno kritični vidiki ocene tveganja v skladu s standardom DIN EN ISO 12100 Nekaterih ostalih tveganj ni mogoče izkl...

Страница 8: ...atos de medida control y regulación Para aplicaciones especiales y ubicaciones de exterior debe solicitarse la conformidad de Rittal Deben mantenerse los límites de carga indicados en el manual de instrucciones 3 1 Määräystenmukainen käyttö Nämä Rittal tuotteet ovat tyhjiä koteloita pienjännite kytkentälaiteyhdistelmille joiden mittausjännite on enintään 1 000 V AC tai 1 500 V DC ja joiden sisällä...

Страница 9: ...stovu Laikytis nurodytų apkrovos ribų kurios apibrėžtos naudojimo instrukcijoje 3 1 Sihtotstarve Nende Rittali toodete puhul on tegemist tühjade korpustega mis on mõeldud maanduspinge lülitusseadme kombinatsioonidele mille nimipinge on maksimaalselt 1000 V AC või 1500 V DC ning mille mõõte juhtimis ja reguleerimistehnika on siseruumis Eriliste nõudmiste puhul ja vabas õhus paigaldamiseks tuleb kah...

Страница 10: ...nels and roof plate with degree of protection to IP 54 in accordance with EN 60 529 is achieved 7 7 1 SV bayed enclosure 7 7 1 rear panel 7 7 Multi divided gland plates 7 7 1 accessories bag content see 3 3 7 7 4 transport eyebolts Installation floor mounted distribution enclosure In combination with side panels degree of protection to IP 55 in accordance with EN 60 529 is achieved 7 7 1 SV bayed ...

Страница 11: ... 5 5 3 M8 4 5 1 1 1 5 5 2 M8 1 1 1 1 M8 1 1 1 1 1 1 1 1 y8 2 M8 A8 4 A8 Erdungsaufkleber M6x12 y6 1 M6 M8x30 M8 x 20 5 9 5 5 5 9 9 1 M8 x 30 1 1 1 1 y8 2 M8 A8 4 A8 Erdungsaufkleber M6x12 y6 1 A6 4 Schrankschlüssel Stopfen Rückwand M6 M8x30 9 14 9 9 9 14 14 3 A8 Erdungsaufkleber M6x12 y6 1 A6 4 Schrankschlüssel Hygieneschlüssel Stopfen Rückwand Stopfen Dach und Boden M6 M6 mit Unterlegscheibe A8 E...

Страница 12: ...re permitted at lower temperatures If particular operating conditions apply special agreements must be made between Rittal and the user Assembly instructions 7 7 Observe the load capacities specified on page 44 7 7 When installing the enclosures the mounting surfaces must be sufficiently flat 7 7 Observe all specified torque values Over or undershooting the tensioning torques speci fied in these i...

Страница 13: ...ontage TS 8 SV 4 2 Tür demontieren 4 2 Removing the door 4 2 Démontage de la porte 4 Montage und Aufstellung 4 Assembly and siting 4 Montage et implantation 1 2 1 2 2 3 1 5 1 5 2 TX30 1 1 1 1 3 2 2 4 2 4 2 4 3 3 3 3 2 4 4 1 5 5 5 5 3 3 MD 6 Nm M6 x 12 4 2 M6 x 12 MD 6 Nm ...

Страница 14: ...uctions Notice de montage TS 8 SV 4 3 Türanschlagwechsel 4 3 Switching the door hinges 4 3 Inversion du sens d ouverture 4 Montage und Aufstellung 4 Assembly and siting 4 Montage et implantation 6 1 6 7 6 2 6 3 6 4 TX25 6 5 MD 2 Nm 6 6 6 A B C D M5 x 8 ...

Страница 15: ...Notice de montage TS 8 SV 4 4 Türrohrrahmen demontieren 4 4 Removing the tubular door frame 4 4 Démontage du cadre de porte tubulaire 4 Montage und Aufstellung 4 Assembly and siting 4 Montage et implantation 1 1 1 2 SW13 2 1 2 2 MD 5 Nm 1 2 1 2 1 2 1 2 1 2 1 2 ...

Страница 16: ...traverse de séparation H1 mm 150 150 200 200 300 300 400 400 600 600 800 800 1000 1000 1600 1600 1800 1800 2000 2000 A H1 H A 1 1 2 MD 5 Nm 1x M5 x 10 1 3 MD 5 Nm 1x M5 x 10 TX25 mm 1 1 MD 5 Nm 2x 5 5 x 13 IP 54 1 1 MD 5 Nm 2x 5 5 x 13 IP 2X IP 4X 1 4 A 4 5 Trennstege montieren 4 5 Fitting the cross members 4 5 Montage des traverses de séparation 4 Montage und Aufstellung 4 Assembly and siting 4 M...

Страница 17: ...n IP 2X Für Schrankbreite mm For enclosure width mm Pour largeur d armoire mm Höhe mm Height mm Hauteur mm Best Nr Model No Référence 2 400 300 9672 354 2 600 300 9672 356 2 800 300 9672 358 1 2 MD 5 Nm 2x 5 5 x 13 1 3 MD 5 Nm 2x M5 x 10 1 4 MD 5 Nm 2x M6 x 15 2 2 MD 5 Nm 2x 5 5 x 13 2 1 MD 5 Nm 8x 5 5 x 13 4x M6 2 4 MD 5 Nm 4x M6 x 15 1 1 MD 5 Nm 2x M6 4x 5 5 x 13 2 3 MD 5 Nm 2x M5 x 10 mm Frontb...

Страница 18: ...00 300 9672 326 1 800 100 9672 318 2 800 300 9672 328 2 3 MD 5 Nm 2x 5 5 x 13 2 4 MD 5 Nm 2x M5 x 10 2 5 MD 5 Nm 4x M6 x 15 1 2 MD 5 Nm 2x 5 5 x 13 1 4 MD 5 Nm 2x M6 x 15 1 1 MD 5 Nm 2x M6 4x 5 5 x 13 2 1 MD 5 Nm 2x M6 4x 5 5 x 13 1 3 MD 5 Nm 2x M5 x 10 2 2 MD 5 Nm 4x 5 5 x 13 2x M6 mm Frontblenden oben Front trim panels top Bandeaux de finition supérieurs 4 7 Frontblenden montieren oben 4 7 Fitti...

Страница 19: ... 13 2 2 MD 5 Nm 2x 5 5 x 13 TX25 mm 1 1 2 2 3 3 Hinweis Note Remarque Positionsmaße siehe Seite 20 21 Position details see page 20 21 Cotes de position voir page 20 21 4 8 Teiltüren montieren 4 8 Fitting the partial doors 4 8 Montage des portes partielles 4 Montage und Aufstellung 4 Assembly and siting 4 Montage et implantation ...

Страница 20: ...0 50 1 100 300 9672 143 9672 163 9672 183 2 50 50 1 150 400 9672 144 9672 164 9672 184 2 50 50 1 200 600 9672 146 9672 166 9672 186 2 50 50 2 150 550 600 x 9672 167 9672 187 3 50 275 50 2 150 550 800 9672 148 9672 168 9672 188 2 50 50 2 150 750 800 x 9672 169 3 50 375 50 2 150 750 1000 9672 140 9672 160 9672 180 4 50 350 675 50 2 150 950 1600 9672 156 9672 176 9672 196 4 50 550 1075 50 4 150 625 1...

Страница 21: ...0 50 1 75 300 9672 143 9672 163 9672 183 2 50 50 1 125 400 9672 144 9672 164 9672 184 2 50 50 1 175 600 9672 146 9672 166 9672 186 2 50 50 2 125 525 600 x 9672 167 9672 187 3 50 325 50 2 125 525 800 9672 148 9672 168 9672 188 2 50 50 2 125 725 800 x 9672 169 3 50 425 50 2 125 725 1000 9672 140 9672 160 9672 180 4 50 350 675 50 2 125 925 1600 9672 156 9672 176 9672 196 4 50 550 1075 50 4 125 600 10...

Страница 22: ...TS 8 SV TX25 1 1 1 3 2 1 3 1 4 1 1 2 1 4 4 2 1 1 1 1 4 4 2 2 3 3 3 2 MD 5 Nm 2x 5 5 x 13 2 2 MD 5 Nm 2x 5 5 x 13 4 11 Türanschlag wechseln 4 11 Switching the door hinges 4 11 Inversion du sens d ouverture 4 Montage und Aufstellung 4 Assembly and siting 4 Montage et implantation ...

Страница 23: ... TX25 5 3 5 6 5 7 5 2 5 4 5 1 1 2 3 5 5 MD 2 Nm 2x M5 x 8 4 12 Türanschlag wechseln Schlossschild 4 12 Switching the door hinges Lock cover 4 12 Inversion du sens d ouverture Dispositif de recouvrement de serrure 4 Montage und Aufstellung 4 Assembly and siting 4 Montage et implantation ...

Страница 24: ...8611 220 7 mm 8611 120 8 mm 8611 130 7 mm 8611 140 Daimler 8611 150 3 mm 8611 160 Fiat 8611 170 CNOMO 8611 220 A TX25 1 2 A 1 3 B 1 1 1 2 3 1 4 MD 2 Nm M5 x 8 M5 x 8 4 13 Verschluss Einsatz wechseln 4 13 Changing the lock insert 4 13 Remplacement du dispositif de verrouillage 4 Montage und Aufstellung 4 Assembly and siting 4 Montage et implantation ...

Страница 25: ...298 9671 204 600 150 800 498 9671 206 800 150 800 698 9671 208 TX25 1 1 2 MD 6 Nm 3x Fächerscheibe 3x M6 SW13 MD 10 Nm 1x M8 1 1 1 B 600 mm 3x Serrated washer 3x Rondelle à éventail 4 14 Montagelochleiste montieren 4 14 Fitting the perforated mounting strip 4 14 Montage des bandeaux de verrouillage 4 Montage und Aufstellung 4 Assembly and siting 4 Montage et implantation 4 15 Erdung 4 15 Earthing ...

Страница 26: ... 4 16 Rückwand demontieren 4 16 Removing the rear panel 4 16 Démontage du panneau arrière 4 Montage und Aufstellung 4 Assembly and siting 4 Montage et implantation 1 2 1 1 2 2 2 1 1 3 TX30 2 3 MD 5 Nm M6 x 12 200 400 600 800 850 8 x 1000 1100 1200 10 x 1 2 1 2 1 2 1 2 1 2 1 2 1 2 1 2 ...

Страница 27: ...of plate 4 17 Démontage du toit 1 21 1 1 2 1 1 3 TX25 2 21 MD 5 Nm Alu Zink MD 3 Nm 5 5 x 13 2 3 MD 10 35 Nm 1 Zusätzlich bei Breite 850 1000 1100 1200 Additionally for width 850 1000 1100 1200 En complément pour une largeur 850 1000 1100 1200 1 2 1 2 1 2 1 2 4 Montage und Aufstellung 4 Assembly and siting 4 Montage et implantation ...

Страница 28: ...an thus be matched to the mount ing plate The symmetrical enclosure design permits the cable entry plates to be installed on either the right or left in the same way as the gland plates variation in the enclosure depth is similarly pos sible with appropriate sizes Trois exemples représentatifs Les schémas ci dessous montrent 3 exemples possibles de pla cement des plaques d entrée de câbles qui peu...

Страница 29: ... siting 4 Montage et implantation 1 1 1 1 180 1 1 1 2 1 3 1 5 1 7 1 9 1 8 ø 8 5 Farbe Colour Couleur 1 x 8800 7101 2 x 8800 7101 RAL 7035 1 x 8800 190 2 x 8800 190 RAL 7035 1 x 8800 950 2 x 8800 950 RAL 9005 1 x 8701 180 2 x 8701 180 Matt vernickelt Matt nickel plated Nickelé mat 1 Bei dynamischer Belastung 1 In case of dynamic load 1 En cas de charge dynamique 1 4 M6 x 12 MD 6 Nm 1 6 MD 5 Nm M5 x...

Страница 30: ...térieur Äußere Ebene Outer level Niveau extérieur Rahmen Profil Frame section Profilé de l ossature W D 1 2 400 8612 040 8612 140 500 8612 050 8612 150 600 8612 060 8612 160 800 8612 080 8612 180 1000 8612 000 8612 100 1200 8612 020 8612 120 3 4 400 4309 000 4694 000 500 4596 000 4695 000 600 8800 130 4696 000 800 4579 000 4697 000 5 500 8612 550 600 8612 560 800 8612 580 1000 8612 500 1200 8612 5...

Страница 31: ...1 3 TX25 30 4 5 1 5 3 MD 5 Nm M6 x 9 5 2 1 3 3 1 2 4 2 5 2 5 3 3 M6 x 12 MD 5 Nm 2 Alternative 1 3 M6 x 9 M5 x 8 MD 6 Nm MD 5 Nm SW8 4 21 Seitenwände montieren 4 21 Fitting the side panels 4 21 Montage des panneaux latéraux 4 Montage und Aufstellung 4 Assembly and siting 4 Montage et implantation ...

Страница 32: ...assembly instructions Notice de montage TS 8 SV 4 22 Anreihung 4 22 Baying 4 22 Juxtaposition 4 Montage und Aufstellung 4 Assembly and siting 4 Montage et implantation 2 blau blue bleu 1 TX30 1 8 x 6 unten bottom en bas IP 2 8 x 6 x 6000 ...

Страница 33: ...che rapide de juxtaposition en trois parties 6 8800 590 C Anreihzwinge horizontal Baying clamp horizontal Crampon de juxtaposition horizontal 4 8800 400 D Anreihzwinge vertikal für TS TS Baying clamp vertical for TS TS Crampon de juxtaposition vertical pour TS TS 6 8800 410 E Anreihzwinge vertikal für TS PS Baying clamp vertical for TS PS Crampon de juxtaposition vertical pour TS PS 6 8800 420 F A...

Страница 34: ... TS TS Équerre de juxtaposition pour TS TS 4 8800 430 I Anreihlasche für TS TS und TS PS Baying bracket for TS TS and TS PS Patte de juxtaposition pour TS TS et TS PS 4 4582 500 J Kombiwinkel Combination angle Équerre combinée 4 4540 000 K Anreihbefestigung vertikal für TS TS Baying attachment vertical for TS TS Fixation de juxtaposition verticale pour TS TS 6 8800 670 L Anreihverbinder für Montag...

Страница 35: ...leber M6x12 y6 1 A6 4 Schrankschlüssel Stopfen Rückwand M6 M8x30 y8 2 M8 A8 4 A8 Erdungsaufkleber M8x30 y8 2 M8 A8 4 A8 Erdungsaufkleber M6x12 M8x30 4 MD 10 12 Nm 2 MD 8 10 Nm M8 M8 x 20 M8 3 MD 8 10 Nm M8 MD 10 12 Nm M8 x 20 5 MD 8 10 Nm 6 M8 x 20 M8 A Ø mm L mm Best Nr Model No Référence A 4 170 SZ 2564 000 16 170 SZ 2565 000 25 170 SZ 2566 000 4 300 SZ 2567 000 10 300 SZ 2565 120 16 300 SZ 2568...

Страница 36: ...00 320 330 340 360 380 Bei Anreihung von TS 8 Schränken Anreihlasche 9661 350 355 Setzmutter M10 PE PEN combination angle 9661 230 9661 235 Hex screw M8 Spring washer A8 4 Captive nut M8 Spring washer A10 5 Hex screw M10 PE PEN busbar 30 x 5 9661 305 325 335 345 365 385 30 x 10 9661 300 320 330 340 360 380 For baying of TS 8 enclosures Baying bracket 9661 350 355 Press nut M10 1 8 4 5 6 1 2 3 1 7 ...

Страница 37: ...2 Sechskantmutter M10 M12 Spann Scheibe A10 5 A13 Bei Anreihung von TS 8 Schränken Anreihlasche 9640 190 9650 190 PE PEN combination angle 9661 200 Hex screw M8 Spring washer A8 4 Captive nut M8 PE PEN busbar 9640 XXX 9650 XXX Sliding block M10 M12 Hex nut M10 M12 Spring washer A10 5 A13 For baying of TS 8 enclosures Baying bracket 9640 190 9650 190 4 1 2 3 4 Montage und Aufstellung 4 Assembly and...

Страница 38: ...0 PE PEN combination angle 9661 240 Hex screw M8 Spring washer A8 4 Captive nut M8 PE PEN busbar 9661 000 020 030 040 9661 060 080 100 120 9661 130 140 160 180 Hex nut M12 Spring washer A13 For baying of TS 8 enclosures Baying bracket 9661 050 150 1 M12 40 Nm M12 40 Nm 1 5 6 7 6 7 1 M12 40 Nm 1 5 5 8 6 7 1 M8x25 10 Nm M12x55 10 Nm 1 2 3 4 4 Montage und Aufstellung 4 Assembly and siting 4 Montage e...

Страница 39: ...stung durch Transport und am Aufstellungsort 4 26 Securing of mounting plate in case of dynamic load by transport and on installation site 4 26 Fixation de la plaque de montage en cas de charge dynamique durant le transport et sur le site d installation 4 Montage und Aufstellung 4 Assembly and siting 4 Montage et implantation 4 Montage und Aufstellung 4 Assembly and siting 4 Montage et implantatio...

Страница 40: ...nd configuration If a plinth system is deployed during transport also ensure when raising and lowering that the load is always applied at the plinth corner pieces and never at the plinth trim panels Lors du transport du montage et de l équipement les coffrets doivent être sécurisés pour ne pas basculer Lors du transport et du levage des armoires avec socle il faut veiller à ce que la charge repose...

Страница 41: ...ité automatique du panneau arrière du toit en tôle du panneau latéral en accessoires et de la porte par rapport au châssis et des plaques passe câbles par rapport au châssis est prévue par la concep tion de l armoire Ces pieces plates sont de plus équipées de plots de mise à la masse ou de réservations pour les vis de mise à la terre pour réaliser une liaison à la masse au niveau de l installation...

Страница 42: ...l sufficient as a rule 7 7 Common agents such as talcum vaseline or wax can be used to prevent damage due to gaskets freezing because of low tempera tures All components and surfaces are examined for external damage 7 7 Steel enclosures are also inspected for traces of corrosion Any damage is repaired as follows Damage to small areas that affect only a part of the surface e g scratches Lightly san...

Страница 43: ...e zugelassen werden When storing the enclosure ensure that 7 7 the ambient temperature is not higher than 80 C 7 7 the ambient temperature is not lower than 20 C 7 7 the relative humidty does not exceed 50 at 40 C higher humidity levels are permitted at lower temperatures Pour le stockage de l armoire électrique il faut veiller à ce que 7 7 la température ambiante ne soit pas supéri eure à 80 C 7 ...

Страница 44: ...nschalter mit Sicherung Doppel unterbrechung 2 Max Belastung inkl Schrankgewicht 3 Montageplatte in hinterster Stellung 6000 N a IP nach DIN EN 60529 nur in Verbindung mit montierten Seitenwänden b IK 9 nach DIN EN 60529 und IK 10 nach DIN EN 61439 1 IP protection category depends on the manufacturer of the fuse switch disconnector 2 Max load including enclosure weight 3 Mounting plate in rearmost...

Страница 45: ...2 187 800 250 10 9672 188 800 800 50 9672 190 800 2000 50 9672 196 800 1600 50 9672 198 800 1800 50 W H 11 Technische Daten Schutzgrade 11 Technical specifications Degrees of protection 11 Caractéristiques techniques Indices de protection W mm H mm F N 9673 640 400 1000 800 9673 641 400 150 150 9673 642 400 200 150 9673 643 400 300 250 9673 644 400 400 300 9673 646 400 600 500 9673 648 400 800 600...

Страница 46: ... 2200 600 9670 106 749 605 653 557 605 1200 2000 600 9670 107 854 694 758 630 694 1200 2000 800 9670 108 854 694 758 630 694 1200 2000 800 9670 127 926 750 821 680 750 1200 2200 800 9670 206 335 265 318 212 265 200 2000 600 9670 208 421 333 403 262 333 200 2000 800 9670 226 367 290 348 231 290 200 2200 600 9670 406 433 345 398 292 345 400 2000 600 9670 408 524 419 489 348 419 400 2000 800 9670 426...

Страница 47: ...GmbH Co KG Auf dem Stuezelberg 35745 Herborn Germany Phone 49 0 2772 505 1855 Fax 49 0 2772 505 1850 E mail service rittal de Service HUB USA Service HUB USA Plateforme de service aux États Unis RITTAL Corporation 801 State Route 55 Dock 25 Urbana OH 43078 Phone 1 800 477 4000 option 3 E mail service rittal us www rittal corp com Service HUB Indien Service HUB India Plateforme de service en Inde R...

Страница 48: ... Power Distribution Climate Control IT Infrastructure Software Services www rittal com contact You can find the contact details of all Rittal companies throughout the world here 03 2017 337353 D 0000 00000881REV00 ...

Отзывы: