10
Turn on the transmitter and connect the battery to the Vusion. Perform a sensor
calibration as described in Maintenance Section to verify that the control board
is receiving signals from the receiver. The quadcopter will not enter the calibration
mode if the receiver is wired incorrectly.
Arm the motors by holding the yaw control to the right. Advance the throttle and
check for a motor not running. Bring the throttle back down to its lowest setting.
The motors should stop after 5 seconds.
MAINTENANCE
PROPELLER INSTALLATION
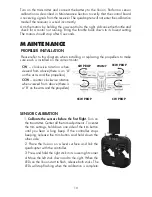
Please refer to this diagram when installing or replacing the propellers to make
sure each is installed on the correct motor.
CW
– clockwise rotation when
viewed from above (there is an “A”
on the arms and the propellers).
CCW
– counter clockwise rotation
when viewed from above (there is
a “B” on the arms and the propellers)
SENSOR CALIBRATION
1.
Calibrate the sensors before the first flight.
Turn on
the transmitter. Center all the trim adjustments. To center
the trim settings, hold down one side of the trim button
until you hear a long beep. If the controller stops
beeping, release the trim button and hold down the
other side.
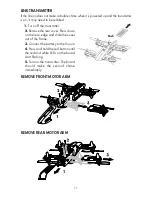
2. Place the Vusion on a level surface and link the
quadcopter with the controller.
3. Press and hold the right stick in its lower right corner.
4. Move the left stick down and to the right. When the
LEDs on the Vusion start to flash, release both sticks. The
LEDs will stop flashing when the calibration is complete.
CW PROP
CW PROP
FRONT
CCW PROP
CCW PROP
Содержание FPV RACER
Страница 13: ...13 ...


