background image

Page 15

VIS500 User Guide

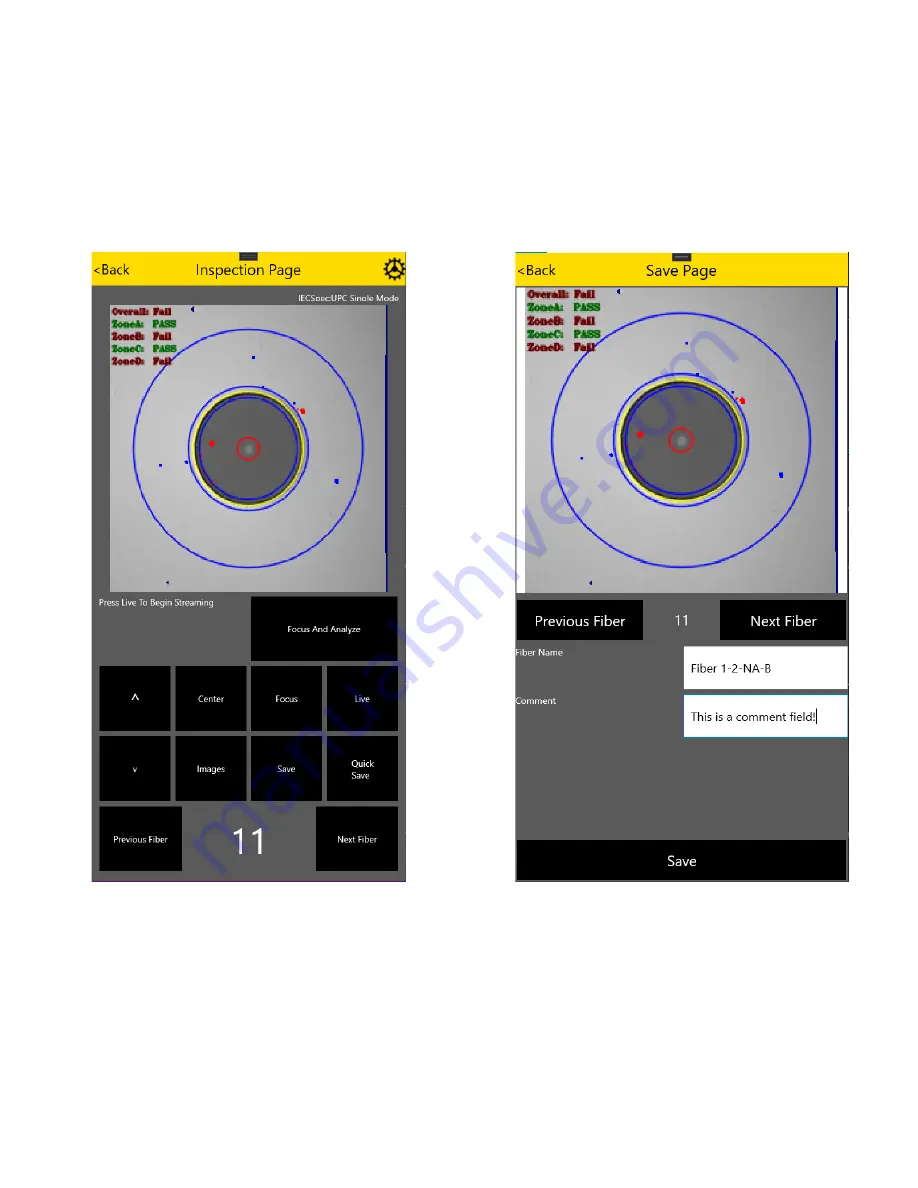
Analyzing and saving a fiber with the InSpec Software

Once connected to the VIS500 and streaming you can see your selected IEC-Spec in the top right. 

To select a new one click the Settings cog in the top right then change “IEC_Spec” to your preffered 

spec. Next to Focus you can either use the manual focus bottons on the left or the Focus button on 

the right. Finally pressing analyze will analyze the current image and display the results. This can all 

be done in one click by pressing the MFB button on the unit, or by pressing the Focus and Analyze 

button in the software. Once you have a fiber you wish to save pressing QuickSave will immediately 

save it with either an index name or a color code name if selected. Pressing Save however will let you 

name the fiber and add a comment before saving.

Содержание MILLER VIS500

Страница 1: ...Page 1 VIS500 User Guide VIS500 Wireless Fiber Inspection Scope User Guide...

Страница 2: ...vice Overview 3 Endface Cleaning and Inspection Procedure 5 Connecting on IOS 7 Connecting on Android 8 Connecting on Windows PCs Tablets 9 Integration with Desktop InSpec 10 Integration with Mobile I...

Страница 3: ...with windows at a lower cost take a look that the VIS500 Introduction MFB Button When pressed this will initiate a focus and analyze routine by default however it can be changed in the software Chargi...

Страница 4: ...the results of an analysis When the unit first turns on it will slowly blink blue to indicate that it is waiting for a connection To connect to the device see the connection instructions for your give...

Страница 5: ...accounts for both the superficial and more stuborn debris that may be found on fiber endfaces Dry Cleaning Dry cleaning connector endfaces is accomplished using a one click or cletop cleaner the one...

Страница 6: ...the fiber endface with an inspection scope and performing the necessary cleaning actions If a connector endface is particularly dirty three dry cleanings must be performed followed by two wet dry clea...

Страница 7: ...o the settings app and press Wifi as shown in the screenshots below Next wait until a SSID Showing VIS500 followed by the 4 digit start to your serial number Once that appears click it and wait for th...

Страница 8: ...st go to the settings app and press Network and internet then Wifi as shown in the screenshots below Next wait until a SSID Showing VIS500 followed by the 4 digit start to your serial number Once that...

Страница 9: ...o to the bottom right of yoru screen and press the Wifi or networking button or Next wait until a ssid with VIS500 and the first four digits of your serial number is shown then click it and wait for w...

Страница 10: ...nd saving a fiber with the InSpec Software Once you connect the VIS500 the Scope tab will appear and you will see the screen below with a live image of the fiber endface At this point you should use t...

Страница 11: ...e Save button will open the popup below First you need to enter a name for the fiber next you need to assign a location for the fiber if you want to save to the next available index just leave Auto As...

Страница 12: ...dark and light boxes are editable The default settings are shown above Click Reset to Defaults to return to this arrangement of information Enter all info as needed and click Save to have the informat...

Страница 13: ...nerate Inspection Report Generating a Closeout Report First ensure you are on the Reports tab here on the left side you will see any Endface images you have saved along with their comments on the righ...

Страница 14: ...hat you have allowed location access and local network access both permissions are required to use a local network device such as the VIS500 Connection To connect the VIS500 to the windows inspec soft...

Страница 15: ...se the manual focus bottons on the left or the Focus button on the right Finally pressing analyze will analyze the current image and display the results This can all be done in one click by pressing t...

Страница 16: ...age Next go to the Reports page then press the settings cog in the top right All information in the boxes are editable The default settings are shown above Click Reset to Defaults to return to this ar...

Страница 17: ...inspection near and far with that indexes readings and Bi Directional will combine near and far readings into one row for bi directional OLTS testing Generating a Closeout Report Once you have set yo...

Страница 18: ...C APC Adapter AC107B LC 60 Adapter AC046B ST Adapter AC047B MTP APC Adapter AC050B MTP Adapter AC048B 1 25 MM universal adapter AC049B 2 5 mm Universal Adapter AC100B ODC Pin Adapter AC101B ODC Socket...

Страница 19: ...erence to radio communications However there is no guarantee that interference will not occur in a particular installation If this equipment does cause harmful interference to radio or television rece...

Отзывы: