background image

Note:

 the total amount of GPUs depends on the motherboard you choose.

Chapter 2

CR101BE

MID TOWER CASE

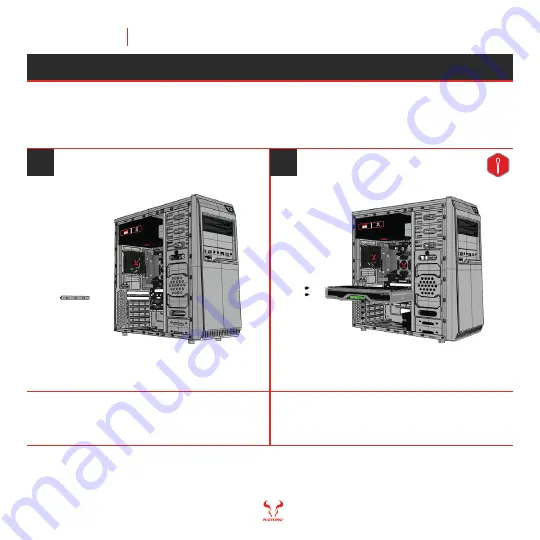
Attach each GPU to the motherboard, place 

and tighten the thumbs screws.

Remove the thumb screws for the PCIe 

expansion covers.

The CR101BE allows for the installation of up to thee (3) GPUs.

1

2

GPU INSTALLATION

19

Содержание CR101BE

Страница 1: ...MID TOWER PC CASE CR101BE...

Страница 2: ...s style and a vast interior with flexible storage and cooling options that make building a powerful PC building effortless Equipped with front and side mounts for 120 0 mm fans and 80 0 mm rear fan mo...

Страница 3: ...Supply Installation Fan Installation Front back side SSD HDD ODD Installation Water Cooling Installation 120 0 mm options Water Cooling Installation 240 0 mm options Air Cooling Installation GPU Insta...

Страница 4: ...Before You Begin 1 www riotoro com cases...

Страница 5: ...CR101BE MID TOWER CASE Exploded view 1 Side panel 2 Front panel 3 I O 4 ODD cover 5 Body 6 Fan bracket 7 Side panel Before You Begin 4 1 7 3 5 4 2 6...

Страница 6: ...HDD screws HDD installation 6 13 CR101BE MID TOWER CASE Motherboard screws 5 WHAT S IN THE BOX QTY ITEM IMAGE USE DESCRIPTION CR101BE MID TOWER Case Standoffs Build your gaming machine Motherboard ins...

Страница 7: ...id damaging components by electrostatic discharge periodically ground yourself by touching an unpainted metal surface or by using a wrist grounding strap Before connecting cables make sure the connect...

Страница 8: ...assistance go to www riotoro com support REQUIREMENTS In order to configure the CR101BE you will need 1 A flat working area e g desk or table with sufficient space 2 A magnetic Phillips screw driver...

Страница 9: ...Ready Setup Go 2 www riotoro com cases...

Страница 10: ...Drive Bays Expansion Slots GENERAL MID TOWER Black Steel ABS Plastic 0 4 mm No ATX Micro ATX Mini ITX No EXPANSION Front Panel 2 0 2 2 7 EXTERNAL PORTS 1x USB 3 0 2x USB 2 0 1x Headphone 1x Microphone...

Страница 11: ...liding it towards the rear and the tempered glass towards you Remove the thumbscrews from both side panels and store them in a safe place 1 2 Put the case upright on a stable flat surface with the rea...

Страница 12: ...ASE CR101BE comes with enough mounting standoffs for a full ATX or smaller form factor Align the motherboards screw holes with the case standoff attach the motherboard using the provided screws 1 2 Fr...

Страница 13: ...motherboard The orientation of the RESET SW and POWER SW connectors does not matter Use your motherboard manual to correctly identify the front I O connectors The front panel switches LEDs and USB por...

Страница 14: ...2 CR101BE MID TOWER CASE CR101BE is designed for a quick PSU installation simply put in place and tighten screws to the back panel Tighten screws Slide the PSU into position 1 2 POWER SUPPLY INSTALLA...

Страница 15: ...ey need to be reinstalled when you put the front panel back Chapter 2 CR101BE MID TOWER CASE Remove the front panel Remove the security screws from the panel In order to install all fans you need to r...

Страница 16: ...ise the top fan will hit the PSU Chapter 2 CR101BE MID TOWER CASE Attach up to two 120 0 mm fans on the side panel Attach the 120 0 mm fan on the front and an 80 0 mm exhaust on the back CR101BE is de...

Страница 17: ...apter 2 CR101BE MID TOWER CASE Attach the ODD to the respective location remove the ODD cover from the front panel and reinstall the front panel Attach the HDD or SSD to the respective location 1 2 CR...

Страница 18: ...101BE MID TOWER CASE 17 Attach the fan and radiator to the fan bracket Attach the water block to the motherboard CR101BE is designed to provide superb water cooling you can easily install a 120 0 mm r...

Страница 19: ...rews are tighten and fans are connected to the correct motherboard headers Attach the brackets and air cooler to the motherboard CR101BE is designed to provide superb cooling with the installation of...

Страница 20: ...d you choose Chapter 2 CR101BE MID TOWER CASE Attach each GPU to the motherboard place and tighten the thumbs screws Remove the thumb screws for the PCIe expansion covers The CR101BE allows for the in...

Страница 21: ...Everything Else 3...

Страница 22: ...computer by doing more than wiping it down with a clean cloth follow these instructions Complete power down of your machine display and peripherals Disconnect all the power cables from the electrical...

Страница 23: ...guidelines to avoid injury and ensure optimum comfort while using your CR101BE MID TOWER Position your keyboard mouse and monitor need to be placed directly in front of you Place your elbows next to...

Страница 24: ...ents not made by RIOTORO Damage caused by service including upgrades and expansions performed by anyone who is not officially acting as an employee representative or sub contractor of RIOTORO Claims a...

Страница 25: ...refer to your MB manual to identify the right pin headers How to clean the Dust filters The CR101BE comes with dust filters and are meant to help keep the computer components clean blocking the dust f...

Страница 26: ...e designed to hit the sweet spot for practical real world perfor mance reliability and price To protect you and your PC ONYX PSUs include full over volt age under voltage over current over power and s...

Страница 27: ...iator with dual 120 0 mm static pressure 120 0 mm fans for extreme cooling that fits nearly any PC case CROSS X LED Fan Red White Blue Delivers unparalleled Cooling Performance with it s Precision Mol...

Страница 28: ...PI adjustments up to 4 000 DPI Multicolor RGB Customizable Back light ing up to 16 8 million different colors The Ghostwriter PRISM features cutting edge stealth design with German made Cherry MX swit...

Страница 29: ...s are the property of their respective owners Reproduction in whole or part without written permission is prohibited 2020 RIOTORO Inc All rights reserved RIOTORO the RIOTORO logo and CR101BE are trade...

Страница 30: ...www riotoro com...

Отзывы: