background image

The format of Date setting 


1. Main MENU 

2. 

select

 Setup 


MAIN> 

  H  12:52

Direct-scan 

Memory-scan 

Upload 


ENTER 


MAIN> 

  H  12:52

Memory-scan 

Upload 

Setup 


ENTER 


3. 

select

 Time setup

4.

 select

 Format 

S> 

  H  12:52

Sleep time 

Output Speed 

Time setup 

ESC 

ENTER 


S/T> 

  H  12:52

Stamp 

Format 

Date adj. 
ESC 

ENTER 


5. 

select the format of date


S/T/F> 

  H  12:52

MM/DD/YY 

DD/MM/YY 

YY/MM/DD 
ESC 

ENTER 


Date setting 


1. Main MENU 

2. 

select

 Setup 


MAIN> 

  H  12:52

Direct-scan 

Memory-scan 

Upload 


ENTER 


MAIN> 

  H  12:52

Memory-scan 

Upload 

Setup 


ENTER 


3. 

select 

Time setup

4. 

select

 Date adj. 

S> 

  H  12:52

Sleep time 

Output Speed 

Time setup 

ESC 

ENTER 


S/T> 

  H  12:52

Stamp 

Format 

Date adj. 

ESC 

ENTER 


5.


Set the date, press 

  to select 

number,  then,  press 

ENTER

  to 

go to the next


6. 

Save the date data


S/T/D> 

  H  12:52

Year 

(00-99) :    11

Month    (01-12) :    12

Date 

(01-XX) :    02

ESC 

ENTER 


Save    it ? 


NO 


YES


Time setting 

1. Main MENU

2. 

select

 Setup 


MAIN>

H 12:52

Direct-scan

Memory-scan

Upload


ENTER


MAIN> 

  H 12:52

Memory-scan 

Upload 

Setup

ENTER 


3. 

select

Time setup

4. 

select

 Clock adj.

S>

H 12:52

Sleep time

Output Speed

Time setup

ESC

ENTER 


S/T>

  H 12:52

Format 

Date adj. 

Clock adj. 

ESC

ENTER 


5. 

set the time. Press 

  to   

select the number, then,   

press the 

ENTER

 to go the next


6. 

save the time setting


S/T/T>

H

12:52

Hour

(00-23) : 00

Min

(00-59) : 00

Sec

(00-59) : 00

ESC

ENTER 


Save    it ? 

NO


YES


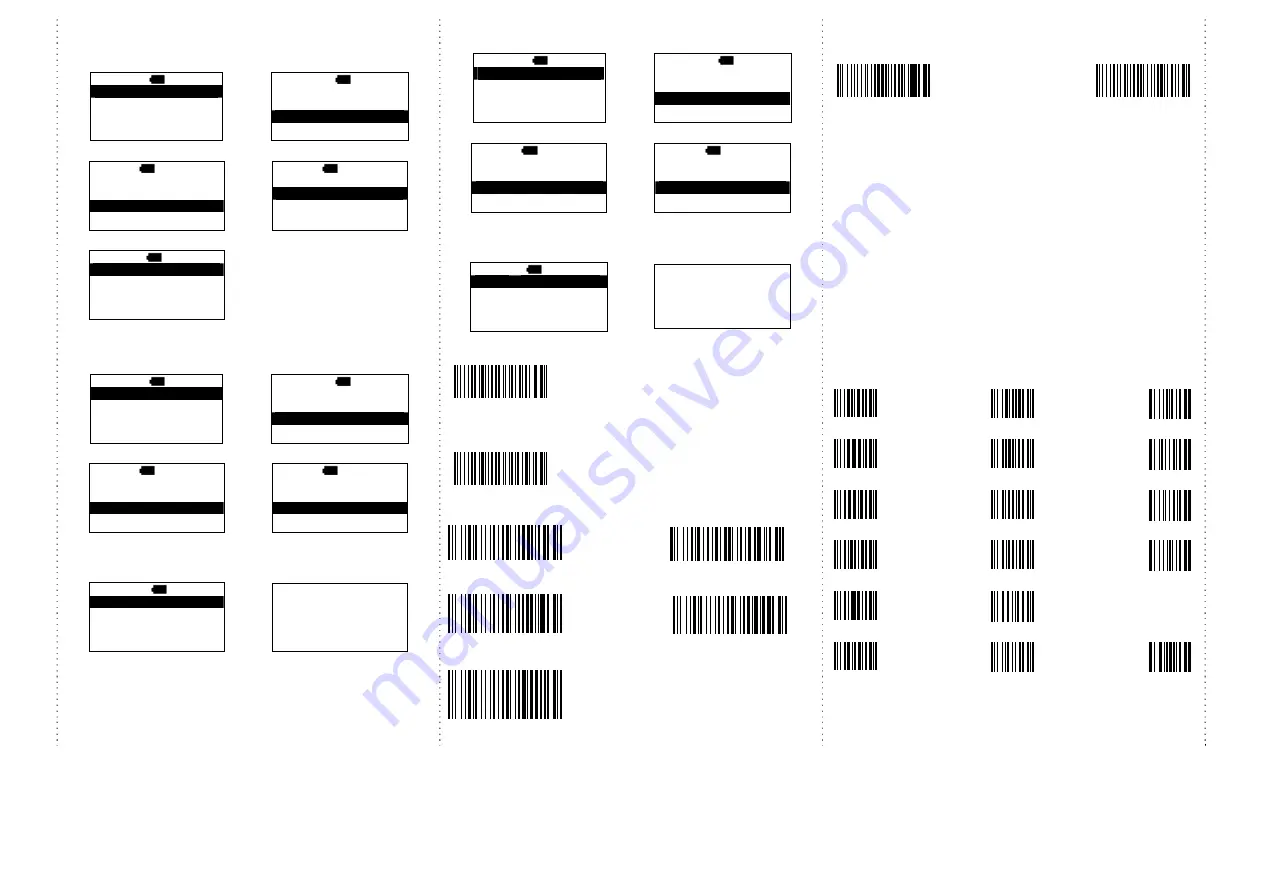
Trigger Mode 

Trigger always 
(You can read the next code, even the data is 
under transmitting or transmitting 
completely.)


Trigger standard 

(Default)


(You can read the next code after the data is 
transmitting completely.)


Multi-language UI setting


(can be changed to different UI by reading the below setting code) 


Germany UI                                              Japan UI 


English UI


(

Default

)


Spain UI


French UI 


How to append a “prefix” or a “suffix” to the 

barcode data 


prefix


suffix


1.


Scan above configuration code for Prefix or Suffix 

2.


Enter the required values (right, numeric barcode) for Prefix or Suffix 
using the hex values for the desired HEX values from Prefix & Suffix 
TABLE (below page)” 

3.


Then, end by scanning Code X (below, right) 

 
*


The max. of special characters is 5. 

*


When you append 1~4 required values for Prefix or Suffix, it must end 
with Code X. 

*


It doesn’t need Code X, if you append 5 values to barcode data. 


How to delete Prefix or Suffix 

1.


Scan above configuration code for Prefix or Suffix 

2.


Enter the “0” “0” (above, right) 

3.


Then end by scanning Code X (below, right) 


Numeric barcode for settings 


0

6

C

1

7

D

2

8

E

3

9

F

4

A

5

B

X

Содержание iDC9608KW

Страница 1: ...ot follow the safety instructions and information on proper handling in this manual we assume no liability for any resulting personal injury or damage to property Don t put scanner in places excessively high temperatures such as expose under direct sunlight Don t use scanner in extremely humid area or drastic temperature change The rechargeable battery is permanently built into the product and can...

Страница 2: ...to B3 A1 select SPP device B1 select HID device S B S 12 52 HID device SPP device dongle ESC ENTER S B S 12 52 HID device SPP device dongle ESC ENTER A2 select Simple pairing or Pairing B2 select Simple pairing or Pairing S B S S 12 52 Simple pairing Pairing ESC ENTER S B H S 12 5 2 Simple pairing Pairing ESC ENTER A3 Setting Completed B3 Setting Completed Setting Completed Setting Completed After...

Страница 3: ...r 2 seconds to raise keyboard refer to drawing 5 on page 1 LED is RED Bluetooth is offline press it again to lower keyboard LED is off Bluetooth is online It will take 5 10 seconds to make BT online offline Please be noted that when BT is offline scanning function is stopped Under iOS system If you want to raise lower soft keyboard please read the above setting code first Then press Left button fo...

Страница 4: ...n mode 2 must delete all data in the memory D H 12 52 Data in memory will be erased Are you sure NO YES Completed 3 begin to scan the barcode D H 12 52 ESC SCAN Power saving Mode 1 Main MENU 2 select Setup MAIN H 12 52 Direct scan Memory scan Upload ENTER MAIN H 12 52 Memory scan Upload Setup ENTER 3 select Sleep time 4 press decide the time to enter sleeping mode S H 12 52 BT setup Sleep time Out...

Страница 5: ...ck adj ESC ENTER 5 set the time Press to select the number then press the ENTER to go the next 6 save the time setting S T T H 12 52 Hour 00 23 00 Min 00 59 00 Sec 00 59 00 ESC ENTER Save it NO YES Trigger Mode Trigger always You can read the next code even the data is under transmitting or transmitting completely Trigger standard Default You can read the next code after the data is transmitting c...

Страница 6: ... CTRL U NAK 8B F12 34 4 4C L 64 d 7C 16 CTRL V SYN 35 5 4D M 65 e 7D 17 CTRL W ETB 36 6 4E N 66 f 7E 18 CTRL X CAN 37 7 4F O 67 g Keyboard Country Scan the appropriate country code below to program the keyboard for your country or language As a general rule the following characters are not supported by the scanner for countries other than the United States Follow the steps mentioned below to progr...

Страница 7: ...ISABLE ENABLE UK Plessey DISABLE 1D Symbologies 3 ENABLE GS1 DataBar DISABLE ENABLE GS1 DataBar Limited DISABLE ENABLE GS1 DataBar Expanded DISABLE ENABLE CODABAR DISABLE ENABLE Telepen DISABLE 2D Symbologies ENABLE PDF 417 DISABLE ENABLE Micro PDF 417 DISABLE ENABLE Data Matrix DISABLE ENABLE Maxi code DISABLE ENABLE Micro QR CODE DISABLE ENABLE Aztec DISABLE ...

Страница 8: ... g a bent paper clip into the small hole To click the reset button inside How to assemble the Glove set Glove Holder Ring Trigger cable 1 how to assemble the glove 1 2 how to assemble the glove 2 3 Put Holder on glove VELCRO area 4 Put pocket scanner onto holder pay attention to assembling direction Pressing direction Reset ...

Страница 9: ...er unit you can use plastic hook to adjust the trigger cable 6 Glove set can be used for the right hand also 7 If you want to remove pocket scanner from Glove set you can disassembled it as per above photo Quick guide is subject to change without notice R_1200325_01 ...

Отзывы: