Rinnai Australia
24
Installation Manual
HEATER INSTALLATION
1.
UNPACKING THE APPLIANCE
2.
CONNECTING THE FLUE SYSTEM
The heater components are supplied in three main cartons. These cartons contain the heater body assembly, the
fascia and the burner media for the contents of each carton refer to “CARTON CONTENTS / ITEM CHECKLIST”
on page 4.
Check for damage and missing parts. If the heater is damaged or missing any parts, contact your supplier for
advice. Before installing the appliance, check it is labelled for the correct gas type (see label on top rear of heater).
Refer to local gas authority for confirmation of gas type if you are in doubt.
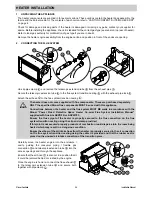
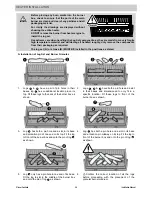
Remove the heater engine assembly from the engine carton and position in front of the enclosure opening.
Un-clip pipe clamp
and remove the telescopic extension tube
from the exhaust pipe
.
Secure the telescopic extension tube
to the flue system transition casting
with the exhaust pipe lock
.
Attach the air hose
to the flue system transition casting
.
The heater does not come supplied with flue components. These are purchased separately.
ONLY the specified Rinnai flue components MUST be used with this appliance.
Connections between the heater and the flue system MUST BE made in accordance with the
Rinnai “Power Flued Flamefire Space Heater Co-axial Flue System Installation Manual”
supplied with flue kits ASPDFK or ASPKIT03.
Ensure the flue spigot of the heater is properly secured to the flue connection on the flue
system transition casting using the clip and clamp provided.
If this joint is not secured properly products of combustion could disperse into the room being
heated which may result in a dangerous condition.
Ensure the elbow of the air intake hose from the heater is properly secured to the air connection
on the flue system transition casting using the cable tie provided and that the rubber seal is
placed on the unused air intake connection of the transition piece.
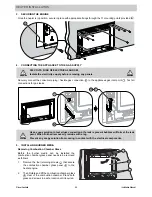
Carefully move the heater engine into the enclosure /
cavity, guiding the consumer piping / flexible gas
connection
and telescopic extension tube
into the
access openings and through the appliance.
Ensure that the air hose
is also not in a position that it
it could be jammed behind or crushed by the engine.
Once the engine is home re-connect the flue exhaust
to the telescopic extension tube
and secure both
together with pipe clamp
.
E
D
F
B
C
A
B
A
B
C
B
D
E
F
C
IMPORTANT
G
B
F
C
B
A
F
E
D
B
G
A
B
C
A
C
C


