background image

Rinnai Corporasion RHFE-263FA

Conversion Manual

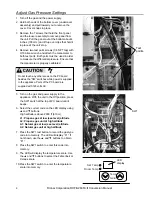
Adjust Gas Pressure Settings

The LED display turns blank and the unit

returns to the normal off mode. While

programming the correct low fire and high fire

gas pressure settings, do not adjust gas

pressure on this appliance using the screw on

top of the gas valve.

11. Press the ON/OFF button to operate the

appliance.

12. Press the SW1 switch. The LED will display “78”

or “7” followed by a symbol.

13. Press the SW1 switch again to change to the low

pressure mode. The LED will display “PL”.

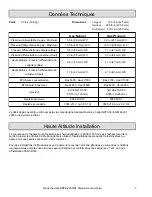
14. Compare the pressure reading on the manometer

to the desired manifold test pressure (low) for

your gas type and altitude. If necessary adjust

the low fire pressure using the ▲ and ▼ buttons.

15. Press the Economy button. The LED will display

“18” indicating that the low pressure has been

recorded into memory.

16. Press the SW1 switch 

TWICE

. This puts the

appliance into the high fire mode. The LED will

display “PH”.

17. Compare the pressure reading on the manometer

to the desired manifold test pressure (high) for

your gas type and altitude. If necessary adjust

the high fire pressure using the ▲ and ▼ buttons.

18. Press the Economy button to enter the high fire

pressure into memory. The LED display will

display “78”. If the LED shows any thing other

than “78” call Rinnai Technical Support at 1-800-

621-9419 for assistance.

19. Press the ON/OFF button again. The LED

display turns blank and the appliance returns to

the normal OFF mode.

20. Remove manometer and install Allen head

screws. Operate the unit and

 • 

  check the normal operating sequence

 • 

  visually inspect the flame

 • 

  check for gas leaks at the test points

Normal Operating Sequence

When you press the ON/OFF button, the LED display

will illuminate, the combustion fan will begin to run,

and the spark will ignite the main burner.
This heater has an automatic ignition system. When

the main burner has lit, the combustion lamp will glow

red, and the spark will stop.

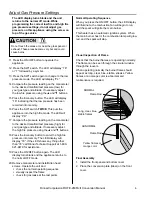
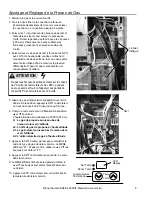
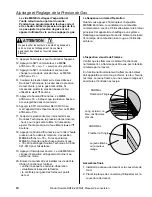
Visual Inspection of Flame

Check that the burner flames are operating normally.

The flame can be seen through the circular window

through the louvers.
When operating normally the burner flame should

appear as long, clear, blue, stable, streaks. Yellow

flames or an orange color is abnormal and

maintenance is required.
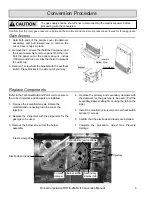
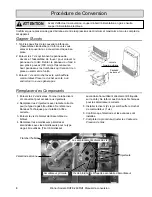
Final Assembly

1

Install the front panel and bottom cover.

2

Place the conversion plate (label) on the front 

cover.

NORMAL 

ABNORMAL     

Flame Rod 

Yellow flames or 

orange color  

Long, clear, blue, 

stable flames 

Flame Rod 

Do not touch the areas at or near the glass panel or

exhaust. These areas become very hot and could

cause burns.

Содержание RHFE-263F II

Страница 1: ...nal injury or loss of life The qualified service agency is responsible for the proper installation of this kit The installation is not proper and complete until the operation of the converted appliance is checked as specified in the manufacturer s instructions supplied with the kit English Technical Data 2 High Altitude 2 Conversion Procedure 3 Parts List 11 Francais Données Techniques 7 Haute Alt...

Страница 2: ...epresentative in accordance with the requirements of the manufacturer provincial or territorial authorities having jurisdiction and in accordance with the requirements of CAN CGA B149 1 or CAN CGA B149 installation codes The input rate can be verified by following the procedure in the National Fuel Gas Code NFPA54 ANSI Z223 1 2006 or latest edition Weight 37 lbs 16 8kg Dimensions Width 16 3 4 in 4...

Страница 3: ... Remove 1 screw from the bracket with the overheat switch Place bracket to the side out of your way Refer to the Technical Data and Parts List to ensure to the correct injectors and dampers are installed 1 Remove the 2 manifold screws Rotate the manifold and connecting tube to access the injectors 2 Replace the 2 injectors with the proper size for the gas type to be used 3 Remove the burner screw ...

Страница 4: ... With the unit in the Off position press the SW1 switch at the top of PC board until it beeps 6 Select the correct code on the LED display using and buttons High altitude is above 2000 ft 610 m L1 Propane gas at low sea level altitude L2 Propane gas unit at high altitude A1 Natural gas at low sea level altitude A2 Natural gas unit at high altitude 7 Press the SW1 test button to record the gas type...

Страница 5: ...ressure into memory The LED display will display 78 If the LED shows any thing other than 78 call Rinnai Technical Support at 1 800 621 9419 for assistance 19 Press the ON OFF button again The LED display turns blank and the appliance returns to the normal OFF mode 20 Remove manometer and install Allen head screws Operate the unit and check the normal operating sequence visually inspect the flame ...

Страница 6: ...structions du fabricant fournies avec la trousse pour la conversion du gaz propane au gaz naturel pour la conversion du gaz naturel au gaz propane pour réglage en haute altitude greater than 2000 ft 610 m English Technical Data 2 High Altitude 2 Conversion Procedure 3 Parts List 11 Francais Données Techniques 7 Haute Altitude 7 Procédure de conversion 8 Liste des Pièces 11 Sécurité Du Consommateur...

Страница 7: ...n Poids 37 lbs 16 8 kg Dimensions Largeur ޓ 16 3 4 in 425 mm Hauteur ޓ 26 5 8 in 676 5 mm Profondeur 9 13 16 in 250 mm Pression d alimentation de gaz Minimum Pression d alimentation de gaz Maximum Pression differentielle du collecteur Bas Pression differentielle du collecteur Haut Haute Altitude Pression differentielle du collecteur Bas Haute Altitude Pression differentielle du collecteur Haut BTU...

Страница 8: ...vec le surchauffe le commutateur Placer le crochet au côté à un endroit où il ne vous gênera pas 1 Enlever les 2 vis diverses Tourner le tube divers et connectant pour accéder aux injecteurs 2 Remplacer les 2 injecteurs avec la taille correcte pour le type de gaz être utilisés Se référer aux Données Techniques pour la taille d orifice correcte 3 Enlever la vis de brûleur de l assemblée de brûleur ...

Страница 9: ...ateur en haut du conseil de PC jusqu à ce qu il sonne 6 Choisir le code correct sur l utilisation d exposition et boutonne L haute altitude est au dessus de 2000 ft 610 m L1 Le gaz de propane au niveau bas le niveau de la mer l altitude L2 L unité de gaz de propane à l haute altitude A1 Le gaz naturel au niveau bas le niveau de la mer l altitude A2 L unité naturelle de gaz à l haute altitude 7 App...

Страница 10: ...te quelle chose autrement que 78 Rinnai d appel Soutien Technique à 1 800 621 9419 pour l assistance 19 Appuyer l interrupteur encore Le vide MENE de virages d exposition et l appareil retournent au normal du mode 20 Enlever le manomètre et installer les vis de tête d Allen Fonctionner l unité et vérifier la séquence normale d opération visuellement inspecter la flamme le contrôle pour gaze des fu...

Страница 11: ...13 308F 218 1 CP 72317 11 Gas Gaz Quantity Quantité Visual Reference Référence visuelle Injector Injecteur Primary Damper Registre Primaire Secondary Damper Registre Secondaire Conversion Plate Plaque de conversion Part Name Nom de la Pièce Part No Numero de Pièce AU129 210 0 90 LPG 2 LPG 1 LPG 1 LPG 1 308F 209 7 308F 218 3 CP 72317 12 Gas Gaz Quantity Quantité Visual Reference Référence visuelle ...

Страница 12: ...308F 2073 00 Printed in Japan 2006 10 1 0 3 International Drive Peachtree City Georgia 3 0 2 6 9 Phone 1 8 0 0 6 2 1 9 4 1 9 Fax 1 8 8 8 4 7 4 6 6 2 4 ...

Отзывы: