background image

GAS PRESSURE SETTING AND ADJUSTMENT

– 3 –

1. Turn the appliance to the off position.

2. Remove test point screw 1/8 NPT tap with 3/16 Allen

wrench and connect manometer pressure gauge. 

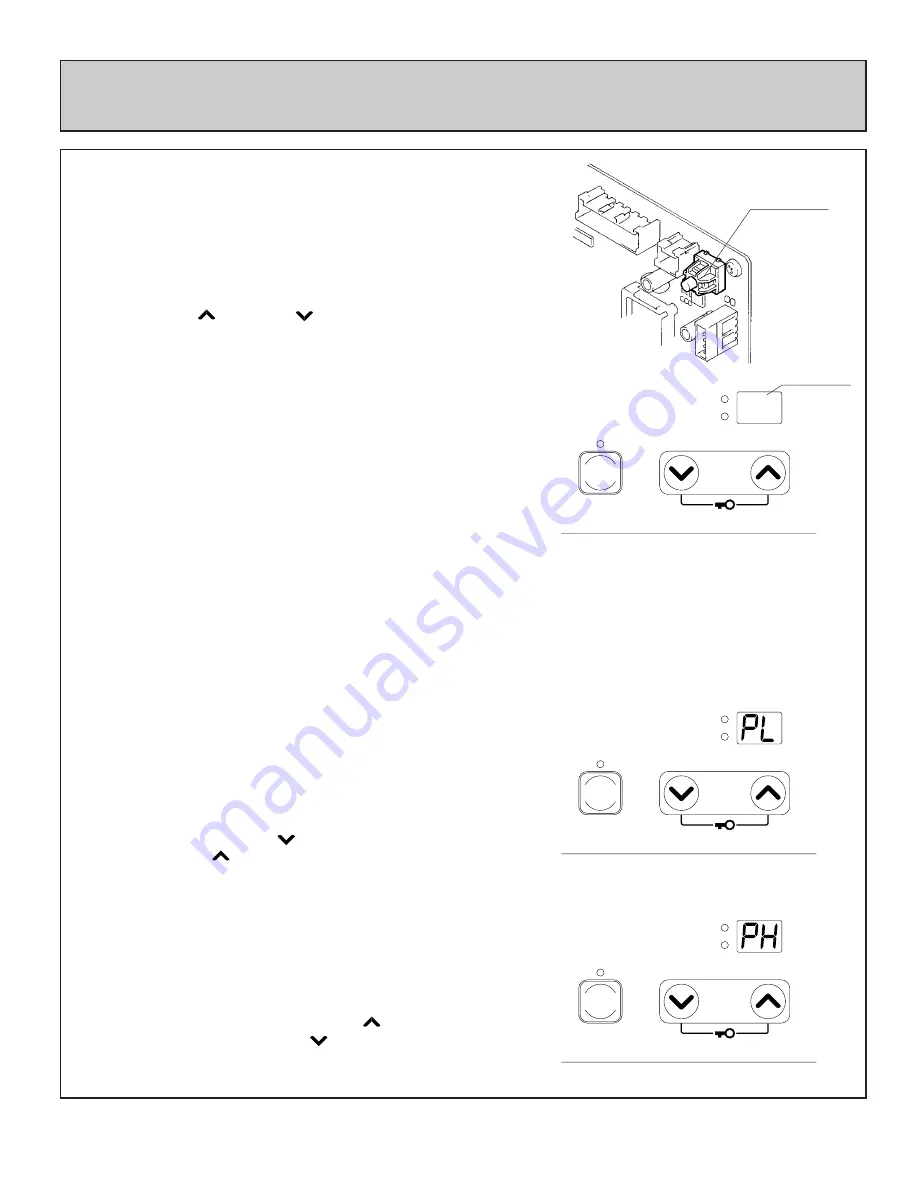
3. When unit completely stops operating, press the “SW1”

test switch at the top of the PC board until it beeps.

4. Select the correct gas type code to appear on the LED

display using “

” (up) and “

” (down) buttons. 

Current selected gas type code will be indicated. 
See below for descriptions.

L1: Propane gas units at normal altitude.
L2: Propane gas units at high altitude.
A1: Natural gas units at normal altitude.
A2: Natural gas units at high altitude.

5. After selecting the appropriate gas setting above, press the

“SW1” test button to record the gas type code into
memory.

TEST SW(SW1)

Set Temp

Room Temp

Economy

Temp 

Control

Function Lock

6. With your manometer gauge zeroed and connected, press

the ON/OFF button and operate furnace.

7. Press the “SW1” test switch. “78” or “7

” will be displayed

on the indicator LED. 

8. Press the “SW1” switch again and change to Low

pressure mode.
“PL” will be indicated on the display.

9. Record your pressure reading on your manometer.

If the Low fire pressure needs adjusting, this can be
achieved by pressing the “

” button to decrease the

pressure or the “

” button to increase the pressure.

Set unit to correct pressure as shown the Technical Data.

10. Press the Economy button, the LED will then display “18”

indicating the low pressure has been recorded into
memory.

11. Next press the “SW1” switch twice, this puts you into the

high fire mode. “PH” will be indicated on the LED display.

12. Adjust the high fire pressure using the “

” button to

increase the pressure and the “

” button to decrease the

pressure.
Set unit to correct pressure as shown The Technical Data.

THE LED DISPLAY TURNS BLANK AND THE UNIT RETURNS TO THE NORMAL OFF MODE. YOU ARE NOW
READY TO PROGRAM IN YOUR CORRECT LOW FIRE AND HIGH FIRE GAS PRESSURE SETTING.
FOLLOW PROCEDURE BELOW FOR SETTING THE MANIFOLD GAS PRESSURE.
DO NOT ADJUST GAS PRESSURE ON THIS APPLIANCE USING THE APPLIANCE REGULATOR SCREW. 

Set Temp

Room Temp

Economy

Temp 

Control

Function Lock

Set Temp

Room Temp

Economy

Temp 

Control

Function Lock

LED DISPLAY

Содержание RHFE-1004FA

Страница 1: ...ICAL SWITCH DO NOT USE ANY PHONE IN YOUR BUILDING IMMEDIATELY CALL YOUR GAS SUPPLIER FROM A NEIGHBOR S PHONE FOLLOW THE GAS SUPPLIER S INSTRUCTIONS IF YOU CANNOT REACH YOUR GAS SUPPLIER CALL THE FIRE DEPARTMENT INSTALLATION AND SERVICE MUST BE PERFORMED BY A QUALIFIED INSTALLER SERVICE AGENCY OR THE GAS SUPPLIER This appliance may be installed in a after market permanently located manufactured mob...

Страница 2: ...00 8 400 HIGH 30 720 29 200 NAT QTY 2 1 PARTS No LPG HI LOW 1004F 2031 B 1 80 1004F 2036 B 1 95 QTY 2 1 PARTS No 1004F 2031 A 0 95 1004F 2036 A 1 20 RHFE 1004FA P Normal Altitude RHFE 1004FA P High Altitude RHFE 1004FA N Normal Altitude RHFE 1004FA N High Altitude MODEL GAS TYPE DIAMETER OF ORIFICES INCHES mm DAMPER ADJUSTMENT LPG NAT 0 037 0 95 0 047 1 20 10 10 10 10 10 10 0 071 1 80 0 077 1 95 7...

Страница 3: ...n damage to the unit If you have not been properly trained on converting this product please do not proceed Contact a qualified service agency to perform conversion 5 Propane gas unit air shutter settings Loosen set screw on air adjustment rods Adjust all three air shutters to 100 air no notches will be showing on the rods when adjusted correctly The air rods can be found directly under each gas l...

Страница 4: ... the SW1 switch again and change to Low pressure mode PL will be indicated on the display 9 Record your pressure reading on your manometer If the Low fire pressure needs adjusting this can be achieved by pressing the button to decrease the pressure or the button to increase the pressure Set unit to correct pressure as shown the Technical Data 10 Press the Economy button the LED will then display 1...

Страница 5: ...3 Press the Economy button to enter the high fire pressure into memory The LED display will indicate 78 14 Press the ON OFF button again The LED display turns blank and the unit returns to the normal OFF mode 15 Reconfirm all pressure settings before putting said unit back into operation Next disconnect your manometer from the unit and reinstall the 1 8 test port plug Leaks test all connections on...

Страница 6: ...BAS 8 400 8 400 HAUT 30 720 29 200 NAT QUANTITÉ 2 1 NUMÉRO DES PIÉCES LPG HAUT BAS 1004F 2031 B 1 80 1004F 2036 B 1 95 QUANTITÉ 2 1 NUMÉRO DES PIÉCES 1004F 2031 A 0 95 1004F 2036 A 1 20 RHFE 1004FA P Altitude Normale RHFE 1004FA P Haute Altitude RHFE 1004FA N Altitude Normale RHFE 1004FA N Haute Altitude MODELE TYPE DE GAZ DIAMETRE DES ORIFICES EN POUCES mm REGLAGE AMORTISSEUR LPG NAT 0 037 0 95 0...

Страница 7: ...onvenablement formé pour convertir cet appareil veuillez ne pas poursuivre Contactez une société de service compétente pour réaliser la conversion 5 Réglages des volets d aération pour les appareils à gaz propane Desserrez la vis sur les tiges de réglage d air Réglez les trois volets d aération à 100 d air aucun cran n apparaîtra sur les tiges une fois le réglage fait correctement Les tiges d air ...

Страница 8: ...PL va s afficher à l écran 9 Enregistrez la lecture de pression sur votre manomètre Si la pression Feu Bas a besoin de réglage ceci peut être réalisé en appuyant sur le bouton pour réduire la pression ou le bouton pour augmenter la pression Réglez l appareil à la pression correcte comme il est indiqué dans les Données Techniques 10 Appuyez sur le bouton Economie Le LED affichera alors 18 indiquant...

Страница 9: ...ez sur le bouton MARCHE ARRET de nouveau L écran LED devient vierge et l appareil retourne à une position ARRET normale 15 Reconfirmez tous les réglages de pression avant de remettre l appareil en question en marche Puis débranchez le manomètre de l appareil et réinstallez la prise de test de 1 8 Faites un test de fuite sur tous les branchements une fois que le processus de conversion a été accomp...

Страница 10: ... High Injecteur haut Injector Low Injecteur bas Injector High Injecteur haut Injector Low Injecteur bas Conversion Plate Plaque de conversion Conversion Plate Plaque de conversion Visual Reference Référence visuelle Qty Quantité Gas Gaz Part No Numéro de piéce Part Name Nom de la piéce LIST OF CONVERSION PARTS LISTE DES PIECES DE CONVERSION ...

Страница 11: ... 10 MEMO ...

Страница 12: ...1004F 2092 02 03 Printed in Japan 2005 05 ...

Отзывы: