background image


Rinnai Corporation EX08CT, EX11CT Manual


19


Final Checklist


The heater is not subject to corrosive compounds 
in the air.


Clearances from the heater unit are met. 


Clearances from the vent termination are met.


Ensure you have used the correct venting 
products for the model installed and that you have 

completely followed the venting manufacturer

installation instructions and these installation 

instructions.


Verify that the vent system does not exceed the 
maximum length for the number of elbows used.


A manual gas control valve has been placed in the 
gas line to the heater.


Check the gas lines and connections for leaks.


Confirm that the gas inlet pressure is within limits.


Confirm that the heater is rated for the gas type 
supplied.


Confirm that the electricity is supplied from a 120 
VAC, 60 Hz power source, is in a properly 

grounded circuit, and  turned on.


Verify the system is functioning correctly by 
connecting your manometer to the gas pressure 

test port on the water heater.  Operate all gas 

appliances in the home or facility at high fire.  The 

inlet gas pressure at the heater must not drop 

below that listed on the rating plate.


Install the front panel.


Explain to the customer the importance of not 
blocking the vent termination.


Explain to the customer the operation of the 
heater, safety guidelines, maintenance, and 

warranty.


The installation must conform with local codes or, 
in the absence of local codes, with the 

National 

Fuel Gas Code, ANSI Z223.1/NFPA 54

, or the 

Natural Gas and Propane Installation Code, CSA 

B149.1

.  If installed in a manufactured home, the 

installation must conform with the 

Manufactured 

Home Construction and Safety Standard, Title 24 

CFR, Part 3280

 and/or 

CAN/SCA Z240 MH 

Series, Mobile Homes

.


Leave the entire manual with the consumer.


Содержание EX08CT

Страница 1: ...ion and service must be performed by a licensed professional If the information in these instructions is not followed exactly a fire or explosion may result causing property damage personal injury or death WARNING READ ALL OF THE INSTRUCTIONS THOROUGHLY BEFORE INSTALLING OR OPERATING THIS HEATER This manual provides information on the installation operation and maintenance of the heater For proper...

Страница 2: ...ount with us If you have any questions or feel that the manual is incomplete contact Rinnai at 1 800 621 9419 Table of Contents 2 Safety Definitions 2 Safety Behaviors and Practices for the Consumer and Installer 3 Installation Instructions for the licensed professional State Regulations 4 Included Installation and Vent Components 5 Installation Instructions 6 Prepare for Installation 7 Determine ...

Страница 3: ...and parts behind the appliance Do not sit on the heater Do not place containers of liquid on top of the heater Water spillage can cause extensive damage to the appliance and may result in electric shock Repairs should be performed by a qualified service technician Keep the area around the appliance clear and free from combustible materials gasoline and other flammable vapors and liquids Never stor...

Страница 4: ...ng appliance or equipment The sign shall read in print size no less than one half 1 2 inch in size GAS VENT DIRECTLY BELOW KEEP CLEAR OF ALL OBSTRUCTIONS 4 INSPECTION The state or local gas inspector of the side wall horizontally vented gas fueled equipment shall not approve the installation unless upon inspection the inspector observes carbon monoxide detectors and signage installed in accordance...

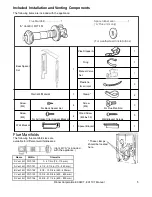
Страница 5: ... 3 4 23 5 8 in 400 600 mm D Vent Kit FOT 154 23 5 8 31 1 2 in 600 800 mm Flue Manifolds Flue Manifold S l a e s r e b b u r e r a p 1 1 A Flue units only For weatherboard installations 1 Manual Valve Set Owner s Manual A Vent Kit FOT 151 Back Spacer Set Pipe Stopper A Ring Plastic tie for air inlet Clamp Screw M4 8 32 Wood Screw 1 1 1 3 2 3 5 1 4 4 M4 Screw M4 Screw M4 Wall Bracket Spacer Bracket ...

Страница 6: ...nly or mobile home OEM installation must conform with the Manufactured Home Construction and Safety Standard Title 24 CFR Part 3280 or when such a standard is not applicable the standard for Manufactured Home Installations ANSI Z225 1 or the standard for Gas Equipped Recreational Vehicles and Mobile Housing CSA Z240 4 The appliance when installed must be electrically grounded in accordance with lo...

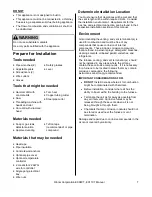
Страница 7: ...he installation environment Requirements for the gas line and electrical connection can be found in their respective installation sections of this manual Environment Air surrounding the venting and vent termination s is used for combustion and must be free of any compounds that cause corrosion of internal components These include corrosive compounds that are found in aerosol sprays detergents blea...

Страница 8: ...T 6 inches 15 cm EX11CT 9 inches 23 cm C Clearance to permanently closed window D Vertical clearance to ventilated soffit located above the terminal within a horizontal distance of 2 feet 61 cm from the center line of the terminal E Clearance to unventilated soffit F Clearance to outside corner G Clearance to inside corner H Clearance to each side of center line extended above meter regulator asse...

Страница 9: ...h the clearances The planned venting will not exceed the maximum length for the number of elbows used The planned venting termination air intake location meets the clearances Indoor air is not being used for combustion A standard 3 prong 120 VAC 60 Hz properly grounded wall outlet The installation must conform with local codes or in the absence of local codes with the National Fuel Gas Code ANSI Z...

Страница 10: ...flanges is zero inches 2 Adjust the sleeve length Measure wall thickness through previously drilled 3 1 8 inch 80 mm hole The end of the sleeve should protrude 3 16 3 8 inch 5 10 mm from the outside wall The sleeve is threaded for adjustment Adjust the sleeve length to wall thickness plus 3 16 3 8 inch 5 10 mm NOTE Do not extend beyond the red line For other than the S type flue manifold if a shor...

Страница 11: ... 3 screws The inner connection can still be turned to install the screws 4 Install the Terminal Check that the terminal seal is in place For weatherboard walls add the second seal next to the terminal seal to compensate for weather board angle From the outside insert the terminal into the sleeve with the marking TOP at the top The left hand side locking tie should be marked LEFT Terminal seal Lock...

Страница 12: ...tudes above 2000 feet 610 m the maximum vertical length is 5 feet 1 5 m 3 If the extension is longer than that shown in the table below the condensate may overflow the condensation pan Therefore extensions exceeding this length should drain to the outside and sloped 3 downward 4 Do not allow any low points or sagging in the exhaust line Otherwise condensate may block the exhaust and affect combust...

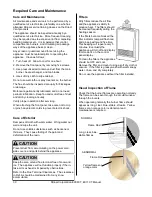
Страница 13: ...ne Do not cut the exhaust pipe Use the adjustable pipes if necessary To bend the elbow insert exhaust pipes into both ends for additional leverage Bend to desired angle Do not straighten the bent pipe attached to the appliance Pipe stopper A Pipe stopper B Male end Female end Adjust the angle Connecting the Air Intake Hose The air intake hose is connected between the air connection at the rear of ...

Страница 14: ...e 49 2 in 1 25 m 1 3 Air Intake Hose 90 6 in 2 3 m 1 4 Bent Elbow 1 5 Long Bent Elbow 1 1 6 Hose Joint 1 5 in 38 mm inner dia 1 1 1 1 6 Hose Joint 2 0 in 50 mm inner dia 1 7 Pipe Stopper A 1 1 1 2 1 1 8 Pipe Stopper B 1 1 1 9 Pipe Clamp 2 sets 3 sets 4 sets 10 Wall Fixture 2 3 4 11 Nut 2 3 4 12 Screw A 2 3 4 13 Screw B 4 6 8 Extension Kits and Parts EXHAUST PIPE ADJUSTABLE EXHAUST PIPE NON ADJUSTA...

Страница 15: ...3 Fit the pipe stopper over the connection between the flue elbow and the manifold Engage the hook and rotate it until it snaps against the body of the clamp 4 Slide the insulation sleeve up to the flue manifold and slip the securing clip over the sleeve as shown 5 Install the bracket on the rear of the top spacer by tightening 2 screws 6 Install the wall bracket with two screws Install the top sp...

Страница 16: ...cracking the piping shall be rinsed with water after testing unless it has been determined that the leak test solution is non corrosive Check the gas supply pressure immediately upstream at a location provided by the gas company Supplied gas pressure must be within the limits shown in the Specifications section Refer to an approved pipe sizing chart if in doubt about the size of the gas line Adjus...

Страница 17: ...necessary adjust the low fire pressure using the and buttons 10 Press the test switch The LED will display PH indicating high fire mode Natural Gas Propane Gas Code A1 A5 A2 A6 A3 A7 A4 A8 L1 L5 L2 L6 L3 L7 L4 L8 Altitude 0 2000 ft 0 610 m 2001 5200 ft 611 1585 m 5201 7700 ft 1586 2347 m 7701 10200 ft 2348 3109 m 0 2000 ft 0 610 m 2001 5200 ft 611 1585 m 5201 7700 ft 1586 2347 m 7701 10200 ft 2348...

Страница 18: ...ed Visual Inspection of Flame NORMAL Flame Rod Long clear blue stable flames ABNORMAL Yellow flames or orange color Flame Rod Final Assembly check the normal operating sequence visually inspect the flame check for gas leaks at the test points Normal Operating Sequence When you press the ON OFF button the LED display will illuminate the combustion fan will begin to run and the spark will ignite the...

Страница 19: ...m a 120 VAC 60 Hz power source is in a properly grounded circuit and turned on Verify the system is functioning correctly by connecting your manometer to the gas pressure test port on the water heater Operate all gas appliances in the home or facility at high fire The inlet gas pressure at the heater must not drop below that listed on the rating plate Install the front panel Explain to the custome...

Страница 20: ...ai Corporation EX08CT EX11CT Manual A full size template is provided on the cardboard packaging DO NOT DISCARD until installation is completed NOTICE 10 1 in 257 mm 3 3 in 85 6 8 in 172 mm inches mm Dimensions ...

Страница 21: ...r mobile home or residential installation convertible for use with natural gas and liquefied petroleum gases propane when provision is made for the simple conversion from one gas to the other Approved for commercial setting Approved for installation at altitudes up to 10 200 feet 3109 m Natural Gas Propane Gas Natural Gas Propane Gas Min Supply Gas Pressure 4 5 in 114 mm W C 8 0 in 203 mm W C 3 5 ...

Страница 22: ...ion shared with these businesses please contact customer service and ask not to have your information shared We will however continue to contact you with information relevant to the product s you registered and or you account with us Do not store or use gasoline or other flammable vapors and liquids in the vicinity of this or any other appliance WHAT TO DO IF YOU SMELL GAS Do not try to light any ...

Страница 23: ...lace any part of the control system and any gas control which has been under water TO TURN OFF GAS TO APPLIANCE 1 Set the thermostat to lowest setting 2 Turn off all electric power to the appliance using the ON OFF button on the control panel 3 Locate the manual gas valve on the side of the unit Turn the manual valve clockwise to the full OFF position NOTE The fan will continue to operate until th...

Страница 24: ...AND PULL TOWARD YOU CONTROL PANEL RATING PLATE MODEL NUMBER SERIAL NUMBER GAS TYPE ETC ENGLISH IS ON THE RIGHT FRENCH IS ON THE LEFT ROOM TEMPERATURE SENSOR THERMISTOR POWER CORD PLUG 120V AC 60 Hz AIR FILTER EXHAUST PIPE COMBUSTION AIR INTAKE HOSE VENT TERMINAL COMBUSTION AIR EXHAUST GAS CONNECTION 1 2 MALE NPT Getting to Know Your Appliance ...

Страница 25: ...when the heating starts the heating capacity is automatically adjusted to achieve a comfortable heating effect and to reach the temperature setting quickly Occasionally the room temperature may briefly exceed the temperature setting due to the layout of the room or heating area ON OFF Press the ON OFF button to operate the heater The ON indicator will glow green Once the burner ignites the ON indi...

Страница 26: ...ations Part 204000048 for Canadian installations Once installed the furnace must be placed in Remote Thermostat mode by following the steps below 1 Ensure the furnace is plugged in but is turned OFF 2 Ensure the Set back feature is turned OFF 3 Press and hold the Economy Up Program buttons for 2 5 seconds and then release 00 appears in the display 4 Press the UP button 01 appears in the display 5 ...

Страница 27: ... 2 Press the up or down arrows to set the temperature The left side of the display shows the temperature setting The right side of the display shows the room temperature Setting the Clock Operating the Furnace Manually Setting and Operating the Timers 2 The light next to Clock should be lit Press the up and down arrows to set the time Holding down either of the arrow keys will change the time more...

Страница 28: ...nomy mode can only be turned off while the heater is operating heating and when the Economy indicator is lit Economy Mode Information After the room is heated initially the air temperature may be dropped to a lower level without affecting comfort The Economy Mode reduces the temperature by 2 ºF 30 minutes after the room temperature setting is reached After another 30 minutes it reduces the tempera...

Страница 29: ... be adjusted Do not adjust the air flow louvers while warm air is flowing Adding Water to the Humidifier Warm air is humidified when it passes over the water in the tray To fill the tray remove the bottom panel by pushing on both sides and pulling it toward you Pull the tray out and fill with water Do not exceed the fill line Push the tray back in and attach the bottom panel Do not operate the app...

Страница 30: ... by removing five screws 3 Use pressurized air to remove dust from the main burner heat exchanger and fan blades 4 Use soft dry cloth to wipe cabinet Do not use wet cloth or spray cleaners on the burner The flue should be inspected annually for blockages or damage Motors are permanently lubricated and do not need periodic lubrication Keep fan and motor free of dust and dirt by cleaning annually Ve...

Страница 31: ...fan is started automatically after a short delay This is to allow the heat exchanger to warm up helping to avoid cold draughts This is caused by grease or oil and dust on the heat exchanger and will stop after a short time This is simply expansion noise from the heat exchanger This is the sound of the solenoid gas valves opening and closing Is the air filter blocked Is the set temperature high eno...

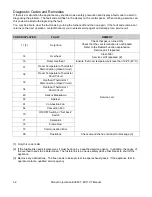
Страница 32: ...F 40 C 31 Room Temperature Thermistor Disconnection Open Circuit Service call 32 Room Temperature Thermistor Short Circuit 33 Overheat Thermistor 1 Disconnection Open Circuit 34 Overheat Thermistor 1 Short Circuit 49 Sensor Breakdown 53 Sparker 61 Combustion Fan 62 Convection Fan 70 ON OFF Switch or Set back Switch 71 Solenoids 72 Flame Rod 73 Communication Error 99 Flue Block Check around the flu...

Страница 33: ...akes place for about 15 18 seconds before ignition After this time the temperature control logic controls the combustion If the flame is extinguished burner combustion failure while the temperature control logic is operating the appliance then the appliance will immediately attempt ignition No fault code will appear Issue No ON Indicator No Burner Ignition Abnormal Combustion Loss of Combustion Sm...

Страница 34: ...34 Rinnai Corporation EX08CT EX11CT Manual Cut Away Diagram ...

Страница 35: ...gerous operation CAUTION CODE COLOR bk black bl blue gr green gr y green yellow r red w white y yellow gy gray or orange br brown MARK PART NAME MARK PART NAME MS MAIN SWITCH OH TH OVER HEAT THERMISTOR R TH THERMISTOR OHS1 2 OVER HEAT SWITCH 1 2 TF THERMAL FUSE FM CONVECTION FAN MOTOR F FUSE SP SPARKER ER ELECTRODE SV1 2 MAIN SOLENOID VALVE 1 2 POV MODULATING SOLENOID VALVE BL COMBUSTION FAN MOTOR...

Страница 36: ...K PARTS NAME MS Main switch OH TH Over heat thermistor R TH Thermistor OHS1 2 Over heat switch 1 2 TF Thermal fuse FM Convection fan motor F Fuse SP Sparker ER Electrode SV1 2 Main solenoid valve 1 2 POV Modulating solenoid valve BL Combustion fan motor TR Transformer FCC Fan control circuit FR Flame rod MB Main burner PS Pressure sensor CPU Central processing unit CF Convection Fan W TH Wall Ther...

Страница 37: ...Rinnai Corporation EX08CT EX11CT Manual 37 Parts List Liste de Pièces For replacement parts call Rinnai at 1 800 621 9419 Pour les pièces de rechange appelez Rinnai au 1 800 621 9419 ...

Страница 38: ...38 Rinnai Corporation EX08CT EX11CT Manual Parts List Liste de Pièces ...

Страница 39: ...Rinnai Corporation EX08CT EX11CT Manual 39 Parts List Liste de Pièces ...

Страница 40: ...40 Rinnai Corporation EX08CT EX11CT Manual Parts List Liste de Pièces ...

Страница 41: ...Rinnai Corporation EX08CT EX11CT Manual 41 Parts List Liste de Pièces ...

Страница 42: ...08F 462 3 1 1 020 Cover couverture 209000065 1 1 021 Top Plate Supporter soutien de plateau supérieur 209000066 1 1 022 Top Plate B plateau supérieur B 209000067 1 1 024 Back Spacer Top B espaceur arrière supérieur B 209000068 1 1 025 Back Spacer R B espaceur arrière droite B 209000069 1 1 026 Back Spacer L B panneau latéral gauche B 209000070 1 1 027 Wall Bracket support mural 308F 9077 1 1 028 P...

Страница 43: ...Packing garniture de plaque de fixation 209000078 1 1 125 Warm Air Seal Panel panneau de fermeture d air chaud 556F 305 1 1 126 Heat Exchanger Packing enveloppe d échangeur thermique 554F 421 2 1 1 127 Gas Control Assy ensemble de commande de gaz 206000035 1 1 128 Test Port Screw vis de liaison AU39 965 2 2 129 Interconnection Assy ensemble d interconnexion 206000036 1 1 130 O Ring joint torique M...

Страница 44: ...ssy plaque écran thermique 209000090 1 1 406 TF Fixing Plate support TF 308F 313 1 1 407 Capacitor Harness toron de condensateur 205000030 1 1 408 Detection Harness toron de indicateur 205000031 1 1 409 Convection Motor Harness toron de moteur de convection 205000032 1 1 410 Convection Fan Total Assy ensemble de ventilateur de convection 208000038 1 410 Convection Fan Total Assy ensemble de ventil...

Страница 45: ...alimentation d énergie 431F 1860 1 1 803 Exhaust Caution Label B étiquette d attention 1001F 1654 1 1 804 Caution Label étiquette d attention RHF559 1240 1 1 888 Operation Manual manuel 200000057 1 1 Conversion Kits Optional Kits de conversion facultatifs Model Modèle For converting to NG Pour la conversion NG For converting to Propane Pour la conversion Propane EX08CT RHFE 202FTA2 204000033 20400...

Страница 46: ...epairs or replacements must be performed by an individual or servicing company that is properly trained state qualified or licensed to do the type of repair Item Period of Coverage Heat Exchanger 10 years from date of purchase All Other Parts 5 years from date of purchase Reasonable Labor 2 years from date of purchase Limited Warranty The installer is responsible for your water heater s correct in...

Страница 47: ...ures or operating difficulties due to the following accident abuse or misuse alteration misapplication force majeure improper installation such as but not limited to condensate damage improper venting incorrect gas type or incorrect gas pressure improper conversion including conversions for inventory adjustment improper maintenance such as but not limited to vent blockage incorrect sizing any othe...

Страница 48: ...48 Rinnai Corporation EX08CT EX11CT Manual NOTES ...

Страница 49: ... il peut en résulter un départ d incendie ou une explosion causant des dégâts matériels et des blessures pouvant être mortelles AVERTISSEMENT LISEZ SOIGNEUSEMENT TOUTES CES INSTRUCTIONS AVANT D INSTALLER OU D UTILISER CET APPAREIL Ce manuel fournit des informations sur l installation l utilisation et l entretien du générateur d air chaud Pour un bon fonctionnement et la sécurité il est important d...

Страница 50: ...istré s et ou sur votre compte chez nous Si vous avez des questions ou pensez que ce manuel est incomplet contactez Rinnai au 1 800 621 9419 Table des matières 50 Définitions de sécurité 50 Comportements et pratiques de sécurité pour le Consommateur et l Istallateur 51 Instructions d installation pour professionnel agréé Réglementations d états 52 Installation des composants de la ventilation incl...

Страница 51: ...e l appareil Ne vos asseyez pas sur le générateur d air chaud Ne placez pas de conteneurs de liquide sur le dessus du générateur d air chaud De l eau renversée peut causer de gros dégâts à l appareil et peut entraîner une commotion électrique Les réparations doivent être effectuées par un technicien de service qualifié Gardez la zone autour de l appareil dégagée et exempte de matières combustibles...

Страница 52: ... pouce GAS VENT DIRECTLY BELOW Évacuation de gaz brûlés juste en dessous KEEP CLEAR OF ALL OBSTRUCTIONS À n obstruer d aucune façon 4 INSPECTION L inspecteur local ou de la province mandaté pour cet équipement carburant au gaz ventilé horizontalement sur un mur de côté le doit pas approuvé l installation si son inspection ne constate pas la présence des détecteurs de monoxyde de carbone et la sign...

Страница 53: ... r a p 1 1 A Flue units only For weatherboard installations 1 Manual Valve Set Owner s Manual A Vent Kit FOT 151 Back Spacer Set Pipe Stopper A Ring Plastic tie for air inlet Clamp Screw M4 8 32 Wood Screw 1 1 1 3 2 3 5 1 4 4 M4 Screw M4 Screw M4 Wall Bracket Spacer Bracket 1 1 For Back Spacer Set For Flue Manifold For Air Intake Clip Spacer Bracket Wall Bracket Screws Collecteur de fumée Joint ca...

Страница 54: ...es installations au gaz naturel et au propane CSA B149 1 Une installation dans une maison préfabriquée USA uniquement ou une maison mobile de constructeur doit se faire en conformité avec la norme de Construction et sécurité des maisons préfabriquées Title 24 CFR Part 3280 ou quand cette norme n est pas applicable avec les normes pour Installations de maisons préfabriquées AN SI Z225 1 ou la norme...

Страница 55: ...ment de l installation Les besoins concernant la conduite de gaz et la connexion électrique peuvent se trouver dans leurs sections d installation spécifiques de ce manuel Environnement L air entourant la ventilation et la les terminaison s de ventilation est utilisé pour la combustion et ne doit comporter aucun des composés pouvant provoquer une corrosion de composants internes Cela inclut des com...

Страница 56: ...par rapport à un soffite ventilé situé au dessus de la terminaison à une distance horizontale de moins de 2 pieds 60 cm de l axe de cette terminaison E Dégagement par rapport à un soffite non ventilé F Dégagement par rapport à un angle sortant G Dégagement par rapport à un angle rentrant 20 po 50 cm 20 po 50 cm H Dégagement par rapport à une ligne centrale prolongée au dessus de l ensemble de comp...

Страница 57: ...n du nombre de coudes utilisés L emplacement prévu pour la terminaison de ventilation admission d air permettra de respecter les dégagements De l air de l intérieur n est pas utilisé pour la combustion Il y a une prise secteur 120 V 60 Hz à trois broches avec liaison de terre correcte L installation doit être en conformité avec les normes locales ou en leur absence avec la norme américaine ANSI Z2...

Страница 58: ...minée autre que le type S si une longueur plus petite est nécessaire une extension peut être ôtée Coupez le plastique et ôtez l extension Le collecteur de cheminée doit sortir sur l extérieur N évacuez pas dans d autres pièces Le collecteur de cheminée n est pas conçu pour être positionner sous des planchers ou plus bas que le générateur d air chaud La terminaison ne peut pas être verticale L appa...

Страница 59: ...be de terminaison en vous assurant que le joint est en place dans sur tube intérieur Fixez la connexion intérieure avec 3 vis La connexion intérieure peut toujours être tournée pour installer les vis 4 Installez la terminaison Contrôlez que le joint de terminaison est en place Pour des murs avec bardage ajoutez un deuxième joint près du premier pour compenser l angle de bardage Depuis l extérieur ...

Страница 60: ...verticale est 5 pieds 1 5 m 3 Si l extension est plus longue que celui indiqué dans le tableau ci dessous le condensat peut déborder le pan de condensation Par conséquent extension dépassant cette longueur devrait drainer vers l extérieur et pente 3 vers le bas 4 Ne permettez pas des points bas sur la conduite d évacuation où du condensat pourrait s accumuler Dans le cas contraire les condensats p...

Страница 61: ...r réglable si nécessaires Pour former le coude insérez les tuyaux d échappement Courbez à l angle voulu Ne cherchez pas à redresser le raccord coudé en sortie de l appareil Arrêt de tuyau A Arrêt de tuyau B Extrémité male Extrémité femelle Ajustez l angle de courbure Connexion du tuyau d admission d air Le tuyau d admission d air est connecté entre l entrée d air à l arrière générateur d air chaud...

Страница 62: ... 1 3 Tuyau d admission d air 90 6 po 2 300 mm 1 4 Coude 1 5 Coude long 1 1 6 Joint de tuyaux 1 5 po 38 mm diamètre intérieur 1 6 Joint de tuyaux 2 0 po 50 mm diamètre intérieur 1 1 1 1 7 Arrêt de tuyau A 1 1 1 2 1 1 8 Arrêt de tuyau B 1 1 1 9 Collier de tuyaux 2 sets 3 sets 4 sets 10 Dispositif mural 2 3 4 11 Écrou 2 3 4 12 Vis A 2 3 4 13 Vis B 4 6 8 EXHAUST PIPE ADJUSTABLE EXHAUST PIPE NON ADJUST...

Страница 63: ...Engagez le crochet et tournez le jusqu à ce qu il s enclenche contre le corps de l étrier 4 Faites glisser en remontant le manchon d isolation et placez l agrafe de fixation par dessus le manchon comme illustré ci contre 5 Installez la patte à l arrière de l espaceur du haut en serrant deux vis 6 Mettez en place le support mural avec deux vis Installez l espaceur supérieur en insérant sa patte dan...

Страница 64: ... fissuration sous contrainte les conduites sont à rincer à l eau après le test sauf s il a été déterminé que la solu tion pour chercher des fuites n est pas corrosive Contrôlez la pression de l alimentation en gaz immédiate ment en amont à un endroit fourni par la régie du gaz La pression du gaz fourni doit être dans les limites montrées dans la section Spécifications Référez vous au tableau de ca...

Страница 65: ...86 2347 m 7701 10200 ft 2348 3109 m EX08CT Pression differentielle du collecteur W C Bas 0 58 in 15 mm 0 62 in 16 mm 0 70 in 18 mm 0 78 in 20 mm 0 86 in 22 mm 0 92 in 24 mm 1 04 in 27 mm 1 16 in 29 mm Pression differentielle du collecteur W C Haut 3 4 in 86 mm 3 6 in 92 mm 4 1 in 103 mm 3 2 in 82 mm 5 8 in 147 mm 6 2 in 158 mm 7 0 in 177 mm 5 5 in 140 mm EX11CT Pression differentielle du collecteu...

Страница 66: ...st diverse haut pour le gaz étant utilisé Si nécessaire ajuster l haute pression de feu utilisant le et boutons 12 Appuyer l interrupteur encore Le vide MENE de virages d exposition et l appareil retournent au normal du mode 13 Enlever le manomètre et installer les vis de tête d Allen Fonctionner l unité et vérifier la séquence normale d opération visuellement inspecter la flamme le contrôle pour ...

Страница 67: ...tion électrique vient d une source secteur 120 V CA 60 Hz avec circuit alimenté et bien relié à la terre Vérifiez que le système fonctionne bien en branchant votre manomètre sur le port de test de pression du gaz sur le générateur d air chaud Faites fonctionner tous les appareils carburant au gaz de votre maison ou du site à plein feu La pression d arrivée du gaz au générateur d air chaud ne doit ...

Страница 68: ...re Un gabarit est fourni Pour une installation n utilisant pas de kits d extension la configuration du collecteur de fumée du tuyau d admission d air et du tuyau d évacuation coulissant doit ressembler à ce qui est montré quand l installation est finie La zone hachurée montre où le collecteur de fumée peut être situé Dimensions 10 1 in 257 mm 3 3 in 85 mm 6 8 in 172 mm Flue Hole 3 1 8 80 mm 8 7 16...

Страница 69: ...convertible pour une utilisation au gaz naturel et aux gaz de pétrole liquéfié propane GPL quand une disposition est prise pour la simple conversion d un gaz à l autre Approuvé pour un contexte commercial Approuvé pour une installation à des altitudes allant jusqu à 3109 m 10 200 pieds Gaz Naturel Gaz Propane Gaz Naturel Gaz Propane Pression d alimentation minimale 4 5 in 114 mm W C 8 0 in 203 mm ...

Страница 70: ...tacter notre service à la clientèle et demander à ce que cela ne se fasse pas pour vous Nous continuerons cependant dans ce cas à vous contacter nous mêmes avec des informations relatives au x produit s que vous avez enregistré s et ou sur votre compte chez nous N entreposez pas ou n utilisez pas d essence ou d autres vapeurs ou liquides inflammables à proximité de cet appareil ou de n importe que...

Страница 71: ...nez le thermostat sur le réglage de consigne le plus bas possible 2 Coupez l alimentation électrique de l appareil par le bouton marche arrêt ON OFF 3 Repérez le robinet de coupure manuelle de gaz sur le côté du chauffage Tournez le dans le sens horaire jusqu à la fermeture totale position OFF REMARQUE Le ventilateur va continuer de tourner jusqu au refroidissement de l appareil Ne coupez pas l ap...

Страница 72: ... SORTIE D AIR CHAUD COUVERCLE DU BAS TENIR LES DEUX CÔTÉS ET TIRER VERS VOUS AFFICHAGE PLAQUE SIGNALÉTIQUE RÉFÉRENCE DE MODÈLE N DE SÉRIE TYPE DE GAZ ETC THERMISTANCE FICHE PLUG 120V AC 60 Hz FILTRE À AIR CONDUITE D ÉVACUATION TUYAU D ADMISSION D AIR DE COMBUSTION TERMINAISON DE VENTILATION COMBUSTION ÉVACUATION CONNEXIONS DE GAZ 1 2 mâle NPT ...

Страница 73: ...rêt seront bloquées S il est activé pendant que le chauffage est à l arrêt toutes ses commandes seront bloquées Si le chauffage a été arrêté pendant que le verrouillage est activé il ne pourra pas être remis en marche avant que le verrouillage ne soit désactivé La désactivation du verrouillage libère les boutons de commande Marche Arrêt Actionnez le bouton ON OFF pour activer désactiver le chauffa...

Страница 74: ...es Les boutons et indicateurs qui suivent sur le panneau de commandes restent fonctionnels quelque soit le mode Bouton M A ON OFF Indicateur de filtre FILTER Indicateur de Marche ON AFFICHEUR L écran sera vide sauf en cas d apparition de code d erreur Tous les codes d erreur seront visibles à l affichage quelque soit le mode de fonctionnement Ces codes d erreur ne seront pas visibles sur le thermo...

Страница 75: ...n ON OFF 2 Appuyez sur les flèches vers le haut ou vers le bas pour régler la température Le côté gauche de l écran affiche le réglage de la température Le côté droit de l écran indique la température ambiante Réglage de l horloge Fonctionnement du Fournaise Manuellement Réglage et Utilisation des Minuteries 2 Le voyant près de la légende Clock va clignoter Pressez les boutons de flèche montante U...

Страница 76: ... Ce mode d économie d énergie ne fonctionne pas si le générateur d air chaud a une capacité sous dimensionnée par rapport à la taille de la pièce Économie Mode d économie énergétique 2 F de réduction 2 F de réduction 30 mi 30 mi Température prédétermi Cette fonction permet de déterminer à l avance une température minimale pour la pièce à définir entre 38ºF et 78ºF par incréments de 2ºF Cette tempé...

Страница 77: ...lissez le d eau Ne pas dépasser la ligne de remplissage Repoussez le bac plein en place et remettez le panneau de remplissage du bas Ne faites pas fonctionner l appareil sans que de bac d humidificateur soit en place Durant le fonctionnement une petite quantité de condensation est produite dans le système d évacuation et retombe dans le bac d humidificateur Lorsque vous supprimez le volet inférieu...

Страница 78: ...hangeur thermique et des pales de ventilateur 4 Essuyez le coffret avec un chiffon doux sec N utilisez pas de chiffon mouillé ou de nettoyants en bombe sur le brûleur Le conduit de cheminée doit être inspecté annuellement pour repérer obstructions ou dommages Les moteurs comportent une lubrification permanente et n ont pas besoin de lubrification périodique Maintenez ventilateur et moteur exempts ...

Страница 79: ...ch OFF then ON again when power is restored to re set controls À l allumage Le chauffage ne fonctionne pas L appareil est il bien branché électriquement Y a t il un fusible grillé ou un disjoncteur déclenché au panneau de distribution en amont Y a t il une panne de secteur Le filtre à air est il saturé La sortie d air chaud est elle obstruée La conduite de cheminée est elle bouchée De l air chaud ...

Страница 80: ... se déclenchant il permet d arrêter l appareil 3 Dégagez toutes les obstructions La cheminée doit être gardée dégagée pour libérer les gaz d échappement Si l appareil a cessé de fonctionner contactez une agence de service qualifiée CODE AFFICHÉ DÉFAUT REMÈDE 11 1 Panne d allumage Vérifier que l arrivée de gaz est ouverte Vérifier l absence de blocage à la terminaison de ventilation Se référer à l ...

Страница 81: ...la combustion Si la flamme est éteinte panne de combustion du brûleur pendant que c est la logique de contrôle de température qui pilote l appareil il essaiera immédiatement de se rallumer Aucun code de défaut n apparaitra Problème Pas d indication de marche Pas d allumage du brûleur Combustion anormale Arrêt de combustion en fonctionnement Odeur de gaz Allumage bruyant Réchauffage de la pièce tro...

Страница 82: ...ENTILATEUR DE CONVECTION FILTRE À AIR MOTEUR DE CONVECTION PANNEAU FRONTAL INTERRUPTEUR DE SURCHAUFFE N 1 THERMISTANCE DE SURCHAUFFE ÉCHANGEUR THERMIQUE ÉLECTRODE DE DÉTECTION DE FLAMME PERSIENNE FUSIBLE THERMIQUE ÉLECTRODE DISTRIBUTEUR RACCORDEMENT DE CHAMBRE DE COM BUSTION BRÛLEUR REGISTRE D AIR SECONDAIRE REGISTRE CORDON D ALIMENTATION SECTEUR THERMISTANCE CAPOT INFÉRIEUR INJECTEUR INTERRUPTEUR...

Страница 83: ... dangereux Vérifiez le bon fonctionnement après une intervention ATTENTION CODE COLOR bk noir bl bleu gr vert gr y Vert jaune r rouge w blanc y jaune gy gris or orange br brun NOM DE PIÈCE NOM DE PIÈCE MS COMMUTATEUR PRINCIPAL OH TH THERMISTANCE DE SURCHAUFFE R TH THERMISTANCE OHS 1 2 INTERRUPTEUR DE SURCHAUFFE 1 2 TF FUSIBLE THERMIQUE FM F FUSIBLE SP ÉCLATEUR ER ÉLECTRODE SV1 2 ÉLECTROVANNE 1 2 P...

Страница 84: ...HAUFFE R TH THERMISTANCE OHS1 2 INTERRUPTEUR DE SURCHAUFFE 1 2 TF FUSIBLE THERMIQUE FM F FUSIBLE SP ALLUMEUR ER ÉLECTRODE SV1 2 ÉLECTROVANNE 1 2 POV VANNE MODULATRICE BL TR TRANSFORMATEUR PS DÉTECTEUR DE PRESSION FR ÉLECTRODE DE DÉTECTION DE FLAMME W TH THERMOSTAT MURAL CODE COLOR bk noir bl bleu gr vert gr y Vert jaune r rouge w blanc y jaune gy gris or orange br brun ...

Страница 85: ...s de réparation seront des pièces Rinnai d origine Toutes les réparations ou les remplacements seront effectués par un professionnel agréé ou une société de service convenablement formés habilités dans l État ou la Province pour ce type de réparations Réf Période de couverture Échangeur thermique 10 ans à partir de l achat Toutes les autres pièces 5 ans à partir de l achat Main d œuvre raisonnable...

Страница 86: ...se application force majeure installation incorrecte comme sans y être limité dommages par condensats ventilation incorrecte type de gaz inapproprié ou pression de gaz hors limites conversion incorrecte y compris des conversions pour ajustement d inventaire mauvaise maintenance comme sans y être limité un blocage de ventilation calibre incorrect toute cause autre que des défauts dus aux matériaux ...

Страница 87: ...Manuel EX08CT EX11CT de Rinnai Corporation 87 NOTES ...

Страница 88: ...107517 RHF265 1107X02 00 200000072 02 5 2018 ...

Отзывы: