background image

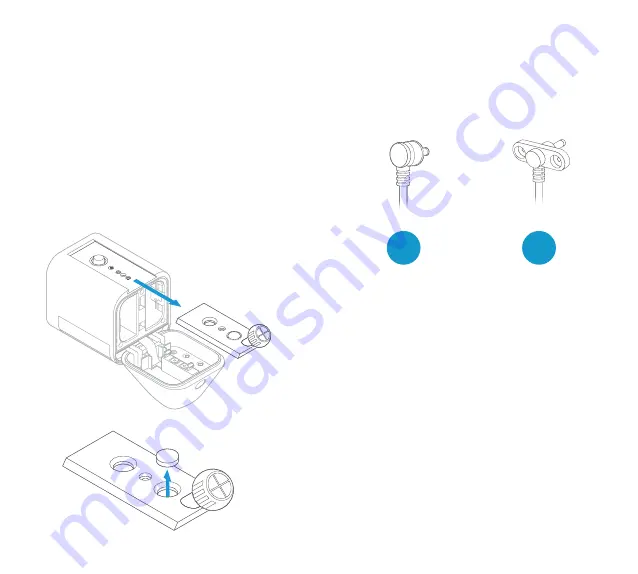
Plug in your  

Solar Panel.

If your Solar Panel plug looks 

like example 1, simply insert it 

into the power port on the rear 

of your Spotlight Cam.

Press the plug in firmly, until 

you feel it click into place. 

You’re all set!

If your Solar Panel plug looks 

like example 2, skip to the  

next page.

Remove the seal.

Remove the weatherproofing 

seal on the rear of your 

Spotlight Cam.

Then, slot the mounting plate 

back into place.

1

2

29

28

Содержание Spotlight Cam

Страница 1: ...Spotlight Cam Battery ...

Страница 2: ...roperty Now you ll always be the first to know when someone s in your yard and you can watch over your home from anywhere Monitor your home prevent crime and protect your property all from your phone tablet or PC Contents 1 Charge the battery 2 Set up your Spotlight Cam 3 Install your Spotlight Cam 4 Need help with setup 3 2 ...

Страница 3: ... source using the provided USB cable The small light on top will glow green once fully charged Charged Charging If you can t wait to play with your Spotlight Cam go ahead and set it up But we recommend fully charging it before installation 1 Charge the included battery 5 ...

Страница 4: ...2 Set up your Spotlight Cam in the Ring app Insert the battery After charging insert the battery in your Spotlight Cam until it clicks into place Then click the door closed A C B ...

Страница 5: ...om app Download from Windows Store Your Wi Fi password Grab your Wi Fi password It s required for the in app setup Write it down below so it s handy when you need it Spotlight Cam Wired Spotlight Cam Battery Set up your Spotlight Cam near your router In the Ring app select Set Up Device When prompted select Spotlight Cam and follow the in app instructions 9 ...

Страница 6: ...p to see video from the camera White light flashing If the light on the bottom of your Spotlight Cam flashes after setup it s updating its internal software The update process can take up to a few minutes The light stops flashing when the update is complete 11 10 ...

Страница 7: ...eo quality outside Now take your Spotlight Cam outside near the place where you want to install it Test video quality again Everything look good Continue to the next section Something not right Jump ahead to the troubleshooting section 12 ...

Страница 8: ...ucco or brick Mounting Bracket Attach this to the wall first then pop Spotlight Cam into the socket Install Screws 5 Use these to secure the mounting bracket to your wall Wall Anchors 5 Use these to attach the mounting bracket to your wall if installing on a hard surface such as stucco or brick What s in the box How to remove the mounting plate 2 Remove security screw 3 Press release button 1 Pres...

Страница 9: ...alling Spotlight Cam on a wall insert the mounting plate with the ball socket pointing down If installing on an eave Before installing Spotlight Cam on an eave or overhang insert the mounting plate with the ball socket pointing up 17 16 ...

Страница 10: ...ion 30 feet 10 Meters 9 feet 3 Meters Parallel to ground Choose your install height When mounted at 9 feet off the ground with the motion detector parallel to the ground the motion sensor is optimized to detect human sized objects at up to 30 feet ...

Страница 11: ...ng the mounting bracket as a guide If installing on a masonry surface first drill holes using the provided drill bit Insert the wall anchors before inserting the screws If installing on a wood surface you can screw the bracket directly into your wall 21 20 ...

Страница 12: ... need to charge or swap out batteries If you don t yet have a Ring Solar Panel skip this section For more info visit ring com Mark the holes Select an install location where Solar Panel can get at least 1 hour of direct sunlight a day Mark the holes using the mounting arm as a template 23 22 ...

Страница 13: ...mounting holes then insert the wall anchors If installing on wood or siding skip this step Screw in the mounting arm Drive the included mounting screws into your wall or the wall anchors if installing on a hard surface until the mounting arm is secure It s easier to screw in the mounting arm before you attach the solar panel 25 24 ...

Страница 14: ...lot the Solar Panel onto the mounting arm and make sure it s secure Adjust the panel angle Loosen the screw on the mounting arm and adjust the panel to your desired angle then re tighten the screw to secure your setting 27 26 ...

Страница 15: ... the rear of your Spotlight Cam Press the plug in firmly until you feel it click into place You re all set If your Solar Panel plug looks like example 2 skip to the next page Remove the seal Remove the weatherproofing seal on the rear of your Spotlight Cam Then slot the mounting plate back into place 1 2 29 28 ...

Страница 16: ...any other screws to secure the plug Be sure to charge and insert the included battery Ring Solar Panel charges the battery but does not replace it Attach Spotlight Cam to the mounting bracket First fully loosen the metal collar on the bracket using the phillips end of the included screwdriver Then push the ball into the socket until it snaps into place 31 ...

Страница 17: ...just the camera angle To ensure accurate motion detection position the camera with the motion detector parallel to the ground Then tighten the screw on the metal collar to secure the camera position 33 32 ...

Страница 18: ... most common setup issues come from entering the wrong Wi Fi password These passwords are case sensitive and every little error counts Reboot your router If you entered the right password but you re having no luck try turning your Wi Fi router off wait 30 seconds then turn it back on Then begin setup again in the Ring app 34 35 ...

Страница 19: ...e 1 310 929 7085 For a list of all of our customer support numbers visit ring com callus To review your warranty coverage please visit www ring com warranty Patents www ring com patents 2019 Ring LLC or its affiliates Ring Alexa Always Home and all related logos are trademarks of Amazon com Inc or its affiliates Last updated 03 14 19 ...

Отзывы: