background image

27

Everest 600 プリンタのメンテナンス

2001474_B

詳細は 

rimage.com/support

 をご覧ください。 

f. 

モード スイッチ

を正しい動作位置に回します。詳細は、9 ページの「

スイッチ

」ご参照してください。

g. 

プリンタ

の電源をオンにします。

プリンタの使用準備ができました。

センサーのクリーニング

センサーのクリーニングが必要な場合は、次の通りです。

•  プリンタが印刷リボンを認識できないという内容のエラー メッセージが表

示された場合。

•  上部センサーが応答していないという内容のエラー メッセージが表示され

た場合。

•  下部センサーが応答していないという内容のエラー メッセージが表示され

た場合。

•  印刷が中心からずれている場合。


#

必要なツール:

•  長い柄つきのスポンジ ブラシ  

(Everest クリーニング キット

に含まれています)

•  圧縮空気缶

1. 

センサー

にアクセスします。

a.  2 つの

サイド カバー ラッチ

押して、サイド カバーを外し

ます。

b. 

サイド カバー

を降ろして開き

ます。

c. 

ラッチ 1

 を開けます。

d. 

印刷リボン キャリヤ

を取り外します。詳細な手順については、17 ペー

ジの「

印刷リボンの取り外し

」を参照してください。

e.  印刷リボン キャリヤを取り外します。詳細な手順については、20 ペー

ジの「

再転写リボンの取り外し

」を参照してください。

2. 

プリンタ、オートローダまたは AutoPrinter

 の電源をオフにします。詳細

は、10 ページ の「

Everestn600nプリンタの電源オンとオフ

」を参照してく

ださい。

重要!

プリンタの電源が完全にオフになるまで、プリンタ センサーの清掃は

しないでください。

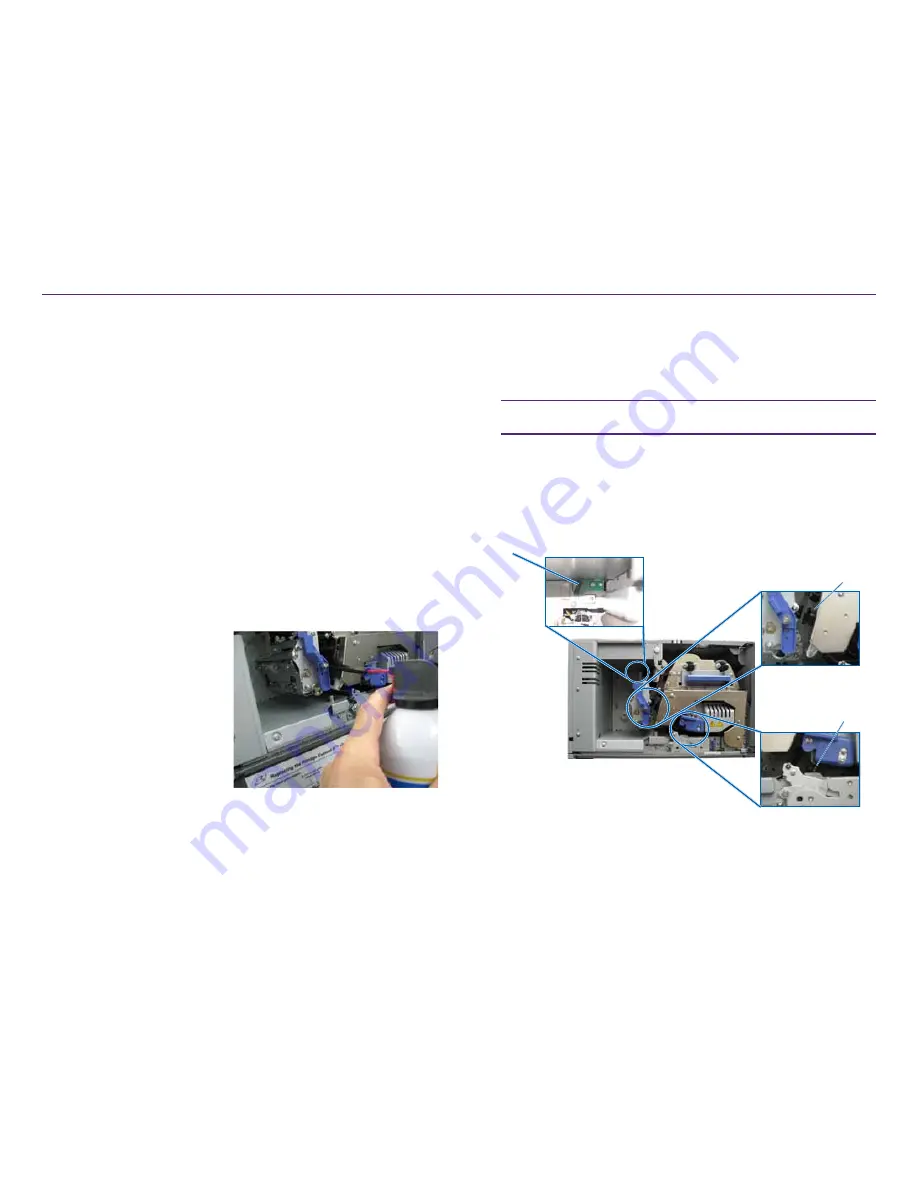
3. 

センサー

の検索

•  印刷リボン センサー
•  上部センサー
•  下部センサー 

上部センサー

下部センサー

印刷リボン 

センサー

Содержание Everest 600

Страница 1: ...Rimage Everest 600 Printer User Guide ...

Страница 2: ...e owned and operated by third parties Rimage Corporation is not responsible for the content of any such third party site 2012 Rimage Corporation Rimage is a registered trademark of the Rimage Corporation Professional and Everest are trademarks of the Rimage Corporation Dell is trademark of Dell Computer Corporation FireWire is a trademark of Apple Computer Inc Windows is a registered trademark of ...

Страница 3: ...s Printing Preferences PC 11 Access Printing Preferences through the Windows Start Menu 11 Access Printing Preferences through CD Designer 11 Access Printing Preferences when Printing PDFs 12 Set the Media Type Media Size Orientation and Ribbon Type PC 12 Set the Print Quality Color Matching and Image Adjustments PC 12 Set the Printable Area PC 13 Adjust the Print Alignment and Color Density PC 13...

Страница 4: ...the benefits and capabilities of the product Important An Important note provides information essential to the completion of a task Important supplemental information You can disregard information in a Tip and still complete a task but do not disregard an Important note n n Caution A Caution indicates that failure to observe this guideline could result in loss or damage to the equipment product so...

Страница 5: ...Name Date of Purchase Learn More Online At www rimage com support you can experience Rimage s world class Support and Services From the Support home page 1 Select your product series 2 Select your product 3 Learn more on the product page From your product page you can access Information about the latest software and firmware updates Product specifications The latest documents Current firmware and ...

Страница 6: ...for the geographical area within a radius of 20km from the center of NY Alesund n n Caution All equipment with AC line voltage or low DC voltages such as switches power supplies fuses fans and non stepper motors must be replaced with Rimage approved components to maintain the safety approval issued by UL Use only the supplied AC power cord Fore more information or to order a new power cord contact...

Страница 7: ...his Class A digital apparatus complies with Canadian ICES 003 Issue 4 2004 Cet appareil numerigue de la classe A est conforme a la norme NMB 003 du Canade This product complies with CAN CSA C22 2 No 60950 1 03 1st edition Notice for Europe This product is in conformity with the EMC Directive 89 336 EEC and the Low Voltage Directive 73 23 EEC through compliance with the following European standards...

Страница 8: ...te full color discs Print ribbons are also available in black Everest 600 Ribbons Ribbon Type Number of Discs Printed 3 Color CMY 500 Black monochrome 1000 Retransfer ribbon 500 prints 500 Label Design Requirements The Everest 600 Windows compatible software ships with the CD Designer label editor software This software is installed on your PC during a typical installation of the Rimage software I...

Страница 9: ...lone printer or on an AutoEverest AutoPrinter and you are printing directly from an image editing program you can work in the color mode of your choice Resolution pixels per inch For best results use images set to a minimum of 300 pixels per inch You may notice better results if you use images with 600 pixels per inch or higher Print Requirements Any label you create and save through CD Designer i...

Страница 10: ...control panel allows you to monitor and control the printer The table below identifies the name and function of all parts of the control panel Control Panel Indicators Image Name Function Operator button The Operator button is used to complete the following tasks Open the printer tray Close the printer tray Reset after an error Put the printer into sleep mode To put the printer into sleep mode pre...

Страница 11: ...es Print ribbon problem incorrect missing or depleted print ribbon 3 flashes Retransfer ribbon problem missing or depleted retransfer ribbon 4 flashes Error upon clamping the disc on the printer tray Active indicator light The Active indicator light illuminates when the printer has completed initialization The Active indicator light flashes when the printer is receiving data from the host Power in...

Страница 12: ... power outlet AC Voltage Switch Mode Switch Mode Switch Important You must power off the printer before changing the mode Power the printer on when the mode switch is set The mode switch is a rotary switch used to set the operational mode of the Everest 600 The opening at the base of the cap on the switch indicates the selected mode When the printer is shipped it is set to the correct mode for you...

Страница 13: ...utoloader or AutoPrinter Follow these steps if your Everest 600 is connected to an autoloader or AutoPrinter To power on the printer power on the autoloader or AutoPrinter To power off the printer power off the autoloader or AutoPrinter Tip The printer enters power saving mode if it is idle for more than 30 minutes When this occurs the printer takes 2 3 minutes to warm up after a job is sent to th...

Страница 14: ...iameter 17 mm Access Printing Preferences PC Use one of the procedures below to access the Everest 600 Printing Preferences Access Printing Preferences through the Windows Start Menu Using this method printing preferences are saved in the printer driver settings and are applied to all newly created labels 1 Select Start Devices and Printers Tip In Windows XP select Start Printers and Faxes Navigat...

Страница 15: ...the appropriate Media Type b Select the appropriate Media Size c Select the desired number of Copies d Select the desired Orientation e Select the appropriate type of Ribbon 4 When you have made the desired choices in the Rimage Everest 600 Printing Preferences window select Apply 5 Select OK to close the Rimage Everest 600 Printing Preferences window Set the Print Quality Color Matching and Image...

Страница 16: ...w select Apply 4 Select OK to close the Rimage Everest 600 Printing Preferences window Adjust the Print Alignment and Color Density PC 1 Access Printing Preferences Refer to page 11 for instructions 2 Select the Utility tab 3 Select Status Monitor button The Rimage Everest 600 Status Monitor window opens with the Status tab active Tip On the Status tab you can view the progress of a print job the ...

Страница 17: ...ntinue setting your printing preferences select other options from the third dropdown list OR Select Print to print the label Define Your Print Settings on a Macintosh The print settings allow you to set up your Everest 600 printer to produce the best possible labels on your discs Important The location of the preferences described in this section will change depending on the program used to print...

Страница 18: ...nue setting your printing preferences select other options from the third dropdown list OR Select Print to print the label Adjust the Print Alignment and Color Density Macintosh In the Everest Utility you can adjust the print alignment and the color density The Everest Utility also allows you to view information such as the current firmware version serial number and installed ribbon type and to up...

Страница 19: ... remaining windows close e Select Close to close the Status Monitor window f Select OK to close the Printing Preferences window View the Ribbon Status Macintosh The Status tab of the Everest Utility window for Macintosh allows you to view the estimated percentage and number of prints remaining on the print and retransfer ribbons 1 Access the Everest Utility a Select System Preferences Print Fax Th...

Страница 20: ...fer to the Clean the Rear Air Filters section on page 23 and Clean the Side Air Filters section on page 24 Clean the platen roller Important Clean the platen roller only if you notice a diminished print quality such as white specks on the printed disc Refer to the Clean the Platen Roller section on page 25 Clean the exterior Weekly Wipe the exterior of the printer with a lint free cloth Important ...

Страница 21: ...r c Lay the print ribbon carrier on its back Print Ribbon Carrier Latch 1 Tip Perform cleaning procedures while the print ribbon is removed For more information refer to the Clean the Everest 600 Printer section on page 21 3 Remove the print ribbon from the carrier a Slide the supply roll to the left b Slide the take up roll to the right c Discard the used print ribbon Supply Roll Take up Roll ...

Страница 22: ...d to lift the ribbon up from the tacky roller to straighten it Important Do not rotate the ribbon past the Cleaning Bars at the front of the ribbon If you installed a monocolor ribbon advance the ribbon so the ink portion of the ribbon is advanced to the take up roll 3 Reassemble the printer a Set the print ribbon carrier upright b Slide the print ribbon carrier into the printer c Close latch 1 d ...

Страница 23: ...ns are stored at a temperature between 41 and 95 F 5 to 35 C and humidity level between 45 and 85 Avoid moisture and direct sunlight Do not reuse ribbons Make sure you only use ribbons designed for the Everest 600 printer Remove the Retransfer Ribbon 1 Open the side cover a Press the two side cover latches to release the side cover b Lower the side cover Side Cover Latches Side Cover 2 Remove the ...

Страница 24: ...on winds under the supply roll d Bring the take up roll up and around the guide rollers and snap the roll into place Supply Roll Take up Roll Retransfer Ribbon Carrier 3 Rotate the take up roll counterclockwise in order to tighten the retransfer ribbon 4 Reassemble the printer a Slide the retransfer carrier into the printer b Close latches 1 2 and 3 c Close the side cover The printer is ready for ...

Страница 25: ...Print Head Area to Wipe Roller b Use the sponge swab to wipe across the print head from one end to the other in the direction shown c Repeat as needed until the print head is clean of dust and debris d Use the sponge swab to remove any waxy buildup from the roller below the print head 3 Prepare the printer for use a Install the print ribbon For specific instructions refer to the Change the Print R...

Страница 26: ...ler 2 4 Prepare the printer for use a Install the print ribbon carrier b Close all latches c Close the side cover The printer is ready for use Tacky Roller 2 Clean the Rear Air Filter Tool Required Phillips 2 screwdriver 1 Remove the air filter a At the rear of the printer remove the Phillips screws Qty 2 that secure the fan cover b Remove the fan cover c Remove the air filter 2 Clean the air filt...

Страница 27: ...ed fan cover 2 Remove the fan cover from the side cover a Remove the Torx T10 screws Qty 4 from the inside of the side cover b Close the side cover The fan cover remains on the work surface with air filters exposed Tip If the fan cover remains attached to the side cover gently lower the fan cover 3 Remove the three air filters from the fan cover Side Cover 4 Clean the air filters a Hold each air f...

Страница 28: ... printer is ready for use Clean the Platen Roller Important Clean the platen roller only if you notice a diminished print quality such as white specks on the printed disc Tools required Sponge swabs with long handles included in the Everest Cleaning Kit 99 Isopropyl alcohol Tabs Side Cover Fan Cover 1 Prepare to clean the platen roller a Power off the printer b At the back of the printer turn the ...

Страница 29: ...o the right of the print head a Remove the sponge swab and the swab handle from the Everest cleaning kit Platen Roller Print Head b Insert the sponge swab into the unnotched end of the swab handle c Apply isopropyl alcohol to the sponge swab d As the platen roller rotates use the sponge swab to wipe the platen roller n n Caution Do not apply pressure when cleaning the platen roller with the sponge...

Страница 30: ...red Sponge swabs with long handles included in the Everest cleaning kit Can of compressed air 1 Access the sensors a Press the two side cover latches to release the side cover b Lower the side cover c Open latch 1 d Remove the print ribbon carrier For specific instructions refer to the Remove the Print Ribbon procedure on page 17 e Remove the retransfer ribbon carrier For specific instructions ref...

Страница 31: ... 5 Clean the sensors a Position the slotted end of the swab handle by the sensor Refer to page 27 for the sensors location b Position the can of compressed air s nozzle in the unnotched end of the handle c Blow compressed air in to the end of the handle for one to two seconds d Repeat two to three times e Repeat for each of the three sensors Sponge Swab Notch Swab Handle 6 Prepare the Printer for ...

Страница 32: ...Rimage Everest 600 Drucker Benutzerhandbuch ...

Страница 33: ...s zu Internet Sites die das Eigentum von Drittanbietern sind und von diesen verwaltet werden Rimage Corporation ist für den Inhalt von Drittanbieter Sites nicht verantwortlich 2012 Rimage Corporation Rimage ist eine eingetragene Marke der Rimage Corporation Professional und Everest sind Marken der Rimage Corporation Dell ist eine Marke der Dell Computer Corporation FireWire ist eine Marke von Appl...

Страница 34: ... Zugreifen auf die Druckeinstellungen PC 11 Zugreifen auf die Druckeinstellungen über das Startmenü von Windows 11 Zugreifen auf die Druckeinstellungen über CD Designer 11 Zugreifen auf Druckeinstellungen beim Drucken von PDF Dateien 12 Einstellen von Medientyp Mediengröße Ausrichtung und Bandtyp PC 12 Festlegen der Druckqualität Farbabstimmung und Bildeinstellungen PC 12 Festlegen des bedruckbare...

Страница 35: ...en dazu bei dass Sie die Vorteile und Möglichkeiten die das Produkt bietet besser verstehen Wichtig Ein wichtiger Hinweis enthält Informationen die zur Durchführung eines Verfahrens oder einer Aufgabe unbedingt erforderlich sind Bei einem wichtigen Hinweis kann es sich auch um wichtige Zusatzinformationen handeln Normale Tipps können durchaus außer Acht gelassen werden wichtige Hinweise sollten je...

Страница 36: ...Weitere Online Informationen Unter www rimage com support können Sie die erstklassigen Support und Kundendienstleistungen von Rimage in Anspruch nehmen Auf der Support Homepage 1 Wählen Sie die Produktserie aus 2 Wählen Sie das Produkt aus 3 Lesen Sie die Angaben auf der Produktseite Auf der Produktseite stehen folgende Informationen zur Verfügung Informationen über die neuesten Software und Firmw...

Страница 37: ...n im Umkreis von 20 km um das Zentrum von NY Alesund n n Vorsicht Damit die Sicherheitszulassung von UL aufrechterhalten werden kann sind sämtliche Gerätekomponenten für die Wechselspannung oder niedrige Gleichspannung verwendet wird z B Schalter Netzgeräte Sicherungen Lüftungen oder Motoren bei denen es sich nicht um Schrittmotoren handelt durch von Rimage zugelassene Komponenten zu ersetzen Verw...

Страница 38: ...ale Gerät der Klasse A entspricht der kanadischen Norm ICES 003 Ausgabe 4 2004 Cet appareil numerigue de la classe A est conforme a la norme NMB 003 du Canade Dieses Produkt entspricht CAN CSA C22 2 No 60950 1 03 1 Ausgabe Hinweis für Europa Dieses Produkt entspricht der EMC Richtlinie 89 336 EEC und der Richtlinie für Niedrigspannung 73 23 EEC unter Einhaltung der folgenden europäischen Standards...

Страница 39: ...iscs im Vollfarbdruck Druckbänder sind außerdem in Schwarz erhältlich Everest 600 Bänder Bandtyp Anzahl bedruckbarer Discs 3 farbig CMY 500 Schwarz einfarbig 1 000 Retransfer Band 500 Drucke 500 Grafikdesign Anforderungen Die Windows kompatible Everest 600 Software wird mit der Grafikeditor Software CD Designer geliefert Diese Grafikeditor Software wird bei der normalen Installation der Rimage Sof...

Страница 40: ...erät oder einen AutoEverest AutoPrinter handelt und Sie direkt von einem Bildbearbeitungsprogramm drucken können Sie einen beliebigen Farbmodus verwenden Auflösung Pixel pro Zoll Um optimale Ergebnisse zu erzielen verwenden Sie Bilder mit einer Auflösung von mindestens 300 Pixel pro Zoll ppi Eventuell erzielen Sie bessere Ergebnisse wenn Sie Bilder mit 600 Pixel oder mehr verwenden Druckanforderun...

Страница 41: ...ie den Drucker überwachen und steuern In der nachstehenden Tabelle werden Name und Funktion aller Bedienfeld Elemente aufgeführt Kontrollleuchten am Bedienfeld Disc Image Name Funktion Bedienertaste Mit der Bedienertaste werden folgende Aufgaben ausgeführt Druckerschublade öffnen Druckerschublade schließen Nach einem Fehler Drucker zurücksetzen Drucker in den Standby Modus setzen Um den Drucker in...

Страница 42: ...2 Blinkvorgänge Druckband Problem falsch eingelegtes fehlendes oder fast leeres Druckband 3 Blinkvorgänge Retransfer Band Problem fehlendes oder fast leeres Retransfer Band 4 Blinkvorgänge Fehler beim Greifen der Disc in der Druckerschublade Kontrollleuchte Aktiv Die Kontrollleuchte Aktiv leuchtet auf wenn der Drucker die Initialisierung abgeschlossen hat Die Kontrollleuchte Aktiv blinkt wenn der ...

Страница 43: ...nnung ein Versorgungs spannungs wahlschalter Drehcodierschalter Drehcodierschalter Wichtig Bevor Sie die Stellung des Drehcodierschalters ändern müssen Sie den Drucker vom Netz trennen Schalten Sie den Drucker erst ein nachdem Sie die Position des Drehcodierschalters eingestellt haben Mit dem Drehcodierschalter stellen Sie den Betriebsmodus des Everest 600 ein An der Öffnung in der Kappe auf dem D...

Страница 44: ...er Everest 600 mit einer Roboter Station oder einem AutoPrinter verbunden ist gehen Sie wie folgt vor Schalten Sie zum Einschalten des Druckers die Roboter Station oder den AutoPrinter ein Schalten Sie zum Ausschalten des Druckers die Roboter Station oder den AutoPrinter aus Tipp Der Drucker wechselt in den Standby Modus wenn er sich länger als 30 Minuten im Leerlauf befunden hat In diesem Fall be...

Страница 45: ...urchmesser 17 mm Zugreifen auf die Druckeinstellungen PC Verwenden Sie eine der nachstehend beschriebenen Methoden um auf die Everest 600 Druckeinstellungen zuzugreifen Zugreifen auf die Druckeinstellungen über das Startmenü von Windows Bei Verwendung dieser Methode werden die Druckeinstellungen in den Druckertreibereinstellungen gespeichert und auf alle neu erstellten Grafiken angewendet 1 Wählen...

Страница 46: ...en entsprechenden Medientyp aus b Wählen Sie unter Media Size Mediengröße die entsprechende Mediengröße aus c Wählen Sie unter Copies Kopien die gewünschte Anzahl der Kopien aus d Wählen Sie unter Orientation Ausrichtung die gewünschte Ausrichtung aus e Wählen Sie unter Ribbon Bandtyp den entsprechenden Bandtyp aus 4 Nachdem Sie Ihre Auswahl im Fenster Rimage Everest 600 Printing Preferences Druck...

Страница 47: ...instellungen wird geschlossen e Über die Option Default Standard können Sie bei Bedarf die Standardeinstellungen wiederherstellen f Nachdem Sie Ihre Auswahl im Fenster Rimage Everest 600 Printing Preferences Druckeinstellungen für Rimage Everest 600 getroffen haben wählen Sie Apply Übernehmen 4 Wählen Sie OK um das Fenster Rimage Everest 600 Printing Preferences Druckeinstellungen für Rimage Evere...

Страница 48: ...tellungen auf einem Macintosh Computer Über die Druckeinstellungen können Sie den Everest 600 Drucker so einrichten dass Sie Grafiken in bestmöglicher Qualität auf die Discs aufbringen Wichtig Wo Sie die in diesem Abschnitt beschriebenen Einstellungen finden ist davon abhängig welches Programm Sie zum Drucken der Grafikdatei verwenden Zugreifen auf die Druckeinstellungen Macintosh 1 Öffnen Sie die...

Страница 49: ...ssen der Druckausrichtung und Farbdichte Macintosh Über das Everest Dienstprogramm können Sie die Druckausrichtung und die Farbdichte einstellen Im Everest Dienstprogramm können Sie Informationen wie die aktuelle Firmware Version die Seriennummer und den eingelegten Bandtyp anzeigen und Ihre Drucker Firmware aktualisieren Wichtig Die Einstellungen im Everest Dienstprogramm können nur geändert werd...

Страница 50: ...s Monitor Statusüberwachung auf Close Schließen f Wählen Sie OK um das Fenster Printing Preferences Druckeinstellungen zu schließen Anzeigen des Bandstatus Macintosh Im Fenster Everest Utility Everest Dienstprogramm können Sie auf der Registerkarte Status Macintosh die geschätzte Anzahl noch möglicher Drucke sowie die geschätzte verbleibende Menge des Druck und Retransfer Bands in Prozent anzeigen...

Страница 51: ...er seitlichen Luftfilter auf Seite 23 Andruckrolle reinigen Wichtig Die Andruckrolle sollte nur bei Verringerung der Druckqualität gereinigt werden wie etwa beim Auftreten weißer Flecken auf der bedruckten Disc Informationen hierzu finden Sie unter Reinigen der Andruckrolle auf Seite 25 Außenseiten reinigen wöchentlich Wischen Sie die Außenseite des Druckers mit einem fusselfreien Tuch ab Wichtig ...

Страница 52: ...Druckbandträger mit der Rückseite nach unten hin Druckbandträger Verriegelung 1 Tipp Führen Sie die Reinigungsmaßnahmen durch solange das Druckband ausgebaut ist Weitere Informationen hierzu finden Sie unter Reinigen des Everest 600 Druckers auf Seite 21 3 Entfernen Sie das Druckband vom Träger a Schieben Sie die Zuführungsrolle nach links b Schieben Sie die Aufnahmerolle nach rechts c Entsorgen S...

Страница 53: ...inigungsrolle abheben um es gerade auszurichten Wichtig Drehen Sie das Band nicht über die Reinigungsstäbe auf der Vorderseite des Bands hinaus Wenn Sie ein einfarbiges Band eingelegt haben drehen Sie es so weit vor bis der Bandabschnitt der Farbe enthält auf der Aufnahmerolle aufliegt 3 Bauen Sie den Drucker wieder zusammen a Richten Sie den Druckbandträger auf b Schieben Sie den Druckbandträger ...

Страница 54: ...tigkeit zwischen 45 und 85 gelagert werden Vermeiden Sie Feuchtigkeit und direktes Sonnenlicht Verwenden Sie die Bänder nur einmal Verwenden Sie ausschließlich Bänder die für den Everest 600 geeignet sind Entfernen des Retransfer Bands 1 Öffnen Sie die Seitenabdeckung a Drücken Sie auf die beiden Verriegelungen an der Seitenabdeckung um die Seitenabdeckung zu öffnen b Klappen Sie die Seitenabdecku...

Страница 55: ...erläuft d Führen Sie die Aufnahmerolle nach oben und um die Führungsrollen herum und drücken Sie sie bis zum Einrasten ein Zuführungsrolle Aufnahmerolle Retransfer Bandträger 3 Drehen Sie die Aufnahmerolle gegen den Uhrzeigersinn um das Retransfer Band zu straffen 4 Bauen Sie den Drucker wieder zusammen a Schieben Sie den Retransfer Träger in den Drucker ein b Schließen Sie die Verriegelungen 1 2 ...

Страница 56: ...igender Bereich des Druckkopfs Rolle b Wischen Sie mit dem Reinigungsschwamm den Druckkopf von einem Ende zum anderen ab siehe Abbildung c Wiederholen Sie diesen Schritt bei Bedarf bis Staub und andere Verunreinigungen restlos vom Druckkopf entfernt sind d Entfernen Sie mit dem Reinigungsschwamm Wachs und Verunreinigungen von der Rolle unter dem Druckkopf 3 Bereiten Sie den Drucker für den Betrieb...

Страница 57: ...dträger ein b Schließen Sie alle Verriegelungen c Schließen Sie die Seitenabdeckung Der Drucker ist jetzt betriebsbereit Reinigungs rolle 2 Reinigen des hinteren Luftfilters Benötigtes Hilfsmittel Kreuzschlitzschraubendreher PH 2 1 Entfernen Sie den Luftfilter a Drehen Sie auf der Rückseite des Druckers die Kreuzschlitzschrauben 2 Stück aus der Lüfterabdeckung heraus b Entfernen Sie die Lüfterabde...

Страница 58: ...ernen Sie die Lüfterabdeckung von der Seitenabdeckung a Drehen Sie die Torx T10 Schrauben 4 Stück von der Innenseite der Seitenabdeckung heraus b Schließen Sie die Seitenabdeckung Die Lüfterabdeckung verbleibt auf der Arbeitsfläche und die Luftfilter sind freigelegt Tipp Wenn die Lüfterabdeckung sich nicht von der Seitenabdeckung löst klappen Sie die Lüfterabdeckung vorsichtig herunter 3 Entfernen...

Страница 59: ...ie Andruckrolle sollte nur bei Verringerung der Druckqualität gereinigt werden wie etwa beim Auftreten weißer Flecken auf der bedruckten Disc Benötigte Hilfsmittel Reinigungsschwämme mit langem Griff im Everest Reinigungskit enthalten 99 prozentiger Isopropylalkohol 1 Bereiten Sie die Reinigung der Andruckrolle vor Nasen Seitenabdeckung Lüfterabdeckung a Schalten Sie den Drucker aus b Stellen Sie ...

Страница 60: ...Griff aus dem Everest Reinigungskit Andruck Rolle Druck kopf b Führen Sie den Reinigungsschwamm in das nicht eingekerbte Ende des Griffs ein c Geben Sie Isopropylalkohol auf den Reinigungsschwamm d Halten Sie den Reinigungsschwamm gegen die sich drehende Andruckrolle um sie abzuwischen n n Vorsicht Üben Sie keinen Druck aus wenn Sie die Andruckrolle mit den Reinigungsschwämmen reinigen Die Andruck...

Страница 61: ...en Griffen im Everest Reinigungskit enthalten Druckluftspray 1 Verschaffen Sie sich Zugriff zu den Sensoren a Drücken Sie auf die beiden Verriegelungen an der Seitenabdeckung um die Seitenabdeckung zu öffnen b Klappen Sie die Seitenabdeckung nach unten c Öffnen Sie Verriegelung 1 d Nehmen Sie den Druckbandträger heraus Genauere Anweisungen finden Sie unter Entfernen des Druckbands auf Seite 17 e Z...

Страница 62: ...or Informationen zu den Positionen der Sensoren finden Sie auf Seite 27 b Setzen Sie die Düse des Druckluftsprays auf das nicht eingekerbte Ende des Griffs c Sprühen Sie mit dem Druckluftspray ein bis zwei Sekunden in den Griff d Wiederholen Sie diesen Vorgang zwei bis drei Mal e Führen Sie diese Schritte bei allen drei Sensoren aus Kerbe 6 Bereiten Sie den Drucker für den Betrieb vor a Setzen Sie...

Страница 63: ...Guide de l utilisateur de l imprimante Rimage Everest 600 ...

Страница 64: ...ites Internet qui appartiennent et sont exploités par des tiers Rimage Corporation n est en aucun cas responsable du contenu de ces sites tiers 2012 Rimage Corporation Rimage est une marque déposée de Rimage Corporation Professional et Everest sont des marques de Rimage Corporation Dell est une marque de Dell Computer Corporation FireWire est une marque de Apple Computer Inc Windows est une marque...

Страница 65: ...cès aux options d impression PC 11 Accès aux options d impression par le biais du menu Start Démarrer de Windows 11 Accès aux options d impression via CD Designer 11 Accès aux options d impression au cours de l impression de fichiers PDF 12 Réglage du type et des dimensions du support ainsi que de l orientation et du type de ruban PC 12 Définition de la qualité d impression de la correspondance de...

Страница 66: ...et les possibilités du produit Important Une remarque importante fournit des informations essentielles pour l exécution d une tâche Information importante supplémentaire Si vous n êtes pas obligé de tenir compte d un conseil pour exécuter une tâche en revanche vous ne pouvez ignorer une remarque importante n n Attention Indique que la non observation de la directive correspondante pourrait provoqu...

Страница 67: ...en ligne Sur www rimage com support vous découvrirez les services et l assistance de classe mondiale offerts par Rimage À partir de la page d accueil Support Assistance 1 Sélectionnez la série de votre produit 2 Sélectionnez votre produit 3 Apprenez en plus sur la page du produit À partir de la page du produit vous pouvez accéder aux éléments suivants les informations sur les dernières mises à jou...

Страница 68: ...n Attention Tous les équipements avec des tensions secteur alternatives ou des basses tensions continues comme les interrupteurs les alimentations les fusibles les ventilateurs les moteurs autres que pas à pas doivent être remplacés par des composants agréés par Rimage afin de conserver l agrément de sécurité émis par UL N utilisez que le cordon d alimentation secteur fourni Pour de plus amples in...

Страница 69: ...e édition Avis pour le Canada Cet appareil numérique de classe A est conforme à ICES 003 Issue 4 2004 du Canada Cet appareil numérique de classe A est conforme à la norme NMB 003 du Canada Ce produit est conforme à la norme CAN CSA C22 2 No 60950 1 03 1re édition Avis pour l Europe Ce produit est conforme à la directive EMC 89 336 CEE et à la directive basse tension 73 23 CEE relatives aux normes ...

Страница 70: ...mplets Les rubans d impression sont également disponibles en noir Rubans pour l Everest 600 Type de ruban Nombre de disques imprimés 3 couleurs CMJ 500 Noir monochrome 1000 Ruban de retransfert 500 impressions 500 Exigences de conception d étiquettes Le logiciel compatible Windows de l imprimante Everest est accompagné d un éditeur d étiquettes dénommé CD Designer Ce logiciel est installé sur votr...

Страница 71: ...e vous imprimez directement à partir d un programme d édition des images vous pouvez travailler avec le mode couleurs de votre choix Résolution pixels par pouce Pour obtenir de meilleurs résultats utilisez une résolution d images minimale de 300 pixels par pouce Vous obtiendrez peut être de meilleurs résultats en utilisant des images avec une résolution de 600 pixels par pouce ou supérieure Exigen...

Страница 72: ... de surveiller et de commander l imprimante Le tableau ci dessous reprend le nom et la fonction de chaque élément du panneau de commande Voyants du panneau de commande Image Nom Fonction Bouton de commande Le bouton de commande est utilisé pour accomplir les tâches suivantes Ouverture du plateau de l imprimante Fermeture du plateau de l imprimante effectuer une réinitialisation après une erreur Mi...

Страница 73: ... ruban d impression type incorrect manquant ou épuisé 3 clignotements problème de ruban de retransfert manquant ou épuisé 4 clignotements erreur de maintien du disque sur le plateau de l imprimante Voyant lumineux Actif Le voyant lumineux Actif s allume lorsque l imprimante a terminé son initialisation Le voyant lumineux Actif clignote lorsque l imprimante reçoit des données provenant de l hôte Vo...

Страница 74: ...a prise de courant Commutateur de tension alternative Commutateur de mode Commutateur de mode Important Vous devez mettre l imprimante hors tension avant de modifier le mode Allumez l imprimante lorsque le commutateur de mode est bien positionné Le commutateur de mode est un commutateur rotatif utilisé pour sélectionner le mode de fonctionnement de l imprimante Everest 600 L ouverture à la base du...

Страница 75: ...ante Everest 600 est connectée à un chargeur automatique ou à une imprimante automatique Pour mettre l imprimante sous tension mettez le chargeur automatique ou l imprimante automatique sous tension Pour mettre l imprimante hors tension mettez le chargeur automatique ou l imprimante automatique hors tension Conseil L imprimante passe en mode économie d énergie si elle n est pas utilisée pendant pl...

Страница 76: ... options d impression Everest 600 Accès aux options d impression par le biais du menu Start Démarrer de Windows En utilisant cette méthode les préférences d impression sont enregistrées dans les paramètres du pilote de l imprimante et sont appliquées à toutes les étiquettes nouvellement créées 1 Sélectionnez Start Démarrer Devices and Printers Périphériques et imprimantes Conseil Dans Windows XP s...

Страница 77: ...aille du support adéquate c Sélectionnez le nombre de Copies souhaité d Sélectionnez l Orientation souhaitée e Sélectionnez le type de Ribbon Ruban adéquat 4 Après avoir effectué vos choix dans la fenêtre Rimage Everest 600 Printing Preferences Rimage Everest 600 Options d impression cliquez sur Apply Appliquer 5 Cliquez sur OK pour refermer la fenêtre Rimage Everest 600 Printing Preferences Rimag...

Страница 78: ...être Rimage Everest 600 Printing Preferences Rimage Everest 600 Options d impression Réglages de l alignement d impression et de la densité des couleurs PC 1 Accès aux options d impression Pour des instructions reportez vous à la page 11 2 Sélectionnez l onglet Utility Utilitaire 3 Cliquez sur le bouton Status Monitor Écran d état La fenêtre Rimage Everest 600 Status Monitor Rimage Everest 600 Écr...

Страница 79: ...ètres d impression sur un Macintosh Les paramètres d impression vous permettent de configurer votre imprimante Everest 600 pour qu elle produise les meilleures étiquettes possibles sur vos disques Important L emplacement des préférences décrites dans cette section variera en fonction du programme utilisé pour imprimer le fichier d étiquettes Accès aux paramètres d impression Macintosh 1 Ouvrez le ...

Страница 80: ...ession et de la densité des couleurs Macintosh Dans les utilitaires Everest vous pouvez régler l alignement d impression et la densité des couleurs Les utilitaires Everest vous permettent de visualiser des informations telles que la version du micrologiciel installé le numéro de série et le type de ruban utilisé et de mettre à jour le micrologiciel de votre imprimante Important Les paramètres des ...

Страница 81: ...Status Monitor Écran d état sélectionnez Close Fermer f Cliquez sur OK pour fermer la fenêtre Options d impressions Consultation de l état du ruban Macintosh L onglet Status État de la fenêtre Everest Utility Utilitaires Everest dans Macintosh vous permet également de consulter la quantité estimée de ruban restant et le nombre estimés d impressions restantes pour les rubans d impression et de retr...

Страница 82: ...des filtres à air arrières et Nettoyage des filtres à air latéraux aux la page 23 Nettoyage du rouleau de la platine Important Nettoyez le rouleau de la platine si vous remarquez une diminution de la qualité d impression des taches blanches par exemple sur le disque imprimé Reportez vous à la section Nettoyage du rouleau de la platine à la page 25 Nettoyage extérieur Toutes les semaines Essuyez l ...

Страница 83: ...ion sur la face arrière Support de ruban d impression Loquet n 1 Conseil Procédez au nettoyage lorsque le ruban d impression a été retiré Pour de plus amples informations reportez vous à la section Nettoyage de l imprimante Everest à la page 21 3 Retirez le ruban d impression du support a Faites coulisser le rouleau d alimentation sur la gauche b Faites coulisser le rouleau d entraînement sur la d...

Страница 84: ...essaire de soulever le ruban au dessus du rouleau amoureux pour qu il soit droit Important Ne faites pas pivoter le ruban au delà des barres de nettoyage situées à l avant du ruban Si vous installez un ruban monochrome faites avancer le ruban pour que la partie encrée atteigne le rouleau d entraînement 3 Réinstallez les pièces dans l imprimante a Placez le support du ruban d impression en position...

Страница 85: ... C 41 et 95 F et à un niveau d humidité compris entre 45 et 85 Évitez l humidité et la lumière directe du soleil Ne réutilisez pas les rubans Veillez à utilisez uniquement des rubans conçus pour l imprimante Everest 600 Retrait du ruban de retransfert 1 Ouvrez le panneau latéral a Appuyez sur les deux loquets du panneau latéral afin de libérer le panneau latéral b Abaissez le panneau latéral Loque...

Страница 86: ...înement au dessus des rouleaux de guidage et encliquetez le rouleau en place Rouleau d alimentation Rouleau d entraînement Support de ruban de retransfert 3 Faites tourner le rouleau d entraînement dans le sens inverse des aiguilles d une montre pour tendre le ruban de retransfert 4 Réinstallez les pièces dans l imprimante a Faites coulisser le support de retransfert à l intérieur de l imprimante ...

Страница 87: ...à essuyer Rouleau b Utilisez le tampon éponge pour essuyer la tête d impression d une extrémité à l autre dans le sens indiqué c Recommencez l opération jusqu à ce que la tête d impression soit exempte de poussière et de débris d Utilisez le tampon éponge pour éliminer toute accumulation de cire du rouleau se trouvant sous la tête d impression 3 Préparez l imprimante à l utilisation a Installez le...

Страница 88: ...ez l imprimante à l utilisation a Installez le support du ruban d impression b Refermez tous les loquets c Refermez le panneau latéral L imprimante est prête à l utilisation Amoureux Rouleau 2 Nettoyage du filtre à air arrière Outils requis Tournevis cruciforme Phillips n 2 1 Démontez le filtre à air a À l arrière de l imprimante dévissez les deux vis Phillips Qté 2 maintenant le couvercle du vent...

Страница 89: ...ouvercle du ventilateur du panneau latéral a Retirez les vis Torx T10 Qté 4 de l intérieur du panneau latéral b Refermez le panneau latéral Déposez le couvercle du ventilateur sur la surface de travail en exposant les filtres à air Conseil Si le couvercle du ventilateur reste fixé au panneau latéral abaissez délicatement le couvercle du ventilateur 3 Retirez les trois filtres à air du couvercle du...

Страница 90: ...age du rouleau de la platine Important Nettoyez le rouleau de la platine si vous remarquez une diminution de la qualité d impression des taches blanches par exemple sur le disque imprimé Outils requis Tampons éponges avec longs manches compris dans le Kit de Nettoyage Everest Alcool isopropylique 99 Taquets Panneau latéral Cache du ventilateur 1 Préparez vous à nettoyer le rouleau de la platine a ...

Страница 91: ...yez le rouleau de la platine situé à la droite de la tête d impression a Retirez le tampon éponge et le manche du Kit de Nettoyage Everest Rouleau de la platine Tête d impression b Insérez le tampon éponge dans l extrémité du manche c Appliquez de l alcool isopropylique sur le tampon éponge d Faites tourner le rouleau de la platine et essuyez le à l aide du tampon éponge n n Attention N appliquez ...

Страница 92: ... nettoyage Everest Bombe d air comprimé 1 Accédez aux capteurs a Appuyez sur les deux loquets du panneau latéral afin de libérer le panneau latéral b Abaissez le panneau latéral c Ouvrez le loquet 1 d Retirez le support de ruban d impression Pour des instructions spécifiques reportez vous à la procédure Retirer le ruban d impression à la page 17 e Retirez le support du ruban de retransfert Pour de...

Страница 93: ...ité du manche comportant l encoche près du capteur Reportez vous à la page 27 pour localiser les capteurs b Placez l embout de la bombonne d air comprimé dans l extrémité sans encoche du manche c Envoyez de l air comprimé dans le manche pendant une ou deux secondes d Répétez cette procédure deux ou trois fois e Répétez cette procédure pour chacun des trois capteurs Tampon éponge Encoche Manche du ...

Страница 94: ...Guía del usuario de la impresora Rimage Everest 600 ...

Страница 95: ...edad de terceros y están administrados por ellos Rimage Corporation no se responsabiliza por el contenido de estos sitios de terceros Rimage Corporation 2012 Rimage es una marca registrada de Rimage Corporation Professional y Everest son marcas registradas de Rimage Corporation Dell es una marca registrada de Dell Computer Corporation FireWire es una marca registrada de Apple Computer Inc Windows ...

Страница 96: ...impresión a través del menú Inicio de Windows 11 Acceso a las preferencias de impresión a través de CD Designer 11 Acceso a las preferencias de impresión durante la impresión de archivos PDF 12 Configuración del tamaño de medios tipo de medios orientación y tipo de cinta PC 12 Configuración de la calidad de impresión combinación de colores y ajustes de imagen PC 12 Configuración del área de impres...

Страница 97: ...lemente no sean obvios y le ayuda a comprender los beneficios y las capacidades del producto Importante Una nota Importante brinda información esencial para llevar a cabo una tarea Información complementaria importante Usted puede pasar por alto la información de una Sugerencia y aun así completar una tarea pero no debe ignorar la información de una nota Importante n n Precaución indica que no cum...

Страница 98: ...ha de la compra Más información en línea En www rimage com support encontrará el soporte y los servicios de primera línea de Rimage En la página principal de Soporte 1 Seleccione la serie de su producto 2 Seleccione su producto 3 Obtenga información adicional en la página del producto Desde la página del producto puede acceder a Información acerca del software más reciente y actualizaciones de fir...

Страница 99: ...adio de 20 km desde el centro de NY Alesund n n Precaución Todos los equipos con voltaje de CA o voltaje de CC bajo como interruptores suministros de energía fusibles ventiladores y motores no graduales deben reemplazarse con componentes autorizados por Rimage para mantener la aprobación de seguridad emitida por la norma UL Utilice únicamente el cable de alimentación de CA suministrado Para obtene...

Страница 100: ...era edición Aviso para Canadá Este aparato digital Clase A cumple con la norma ICES 003 canadiense Edición 4 2004 Cet appareil numerigue de la classe A est conforme a la norme NMB 003 du Canade Este producto cumple con la norma CAN CSA C22 2 N º 60950 1 03 primera edición Aviso para Europa Este producto se ajusta a lo dispuesto por la Directiva EMC 89 336 EEC y la Directiva de bajo voltaje 73 23 E...

Страница 101: ...as de impresión también están disponibles en negro Cintas para la impresora Everest 600 Tipo de cinta Cantidad de discos impresos 3 colores CMY 500 Negra monocromo 1000 Cinta de retransferencia 500 impresiones 500 Requisitos para el diseño de etiquetas El software de la impresora Everest 600 compatible con Windows incluye un software editor de etiquetas denominado CD Designer Este software se inst...

Страница 102: ...utoEverest AutoPrinter y usted está imprimiendo directamente desde un programa de edición de imágenes puede trabajar en el modo color de su elección Resolución píxeles por pulgada para obtener los mejores resultados utilice imágenes configuradas a un mínimo de 300 píxeles por pulgada Puede observar mejores resultados si utiliza imágenes con 600 píxeles por pulgada o más Requisitos de impresión Cua...

Страница 103: ... de control puede monitorear y controlar el sistema La tabla a continuación identifica el nombre y la función de todas las partes del panel de control Indicadores del panel de control Imagen Nombre Función Botón de funcionamiento El Botón de funcionamiento se utiliza para realizar las siguientes tareas Abrir la bandeja de la impresora Cerrar la bandeja de la impresora Restablecer después de un err...

Страница 104: ...esión incorrecta faltante o agotada 3 destellos problema con la cinta de retransferencia cinta de retransferencia faltante o agotada 4 destellos el disco no está instalado correctamente en la bandeja de la impresora Luz indicadora de activación La Luz indicadora de activación se enciende cuando la impresora ha terminado la inicialización La Luz indicadora de activación parpadea cuando la impresora...

Страница 105: ...rriente Interruptor de voltaje de CA Interruptor de modo Interruptor de modo Importante antes de cambiar de modo debe apagar la impresora Encienda la impresora cuando el interruptor de modo está configurado El interruptor de modo es un interruptor giratorio que se utiliza para ajustar el modo de funcionamiento de la impresora Everest 600 La abertura en la base de la tapa del interruptor indica el ...

Страница 106: ...nuación si su impresora Everest 600 está conectada a un autoloader o AutoPrinter Para encender la impresora encienda el autoloader o la AutoPrinter Para apagar la impresora apague el autoloader o la AutoPrinter Sugerencia la impresora pasa al modo ahorro de energía cuando está inactiva por más de 30 minutos Cuando sucede esto la impresora demora 2 ó 3 minutos en calentarse después de que se le env...

Страница 107: ...a las Preferencias de impresión de la impresora Everest 600 Acceso a las preferencias de impresión a través del menú Inicio de Windows Al utilizar este método las preferencias de impresión se guardan en la configuración del controlador de la impresora y se aplican a todas las etiquetas creadas recientemente 1 Seleccione Start Inicio Devices and Printers Dispositivos e impresoras Sugerencia en Wind...

Страница 108: ...opiado b Seleccione el Media Size Tamaño de medio apropiado c Seleccione la cantidad deseada de Copies Copias d Seleccione la Orientation Orientación deseada e Seleccione el tipo de Ribbon Cinta apropiado 4 Una vez que haya configurado las opciones deseadas en la ventana Rimage Everest 600 Printing Preferences Preferencias de impresión de Rimage Everest 600 seleccione Apply Aplicar 5 Seleccione OK...

Страница 109: ...o para volver a la configuración predeterminada f Una vez que haya elegido las opciones deseadas en la ventana Rimage Everest 600 Printing Preferences Preferencias de impresión de Rimage Everest 600 seleccione Apply Aplicar 4 Seleccione OK Aceptar para cerrar la ventana Rimage Everest 600 Printing Preferences Preferencias de impresión de Rimage Everest 600 Ajuste de la alineación de impresión y de...

Страница 110: ...presión puede configurar su impresora Everest 600 para producir las mejores etiquetas posibles para sus discos Importante la ubicación de las preferencias que se describen en esta sección varía según el programa utilizado para imprimir el archivo de etiqueta Acceso a la configuración de impresión Macintosh 1 Abra el archivo de etiqueta en la aplicación que prefiera 2 En el menú File Archivo selecc...

Страница 111: ...te de la alineación de impresión y de la densidad del color Macintosh En las Everest Utility Herramientas de Everest puede ajustar la alineación de impresión y la densidad del color También le permiten ver la información sobre la versión actual de firmware el número de serie y el tipo de cinta instalada y actualizar el firmware de su impresora Importante la configuración de las Everest Utility Her...

Страница 112: ...na Status Monitor Monitor de estado f Seleccione OK Aceptar para cerrar la ventana Printing Preferences Preferencias de impresión Visualización del estado de la cinta Macintosh La ficha Status Estado de la ventana Everest Utility Herramientas de Everest para Macintosh le permite ver el porcentaje estimado y la cantidad de impresiones restantes en las cintas de impresión y de retransferencia 1 Acce...

Страница 113: ...secciones Limpieza de los filtros de aire traseros y Limpieza de los filtros de aire laterales en la página 23 Limpiar el rodillo de la platina Importante limpie el rodillo de la platina sólo cuando observe una menor calidad de impresión por ejemplo manchas blancas en el disco impreso Consulte la sección Limpieza del rodillo de la platina en la página 25 Limpiar la parte exterior Una vez por seman...

Страница 114: ...sión sobre su parte trasera Soporte de la cinta de impresión Seguro 1 Sugerencia realice los procedimientos de limpieza al extraer la cinta de impresión Para más información consulte la sección Limpieza de la impresora Everest 600 en la página 21 3 Retire la cinta de impresión del soporte a Deslice el rodillo de suministro hacia la izquierda b Deslice el rodillo de recogida hacia la derecha c Dese...

Страница 115: ...a del rodillo adhesivo para enderezarla Importante No gire la cinta más allá de las Barras de limpieza de la parte delantera de la cinta Si instaló una cinta monocolor haga avanzar la cinta para que la porción con tinta llegue al rodillo de recogida 3 Vuelva a ensamblar la impresora a Coloque el soporte de la cinta de impresión en posición vertical b Deslice el soporte de la cinta de impresión den...

Страница 116: ...e que el nivel de humedad esté entre 45 y 85 Evite la humedad y la luz directa del sol No vuelva a utilizar las cintas Asegúrese de utilizar únicamente cintas diseñadas para la impresora Everest 600 Extracción de la cinta de retransferencia 1 Abra la cubierta lateral a Presione los dos seguros de la cubierta lateral para soltarla b Baje la cubierta lateral Seguros de la cubierta lateral Cubierta l...

Страница 117: ...ase el rodillo de recogida por arriba y alrededor de los rodillos guía y ajuste el rodillo en su lugar Rodillo de suministro Rodillo de recogida Soporte de la cinta de retransferencia 3 Gire el rodillo de recogida hacia la izquierda para ajustar la cinta de retransferencia 4 Vuelva a ensamblar la impresora a Deslice el soporte de retransferencia al interior de la impresora b Cierre los seguros 1 2...

Страница 118: ...la dirección indicada Dirección de limpieza Área del cabezal de impresión a limpiar Rodillo c Repita el proceso las veces que sea necesario hasta que el cabezal de impresión esté limpio sin polvo ni suciedad d Con el hisopo de esponja elimine los residuos cerosos del rodillo que está debajo del cabezal de impresión 3 Prepare la impresora para el uso a Instale la cinta de impresión Para obtener ins...

Страница 119: ...el soporte de la cinta de impresión b Cierre todos los seguros c Cierre la cubierta lateral La impresora está lista para utilizar Rodillo adhesivo 2 Limpieza del filtro de aire trasero Herramientas necesarias destornillador Phillips N 2 1 Extraiga el filtro de aire a En la parte trasera de la impresora retire los tornillos Phillips Cant 2 que ajustan la cubierta del ventilador b Retire la cubierta...

Страница 120: ... la cubierta lateral a Extraiga los tornillos Torx T10 Cant 4 del interior de la cubierta lateral b Cierre la cubierta lateral La cubierta del ventilador permanece sobre la superficie de trabajo con los filtros de aire expuestos Sugerencia si la cubierta del ventilador sigue sujeta a la cubierta lateral baje suavemente la cubierta del ventilador 3 Extraiga los tres filtros de aire de la cubierta d...

Страница 121: ...ar Limpieza del rodillo de la platina Importante limpie el rodillo de la platina sólo cuando observe una menor calidad de impresión por ejemplo manchas blancas en el disco impreso Herramientas necesarias Hisopos de esponja con mangos largos incluidos en el kit de limpieza Everest Alcohol isopropílico al 99 Lengüetas Cubierta lateral Cubierta del ventilador 1 Prepare el sistema para limpiar el rodi...

Страница 122: ...latina a la derecha del cabezal de impresión a Quite el hisopo de esponja y el mango del hisopo del kit de limpieza Everest Rodillo de la platina Cabezal de impresión b Inserte el hisopo de esponja en el extremo sin muesca del mango del hisopo c Aplique alcohol isopropílico en el hisopo de esponja d A medida que el rodillo gira utilice el hisopo de esponja para limpiar el rodillo de la platina n n...

Страница 123: ...idos en el kit de limpieza Everest Limpiador de aire comprimido 1 Acceda a los sensores a Presione los dos seguros de la cubierta lateral para soltarla b Baje la cubierta lateral c Abra el seguro 1 d Retire el soporte de la cinta de impresión Para obtener instrucciones específicas consulte el procedimiento Extracción de la cinta de impresión en la página 17 e Retire el soporte de la cinta de retra...

Страница 124: ...ue el extremo ranurado del mango del hisopo al lado del sensor Consulte la página 27 para ubicar los sensores b Ubique el cartucho del limpiador de aire comprimido en el extremo sin muesca del mango c Aplique aire comprimido en el extremo del mango durante uno a dos segundos d Repita el procedimiento dos o tres veces e Repita el procedimiento con cada uno de los tres sensores Hisopo de esponja Mue...

Страница 125: ...Rimage Everest 600プリンタユーザー ガイ ド ...

Страница 126: ...イトの内容に関しては 責任を負いかねます 2012 Rimage Corporation Rimage は Rimage Corporation の登録商標です Professional および Everest は Rimage Corporation の商標です Dell は Dell Computer Corporation の登録商標です FireWire は Apple Computer Inc の商標です Windows は Microsoft Corporation の登 録商標です 他のすべての商標および登録商標は それぞれの所有者の財産です 本社 Rimage Corporation 7725 Washington Avenue South Minneapolis MN 55439 USA 800 553 8312 米国内フリーダイヤル サービス 1 952 946 000...

Страница 127: ...可能エリアのデフォルト設定 11 Windows PC 上での印刷環境設定 11 印刷環境設定へのアクセス PC 11 Windows の Start スタート メニューから印刷環境設定へのアクセス 11 CD Designer から印刷環境設定へのアクセス 11 PDF ファイル印刷の印刷環境設定へのアクセス 12 メディアタイプ メディア サイズ 印字方向印字方向 リボン タイプの設定 PC 12 印刷品質 カラー マッチング 画像調整の設定 PC 12 印刷可能エリアの設定 PC 13 印刷位置および色濃度の調整 PC 13 Macintosh 上での印刷環境設定 14 印刷設定へのアクセス Macintosh 14 メディアタイプ リボン タイプ 印刷品質の設定 Macintosh 14 カラー マッチング 画像調整の設定 Macintosh 14 印刷可能エリアの設定 Macin...

Страница 128: ...報のタイプに応じて以下の注記および記号が使用さ れています ヒント あまり知られていない別の方法が示され 本製品の利点や機能の理解に 役立つ情報が記載されています 重要 重要 には タスクの完了に欠かせない情報が提供されます 重要な追加情報です ヒント の情報を読まなく てもタスクを完了できますが 重要 の記載は 必ず読むようにしてください n n 注意 注意 は 記載されたガイドラインの順守を怠る場合 機器または製 品 ソフトウェア データに損失または損傷が生じる恐れがあることを示しn ます n n 警告 警告 は 記載されたガイドラインの順守を怠る場合 機器の操作ま たは保守担当者に身体的傷害が生じる恐れがあることを示します Everest 600プリンタについて Everest 600 は Rimage シリーズのプリンタ製品です プリンタはスタンドアロー ン プリンタとして使用可能...

Страница 129: ...074 8521 101 Rimage サービスにお問い合わせにな る際は 以下の情報をご用意く ださい システムのシリアル番号とソフトウェアの バージョン エラーの機能的および技術的説明 表示された正確なエラー メッセージ ご使用の Rimage 製品情報 今後必要な場合に備えて ご使用の Rimage 製品について以下の情報をお控 えください 注記 システムを交換した場合には 必ず シリアル番号を更新してください シリアル番号 製品名 ご購入日 オンラインでご覧いただける詳細情報 Rimage のサポートおよびサービスは www rimage com supportからご利用 いただけます サポートのホーム ページから 1 ご使用の製品シリーズを選択し ます 2 製品を選択します 3 製品ページで詳細をご覧くださ い 製品ページから 以下の情報にアクセ スすることができます ソフトウェ...

Страница 130: ...エー 本件は Ny Alesund の中心から半径 20km 以内の場所には 適用されません n n 注意 スイッチ 電源 ヒューズ ファン 非ステッピング モーターなどの交流線 電圧または直流低電圧を有するすべての機器は UL 規格によって発行 された安全承認を維持するために Rimage に承認されたコンポーネン トと交換する必要があります 付属の AC 電源コードのみ使用してください 詳細または 新しい電源 コードにつきましては Rimage のカスタマ サービスまでお問い合わせ ください 本製品はオフィス用機器として設計されています プリンタが過熱していたり 異臭がしたりする場合は 使用しないでくだ さい そのまま使用を継続すると 火事に至ったり 電気ショックが生じ たりする場合があります 過熱していたり 異臭がしたりする場合は 直 ちに コンセントからケーブルを抜いてください 修...

Страница 131: ... 2 No 60950 1 03 第 1 版 に適合します ヨーロッパにおける注意 本製品は 以下のヨーロッパ標準に準拠する EMC Directive 89 336 EEC および Low Voltage Directive 73 23 EEC に適合します EN 55022 1998 Amd 1 2000 Class B Limit EN 55024 1998 EN 61000 3 2 2000 EN 61000 3 3 1995 Amd 1 2001 EN 60950 2000 CE マークは CE Marking Directive 93 68 EEC に従って貼られています 日本における注意 This is a Class A product based on the standard of the Voluntary Control Council for Interferen...

Страница 132: ...ンには ブ ラックもあります Everest 600リボン リボンタイプ ディ スクの印刷枚数 3 色 CMY 500 ブラック モノクロ 1000 再転写リボン 500 印刷 500 使用可能なラベル デザイン Everest 600 の Windows 対応ソフトウェアには CD Designer ラベル エディタ ソフトウェアが同梱されています このソフトウェアは Rimage ソフトウェアの標 準インストール時に PC にインストールされます Windows が動作しているパー ソナル コンピュータをご使用の場合 CD Designer を使用してラベルをデザイ ンできます Macintosh をご使用の場合 またはCD Designer 以外のソフトウェアでラベルを デザインされる場合は 次の基準に従ってください 重要 CD Designer は Macintosh に対応してい...

Страница 133: ... CD Designer にインポートするためにラベルをすべて RGB カ ラーモードに変換します Everest 600 プリンタがスタンドアローンまたは AutoEverest AutoPrinter 上にあり イメージ編集プログラムから直接印刷 される場合は 任意のカラーモードで作業が可能です 解像度 ピクセル インチ 最良の結果を得るためには 最低 300 ピクセル インチ以上のイメージを使用します 600 ピクセル インチ以上のイメージを 使用すると 印刷結果がさらに向上します 印刷の要件 CD Designer を使用して作成および保存したラベルは Rimage Autoloader 上 の Everest 600 で印刷するための正しいファイル形式 btw となっています Everest 600 が Rimage Autoloader 上にある場合は PDF ファイルで保存し...

Страница 134: ... 600 の正面に設置されており オ ペレータ ボタンと 4 つの表示ランプがついています 表示ランプ の内の 1 個はオペレータ ボタン上についています コントロール パネルではシステムの監視および制御が可能です 次の表は コントロール パネルのすべての部品名とその機能を示 しています コン トロール パネルの表示図 イメージ 名前 機能 オペレータボタン オペレータ ボタンは以下の作業で 使用します プリンタトレイを開く時 プリンタトレイを閉じる時 エラー後のリセッ ト プリンタをスリープ モードにす る時 プリンタをスリープ モー ドにするには オペレータボタ ンを 10 秒間押し続けます 通 常の動作状態に戻すには オペ レータ ボタンを再度押します エラー表示ランプ オペレータボタン上 オペレータによる操作が必要な場合 にエラー表示ランプが点灯します ...

Страница 135: ...種類 を示しています 1 回点滅 サイド カバーが開 いている またはラッチ 1 2 3 が開いている 2 回点滅 印刷リボンの問題 印刷リボンが異なる 無い ま たは足りなくなっている 3 回点滅 再転写リボンの問 題 印刷リボンが無い または 足りなくなっている 4 回点滅 プリンタトレイに ディスクをクランプする際のエ ラー アクテ ィ ブ表示ランプ アクティブ表示ランプは プリンタ が 初期設定を終了すると点灯し ます アクティブ表示ランプは プリンタ が ホストからデータを受け取ると 点滅します 電源表示ランプ プリンタの電源がオンになると 緑 色の電源ランプが点灯します 背面図 モードスイッチ USB コネクタ プリンタケーブルコネクタ 交流電圧 スイッチ 電源コネクタ シッピングスク リ ュの 元の位置 シッピングスク リ ュの 保管時の位置 ...

Страница 136: ... 220V です n n 警告 交流電圧スイッチをコンセントの交流電圧と一致するように設定しn ます 交流電圧スイッチ モードスイッチ モードスイッチ 重要 モードスイッチを切り換えるときは 電源をオフにする必要があります モ ードスイッチを設定する場合は プリンタの電源をオンにします モード スイッチ ロータリースイッチ は Everest 600 プリンタの運転モー ドの設定に使用します スイッチの上のキャップの根元にある開口部で 選択さ れたモードが表示されます プリンタ出荷時に 正しい操作モードに設定されて います 診断を実行するのでなければ スイッチの位置を変更する必要はありま せん スイッチの位置 用途 0 スタンドアローン プリンタ 2 Rimage Autoloader または AutoPrinter 3 診断試験 その他すべて 使用されていません ...

Страница 137: ...utoPrinter に接続されたプリンタの 電源のオンとオフ お使いの Everest 600 が Autoloader または AutoPrinter に接続されている場 合は 次の手順に従います プリンタの電源をオンにするには Autoloader または AutoPrinter の電源 をオンにします プリンタの電源をオフにするには Autoloader または AutoPrinter の電源 をオフにします ヒン ト プリンタを30分以上使用しない場合 自動的にスリープ モードに替わりま す スリープ モードに替わると ジョブが送られた後プリンタのウォームアップに 2 3 分かかります プリンタトレイへの ディ スクの配置 この手順に従い ディスクをプリンタトレイに入れます 1 オペレータボタンを押します プリンタトレイが開きます 2 プリンタトレイに印刷パッ ドを置きます 印刷...

Страница 138: ...刷環境設定へのアク セス この方法を使用すると 印刷環境設定はプリンタドライバ設定に保存され 新規 に作成するすべてのラベルに適用されます 1 次の順に選択します Start スタート Devices and Printers デバイスと プリンター ヒン ト Windows XP の場合は Start スタート Printers and Faxes プリンターとFAX の順に選択してください Windows Server 2008 の ナビゲーションについては Windows 7 と同じです 2 Everest 600プリンタを右クリックします ドロップダウン メニューが表示さ れます 3 Printing Preferences 印刷環境設定 を選択します Rimage Everest 600 Printing Preferences Rimage Everest 600 印刷環境設定...

Страница 139: ... Type メディ アタイプ を選択します b 適切な Media Size メディ アサイズ を選択します c 希望する Copies コピー 部数を選択します d 希望する Orientation 印字方向 を選択します e 適切な Ribbon リボン タイプを選択します 4 Rimage Everest 600 Printing Preferences Rimage Everest 600 印刷環境 設定 ウィンドウで希望する選択を行った後 Apply 適用 を選択します 5 OK をクリックして Rimage Everest 600 Printing Preferences Rimage Everest 600 印刷環境設定 ウィンドウを閉じます 印刷品質 カラー マッチング 画像調整の設定 PC 1 印刷環境設定 にアクセスします 11 ページを参照してください 2 Advan...

Страница 140: ...フォルト設定に戻し ます f Rimage Everest 600 Printing Preferences Rimage Everest 600 印刷環 境設定 ウィンドウで希望する選択を行った後 Apply 適用 を選択し ます 4 OK をクリックして Rimage Everest 600 Printing Preferences Rimage Everest 600 印刷環境設定 ウィンドウを閉じます 印刷位置および色濃度の調整 PC 1 印刷環境設定 にアクセスします 11 ページを参照してください 2 Utility ユーティ リティ タブを選択します 3 Status Monitor 状態モニタ ボタンを選択します Rimage Everest 600 Status Monitor Rimage Everest 600 状態モニタ ウィンドウが開 き Status 状態 タブ...

Страница 141: ...照度を調節します 6 希望する Threshold 閾値 を選択します 7 印刷環境設定を継続するには 3 つ目のドロップダウンリストで他のオプシ ョンを選択します または Print 印刷 を選択して ラベルを印刷します Macintosh 上での印刷環境設定 印刷設定により ディスク上に最良のラベルを作成するように Everest 600 プリ ンタを設定できます 重要 本セクションで説明されている環境設定の位置は ラベル ファイルの印刷 に使用されるプログラムにしたがって変化します 印刷設定へのアクセス Macintosh 1 選択したアプリケーション内のラベルファイルを開きます 2 File ファイル メニューから Print 印刷 を選択します Print 印刷 ダイ アログ ボックスが開きます 3 Printer プリンタ ドロップダウンリストから CDPR23 を選択します ...

Страница 142: ...rint 印刷 を選択して ラベルを印刷します 印刷位置および色濃度の調整 Macintosh Everest Utility Everest ユーティ リティ で印刷位置および色濃度を調整できま す Everest Utility Everest ユーティ リティ では 現在のファームウェアのバー ジョン シリアル番号および装着されているリボンの種類等の表示 およびプリン タのファームウェアの更新を行えます 重要 Everest Utility Everest ユーティ リティ における設定は プリンタがアイ ドル状態 現在 どの仕事の印刷もしていない の時にのみ変更できます 1 Everest Utility Everest ユーテ ィ リテ ィ にアクセスします a System Preferences システム環境設定 Print Fax 印刷とファ ッ クス の順に選択します P...

Страница 143: ...Monitor 状態モニタ ウィンドウを閉じるには Close 閉じる を選択します f OK をクリックして Printing Preferences 印刷環境設定 ウィンドウを 閉じます リボンの状態の表示 Macintosh Macintosh の Everest Utility Everest ユーティ リティ ウィンドウの Status 状 態 タブでは 印刷リボンおよび再転写リボンの残量から推定された印刷可能 な枚数を確認することができます 1 Everest Utility Everest ユーティ リティ にアクセスします a System Preferences システム環境設定 Print Fax 印刷とファ ッ クス の順に選択します Print Fax 印刷とファックス ウィンドウが 開きます b プリンタリストに CDPR23 が表示されます CDPR23 ウィン...

Страница 144: ...れかのセンサーが応 答していない 印刷が中心からずれている 27 ページの センサーの清 掃 を参照してください エアフ ィルタの ク リーニング 毎月 23 ページの 背面のエアフ ィルタの清掃 および 側面の エアフィルタの清掃 を参照し てください プラテンローラーの ク リーニング 重要 プラテンローラーの掃除は 印刷 したディスク上の白い染みを発見する など 印刷品質の低下に気付いた時の み行ってください 25 ページの プラテン ロー ラーのクリーニング を参照して ください 外側のク リーニング 毎週 糸くずの出ない布でプリンタの 外側を拭きます 重要 最適性能を発揮させるためには 周囲が清潔で埃のない環境に Everest 600 プリンタを設置します 印刷リボンの交換 Everest 600 プリンタのリボンを交換する際 または新しいリボンを取り付ける際 には 新しいリボ...

Страница 145: ...印刷リボンにアクセスします a ラッチ 1 を開けます b 印刷リボン キャリヤをプリンタからまっすぐに引き抜きます c 印刷リボンキャ リヤを立てて置きます 印刷リボンキャリヤ ラッチ 1 ヒン ト 印刷リボンが外されている間に クリーニング作業を行ってください 詳細 は21 ページの Everest 600 プリンタのクリーニング を参照してください 3 キャリヤから印刷リボンを取り外します a 供給ロールを左にスライドします b 巻き取りロールを右にスライドします c 使用済みの印刷リボンを廃棄します 供給ロール 巻き取りロール ...

Страница 146: ...ロール e リボンが揃い 平らになるように巻き取りロールを回転させます リボン をまっすぐに伸ばすために 粘着ローラーからリボンを持ち上げる作業 が必要となる場合もあります 重要 リボン前部のクリーニング バーの位置を超えて リボンを回転させないよう 注意してください モノクロのリボンを装着した場合は リボンのインク部分が巻き取りロール まで進むように リボンを前進させます 3 プリンタを元に戻します a 印刷リボンキャ リヤを直立させます b 印刷リボンキャ リヤをプリンタの中に押し込みます c ラッチ 1 を閉じます d サイ ドカバーを閉めます ヒン ト リボンの色はロッ トによって異なることがあります 場合によっては 新し いリボンを取り付けた後で プリンタドライバで濃度設定を調節する必要があり ます 詳細は 13 ページ の 印刷位置および色濃度の調整 PC か15 ペ ージ の...

Страница 147: ...ナン ス契約の対象外になります 最善の結果を得るために Everest 600 のリボンは必ず華氏 41 95 度 摂 氏 5 35 度 の温度および 45 85 の湿度で保管してください 湿気と直射日光は避けてください リボンの再使用は避けてください 必ず Everest 600 プリンタ専用のリボンをご使用ください 再転写リボンの取り外し 1 サイ ドカバーを開きます a 2 つのサイ ドカバーラッチを押して サイド カバーを外します b サイ ドカバーを降ろして開きます サイ ドカバーラッチ サイ ドカバー 2 再転写リボンを取り外します a ラッチ 1 ラッチ 2 3 を解除します b ハンドルを持って 再転写リボンキャ リヤをプリンタの外にスライドさせ ます ヒン ト 再転写リボン キャリヤは プリンタから取り外すことはできません c 再転写ロールをキャリヤから引き出します d ...

Страница 148: ...取り付けます リボンが供 給ロールの下側をく ぐるようにします d 巻き取りロールを持ち上げ ガイド ローラーの周りに沿って 所定の位 置にはめ込みます 供給ロール 巻き取りロール 再転写リボンキャリヤ 3 再転写リボンのたるみをとるために 巻き取りロールを反時計方向に回転し ます 4 プリンタを元に戻します a 再転写キャ リヤをプリンタの中に戻します b ラッチ 1 ラッチ 2 およびラッチ 3を閉じます c サイ ドカバーを閉めます プリンタの使用準備ができました Everest 600プリンタのク リーニング 定期的なクリーニングを行うことで Everest 600 プリンタを最適な状態に保つこ とができます 印刷ヘッ ドのク リーニング 必要なツール 長い柄つきのスポンジ ブラシ Everest クリーニング キッ トに含まれて います 99 のイソプロピル アルコール ラッチ ...

Страница 149: ... 指示された部分以外を拭き取らないよう注意してください a イソプロピルアルコールをスポンジスワブに塗布します ふき取り方向 ふき取る印刷ヘッ ドエリア ローラー b スポンジスワブを使用して印刷ヘッ ドの端から端まで示された方向にふ き取ります c 必要に応じ 印刷ヘッ ドに埃や塵が無く なるまでこの作業を繰り返します d スポンジスワブを使用して 印刷ヘッ ドの下のローラーから ろう状蓄積 物を取り除きます 3 プリンタの使用準備をします a 印刷リボンを取り付けます 詳細な手順については 17 ページの 印 刷リボンの交換 を参照してください b 印刷リボンキャリヤを取り付けます c すべてのラッチを閉めます d サイ ドカバーを閉めます プリンタの使用準備ができました 粘着ローラーのク リーニング 必要なツール 長い柄つきのスポンジ ブラシ Everest クリーニング キッ トに...

Страница 150: ... リボンの交換 を参照してください 3 スポンジを使用して プリンタの内部の粘着ローラー 2 をふきます 4 プリンタの使用準備をします a 印刷リボンキャ リヤを取り付けます b すべてのラッチを閉めます c サイ ドカバーを閉めます プリンタの使用準備ができました 粘着 ローラー 2 背面エアフ ィルタのク リーニング 必要なツール 2 番プラスドライバ 1 エアフ ィルタを取り外します a プリンタの背面で ファン カバーを留めている 2 本のネジ を取り外し ます b ファ ンカバーを取り外します c エアフ ィルタを取り外します 2 エアフ ィルタを清掃します a エアフ ィルタを流水につけます b エアフ ィルタを乾かします 3 プリンタの使用準備をします a エアフ ィルタが乾いたら ファンカバーの中に入れます b ネジを 2 本とも締め ファ ンカバーをプリンタ背面に取り付...

Страница 151: ...イ ドカバーラッチを押して サイド カバーを外します b サイ ドカバーとそれに取り付けられているファ ンカバーを下げます 2 ファンカバーをサイド カバーから取り外します a サイド カバー内側の 4 本のトルクス T10 ネジを取り外します b サイ ドカバーを閉めます ファン カバーが エアフィルタが露出した状 態で 作業台に残されます ヒン ト ファン カバーがサイド カバーから外れていない場合は ファン カバーを慎重に下げます 3 ファン カバーから 3 つのエアフ ィルタを取り外します サイ ドカバー 4 エアフ ィルタを清掃します a 各エアフ ィルタを流水につけます b エアフ ィルタを乾かします エアフ ィルタ ファ ンカバー ...

Страница 152: ...イ ドカバーとそれに取り付けられているファン カバーを閉めます プリンタの使用準備ができました プラテンローラーのク リーニング 重要 プラテン ローラーの掃除は 印刷したディスク上の白い染みを発見するな ど 印刷品質の低下に気付いた時のみ行ってください 必要なツール 長い柄つきのスポンジ ブラシ Everest クリーニング キッ トに含まれて います 99 のイソプロピル アルコール タブ サイ ドカバー ファンカバー 1 プラテンローラーのクリーニングのための準備を行います a プリンタの電源をオフにします b プリンタの背面で モードスイッチをポジション 3 診断モード にします c プリンタの電源をオンにします 2 プラテンローラーにアクセスします a 2 つのサイ ドカバーラッチを押して サイド カバーを外します b サイ ドカバーを降ろして開きます 印刷 リボンキャリヤ 再転...

Страница 153: ...ンプが点滅します 4 印刷ヘッ ド右側のプラテンローラーをクリーニングします a Everest クリーニング キッ トからスポンジスワブとスワブ用のハンドルを 取り出します プラテン ローラー 印刷 ヘッ ド b スポンジスワブをノッチ V 字型の切込み のないスワブ用のハンドル の先に差し込みます c イソプロピルアルコールをスポンジスワブに塗布します d プラテン ローラーが回転しているときに スポンジスワブを使用してプ ラテンローラーをふき取ります n n 注意 スポンジでプラテン ローラーを清掃するときは 圧力をかけ ないでください 圧力をかけると プラテン ローラーが損傷し 印刷 済みのディスクに引っかき痕をつける可能性があります ヒン ト プラテン ローラーを拭く ときは ローラーが完全に 1 回転してか ら次のエリアに移ります 5 オペレータボタンを押して離し 診断モードか...

Страница 154: ...ラー メッセージが表示され た場合 印刷が中心からずれている場合 必要なツール 長い柄つきのスポンジ ブラシ Everest クリーニング キッ ト に含まれています 圧縮空気缶 1 センサーにアクセスします a 2 つのサイ ドカバーラッチを 押して サイド カバーを外し ます b サイ ドカバーを降ろして開き ます c ラッチ 1 を開けます d 印刷リボンキャ リヤを取り外します 詳細な手順については 17 ペー ジの 印刷リボンの取り外し を参照してください e 印刷リボン キャリヤを取り外します 詳細な手順については 20 ペー ジの 再転写リボンの取り外し を参照してください 2 プリンタ オートローダまたは AutoPrinter の電源をオフにします 詳細 は 10 ページ の Everest 600 プリンタの電源オンとオフ を参照してく ださい 重要 プリンタの電源が完...

Страница 155: ...ところにノッチ V 字 型の切込み のあるスロッ トが付いています こちら側がプリンタに挿入する方 です 5 センサーをクリーニングします a スワブ用ハンドルのスロッ トがある先端をセンサーに置きます センサー の位置については 27 ページを参照してください b ノッチ V 字型切込み のないスワブ用ハンドルの先に圧縮空気缶のノ ズルを差し込みます c 1 2 秒間 圧縮空気を吹き付けます d これを2 3 回繰り返します e 3 つのセンサーそれぞれに この手順を繰り返します スポンジ スワブ ノッチ スワブ ハンドル 6 プリンタの使用準備をします a 印刷リボンキャ リヤを取り付けます b 再転写リボンのキャリアを装填します c ラッチを閉めます d サイ ドカバーを閉めます プリンタの使用準備ができました ...

Страница 156: ...Guida per l utente Stampante Rimage Everest 600 ...

Страница 157: ...Web che sono di proprietà di terzi Rimage Corporation non è responsabile dei contenuti pubblicati dalle suddette terze parti 2012 Rimage Corporation Rimage è un marchio registrato di Rimage Corporation Professional e Everest sono marchi registrati di Rimage Corporation Dell è un marchio registrato di Dell Computer Corporation FireWire è un marchio registrato di Apple Computer Inc Windows è un marc...

Страница 158: ...tampa PC 11 Accesso alle Preferenze di stampa mediante il menu Start di Windows 11 Accesso alle Preferenze di stampa tramite CD Designer 11 Accesso a alle Preferenze di stampa per stampare i file PDF 12 Impostazione delle dimensioni del tipo e dell orientamento del supporto e del tipo di nastro PC 12 Impostazione della qualità di stampa della corrispondenza dei colori e regolazione dell immagine P...

Страница 159: ...ntenere metodi alternativi che possono non sembrare ovvi e contribuisce a far comprendere vantaggi e funzionalità del prodotto Importante Una nota importante fornisce informazioni essenziali al completamento di un operazione Informazioni supplementari importanti Trascurando un Suggerimento si può comunque portare a termine un attività cosa che non accade se si trascura una nota importante n n Atte...

Страница 160: ...riori informazioni online Sul sito Web www rimage com support è possibile toccare con mano l ottima qualità dell assistenza e dei servizi Rimage Dalla pagina iniziale Support Supporto 1 Selezionare la serie del prodotto 2 Selezionare il prodotto 3 Ulteriori informazioni sono disponibili sulla pagina del prodotto Dalla pagina del prodotto è possibile accedere a quanto segue Informazioni sui più rec...

Страница 161: ...te sottosezione non vale per l area compresa entro un raggio di 20 km dal centro di Ny Alesund n n Attenzione Tutte le apparecchiature con tensione di rete CA o a basse tensioni CC quali interruttori alimentatori fusibili ventole motori non passo passo devono essere sostituite con componenti approvati da Rimage per poter mantenere l approvazione sulla sicurezza emessa da UL Utilizzare esclusivamen...

Страница 162: ...ra digitale di Classe A è conforme alla normativa canadese ICES 003 Versione 4 2004 Cet appareil numérique de la classe A est conforme à la norme NMB 003 du Canada Questo prodotto è conforme a CAN CSA C22 2 N 60950 1 03 a edizione Avviso per l Europa Questo prodotto è conforme alla direttiva sulla compatibilità elettromagnetica 89 336 CEE e alla direttiva sulla bassa tensione 73 23 CEE in quanto r...

Страница 163: ...a stampa monocromatici Nastri per la Everest 600 Tipo di nastro Numero di dischi stampati 3 colori CMY 500 Nero monocromatico 1000 Nastro di ritrasferimento 500 dischi 500 Requisiti per la creazione di etichette Il software della stampante Everest 600 compatibile con Windows è corredato da un editor di etichette CD Designer che viene installato sul PC durante l installazione standard del software ...

Страница 164: ...nte Everest 600 è di tipo autonomo o è utilizzata su un AutoEverest AutoPrinter e la stampa viene eseguita direttamente da un editor di immagini è possibile utilizzare la modalità colore desiderata Risoluzione pixel per pollice per ottenere i migliori risultati impostare le immagini su un minimo di 300 pixel per pollice I risultati migliori si ottengono con immagini di almeno 600 pixel per pollice...

Страница 165: ...sente di monitorare e controllare il sistema Nella tabella seguente sono indicati il nome e la funzione di tutte le parti che lo compongono Spie del pannello di comando Immagine Nome Funzione Pulsante operativo Il pulsante operativo serve per eseguire le seguenti operazioni Aprire il vassoio della stampante Chiudere il vassoio della stampante Azzerare dopo un errore Impostare la stampante in modal...

Страница 166: ... con il nastro di stampa non corretto mancante o esaurito 3 lampeggiamenti problema con il nastro di ritrasferimento mancante o esaurito 4 lampeggiamenti errore di inserimento del disco sul vassoio della stampante Spia di Attiva La spia di Attiva si illumina quando la stampante ha completato l inizializzazione La spia lampeggia quando la stampante sta ricevendo i dati dall host Spia dell alimentaz...

Страница 167: ...ione CA della presa di corrente Selettore della tensione a corrente alternata Selettore di modalità Selettore di modalità Importante prima di cambiare modalità è necessario spegnere la stampante Accendere la stampante dopo aver impostato la modalità Il selettore di modalità è a rotazione ed è utilizzato per l impostazione della modalità operativa della stampante Everest 600 L apertura presente sul...

Страница 168: ...gate a un autoloader o AutoPrinter seguire questa procedura Per accendere la stampante accendere l autoloader o l AutoPrinter Per spegnere la stampante spegnere l autoloader o l AutoPrinter Suggerimento se resta inattiva per più di 30 minuti la stampante va in modalità di sospensione sleep mode In questa condizione sono necessari 2 3 minuti per il riscaldamento dal momento in cui viene inviato un ...

Страница 169: ...erenze di stampa della stampante Everest 600 Accesso alle Preferenze di stampa mediante il menu Start di Windows Utilizzando questo metodo le preferenze di stampa vengono salvate nelle impostazioni del driver della stampante e saranno applicate alle nuove etichette create 1 Selezionare Start Devices and Printers Dispositivi e stampanti Suggerimento in Windows XP selezionare Start Printers and Faxe...

Страница 170: ...rientamento desiderato e Selezionare il tipo di Ribbon Nastro desiderato 4 Dopo avere effettuato le selezioni desiderate selezionare Apply Applica nelle Rimage Everest 600 Printing Preferences Preferenze di stampa della stampante Rimage Everest 600 5 Per chiudere la finestra delle Rimage Everest 600 Printing Preferences Preferenze di stampa della stampante Rimage Everest 600 selezionare OK Imposta...

Страница 171: ... Everest 600 selezionare OK Regolazione dell allineamento di stampa e della densità di colore PC 1 Accesso alle Preferenze di stampa Per le istruzioni fare riferimento a pagina 11 2 Selezionare la scheda Utility Utilità 3 Selezionare il pulsante Status Monitor Monitoraggio di stato Viene visualizzata la finestra di Rimage Everest 600 Status Monitor Monitoraggio stato di Rimage Everest 600 con la s...

Страница 172: ... Macintosh Le Preferenze di stampa consentono di configurare la stampante Everest 600 per la produzione ottimale delle etichette per dischi Importante la posizione delle preferenze descritte in questa sezione cambia a seconda del programma utilizzato per stampare il file di etichetta Accesso alle Preferenze di stampa Mac 1 Aprire il file di etichetta nell applicazione desiderata 2 Dal menu File Ar...

Страница 173: ...l Utility Everest è possibile regolare l allineamento di stampa e la densità di colore L Utility Everest consente di visualizzare informazioni quali la versione attuale del firmware il numero di serie e il tipo di nastro installato nonché di aggiornare il firmware della stampante Importante le impostazioni di Everest Utility Utilità Everest possono essere modificate unicamente se la stampante Ever...

Страница 174: ...i dialogo Status Monitor Monitoraggio di stato selezionare Close Chiudi f Per chiudere la finestra delle preferenze di stampa selezionare OK Visualizzazione dello stato del nastro Macintosh Nella scheda Status Stato della finestra Everest Utility Utilità Everest per Macintosh è possibile visualizzare la percentuale stimata e il numero di stampe rimanenti con i nastri di stampa e di ritrasferimento...

Страница 175: ...i filtri dell aria Mensile Fare riferimento alla sezione Pulizia dei filtri dell aria posteriori e Pulizia dei filtri dell aria laterali a pagina 23 Pulire il rullo platina Importante Il rullo platina deve essere pulito solamente se si nota che la qualità di stampa è diminuita ad esempio per la presenza di difetti sul disco stampato Fare riferimento alla sezione Pulizia del rullo platina a pagina ...

Страница 176: ...poggiandolo sulla parte posteriore Supporto del nastro di stampa Fermo 1 Suggerimento eseguire le procedure di pulizia in assenza del nastro di stampa Per maggiori informazioni fare riferimento alla sezione Pulizia della stampante Everest 600 a pagina 21 3 Rimuovere il nastro di stampa dal supporto a Spostare il rullo di alimentazione verso sinistra b Spostare il rullo di avvolgimento verso destra...

Страница 177: ... essere necessario sollevarlo dal rullo adesivo Importante Non ruotare il nastro attorno alle barre di pulizia davanti al nastro Se si è installato un nastro monocromatico farlo avanzare in modo che la porzione con l inchiostro raggiunga il rullo di avvolgimento 3 Riassemblare la stampante a Installare il supporto del nastro di stampa b Inserire il supporto del nastro nella stampante c Chiudere il...

Страница 178: ...ratura compresa tra 5 e 35 C 41 e 95 F e a un livello di umidità compreso tra 45 e 85 Evitare l umidità e la luce solare diretta Non riutilizzare i nastri Utilizzare solo modelli di nastro progettati per la stampante Everest 600 Rimozione del nastro di ritrasferimento 1 Aprire il coperchio laterale a Premere i due fermi di chiusura del coperchio laterale per aprirlo b Abbassare la copertura latera...

Страница 179: ...otto il rullo di alimentazione d Portare il rullo di avvolgimento in su e intorno ai rulli di guida e insediarlo con uno scatto Rullo di alimentazione Rullo di avvolgimento Supporto del nastro di ritrasferimento 3 Ruotare il rullo di avvolgimento in senso antiorario per tendere il nastro di ritrasferimento 4 Riassemblare la stampante a Far scorrere il supporto nella stampante b Chiudere i fermi 1 ...

Страница 180: ...testina di stampa da pulire Rullo b Passare il tampone di spugna da una parte all altra della testina di stampa nella direzione illustrata c Ripetere l operazione finché la testina non è pulita da polvere e scorie d Rimuovere con il tampone di spugna l eventuale accumulo di cera dal rullo sotto la testina di stampa 3 Preparare la stampante per l uso a Installare il nastro di stampa Per istruzioni ...

Страница 181: ...tampante per l uso a Installare il supporto del nastro di stampa b Chiudere tutti i fermi c Chiudere il coperchio laterale La stampante è pronta all uso Rullo di avvolgimento 2 Pulizia del filtro dell aria posteriore Strumento necessario cacciavite n 2 1 Rimuovere il filtro dell aria a Sul retro della stampante svitare le viti Phillips 2 che fissano il coperchio della ventola b Rimuovere il coperc...

Страница 182: ...e il coperchio della ventola dal coperchio laterale a Svitare le viti Torx T10 4 dalla parte interna del coperchio b Chiudere il coperchio laterale Il coperchio della ventola rimane sulla superficie di lavoro con i filtri dell aria in vista Suggerimento se il coperchio della ventola rimane collegato al coperchio laterale abbassarlo con delicatezza 3 Rimuovere i tre filtri dell aria dal coperchio d...

Страница 183: ...ll uso Pulizia del rullo platina Importante il rullo platina deve essere pulito solamente se si nota che la qualità di stampa è diminuita ad esempio per la presenza di difetti sul disco stampato Strumenti necessari Tamponi di spugna con manici lunghi inclusi nel kit di pulizia Everest Alcol isopropilico al 99 Schede Coperchio Laterale Coperchio della ventola 1 Preparare rullo platina per la pulizi...

Страница 184: ...riore lampeggia 4 Pulire il rullo platina a destra della testina di stampa a Rimuovere i tamponi in cotone e il manico del tampone dal kit di pulizia Everest Rullo platina Testina di stampa b Inserire il tampone di spugna nell estremità senza tacche del manico c Inumidire il tampone di spugna con alcool isopropilico d Mentre il rullo platina ruota pulirlo con un tampone di spugna n n Attenzione pu...

Страница 185: ... lunghi inclusi nel kit di pulizia Everest Contenitore di aria compressa 1 Accedere ai sensori a Premere i due fermi di chiusura del coperchio laterale per aprirlo b Abbassare la copertura laterale c Aprire il fermo 1 d Rimuovere il supporto del nastro di stampa Per istruzioni specifiche fare riferimento alla procedura Rimozione del nastro di stampa a pagina 17 e Rimuovere il supporto del nastro d...

Страница 186: ...l estremità con fessura del manico del tampone accanto al sensore Per la posizione del tampone fare riferimento a pagina 27 b Posizionare l ugello della bomboletta di aria compressa all estremità senza fessura del manico c Soffiare aria compressa nell estremità del manico per uno o due secondi d Ripetere l operazione due o tre volte e Ripetere per ciascuno dei sensori Tampone di spugna Tacca Manic...

Страница 187: ...Rimage Everest 600 打印机用户指南 ...

Страница 188: ...age Corporation Rimage 是 Rimage Corporation 的注册商标 Professional 和 Everest 是 Rimage Corporation 的商标 Dell 是 Dell Computer Corporation 的商标 FireWire 是 Apple Computer Inc 的商标 Windows 是 Microsoft Corporation 的注册商标 所有其它商标和注册商标都是其各自所有者的财产 公司总部 Rimage Corporation 7725 Washington Avenue South Minneapolis MN 55439 USA 800 553 8312 美国免费 服务部 1 952 946 0004 亚太地区 墨西哥 拉丁美洲 传真 1 952 944 6956 欧洲总部 Rimage Europe GmbH...

Страница 189: ...10 将光盘放在打印机托盘上 10 设置打印首选项 11 默认可打印区域设置 11 在 Windows PC 上设置打印首选项 11 访问打印首选项 PC 11 通过 Windows 开始菜单访问打印首选项 11 通过 CD Designer 访问打印首选项 11 打印 PDF 时访问打印首选项 12 设置介质类型 介质尺寸 方向和色带类型 PC 12 设置打印质量 颜色匹配和图像调节 PC 12 设置可打印区域 PC 13 调节打印对齐和色彩密度 PC 13 在 Macintosh 上定义打印设置 14 访问打印设置 Macintosh 14 设置介质类型 色带类型和打印质量 Macintosh 14 设置颜色匹配和图像调节 Macintosh 14 设置可打印区域 Macintosh 15 调节打印对齐和色彩密度 Macintosh 15 检查色带剩余量 15 查看色带状态 PC 16...

Страница 190: ...均以 Windows 7 系 统路径为准 其它 Windows 操作系统的导航路径可能稍有差异 本手册采用下列注释和符号来帮助阐明信息 提示 提示 用于提出可能不明显但有助于您理解产品的优点和功能 的替代方法 重要信息 重要提示 用于提供对完成任务至关重要的信息 重要补充信息 如忽略 提示 中的信息仍可完成任务 但切勿忽略 重要信息 注释 n n 小心 小心 表示不遵守此指导原则可能导致设备 产品 软件 或数据损坏 n n 警告 警告 表示不遵守此指导原则可能导致操作或维护设备的 人员遭受人身伤害 关于 Everest 600 打印机 Everest 600 打印机属于 Rimage 打印机系列 该打印机既可用作独 立打印机 也可以与 Rimage Autoloader 或 Rimage AutoPrinter 配合 使用 有关从联网 PC 设置和提交指令的信息 请参阅以下网站上提供的 R...

Страница 191: ...mage custhelp com 登录并选择 Ask a Question 提问 选 项卡 电子邮件 support rimage de 电话 49 1805 7462 43 传真 49 6074 8521 101 联系 Rimage 服务部时 请提供 系统序列号和软件版本 对问题的功能性和技术性描述 收到的错误消息原文 我的 Rimage 产品信息 从 Rimage 产品上复制此信息以备将来 使用 附注 附注 每次收到替换系统后 请确 保更新此处的序列号 序列号 产品名称 购买日期 在线了解更多信息 在 www rimage com support 上 您可体验到 Rimage 的世界级支持 和服务 在 Support 支持 主页 1 选择您的产品系列 2 选择您的产品 3 在产品页面了解更多信息 可从产品页面访问 关于最新的软件和固件更新的 信息 产品规格 最新的文档 当前的固件和驱...

Страница 192: ...带数据传输系统 2400 2483 5 MHz 的注意事项 法国 切勿在户外使用 意大利 如果在自己的场所之外使用 则需要获得常规授权 挪威 本小节不适用于以 NY Alesund 为中心 以 20km 为半 径这一范围内的地理区域 n n 小心 带有 AC 线路电压或 DC 低压的所有设备 例如开关 电源 保险丝 风扇和非步进电机 更换时必须采用 Rimage 认可的 零部件 以维持由 UL 认可的安全性 仅使用随附的 AC 电源线 要了解详细信息或订购新的电源 线 请联系 Rimage 客户服务部 本产品设计用于办公环境 如果检测到过热或异常气味 请勿使用打印机 这可能导致火 灾和电击 如果出现过热或异常气味 请立即从插座断开电 缆 并联系 Rimage 的授权经销商进行维修 请留出足够的空间以打开打印机托盘 切勿在打印机托盘运动 时触碰它 如果在通电状态下打开侧盖 则打印机会停止工作...

Страница 193: ...la norme NMB 003 du Canade 本产品符合 CAN CSA C22 2 编号 60950 1 03 第 1 版之规定 用于欧洲的公告 本产品因满足以下欧洲标准而符合 EMC 指令 89 336 EEC 及低压指令 73 23 EEC EN 55022 1998 Amd 1 2000 B 类规定 EN 55024 1998 EN 61000 3 2 2000 EN 61000 3 3 1995 Amd 1 2001 EN 60950 2000 所有符合 CE 标志指令 93 68 EEC 的设备均带有 CE 标志 用于日本的公告 本设备为符合日本电磁干扰控制委员会 Voluntary Control Council for Interference by Information Technology Equipment 标准的 A 类产品 在 居住区使用本设备可能会导致...

Страница 194: ...色和黄色 CMY 这三种颜色在打印时将配 合使用 以制作全色光盘 此外 还提供黑色打印色带 Everest 600 色带 色带类型 可打印的光盘片数 3 色 CMY 500 黑色 单色 1000 重传色带 500 次打印 500 标签设计要求 兼容 Windows 的 Everest 600 软件随附了 CD Designer 标签编辑器 软件 该软件将在 Rimage 软件的典型安装过程中安装在 PC 上 如果 您的 PC 上装有 Windows 系统 则可使用 CD Designer 设计您的标 签 如果使用的是 Macintosh 或希望在 CD Designer 之外的其它软件应 用程序中设计标签 请遵循以下标准 重要信息 CD Designer 与 Macintosh 不兼容 且不随兼容 Macintosh 的 Rimage 软件一起安装 标签设计尺寸 设计高度和宽度均为 12 ...

Страница 195: ... Rimage Autoloader 上 请 将所有标签转换为 RGB 颜色模式以将其导入到 CD Designer 中 如果 Everest 600 是独立打印机或位于 AutoEverest AutoPrinter 上 并且您从图像编辑程序中直接打印 则可以在所选的颜色模式 下工作 分辨率 每英寸的像素数 为获得最佳效果 请使用最低每英寸 300 像素的图像设置 如果使用每英寸 600 像素或更改分辨率的图 像 效果会更好 打印要求 您使用 CD Designer 创建并保存的任何标签均应采用正确的文件格式 btw 以供在 Rimage Autoloader 上的 Everest 600 上打印 如果您 的 Everest 600 位于 Rimage Autoloader 上 则还可以打印保存为 PDF 文件的标签 如果您使用独立的 Everest 600 打印机或 AutoEvere...

Страница 196: ...件和功能 正视图 侧盖 侧盖闩锁 手柄 控制面板 打印机托盘 控制面板 控制面板位于 Everest 600 的正面 包含一个操作员按钮 和四个指示灯 其中一个指示灯位于操作员按钮上 通过控制面板 您可监视和控制打印机 下表标识出控制面板的所有部件的名称和功能 控制面板指示灯 图像 名称 功能 操作员按钮 操作员按钮用于完成以下任 务 打开打印机托盘 关闭打印机托盘 在出错后重置 将打印机置入休眠模式 要将打印机置入休眠模式 请按住操作员按钮 10 秒 钟 要恢复正常操作 请再 次按操作员按钮 错误指示灯 在操 作员按钮上 当需要操作员采取措施时 错误指示灯会亮起 ...

Страница 197: ...时 光盘存在指示灯会亮 起 当出现问题时 光盘存在指示 灯会闪烁 每个周期中闪烁的 次数指示问题的类型 1 次闪烁 侧盖打开或色带 闩锁 1 2 或 3 打开 2 次闪烁 打印色带问题 打印色带不正确 缺失或 耗尽 3 次闪烁 重传色带问题 重传色带缺失或耗尽 4 次闪烁 在打印机托盘上 夹紧光盘时出错 活动指示灯 在打印机完成初始化时 活动 指示灯会亮起 当打印机从主机接收数据时 活动指示灯会闪烁 电源指示灯 在打印机通电时 电源指示灯 会亮起 后视图 模式开关 USB 连接器 打印机电缆连接器 AC 电压开关 电源连接器 装运螺钉的初始位置 装运螺钉的贮存位置 ...

Страница 198: ...AC 电压开关用于选择电源插座的 AC 电压 该开关具有两个档 位 110V 和 220V n n 警告 必须将 AC 电压开关设置为与 AC 电源插座的电压相匹配 AC 电压开关 模式开关 模式开关 重要信息 更改模式之前 必须关闭打印机电源 设置好模式开关后 再打开打印机电源 模式开关是一个旋钮开关 用于设置 Everest 600 的操作模式 开关帽 基座上的开孔指示所选的模式 打印机在出厂时已设为符合您操作要求 的正确模式 除非要执行诊断测试 否则不应更改开关位置 开关位置 用途 0 独立打印机 2 Rimage Autoloader 或 AutoPrinter 3 诊断测试 所有其它位置 未使用 ...

Страница 199: ...机通电 请将打印机的电源线连接到电源插座 要使打印机断电 请从打印机背面拔下电源线 与 Autoloader 或 AutoPrinter 相连的打印机的通电和 断电 如果您的 Everest 600 连接到 Autoloader 或 AutoPrinter 请遵循以下 步骤 要使打印机通电 请打开 Autoloader 或 AutoPrinter 的电源 要使打印机断电 请关闭 Autoloader 或 AutoPrinter 的电源 提示 如果打印机闲置 30 分钟以上 则会进入省电模式 当发生这种 情况时 打印机会在接收到作业时预热 2 3 分钟 将光盘放在打印机托盘上 请使用以下规程 将光盘放在打印机托盘上 1 按下操作员按钮 打印机托盘将打开 2 将光盘放在打印垫上 确保可打印面朝上 并使堆叠圈朝向打印 垫 重要信息 为了避免划伤或损坏光盘的刻录面 不得将光盘搁在定位销 或中心销上...

Страница 200: ...选项 使用此方法时 打印首选项保存在打印机驱动程序设置中 并应用到所 有新创建的标签上 1 选择 Start 开始 Devices and Printers 设备和打印机 提示 在 Windows XP 中 选择 Start 开始 Printers and Faxes 打印机和传真 Windows Server 2008 的导航说明与 Windows 7 相同 2 右键单击 Everest 600 printer Everest 600 打印机 将显示下 拉菜单 3 选择 Printing Preferences 打印首选项 Rimage Everest 600 Printing Preferences Rimage Everest 600 打印首选项 对话框将 会打开 通过 CD Designer 访问打印首选项 使用此方法时 打印首选项随标签文件保存 并用于替代打印机驱动程 序设置 1...

Страница 201: ...ia Type 介质类型 b 选择适当的 Media Size 介质尺寸 c 选择所需的 Copies 份数 d 选择所需的 Orientation 方向 e 选择适当的 Ribbon 色带 类型 4 在 Rimage Everest 600 Printing Preferences Rimage Everest 600 打印首选项 窗口中选择所需的选项后 选择 Apply 应用 5 选择 OK 确定 以关闭 Rimage Everest 600 Printing Preferences Rimage Everest 600 打印首选项 窗口 设置打印质量 颜色匹配和图像调节 PC 1 访问打印首选项 请参阅第 11页了解相关说明 2 选择 Advanced 高级 选项卡 3 查看或更改打印首选项 a 选择所需的 Print Quality 打印质量 选项为 Photo 照片 或 Grap...

Страница 202: ...mage Everest 600 Printing Preferences Rimage Everest 600 打印首选项 窗口中选择所需的选项后 选择 Apply 应用 4 选择 OK 确定 以关闭 Rimage Everest 600 Printing Preferences Rimage Everest 600 打印首选项 窗口 调节打印对齐和色彩密度 PC 1 访问打印首选项 请参阅第 11页了解相关说明 2 选择 Utility 实用程序 选项卡 3 选择 Status Monitor 状态监视器 按钮 Rimage Everest 600 Status Monitor 状态监视器 窗口将会打开 并激活 Status 状态 选项卡 提示 在 Status 状态 选项卡中 可查看打印作业的进度 所安 装的打印色带的类型以及打印色带和重传色带预计尚未使用的百分 比 要重置色带的预计...

Страница 203: ...Brightness 亮度 滑块以修改图像亮度 6 选择所需的 Threshold 阈值 7 要继续设置打印首选项 请在第三个下拉列表中选择其它选项 或 选择 Print 打印 以打印标签 在 Macintosh 上定义打印设置 打印设置用于设置 Everest 600 打印机 使其在光盘上生成最佳的标 签 重要信息 本部分所述首选项的位置因用于打印标签文件的程序而异 访问打印设置 Macintosh 1 在所选应用程序中打开标签文件 2 在 File 文件 菜单中 选择 Print 打印 Print 打印 对话 框将会打开 3 在 Printer 打印机 下拉列表中 选择 CDPR23 b 查看或更改 Color Density Settings 色彩密度设置 i 在 Color Density Settings 色彩密度设置 窗格中选择 Modify 修改 按钮 Color Densi...

Страница 204: ...内径盘心 字段 中输入所需的值 4 要继续设置打印首选项 请在第三个下拉列表中选择其它选项 或 选择 Print 打印 以打印标签 调节打印对齐和色彩密度 Macintosh 在 Everest 实用程序中 您可以调节打印对齐和色彩密度 此 外 Everest 实用程序还允许您查看当前固件版本 序列号和已安装的 色带类型等信息以及更新您的打印机固件 重要信息 仅当打印机处于闲置状态且无打印作业时才可修改 Everest 实用程序中的设置 1 访问 Everest Utility Everest 实用程序 a 选择 System Preferences 系统首选项 Print Fax 打印和传真 Print Fax 打印和传真 窗口将会打开 b 在打印机列表中 双击 CDPR23 2 在 CDPR23 工具栏中 选择 Utility 实用程序 Everest Utility Everest ...

Страница 205: ...ng 重置重传色带的剩余打印次 数 窗口关闭 e 选择 Close 关闭 以关闭 Status Monitor 状态监视器 窗口 f 选择 OK 确定 以关闭 Printing Preferences 打印首选项 窗口 查看色带状态 Macintosh 在 Macintosh 中 您可通过 Everest Utility Everest 实用程序 窗口 的 Status 状态 选项卡来查看打印色带和重传色带的预计剩余百分 比和打印次数 1 访问 Everest Utility Everest 实用程序 a 选择 System Preferences 系统首选项 Print Fax 打印和传真 Print Fax 打印和传真 窗口将会打开 b 在打印机列表中 双击 CDPR23 CDPR23 窗口将会打开 2 在工具栏中 选择 Utility 实用程序 Everest Utility Eve...

Страница 206: ...洁传感器 收到以下任何错误消息 打印机未检测到打印色带 上部或下部传感器未响应 打印机偏离中心 请参阅第 27页中的 清洁传 感器 部分 清洁空气滤清器 每月 请参阅第 23页中的 清洁后 部空气滤清器 和 清洁侧面 空气滤清器 部分 清洁压盘辊 重要信息 只有在发现光盘打印质量 下降 例如出现白斑 时才需清洁压 盘辊 请参阅第 25页中的 清洁压 盘辊 部分 清洁打印机外部 每周 使用不掉毛的抹布擦拭打印机 的外部表面 重要信息 为获得最佳性能 请将 Everest 600 置于干净无尘的环境 中 更换打印色带 在更换或新安装 Everest 600 打印色带前 请留出一段时间让新色带适 应工作环境 温度和湿度差越大 所需时间越长 重要信息 Rimage 只支持在我们的打印机上使用 Rimage 品牌的色带 因使 用非 Rimage 生产的色带导致的打印机问题不在 Rimage 保修或维...

Страница 207: ... 打印机 有关详细信息 请访问 rimage com support 2001474_B 2 接近打印色带 a 打开闩锁 1 b 将打印色带盒完全拉出打印机 c 将打印色带盒背面向下放置 打印色带盒 闩锁 1 提示 在卸下打印色带后执行清洁规程 有关更多信息 请参阅第 21 页的 清洁 Everest 600 打印机 部分 3 从色带盒中取下打印色带 a 将进给辊滑至左侧 b 将收紧辊滑至右侧 c 丢弃用过的打印色带 进给辊 收紧辊 ...

Страница 208: ...置在粘性辊和导向辊上 c 根据图示安装进给辊 d 根据图示安装收紧辊 粘性辊 进给辊 导向辊 收紧辊 e 顺时针旋转收紧辊以使色带对齐且平整 可能需要将色带从粘 性辊上抬起以拉直色带 重要信息 旋转色带时 切勿超出色带前方的清洁棒 如果安装的是单色色带 请进给色带以使其带有墨水的部分到达收 紧辊 3 重新组装打印机 a 将打印色带盒竖直放置 b 将打印色带盒滑入打印机中 c 关闭闩锁 1 d 关闭侧盖 提示 色带颜色可能因批次而异 装载新色带后 可能需要在打印机驱 动程序中调节密度设置 请参阅第 13页中的 调节打印对齐和色 彩密度 PC 部分或者第 15页中的 调节打印对齐和色彩密度 Macintosh 部分 了解详细信息 打印机已准备好 可以使用了 收紧辊 ...

Страница 209: ...mage 品牌的色带 因使 用非 Rimage 生产的色带导致的打印机问题不在 Rimage 保修或维 护协议范围内 为达到最佳效果 确保将 Everest 600 色带贮存在温度介于 41 和 95 F 5 和 35 C 之间且湿度水平介于 45 和 85 之间 的环境中 避免潮湿和阳光直射 切勿重复使用色带 确保仅使用指定用于 Everest 600 打印机的色带 卸下重传色带 1 打开侧盖 a 按下两个侧盖闩锁以释放侧盖 b 放低侧盖 侧盖闩锁 侧盖 2 取出用过的重传色带 a 打开闩锁 1 2 和 3 b 握住手柄以将重传色带盒滑出打印机 提示 重传色带盒不能从打印机卸下 c 将重传辊抬出色带盒 d 小心地将重传色带滑出重传色带盒 e 丢弃用过的重传色带 重传色带盒 重传辊 闩锁 1 闩锁 2 闩锁 3 ...

Страница 210: ...色带 a 让进给辊处于左侧 将重传色带退绕几英寸 b 将重传色带滑到重传色带盒下方 c 将进给辊安装在重传色带盒的左侧 确保色带绕在进给辊下方 d 向上抬收紧辊 绕过导向辊 使收紧辊卡入到位 进给辊 收紧辊 重传色带盒 3 逆时针旋转收紧辊以收紧重传色带 4 重新组装打印机 a 将重传色带盒滑入打印机中 b 关闭闩锁 1 2 和 3 c 关闭侧盖 打印机已准备好 可以使用了 清洁 Everest 600 打印机 定期清洁有助于使 Everest 600 打印机保持最佳工作状况 清洁打印头 所需工具 长柄海绵刷 包含在 Everest 清洁工具包中 99 异丙醇 闩锁 1 打印头 ...

Страница 211: ...印头 n n 小心 切勿划伤打印头 记住下列技巧 始终从一端向另一端擦拭打印头 不要在中途停止 仅擦拭图中标出的区域 a 将异丙醇蘸到海绵刷上 擦拭 方向 打印头擦拭区域 辊 b 使用海绵刷按照下图所示的方向从一端到另一端擦拭打印头 c 根据需要重复擦拭 直到打印头清洁无尘杂为止 d 使用海绵刷清除打印头下方的辊子上的蜡状堆积物 3 准备打印机以供使用 a 安装打印色带 有关特定说明 请参阅第 17页中的 更换打 印色带 规程 b 安装打印色带盒 c 关闭所有闩锁 d 关闭侧盖 打印机已准备好 可以使用了 清洁粘性辊 所需工具 长柄海绵刷 包含在 Everest 清洁工具包中 99 异丙醇 1 卸下打印色带 有关特定说明 请参阅第 17页中的 更换打印 色带 规程 打印色带盒 粘性辊 1 ...

Страница 212: ...状堆积物 d 将打印色带安装到打印色带盒中 请参阅第 17页中的 更换 打印色带 规程 3 将海绵刷伸入打印机内擦拭粘性辊 2 4 准备打印机以供使用 a 安装打印色带盒 b 关闭所有闩锁 c 关闭侧盖 打印机已准备好 可以使用了 粘性 辊 2 清洁后部空气滤清器 所需工具 2 号十字螺丝刀 1 卸下空气滤清器 a 在打印机后部 拆下用于固定风扇盖的十字螺钉 数量为 2 个 b 卸下风扇盖 c 卸下空气滤清器 2 清洁空气滤清器 a 用水冲洗空气滤清器 b 将空气滤清器晾干 3 准备打印机以供使用 a 当空气滤清器晾干后 将其放置在风扇盖内侧 b 插入螺钉 数量为 2 个 以将风扇盖固定到打印机后部 打印机已准备好 可以使用了 风扇盖 空气滤清器 螺钉 ...

Страница 213: ...om support 2001474_B 清洁侧面空气滤清器 所需工具 Torx T10 螺丝刀 1 打开侧盖 a 按下两个侧盖闩锁以释放侧盖 b 放低侧盖和相连的风扇盖 2 从侧盖卸下风扇盖 a 从侧盖内侧卸下 Torx T10 螺钉 数量为 4 个 b 关闭侧盖 风扇盖仍留在工作表面上 且露出空气滤清器 提示 如果风扇盖仍与侧盖相连 小心地放低风扇盖 3 从风扇盖卸下三个空气滤清器 侧盖 4 清洁空气滤清器 a 用水冲洗每个空气滤清器 b 将空气滤清器晾干 空气滤清器 风扇盖 ...

Страница 214: ...确保风扇盖上的卡舌装入侧盖上的孔中 c 打开侧盖 d 插入并拧紧 Torx T10 螺钉 数量为 4 个 以将风扇盖固定到侧 盖上 e 关闭侧盖和相连的风扇盖 打印机已准备好 可以使用了 清洁压盘辊 重要信息 只有在发现光盘打印质量下降 例如出现白斑 时才清洁压 盘辊 所需工具 长柄海绵刷 包含在 Everest 清洁工具包中 99 异丙醇 卡舌 侧盖 风扇盖 1 准备清洁压盘辊 a 关闭打印机的电源 b 在打印机后部 将模式开关转至位置 3 诊断模式 c 打开打印机的电源 2 接近压盘辊 a 按下两个侧盖闩锁以释放侧盖 b 放低侧盖 打印 色带盒 重传 色带盒 闩锁 1 闩锁 2 闩锁 3 ...

Страница 215: ...更换重传 色带 规程 提示 重传色带盒不能从打印机卸下 3 按住操作员按钮 2 秒钟以访问诊断测试 1 压盘辊开始旋转且前面 板上的活动指示灯闪烁 4 清洁打印头右侧的压盘辊 a 从 Everest 清洁工具包中取出海绵刷和海绵刷手柄 压盘辊 打印头 b 将海绵刷插入海绵刷手柄的无凹口端 c 将异丙醇蘸到海绵刷上 d 当压盘辊旋转时 使用海绵刷擦拭压盘辊 n n 小心 使用海绵刷清洁压盘辊时请勿用力 用力清洁可能损坏压盘 辊 从而在打印的光盘上留下划痕 提示 擦拭压盘辊时 请让其转一整圈 再换到下一个区域 5 按下然后放开操作员按钮以退出诊断测试模式 6 准备打印机以供使用 a 关闭打印机的电源 b 安装打印色带盒 c 安装重传色带盒 d 关闭所有闩锁 e 关闭侧盖 海绵刷 凹口 海绵刷 手柄 ...

Страница 216: ... 您收到说明上部传感器未响应的错误消息 您收到说明下部传感器未响应的错误消息 打印机偏离中心 所需工具 长柄海绵刷 包含在 Everest 清洁工具包中 压缩空气罐 1 接近传感器 a 按下两个侧盖闩锁以释放 侧盖 b 放低侧盖 c 打开闩锁 1 d 卸下打印色带盒 有关特 定说明 请参阅第 17 页中的 卸下打印色带 规程 e 卸下重传色带盒 有关特定说明 请参阅第 20页中的 卸下 重传色带 规程 2 关闭打印机 Autoloader 或 AutoPrinter 的电源 请参阅第 10 页中的 Everest 600 打印机的通电和断电 部分 了解相关说 明 重要信息 在打印机完全关闭电源之前 不得清洁打印机传感器 3 确定传感器的位置 打印色带传感器 上部传感器 下部传感器 上部传感器 下部传感器 打印色带 传感器 ...

Страница 217: ...从 Everest 清洁工具包中找到海绵刷手柄 如有必要 从海绵刷手 柄卸下海绵刷 提示 手柄的一端具有插槽 其凹口离端部约 英寸 这是进入打印 机的一端 5 清洁传感器 a 将海绵刷手柄的插槽端靠在传感器上 请参阅第 27页了解传 感器的位置 b 将压缩空气罐的喷嘴放置在手柄的无凹口端 c 让压缩空气吹入手柄的无凹口端一到两秒 d 重复两到三次 e 对所有三个传感器执行相同的步骤 海绵刷 凹口 海绵刷 手柄 6 准备打印机以供使用 a 装回打印色带盒 b 装回重传色带盒 c 关闭闩锁 d 关闭侧盖 打印机已准备好 可以使用了 ...

Отзывы: